

Although free and paid versions of our favorite e-commerce platform are very similar to some extent, the Commerce edition introduces multiple unique features. And today, we’d like to draw your attention to the Magento 2 page hierarchy. Below, we explore this functionality in more detail as well as shed light on how to import and export Magento 2 page hierarchy as an entity between two e-commerce stores.
In the introduction to Magento 2 page hierarchy, we provide several examples of this content type as well as explain what the Magento 2 page hierarchy node system is. After that, you will discover how to configure page hierarchy in Magento 2 in general and how to add a node to your page hierarchy in particular. We illustrate the page hierarchy node creation process, elucidate the way you add pages to the node, define the page hierarchy structure, account for page hierarchy pagination controls, and explain the corresponding menu layout. After that, the article switches to the data transfer section., where we show how to import & export Magento 2 page hierarchy data. Since this process incorporates the Improved Import & Export Magento 2 extension, you will also find its features defined.

Table of contents
Introduction to Magento 2 Page Hierarchy
The main benefit of Magento 2 page hierarchy introduces the ability to improve your actual shopping experience. With this feature, you can effortlessly organize your content pages adding pagination, navigation, and menus to the current order of things. As a result, it becomes way more convenient to navigate your e-commerce website.
Magento 2 Page Hierarchy Example
To illustrate the notable improvement of the new Magento 2 feature, let’s take a look at the example provided by the official documentation – the Privacy Policy page. It illustrates how a left-side menu enables you to organize various content improving customers’ navigation between its parts (different pages).
Thus, merchants who regularly publish a large amount of content can organize their content dramatically improving the simplicity of finding the necessary information.

Magento 2 Page Hierarchy Node System
The Magento 2 page hierarchy system uses is based on nodes to utilized for several purposes. Firstly, the system uses them to identify related pieces of content. Secondly, nodes are designed to organize content pages into parent/child relationships.
Imagine a parent node as a folder containing child nodes and pages. The tree hierarchy is leveraged to display the relative position of each node and page. Thus, every single node might contain multiple other nodes and content pages. As for a single content page, it might be associated with various nodes as well as other content pages. The Magento 2 page hierarchy introduces two types of relationships between them:
- parent/child;
- neighbor.
How to Configure Magento 2 Page Hierarchy
To configure the Magento 2 page hierarchy functionality, you have to go to the Settings section of your ecommerce website and enable the features and its metadata. Set “Enable Hierarchy Functionality” to “Yes.” Next, turn on metadata: set “Enable Hierarchy Metadata” to “Yes” as well. The third remaining option lets you determine the default menu layout.
Next, do the following:
- Go to Stores -> Settings -> Configuration;
- Choose Content Management from the left panel under General;
- Expand the CMS Page Hierarchy section to make changes;
- Don’t forget to save everything.

How to Add Node in Magento 2 Page Hierarchy
Let’s take a look at how to create a Magento 2 page hierarchy node that simplifies navigation to related content pages. Note that a node does not include a content page associated with it, but it has a URL Key. Use it as a reference to any page of your website.
So, to simplify the user experience of your Magento 2 website, create a new node. Let’s organize your press releases: name the new node “Press Releases” to enable navigation to individual content pages. Access to the node can be enabled from your “About Us” page. Add the link to the section.
You can create a CMS Hierarchy Node Link to link to a node with the help of the Widget tool. Take a new widget and place it in a content block or page.

Create Magento 2 Page Hierarchy Node
Find the Content section on the Admin sidebar and choose Hierarchy from the Elements subsection. You will be transferred to a page with a grid that contains all CMS pages as well as several control buttons:

There is the Add Node button above the grid.
- Specify your node title under Page Properties;
- Enter a suitable URL Key (lowercase characters, hyphens instead of spaces).

After saving the node, it will appear as a folder in the tree above the grid:

Add Pages to Magento 2 Page Hierarchy Node
Now, you can edit your hierarchy tree. Simply click the node to open it in the edit mode. In the CMS pages section (scroll down to see it), mark the checkbox of each page to add it to the hierarchy. To save the addition, tap Add Selected Pages(s) to Tree. The tree will be changed as follows:

Define Magento 2 Page Hierarchy Structure
Note that you can leverage the drag-and-drop functionality of the tree. Drag pages to improve their frontend position in the menu:

To view page properties, click the node at the top of the hierarchy. The Render Metadata in HTML Head section lets you do the following:
- Identify the node as the top of the hierarchy (enable the “First” option);
- Display a pagination control (enable the “Next/Previous” option);
- Organize the Magento 2 page hierarchy as a book (“Enable Chapter/Section”);
- Assign the node to a specific book part: set “Chapter/Section” to “Chapter,” “Section,” or “Both.” Choose “None” to disable the feature: it won’t be included as part of the book.

Next, go to Pagination Options for Nested Pages. Here, you can enable pagination. Set “Enable Pagination” to “Yes.”
The “Frame” field lets you enter the number of page links to be included in the pagination control. To add more pages to skip ahead (or back) for the next set of pagination links, enter their number in the “Frame Skip” field.

To enable the node in the menu, do the following:
- Go to “Page Navigation Menu Options” and set “Show in Navigation Menu” to “Yes;”
- Set “Menu Layout” to “Use Default,” “Content,” “Left Column,” or “Right Column” to specify the location of the menu concerning the content;
- Set “Menu Detalization” to “Only Children” – your menu will include subpages only, or “Neighbours and Children” – to include subpages and other pages of the same hierarchy level.
- In “Maximal Depth,” set the maximum number of levels to be included in determining the depth of the menu.
- As for “List Type” and “List Style,” you can choose either “Unordered” – menu options are not numbered, or “Ordered” – the menu options are numbered.

Now, you can proceed to the “Main Navigation Menu Options” and make the node visible in the navigation menu. Set “Show in Navigation menu” to “Yes.”

Don’t forget to save changes.
How to Import & Export Magento 2 Page Hierarchy
To import and export the Magento 2 page hierarchy, you need the Improved Import & Export extension. This module lets you freely transfer this content type between the two Magento 2 websites.
To import Magento 2 page hierarchy data, follow these steps:
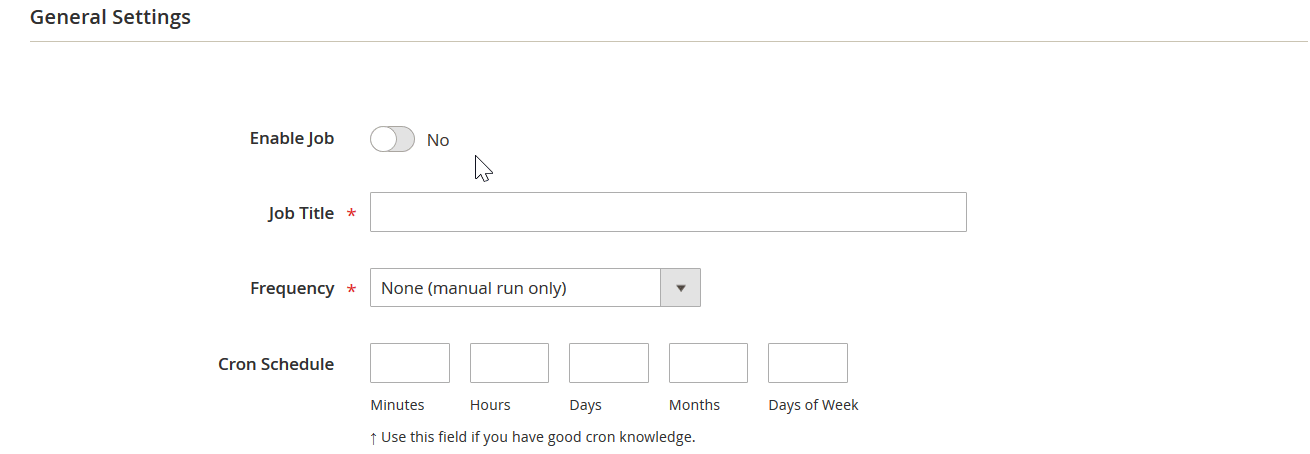
- Go to System -> Improved Import / Export -> Import Jobs and hit the Add New Job button.
- Configure General Settings and proceed to the Import Settings section. Select page hierarchy data among options of the Entity drop-down.
- Configure other job sections, save it, and run the transfer.
As for the Magento 2 page hierarchy data export, the process is entirely the same. You can configure it under System -> Improved Import / Export -> Export Jobs.
Get Improved Import & Export Magento 2 Extension
Improved Import & Export Magento 2 Extension Features

Now, when you are familiar with the Magento 2 page hierarchy – know how to configure the feature and understand how to use it – we’d like to draw your attention to the Improved Import & Export features that simplify page hierarchy import and export processes between two e-commerce stores.
The default Magento 2 import and export processes are not only limited in terms of features – they don’t let you transfer a page hierarchy data at all. Therefore, our module comes in handy. It enables you to transfer all information between your Magento 2 website and any external systems automatically. And Magento 2 page hierarchy data is not an exception.
With the help of Improved Import & Export, different external attributes and their values can be automatically matched to ones used internally, multiple API connections – leveraged in the integration, and all entities – imported/exported! Furthermore, numerous file formats are supported.
Page Hierarchy sample import and export table and attributes explained
The page hierarchy import and export files come with the following set of attributes that represent the hierarchy settings. You can get the sample files for import and export with every attribute value set from:
| Attribute name | Reference | Values | Value example |
| node_id | ID of the node | Can only contain numerals | 1 |
| parent_node_id | ID of the parent node | Can only contain numerals.
Leave empty if the node is of the highest level. |
1 |
| page_id | ID of the CMS page if used as a node.
Must be valid ID of the CMS page. Else, leave the field blank. |
Can only contain numerals | 2 |
| identifier | URL Key of the node | Cannot contain spaces | first_node |
| label | Title of the node | Can contain any symbols | First Node |
| level | Level of the node | Can only contain numerals | 1 |
| sort_order | Sort order of the nodes inside the parent node. Defines the position of the node in the list, the lower the sort order, the higher the position | Can only contain numerals | 15 |
| request_url | Full URL path of the node, including the identifiers (URLs) of the parent nodes | Cannot contain spaces | first_node/second_node |
| scope | The store view the node belongs to and is displayed at | Store View Code can be found under: Stores > All Stores > next, click required store view and check “Code” column.
For example: Store View 1,Store View 2,German Store |
default |
| meta_first_last | Render Metadata in HTML Head – First. Defines if the first metadata is enabled for this node. | 1 – is enabled
0 – disabled |
0 |
| meta_next_previous | Render Metadata in HTML Head – Next/Previous. Defines if the first metadata is enabled for this node. | 1 – is enabled
0 – disabled |
0 |
| meta_chapter | Render Metadata in HTML Head – Chapter/Section. Works in conjunction with meta_section. | Defines the value selected in Chapter/Section field.
meta_chapter=1, meta_section=1 – BOTH meta_chapter=1, meta_section=0 – Chapter meta_chapter=1, meta_section=0 – Section |
1 |
| meta_section | Render Metadata in HTML Head – Chapter/Section. Works in conjunction with meta_chapter. | Defines the value selected in Chapter/Section field.
meta_chapter=1, meta_section=1 – BOTH meta_chapter=1, meta_section=0 – Chapter meta_chapter=1, meta_section=0 – Section |
1 |
| meta_cs_enabled | Render Metadata in HTML Head – Enable Chapter/Section. Defines if Chapter/Section functionality is enabled for this node, its sub-nodes and pages. | 1 – is enabled
0 – disabled |
0 |
| pager_visibility | Enable Pagination. Defines if the pagination is enabled for the node. | 1 – is enabled
0 – disabled |
1 |
| pager_frame | Frame. Maximum number of the links displayed at the time | Can only contain numerals | 3 |
| pager_jump | Frame skip. If the Current Frame Position does not cover Utmost Pages, will render Link to Current Position plus/minus this Value. | Can only contain numerals | 2 |
| menu_visibility | Show in navigation menu. Defines if the node is displayed in the PAGE navigation menu | 1 – is displayed
0 – not displayed |
0 |
| menu_excluded | Exclude from PAGE Navigation Menu | 1 – exclude
0 – include |
1 |
| menu_layout | PAGE Menu Layout. Defines the layout of the PAGE menu | content – Content
left_column – Left Column right_column – Right Column If you want to use default settings, leave column empty. |
content |
| menu_brief | PAGE Menu Detalization. Defines which nodes should be displayed in the PAGE menu | 0 – Neighbours and Children
1 – Only Children |
1 |
| menu_levels_down | Maximal Depth of the PAGE menu. Defines how many levels of the nodes should be displayed in the PAGE menu. | Can only contain numerals | 12 |
| menu_ordered | PAGE menu list type. Defines the order of the nodes displayed in thePAGE menu. | 0 – Unordered
1 – Ordered |
0 |
| menu_list_type | PAGE menu list style. Defines how the node is displayed in the PAGE menu. | 0 – default
1 – numbers a – lower alpha A – upper alpha i – lower roman I – upper roman |
a |
| top_menu_visibility | Show in navigation menu. Defines if the node is displayed in the MAIN navigation menu. | 1 – is displayed
0 – not displayed |
1 |
| top_menu_excluded | Exclude from MAIN Navigation Menu | 1 – exclude
0 – include |
1 |
NOTE how meta_chapter and meta_sections attribute work. They are used to define the value of a single page hierarchy setting – Chapter/Section – however there are two of them. Make sure to read the explanation if you intend using them.
Automated Import & Export Processes
There is no need to automate data transfers when it comes to Magento 2 page hierarchy import or export since it is usually a one-time procedure. But the Improved Import & Export Magento 2 module provides the ability to create schedules or use event-based triggers to make all integrations seamless.
Schedules
Schedules represent the most popular way of automation. You can leverage them to establish the flow of information between the two systems based on cron. Specify a time interval and the system will import/export updates according to it. Our extension lets you create fully independent jobs with several different options:
- custom intervals,
- customizable predefined update schemes,
- profiles with no schedules (which are suitable for maintaining such tasks as Magento 2 page hierarchy import/export),
- asynchronous data transfers (launch every scheduled profile manually whenever you want).
Configure a schedule as follows:
Events
Event-based triggers are the other huge improvement provided by the Improved Import & Export extension related to the automation of data transfers. You can use the following algorithm to automate data transfers between the two systems with triggers:
- Create a trigger;
- Connect it to an event;
- Link an action to a trigger to launch it automatically.
Transferring data to/from your Magento 2 store with the help of a trigger dramatically simplifies any integrations. As mentioned above, this feature enables data exchanges in real time. When something happens on your Magento 2 website (a new customer is registered, an order is placed, a new product is added), the add-on transfers the corresponding data to the specified system or imports something back. For example, a customer makes a purchase; the extension automatically transfers a new order to your accounting system. Follow the link below for more information regarding triggers: How to Run Magento 2 Import or Export After Specific System Event or Process.
Advanced Mapping Features
If you want to establish a transfer between Magento 2 and an external platform, it is not possible to import/export data between them due to the problem of different attribute standards. Luckily, the Improved Import & Export module solves the problem by introducing various mapping features. It lets you freely transfer Magento 2 page hierarchy data beyond the ecosystem. Of course, other platforms don’t support that feature, but you can leverage it when new systems offer the same functionality.
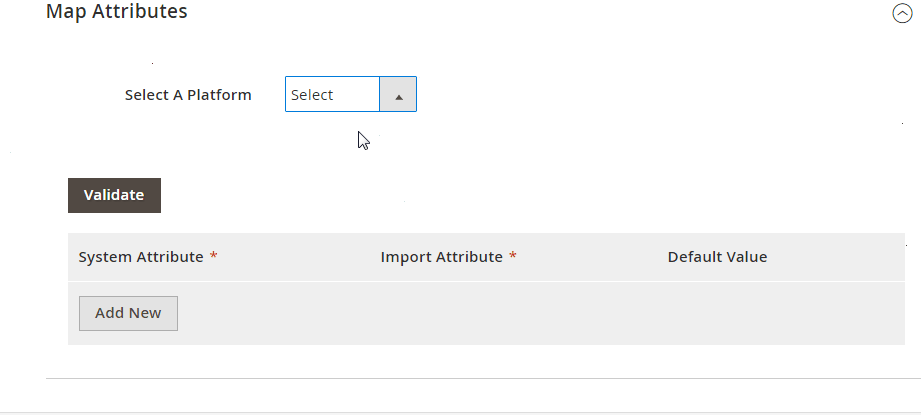
Mapping Presets
Use our module to solve the problem of different attribute standards without headaches with mapping presets – predefined mapping schemes that eliminate manual attributes matching. The Improved Import & Export Magento 2 extension analyzes the input data file transferred from an external system, discovers third-party attributes, and matches them to the ones used in Magento. The same algorithm is applied to export processes. You only have to select a matching scheme suitable for your supplier as shown below:
Matching Interface
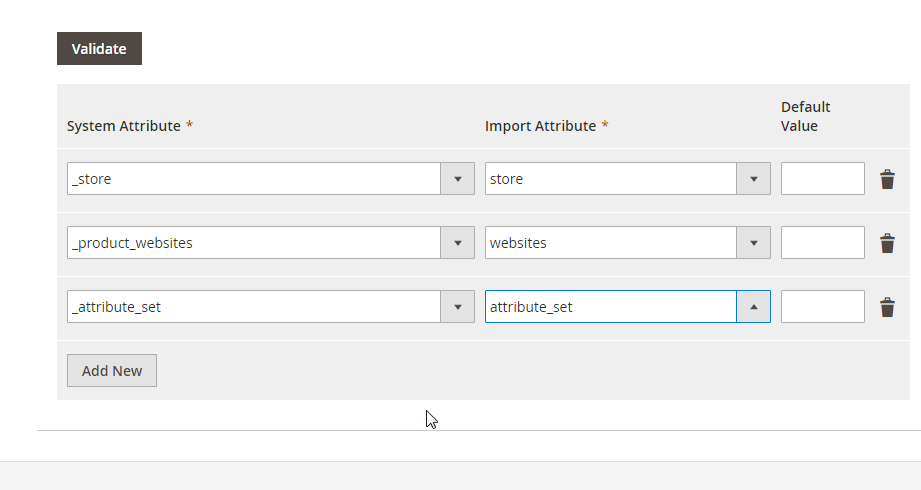
Importing/exporting Magento 2 page hierarchy data can be based on manual attributes mapping right in the Magento admin as well! The Improved Import & Export module provides a unique matching interface which offers full control over the process: specify external (internal) attributes and link them to the corresponding internal (external) ones in a particular grid enabling the data transfer. Here is how everything works:
Attribute Values Mapping
The Improved Import & Export Magento 2 extension offers a separate interface for attribute values mapping that provides the ability to automate all data transfers. Since attribute values also prevent import/export processes, attributes mapping is not enough to create fully automated transfers. Therefore, we’ve added the values mapping functionality.
With our plugin, third-party designations will no longer interrupt data transfers since you can choose an external value from a supplier’s system and specify the internal one from Magento 2 as a replacement. Repeat the procedure until all third-party designations are mapped to ones utilized in Magento 2. Note that the created schemes are saved and applied for further updates. For details, read this article: Attribute Values Mapping.
Attribute Values Editing
Attribute values mapping is not enough to simplify all daily routine. Therefore, we’ve also added attribute values editing. You can leverage the feature while transferring any data from an external platform to your Magento 2 website. To modify attribute values in bulk, use the following rules:
- Add a prefix to multiple attribute values;
- Add a suffix to numerous attribute values;
- Split various attribute values;
- Merge multiple attribute values.
Note that you can combine them and create conditions increasing the efficiency of the applied changes. For further information, read this article: How to Modify Attribute Values During Import and Export in Magento 2.
Category Mapping
As for category mapping, it is a feature introduced in Improved Import & Export. Developed for product data transfers, it dramatically simplifies product transfers from any systems to Magento 2. Designed to match external categories to ones used internally, category mapping reduces the number of difficulties that usually occur when products are transferred from other platforms to Magento 2. The process is displayed below:
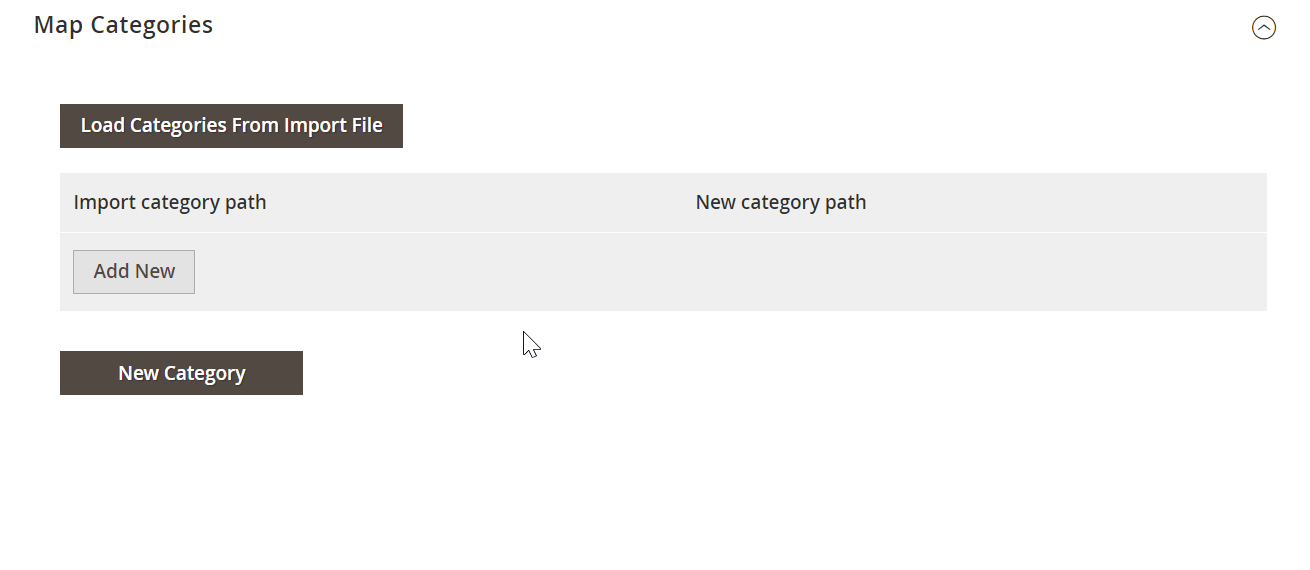
To create new categories right in the import job, choose a parent category and specify a new one that will be generated automatically. The extension will link products to it during the import process. If your Magento 2 website doesn’t include a category from an imported file, it’s no longer a problem. You can find more information about this feature in this article: Category Mapping.
Attributes On The Fly
And if a data file provided from an external system lacks attributes, the Improved Import & Export Magento 2 extension lets you create them on the fly via the following general form:
Attribute|attribute_property_name:attribute_property_value|…
The feature is described here in more detail: Product attributes import.
Extended Connectivity Options
As for the extended connectivity options, they are designed to improve all data transfers and can be leveraged for Magento 2 page hierarchy import/export. Our extension lets you use multiple file formats and two alternative ways of transferring data between your e-commerce store and external platforms.
Multiple File Standards
You can import/export Magento 2 page hierarchy using data files. The Improved Import & Export extension supports CSV, XML, JSON, ODS, and Excel. If you transfer information between two Magento 2 websites, CSV is enough, but multiple other platforms work with XML, JSON, or others.
Another feature that radically simplifies data transfers is support for file archives. Improved Import & Export unpacks them automatically while the default tools work with uncompressed CSV files only!
Multiple File Sources
The following file sources can be leveraged to import and export Magento 2 page hierarchy data:
- FTP/SFTP. Transfer Magento 2 page hierarchy data files using a local or remote server.
- Dropbox. Use a Dropbox account to establish a connection between the two systems. Alternatively, you can rely on Box, OneDrive, Google Drive, iCloud, and Amazon Drive transferring Magento 2 page hierarchy data.
- URL. A direct URL can be used to import a file with Magento 2 page hierarchy data.

Alternative Ways of Import & Export
As for the alternative ways of import and export, they are not represented in Magento 2 by default. However, direct API connections can be leveraged to simplify all transfers, especially the most complicated ones. The Improved Import & Export extension lets you leverage REST, SOAP, and GraphQL APIs.
Note that all API connections are fully compatible with the extension’s features. As a result, you can leverage mapping, schedules, and attributes on the fly while transferring data between your Magento 2 and external platforms via APIs.
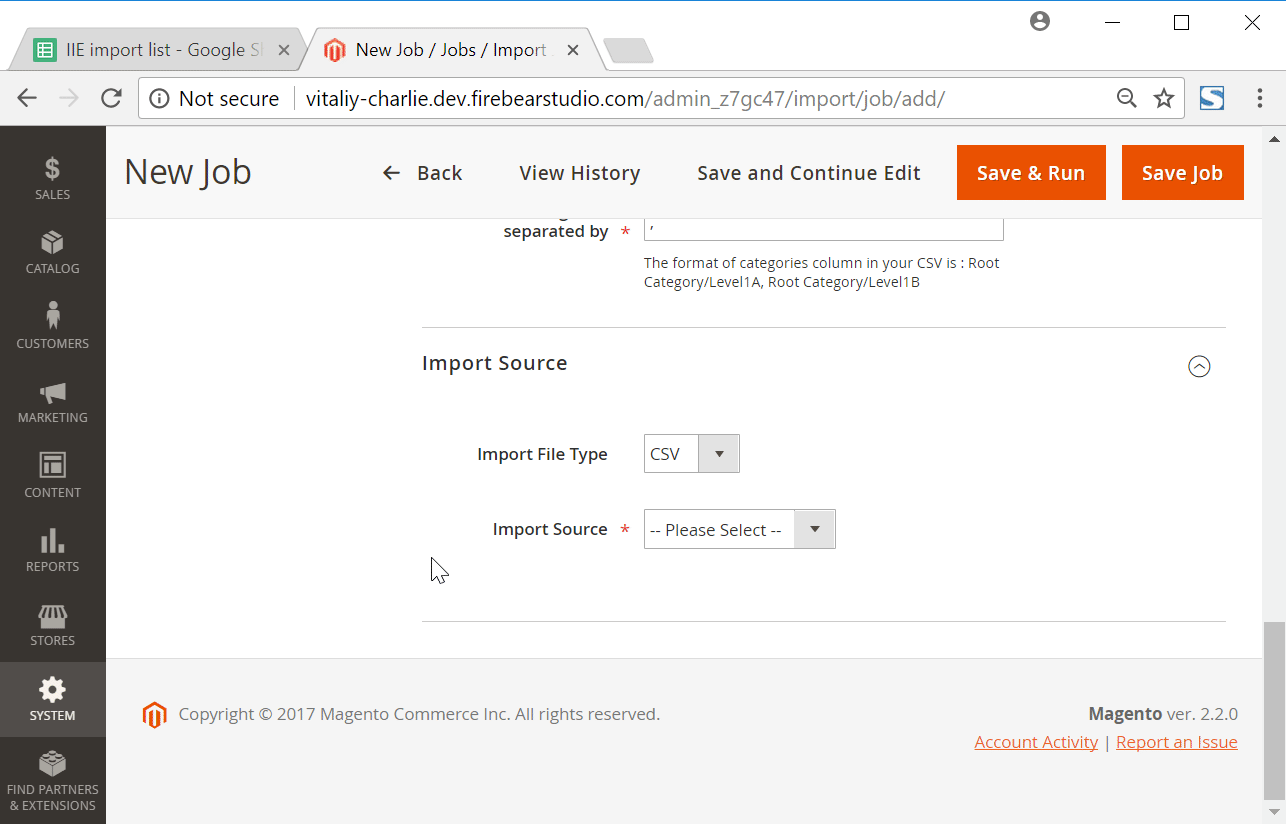
As for the intermediary services, the extension allows using Google Sheets, Office 365 Excel, and Zoho Sheet. Although they cannot be utilized for the needs of Magento 2 page hierarchy transfers, you can streamline them to connect to other systems. The following image shows how to use Google Sheets to move data to Magento 2:
The video below displays our extension in action:
[embedded content]
Final Words
Magento 2 page hierarchy is a significant improvement introduced in the Commerce edition. It dramatically simplifies the navigation on your e-commerce website, increasing the efficiency of content pages. A customer can easily find the desired information due to the tree hierarchy of the displayed content. From the merchant’s perspective, the new functionality is also stunning due to the simple configuration and powerful impact on usability. And of course, you can freely transfer the Magento 2 page hierarchy between your e-commerce website and any external systems using the Improved Import & Export extension. For further information related to the import and export functionality, follow the link below and connect our support:
Get Improved Import & Export Magento 2 Extension
Magento 2 Page Hierarchy Import FAQ
Let’s take a look at other nuances of importing and exporting page hierarchy data in Magento 2 with the help of the Improved Import & Export Magento 2 extension.
How to import and export page hierarchy to Magento 2 automatically?
If you need to transfer page hierarchy data to or from Magento 2 on a regular basis, it is necessary to install a third-party tool. Unfortunately, the default import/export solutions don’t let you create import jobs that run on schedule. Therefore, we recommend you use the Improved Import & Export extension to import page hierarchy data to Magento 2 automatically. The extension leverages cron so that you can create a schedule of updates. Next, the module does everything for you importing and exporting data at a specified time.
How to import and export page hierarchy data to Magento 2 from external systems?
While the default Magento 2 import mechanisms block the import of third-party data that doesn’t follow the system’s requirements, you can use the Improved Import & Export extension to circumvent these restrictions. The module lets you create a mapping scheme matching any external values to the default Magento 2 attributes. Consequently, any external data is easily adapted to the native standards of your e-commerce website. The most intriguing aspect is that you do everything right in your admin. It is also possible to apply mapping to export processes to generate the output your partners require. Thus, the Improved Import & Export extension lets you freely transfer page hierarchy data from your website.
How to import and export page hierarchy data to Magento 2 via API?
You need to use the Improved Import & Export Magento 2 extension to import page hierarchy data to Magento 2 via API. Our extension lets you create the connection between the two systems transferring any data, including page hierarchy data. Any import job provides an interface where you can specify the parameters necessary to put the two systems together. Note that it is possible to create a bi-directional API connection with our module.
How to import and export page hierarchy data to Magento 2 via ODS files?
If the page hierarchy data is stored in an ODS file, you no longer need to convert it to a CSV file to fit the Magento 2 requirements. With the Improved Import & Export Magento 2 extension, it is possible to import ODS files to your ecommerce website without any necessity to run the conversion. You can also export page hierarchy data using this file format.
How to import and export page hierarchy data to Magento 2 via XLSX files?
If the page hierarchy data is stored in an XLSX file, you no longer need to convert it to a CSV file to fit the Magento 2 requirements. With the Improved Import & Export Magento 2 extension, it is possible to import XLSX files to your ecommerce website without any necessity to run the conversion. You can also export page hierarchy data using this file format.
How to import and export page hierarchy data with custom attributes to Magento 2 via JSON files?
If the page hierarchy data is stored in an ODS file, you no longer need to convert it to a CSV file to fit the Magento 2 requirements. With the Improved Import & Export Magento 2 extension, it is possible to import JSON files to your ecommerce website without any necessity to run the conversion. You can also export page hierarchy data using this file format.
How to import page hierarchy data to Magento 2 via compressed files?
If the page hierarchy data is stored in a compressed file, you can also transfer it to Magento 2 with the help of the Improved Import & Export extension. However, there are two requirements to follow. Firstly, your file archive should be in a ZIP or TAR format. Secondly, the compressed data should be stored in a CSV, XML, ODS, XLSX, or JSON file.
How to import page hierarchy data to Magento 2 from Google Sheets?
If your page hierarchy data is stored in Google Sheets, it is no longer a problem. There is no need to export it from the service and then transfer the output to Magento 2. The Improved Import & Export lets you move the corresponding information straight from Google Sheets to your e-commerce website. It is only necessary to specify the address of the corresponding data table.
How to import and export page hierarchy data to Magento 2 from Dropbox?
In addition to Google Sheets, the Improved Import & Export module lets you transfer page hierarchy data to Magento 2 from Dropbox. Your data should be stored in CSV, XML, ODS, XLSX, or JSON. If it is a compressed file, it should be in a ZIP or TAR format. You can use this file storage as your export destination.
How to import and export page hierarchy data to Magento 2 from Google Drive?
In addition to Google Sheets and Dropbox, the Improved Import & Export module lets you transfer page hierarchy data to Magento 2 from Google Drive. Your data should be stored in CSV, XML, ODS, XLSX, or JSON. If it is a compressed file, it should be in a ZIP or TAR format. You can use this file storage as your export destination.


