
Unfortunately, Magento 2 doesn’t let you import and export categories by default. Although the platform’s capabilities associated with data transfers are fairly limited, you can address the existing issues with ease. It is necessary to install a third-party module to import and export categories to Magento 2. In the following article, we shed light on how to transfer an existing category tree to/from your e-commerce website using the Improved Import & Export Magento 2 extension. After describing the Magento 2 category export, we peruse a sample import table that contains product categories. After that, our attention is focused on specific Magento 2 category attributes: we explore use cases and attribute mapping to let you transfer categories to Magento 2 from any external platforms. Next, there is a detailed step-by-step guide that depicts Magento 2 category import. Also, you will find out how to import product positions in categories (a part of the Visual Merchandiser functionality of Magento 2) and move Magento 2 categories per different store views.

Table of contents
How to export and import Magento 2 categories post continues the line of guides for Magento 2 import/export guide list. The other articles in the line are:
Improved Import and Export extension allows to export and import product categories, – an invaluable tool for building product catalog fast. The categories are imported and exported like any other entity with Improved Import and Export extension, via the jobs. To get a reference to the category attributes, let’s first export existing categories to see how the table will look like.
Export Magento 2 categories
To export categories navigate to System > Export Jobs. Here you need to:
- Create a new export job and decide on its frequency;
- Select the ‘Entity’ you want to export – ‘Categories’;
- Decide on file format and field separators for the table, in case you are using different from native Magento 2;
- Apply necessary attribute mapping and filters.
Once done setting up the export job, click ‘Save and Run’ button at the upper right corner of the screen to get a CSV table with all categories available at your store.
Getting Magento 2 sample import table
Instead of exporting categories you can always get sample import table. Understanding the import table will allow you to get the idea of required Magento 2 category attributes and sample category structure. You can get the sample Magento 2 category import table in two locations:
- At GitHub – proceed to the FIreBear Studio GitHub and download the file with required entity type;
- At Google Sheet Master Table – Improved Import and Export extension we will be using for importing categories supports Google Sheets as an import source. That’s why we have composed a Google Sheet Master Table where we have gathered all import entity types with description and sample values.
Sample import tables from both locations have been tested and are working properly. Feel free downloading and editing the tables to your liking, or copying the Master Table to your Google Drive.
Read more about Google Sheet Master table
Magento 2 import table structure
Now that we have the sample table, it is time to talk about its formatting. Improved Import and Export extension allow you to use two table file formats: CSV and XML.
Both tables should be properly formatted before import. If for some reason you have decided to create an import table manually – make sure to use the following settings.
| Character set | Unicode (UTF-8) |
| Field separator | Comma, Tab |
| Text delimiter | ” |
If you want to import a table of different formatting Improved Import and Export extension allows you to map fields and value separators manually. We will talk about this later in this post.
Magento 2 category import attributes
Now that we have a CSV table with the categories let’s break it down to see which attributes are used in importing categories, and which values are expected from the store owner.
| Attribute name | Reference | Values | Value example |
| entity_id | The identifier for categories within Magento 2.
You can find a category ID next to the category name at Catalog > Categories |
Numeral value | 12 |
| name | Category name. The category name contains the full category path, including all parent categories | For example:
If you have a category named ‘Third’ which is nested under ‘First’ and ‘Second’ categories, the name value will look like: First/Second/Third Use ‘/’ to separate category names |
Default Category/First test category |
| store_view | Defines the store view where the category is displayed under the current name.
Store View Code can be found under Stores > All Stores > next, click required store view and check “Code” column. |
Can contain letters and numerals with spaces and hyphens | eng-store
English Store |
| image | The main category image and its path | Should be uploaded to /pub/media/import.
The path of /sample_data/m/b/mb01-blue-0.jpg has the following structure: /pub/media/import/ In addition, you can use a direct URL of an image, such as http://site.com/images/ |
/pub/media/import/ category_images/ image1.png |
| url_path | Category URL path at the frontend. This attribute creates an URL rewrite to compose the end category URL | The end category URL is composed on the following pattern:
yourstore.com/index.php/ For example: If you want the category path to include category1 and category2. In this column you need to enter: category1/category2/. Use / to separate categories. In this case end category URL will look like: yourstore.com/ |
test_parent_category/ test_sub_category |
| available_sort_by | Category option Default Product Listing Sort By. Which defines which sorting options are available at the category page | Available values:
blank – all values position – product position name – product name price – product price Multiple values should be separated by comma. For example, if you want only position and price sorting available the value should look like: position,price |
position,name,price |
| custom_apply_to_products | Category option Apply Design to Products. Defines if the custom category design should also be applied to the products belonging to the category | Available values are:
Yes – Apply Design to Products enabled No – Apply Design to Products disabled Leave blank if no custom design applied |
Yes |
| custom_design | Category Design > Theme option. Defines the theme that should be applied to the category | The value should be the required theme name. Leave blank if no design updates required, and category should be displayed in the default theme applied to the store | Magento Luma |
| custom_design_from | Defines from what date the custom design should be applied to the category | The date should be in the following format:
mm/dd/YY For example: If you want custom design applied from 10th of July 2019, the value should look like: 7/10/19 |
2/1/18 |
| custom_design_to | Defines to what date the custom design should be applied to the category | The date should be in the following format:
mm/dd/YY For example: If you want custom design applied to 10th of July 2019, the value should look like: 7/10/19 |
2/28/18 |
| custom_layout_update | Category Design > Layout Update XML option | The value should be in readable XML, if you want any XML layout updates applied | <referenceContainer name=catalog.leftnav” remove=”true”/>” |
| custom_use_parent_settings | Category Design > Use Parent Category Settings option. Defines whether the category should copy parent category design settings | Available values:
Yes – the category will copy parent design settings No – the category will have a unique design |
No |
| default_sort_by | Category option Default Product Listing Sort By. Defines which sorting order should be applied to the products by default | Available values:
Position – the products will be sorted depending on their position in the category. Product Name – the products will be sorted in alphabetical order. Price – the products will be sorted from lowest to highest and vice versa price |
Product Name |
| description | Category description | Supports simple HTML formatting | <p>Category description</p> |
| display_mode | Category option Display Mode. Defines which entities should be displayed at the category page | Available values:
Static block and products – both static blocks and products displayed Static block only – only static blocks displayed Products only – only products displayed. Only a single value can be entered at a time. No multiple values allowed |
Static block and products |
| filter_price_range | Category option Layered Navigation Price Step. Defines the price step which will be used in the layered navigation | Only numerals allowed | 10 |
| include_in_menu | Category option Include in Menu. Defines if the category should be included in the main category menu | Available values are:
Yes – category included in the menu No – category is not included in the menu |
Yes |
| is_active | Category option Enable Category. Defines if the category is active or disabled | Allowed values are:
Yes – the category is enabled at the frontend No – the category cannot be found at the frontend |
Yes |
| is_anchor | Category option Anchor. Defines if the category is anchor category or not | Available values are:
Yes – the category is anchor No – the category is not anchor |
Yes |
| landing_page | Category option Add CMS Block. Defines which CMS block should be included in the category | The value should be the name of the CMS block. Only a single CMS block can be included. Multiple values are not allowed | Contact us info |
| meta_description | Meta description of the category | Can contain any symbols | Category meta description |
| meta_keywords | Meta Keywords of the Category | Can contain any symbols. Multiple values are separated by comma | category,meta, keywords |
| meta_title | Meta Title of the category | Can contain any symbols | Category meta title |
| page_layout | Category option Layout. Defines the layout of the category | Available values are:
blank – no layout updates Empty 1 column 2 columns with left bar 2 columns with right bar 3 columns |
3 columns |
| position | Category position in the parent category. From top till bottom. The lower the value the higher the category’s position.
Affects the order in which categories are displayed in the menu |
Numeric value | 10 |
| url_key | Category option URL Key. Defines the URL of the category | All characters and symbols that can be used for URLs | test_category_path |
| group | String or integer same for a group of categories per store view.
Use the attribute to create a new category during import |
Numerals | 1039 |
Use Cases
1. The extension functionality is able to fill empty fields for url_key and url_path automatically. If you import a table with the attribute values not specified, Improved Import and Export will create the category URL based on its title (using a hyphen for each space in the name).
E.g.: New Category — new-category
In case you run import with the behavior ‘Replace’, implemented categories with the matching names will be assigned with the increment +1 to enter the database with the unique URL.
E.g.: new-category > new-category1
2. Use Improved Import and Export to import categories per store view with different languages, names and paths. Use the attribute ‘group‘ to assign transferred categories as variations per store view.
As the functionality addresses the ‘entity_id‘ attribute to process existing categories per store view, in case of re-export make sure to check the IDs actually belong to your database.
3. If you want to import new categories, you should empty the ‘entity_id‘ attribute column or delete it for good. Magento 2 assigns IDs to new categories automatically.
4. In case you want to change data in the existing categories, make sure to run a primary export to get the IDs of those categories. Once you are applying updates to the category data make sure not to modify ‘entity_id‘ as it’s the crucial attribute for category processing in Magento 2.
Attribute mapping
However, if you have received the import table from the different source you can skip renaming the attributes. Instead, you can take advantage of Improved Import and Export extension attribute mapping.
With the attribute mapping, you can select Magento 2 category attribute and set the reference column from the import table. In such way you will only need to select the values. The extension will communicate proper attribute names to Magento 2 during the import process. We will talk about the attribute mapping more as the post goes.
Now, that you have learned all customer attributes it is time to proceed to the actual import.
Importing Magento 2 categories
To start with the extension log in to your store admin panel and navigate to System > Improved Import / Export > Import jobs.
The Import Jobs is your main import management screen. Here you will be creating and editing all the import jobs.
To create a new job click ‘Add New Job’ button.
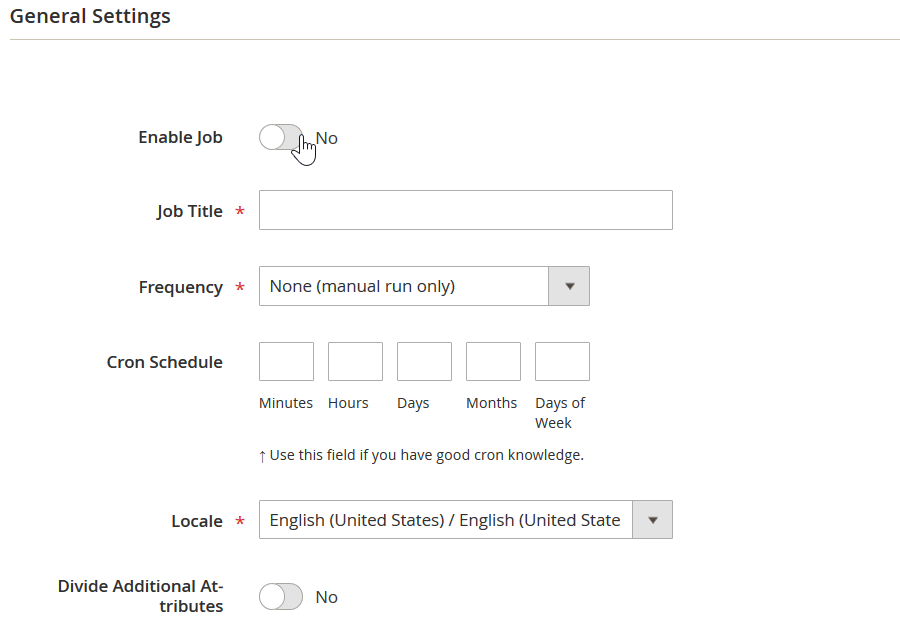
Step 1: create an import job
The New Job screen will greet you with the General job settings.

The settings are pretty much self-explanatory. You need to identity the job by naming it and scheduling it. Otherwise you can the job manually. Next, you will need to select the locale of the store you will be importing to.
There will be two settings left:
- Generate Unique Url if Duplicate – allows you to increment the category URLs if the URL already taken;
- Re-Index after Import – allows re-indexing the store after the entity has been imported.
Step 2: select entity and behavior
After done with general settings you will need to select the entity you are going to import. In our case it is ‘Categories’.

Then, you need to select what the extension should do with the entities from the import table:
- Add/Update – add new categories and update the existing ones;
- Replace – replace categories with new ones;
- Delete – delete categories matching the ones in the import table.

After selecting the behavior, you can specify the validation strategy – whether the extension should skip or stop the process if any errors. This will help you to understand if anything is wrong with your import table.
NOTE: play close attention to Categories separated by and Category levels separated by settings.
- Categories separated by – when you are importing products, you can decide which separator you use for the categories column. By default comma is used to separate multiple category paths. However, if you have commas in category names you may want to use different separator for category paths.
- Category levels separated by – when you are importing products, you can decide which separator you use for the categories column to separate category levels. By default / is used to separate multiple category levels. However, if you have /s in category names you may want to use different separator for category levels.
At last the extension offers you to manually map the import table formatting by setting field and value separators.
Step 3: specify source
Here you are suggested to select the import table file format and specify the source you will be importing from. At the screenshot below we are using direct link to the Google Sheet with our CSV table uploaded.

When the source is specified click ‘Validate file’ button to let the extension to check the integrity of the import table.
Step 4: map attributes
Once the import table has been validated you will presented with the Map Attributes section.

In this section you can set the reference between category attributes used by your Magento 2 store and the ones you are using in your import table. This is particularly useful if you have got the import table from other ecommerce platform or composed it manually without considering proper category attribute naming.
That’s it, now you only need to click ‘Save & Run’ button to proceed to running the import job created. Once you hit ‘Run’ button the extension will present you with the import job log, where you can check how to the import went and look for any errors.

You have just imported categories to your Magento 2 store with Improved Import and Export extension.
How to import product positions in categories
Product positions can also be imported to Magento 2, however along with products, not categories. In this blog post we will cover only a single product attribute introduced by Firebear Team for Improved Import and Export extension for Magento2. If you are interested in reading full-featured guide on how to import products to Magento 2 refer to:
Magento 2 Import and Export Guide List
There you will find step-by-step instructions on how to import products with every product attribute explained.
Now, to importing product position in categories. To import position we will be using custom product attribute categories_position, that only works for Improved Import and Export extension for Magento 2. Again, this is a custom attribute, and it will not work with native Magento 2 import procedure.

categories_position attributes mirrors the value of the categories attribute, however, after every finite category path you specify the position of the product. For example, if we have a category path in the categories attribute:
Default Category/Gear/Bags
To specify that the product is in the position 5 in the category ‘Bags’, we need to add ‘=5’ to the category path in the attribute categories_position:
Default Category/Gear/Bags=5
You can refer to the screenshot above to see how it looks in the actual CSV table. That’s pretty much it. Using this pattern you can import product along with their position in the specified categories.
To import product positions you need to select entity=Products when creating an import job.

Then you configure the import job as usual, don’t forget to add categories_position attribute however into the file you will be importing.
Importing Magento 2 categories for different store views
Importing categories for multiple store views is a bit different, because a single category can have a dedicated name for separate store views. That is why we need to identify multiple lines of the SAME category with different names during the import process, instead of using the ‘name’ attribute for identification.
The name of the category for secondary store views or store views of the different languages can be submitted in the attribute:
‘store_name’
Along with other, necessary category attributes.

‘Store_name’ attribute needs to contain the final category name. For example:
You have three categories with the path:
Category A/Subcategory A/Subcategory B
Then you need to put the proper name of THE LAST category in the path, – in our case it is Subcategory B, – into the ‘store_name’ attribute.
If you want to translate the name of Subcategory A, then you need to put this path in the ‘name’ attribute.
Category A/Subcategory A
And then specify the desired name for the Subcategory A in the ‘store_name’ attribute.
TO MEMORIZE:
When importing categories and translating/changing category names for multiple store views – use ‘store_name’ attribute to update the name of the LAST category in the path specified in the ‘name’ attribute.
See example file for multistore category import for Magento 2
Buy Improved Import and Export extension for Magento 2
If you are interested in importing other entities to your Magento 2 store – refer to the following blog posts:
Magento 2 Category Import/Export FAQ
How to import categories to Magento 2 automatically?
Use the Improved Import & Export Magento 2 extension to import categories to Magento 2 automatically. The module relies on cron to automate data transfers. Consequently, you can create schedules to import product categories to Magento 2 automatically after certain intervals. For instance, you have two e-commerce websites with a similar category tree. Instead of applying updates to both of them manually, you can edit one of the stores and import new categories from it to the remaining storefront.
How to export categories from Magento 2 automatically?
You can also use the Improved Import & Export Magento 2 extension to export categories to Magento 2 automatically due to cron and automated data transfers. Following the example from the previous question, use the module to export categories from a store where you’ve just applied changes. It will help you import new categories to the remaining storefront.
How to import Magento 2 categories from Google Sheets?
You can use the Improved Import & Export Magento 2 module to import categories from numerous sources, including Google Sheets. The extension provides the ability to choose the desired storage when you configure an import profile. Just select Google Sheets as your data source and specify the URL address of a file with categories to import the corresponding update to your Magento 2 website.
How to import Magento 2 categories from Dropbox?
In addition to Google Sheets, you can also transfer a category tree to Magento 2 from Dropbox. Provide the address details of a file stored there and the Improved Import & Export extension will easily move it to your e-commerce storefront. Note that it should be a CSV, XML, ODS, XLSX, or JSON file. You can provide them in a compressed state as ZIP or TAR archives.
How to import Magento 2 categories from a CSV file?
You can use the Improved Import & Export Magento 2 extension to import categories via a CSV file. Follow the instructions mentioned in this article to configure the corresponding import process. Choose a CSV file as your import file type.
How to import Magento 2 categories from an XML file?
You can use the Improved Import & Export Magento 2 extension to import categories via an XML file. Follow the instructions mentioned in this article to configure the corresponding import process. Choose an XML file as your import file type.
How to import Magento 2 categories from an ODS file?
You can use the Improved Import & Export Magento 2 extension to import categories via an ODS file. Follow the instructions mentioned in this article to configure the corresponding import process. Choose an ODS file as your import file type.
How to import Magento 2 categories from an XLSX file?
You can use the Improved Import & Export Magento 2 extension to import categories via an XLSX file. Follow the instructions mentioned in this article to configure the corresponding import process. Choose an XLSX file as your import file type.
How to import Magento 2 categories from a JSON file?
You can use the Improved Import & Export Magento 2 extension to import categories via a JSON file. Follow the instructions mentioned in this article to configure the corresponding import process. Choose a JSON file as your import file type.
How to import Magento 2 categories in a ZIP or TAR archive?
You can use the Improved Import & Export Magento 2 extension to import categories in a ZIP or TAR archive. Note that they should be stored in a CSV, XML, ODS, XLSX, or JSON file.
How to import Magento 2 categories via API?
You can use the Improved Import & Export Magento 2 extension to import categories to Magento 2 via API. The module provides the ability to create a direct connection between the two systems so that you avoid the use of intermediate data exchange points and file transfers.
How to export Magento 2 categories via API?
You can use the Improved Import & Export Magento 2 extension to export categories to Magento 2 via API. The module provides the ability to create a direct connection between the two systems so that you avoid the use of intermediate data exchange points and file transfers.
How to export products by categories from Magento 2?
The Improved Import & Export module also lets you export products by categories from Magento 2. It is only necessary to create export filters and specify a category that contains products that you want to export.
How to assign Magento 2 products to categories on import?
You can use Improved Import & Export to assign products to categories while importing them to your e-commerce website. The module offers a mapping interface where you can select new categories for imported products.
How to map categories in Magento 2?
As mentioned above, you can use import profiles of Improved Import & Export to map the imported categories to the ones available on your frontend. Specify an imported category and select your store category in front of it. Thus, you map external categories to the ones used in your Magento 2 installation.


