

In the following article, we explain what collections on Shopify are. Our guide explores two major screens associated with Shopify collections. Firstly, it is the admin section where all collections are gathered. Secondly, we describe a collection details page – a screen where you add new collections as well as edit the existing ones. You will learn how to add collections on Shopify. Although it is a simple process, you must know the two collection types available on Shopify to properly configure your selection of products. Also, we explain how to add products to collections on Shopify since it is an integral part of your admin routine associated with one of the collection types. So, what are Shopify collections? You will find the answer below.

Table of contents
What are Shopify collections?
Shopify collections are a variation of product categories common for all e-commerce systems but with a different visual representation and extended functionality, such as the ability to add products automatically if they follow specified parameters for automated collections or create any custom selection of goods for manual collections.
By grouping Shopify products into collections, you provide your store visitors with an enhanced customer experience and an easier way to discover new items. For instance, you can grab the attention of your buyers by gathering discounted items into a collection or binding seasonal products together as a limited-time offer. You can even use Shopify collections in product recommendations, but it is the topic of another article.
After a collection is created, you can start displaying it on your online store as a webpage that contains a product gallery. As for store visitors, they just need to click a product image in the collection to get to a specific product’s page. But how do they discover collections on Shopify?
You can dramatically improve your customer experience by adding collection links to the navigation menu. As a result, customers get the ability to find and view Shopify collections much faster.
As for the collection appearance, it is based on the exact theme you use. However, a slight hint of customization is associated with the ability to use collection images. We focus on these and other aspects below.
Note that Shopify lets you view, create, and edit collections. You can do that right in your Shopify admin under Products -> Collections. Before going any further, let’s see what collection types are available in Shopify.
Collection types
Shopify supports two types of collections:
- Automated;
- Manual.
Although they share the same goal, the core principles behind these Shopify collections are different.
Shopify’s automated collections incorporate selection conditions to automatically include products that follow them. It is possible to use up to 60 selection conditions to make your collections as precise as your business requires. Specify whether products need to meet all of them or any. Every time a product matches the selection conditions for a specific collection, it appears there automatically. You create a collection with specific rules, and these rules work for you. There is no need to add each new product to the collection manually. Consequently, you can save tons of time and effort, especially in the case of a large selection of products.
Are there any drawbacks associated with Shopify’s automated product collections? Yes, there is one major inconvenience. It is impossible to remove a product from the collection if it follows its selection conditions. You need to either change the collection’s conditions or edit the product details to achieve this goal.
To avoid this issue, Shopify introduces manual product collections. Yes, you got it right: the system lets you sacrifice automation for extra flexibility. Shopify’s manual collections consist of products that you choose manually. They remain constant in terms of the included items unless you specifically add or remove them.
Manual collections require more work to maintain, but they are a suitable option for personally-curated collections. For instance, you can set up a discount that only applies to the products in a manual collection. It is especially useful for one-time flash sales that consist of a few products.
Although both collection types can be edited after you save them, Shopify prevents changing a collection type. You need to remember that while creating a new collection since you may stuck with a collection that doesn’t work for you.
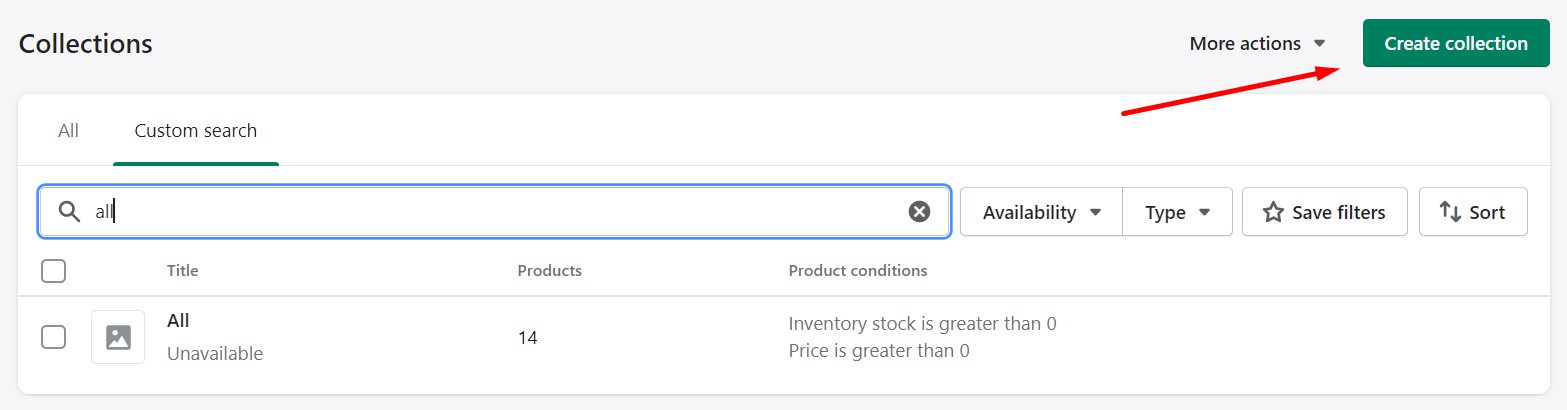
Shopify Admin -> Products -> Collections
No matter what type a Shopify collection has, it appears under Products -> Collections of your admin section.

You can filter out the selection of collections by availability: display collections available or unavailable on your storefront.

Also, Shopify lets you use a collection type to filter out the records on the page. You can display either automated or manual collections. Note that by default, the grid contains all collections.

There is also an opportunity to change the collection sort order by title or update time.

That’s how to change order of collections in Shopify. If you want to change the order of items in your collection, continue reading.
And there is a search field that lets you find specific collections.

Automated Shopify Collections
Now, let’s see how to create collections on Shopify with fully automated product inclusion and manage them. You can create new collections as well as edit and view the existing ones. It is also possible to delete automated Shopify collections if they are no longer necessary.
Below, you will learn how to add collections on Shopify if your goal is to create automated collections. As we’ve already mentioned, creating an automated collection involves defining specific conditions (up to 60). All products that match them appear in the collection according to a specified sort order. The current limit on the number of automated collections is 5k.
How to create automated collections on Shopify
Follow these steps to create automated collections on Shopify:
- Go to Products -> Collections in your Shopify admin.
- You will see the Create collection button on the top right. Click it.
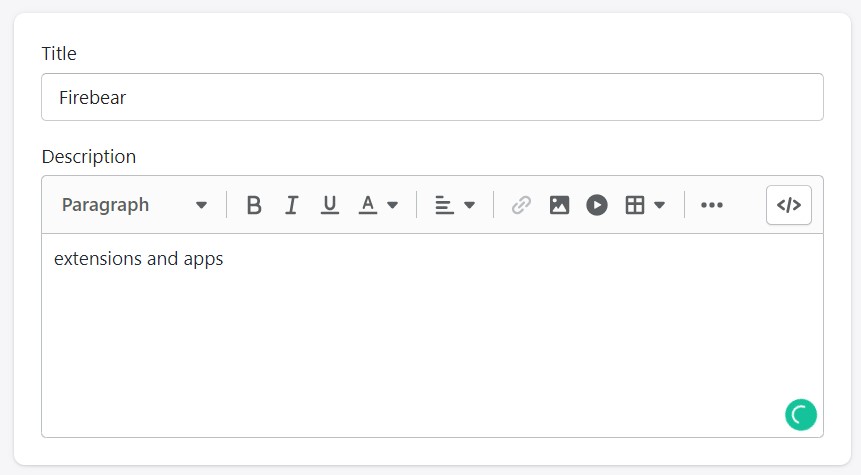
- Specify your collection’s title and description.
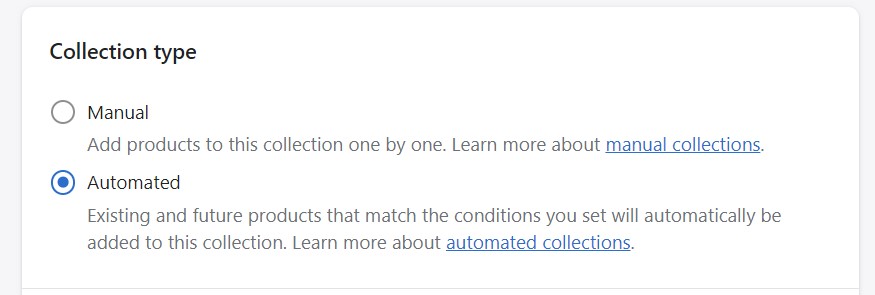
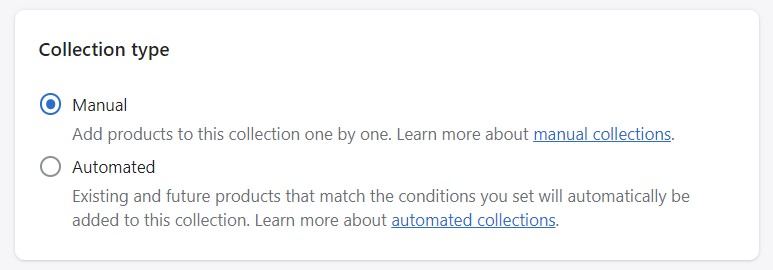
- Proceed to the Collection type section. Choose Automated.
- Now, you must decide whether products should match all or any conditions to appear in your new collection.

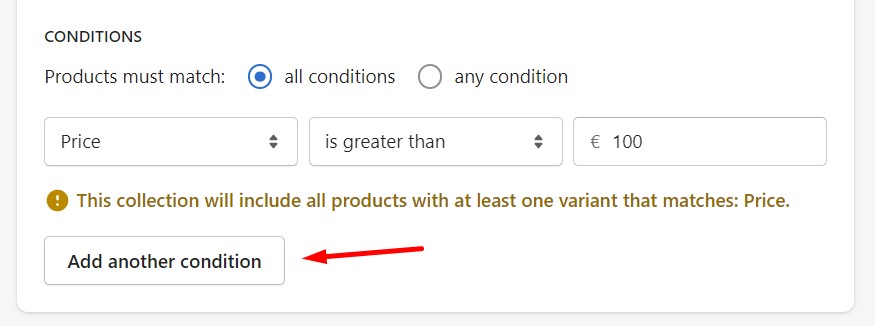
- Set the collection conditions. As we’ve already mentioned, you can create up to 60 conditions per collection:
- Choose a condition type (first drop-down);
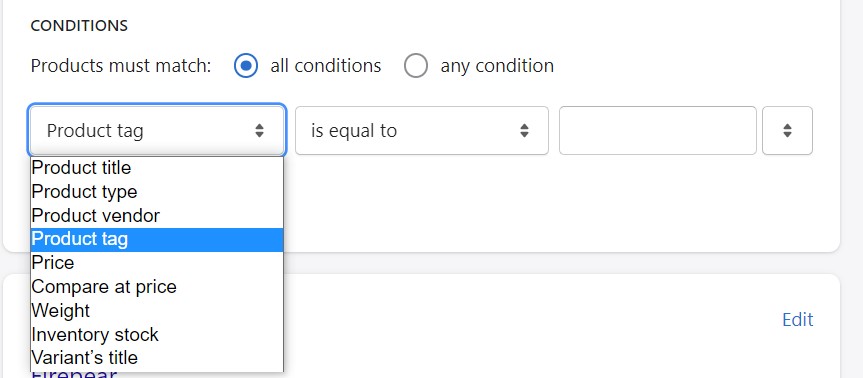
- Select how a product should match the condition to display in the collection (second drop-down);

- Specify a condition value (third field);
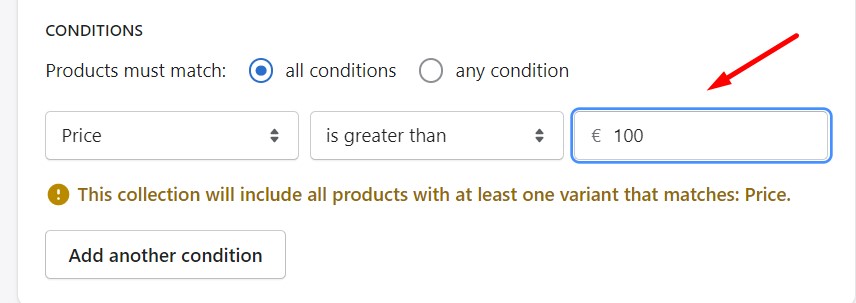
- Add more conditions if necessary by clicking Add another condition.
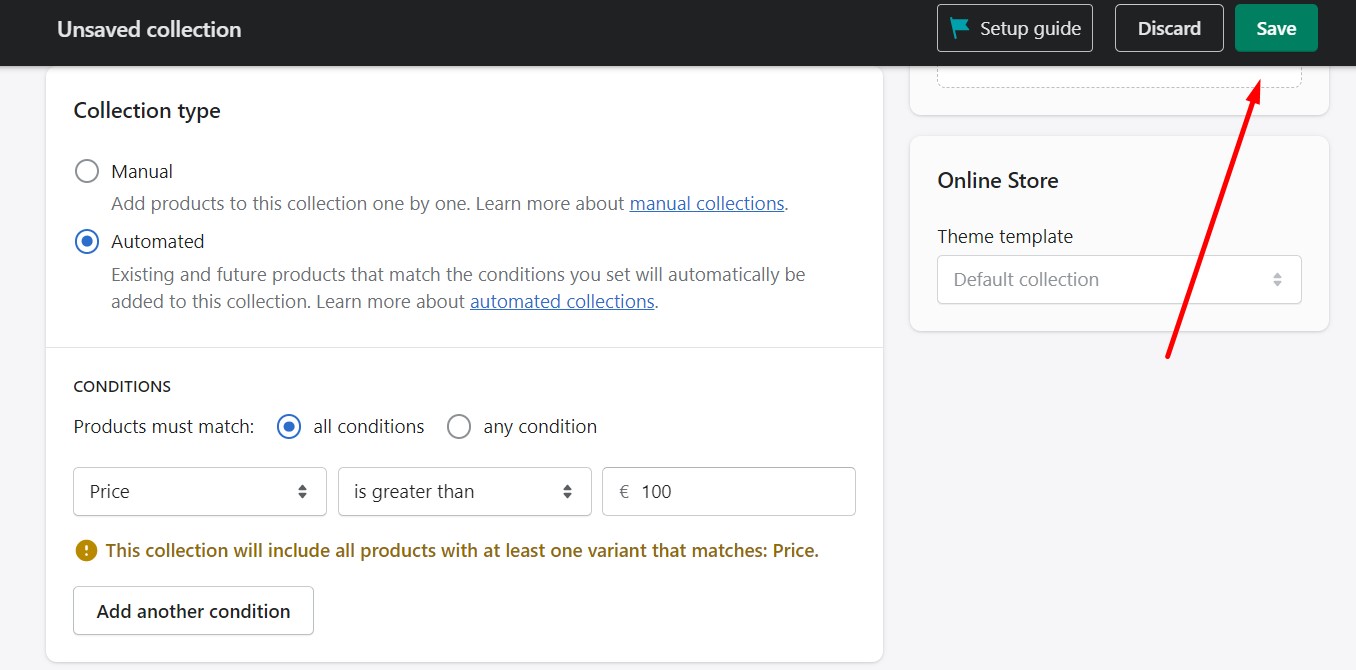
- Choose a condition type (first drop-down);
- Click Save.
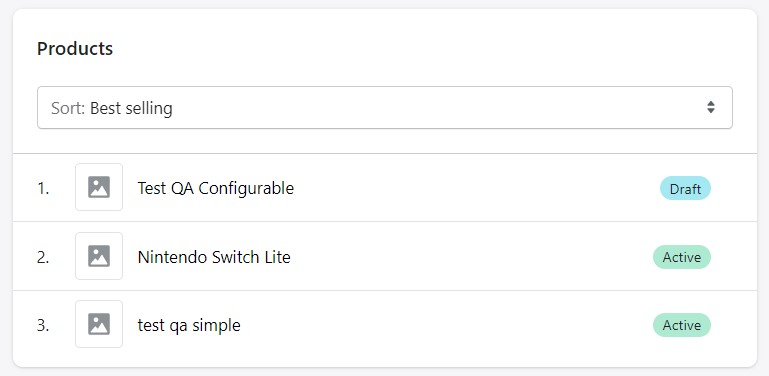
- The system updates the page with products that appear in the collection. The Products section now displays them.
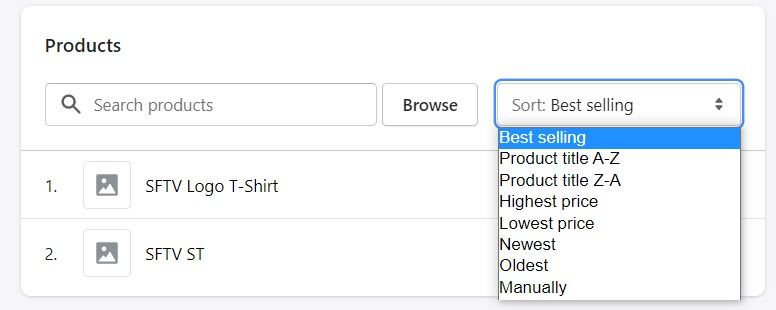
You can change their sort order:- click the drop-down list beside Sort to choose a sort order for products in your collection.
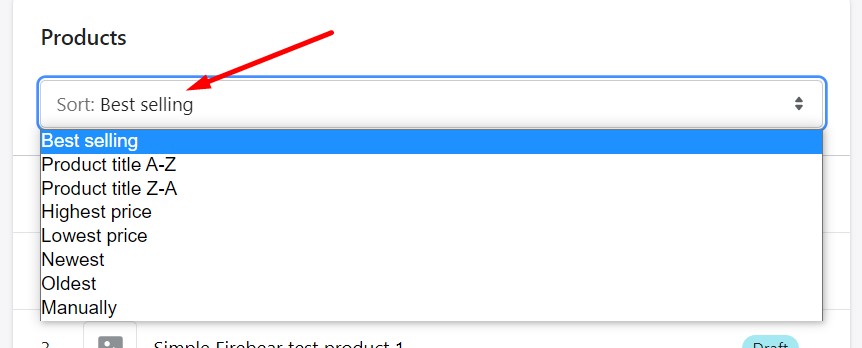
- You can choose Manually to drag the products in any custom order.
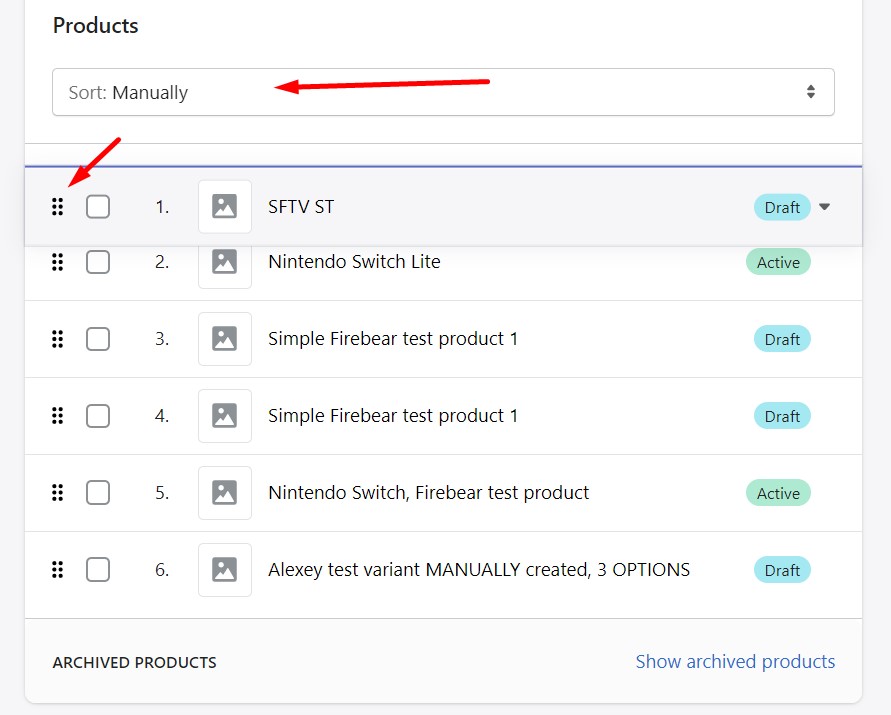
- click the drop-down list beside Sort to choose a sort order for products in your collection.
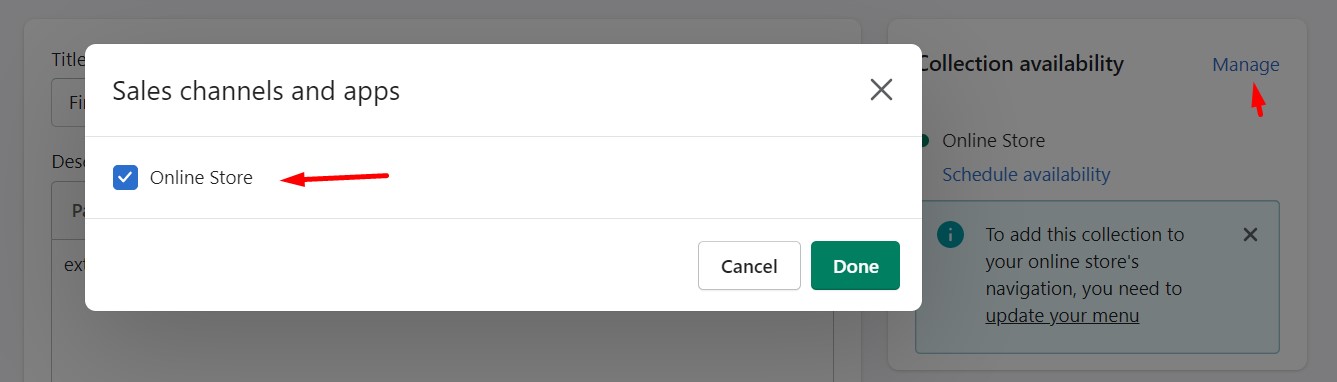
- Now, you need to choose where your automated Shopify collection is displayed:
- Proceed to the Sales channels section;
- Click Manage and select from your active sales channels.
- Also, you can schedule your collection’s publish date here (we describe this process below).
- And, of course, don’t forget about the visual representation:
- Proceed to the Collection image section;
- Hit Add image;
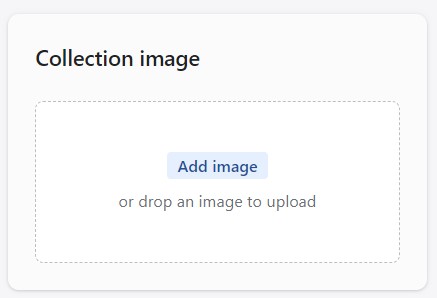
- Add an image for the collection. Your collection images can be any size up to 4472 x 4472 px (20 megapixels) and smaller than 20 MB.
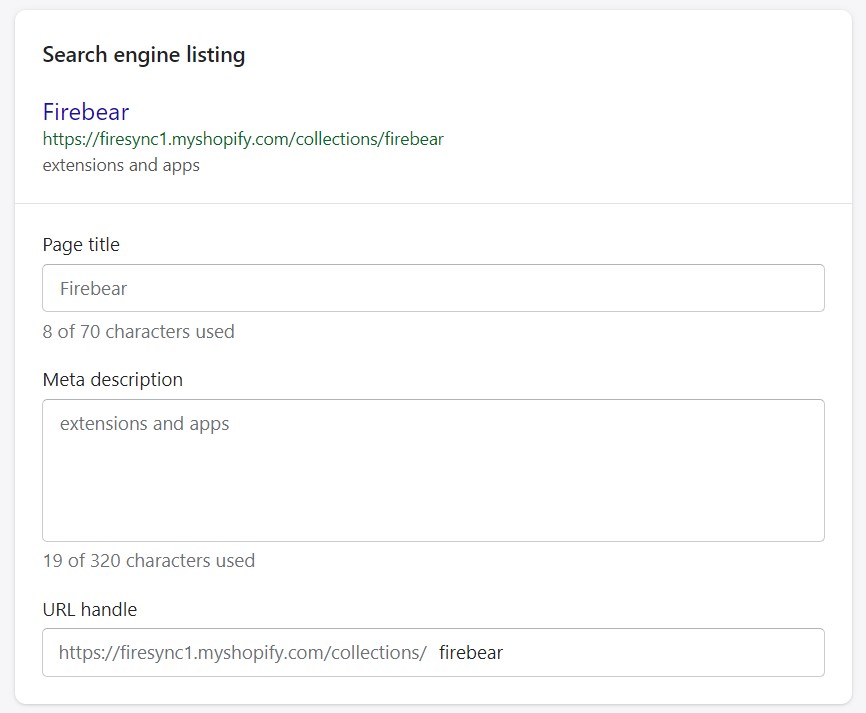
- If you want to optimize your collection’s SEO, follow these steps:
- Go to the Search engine listing preview section;
- Click Edit website SEO;
- Apply changes.
- Click Save.


Now, you can preview your collection. That’s what happens when you upload an image that doesn’t follow the requirements:

How to add collections to pages on Shopify
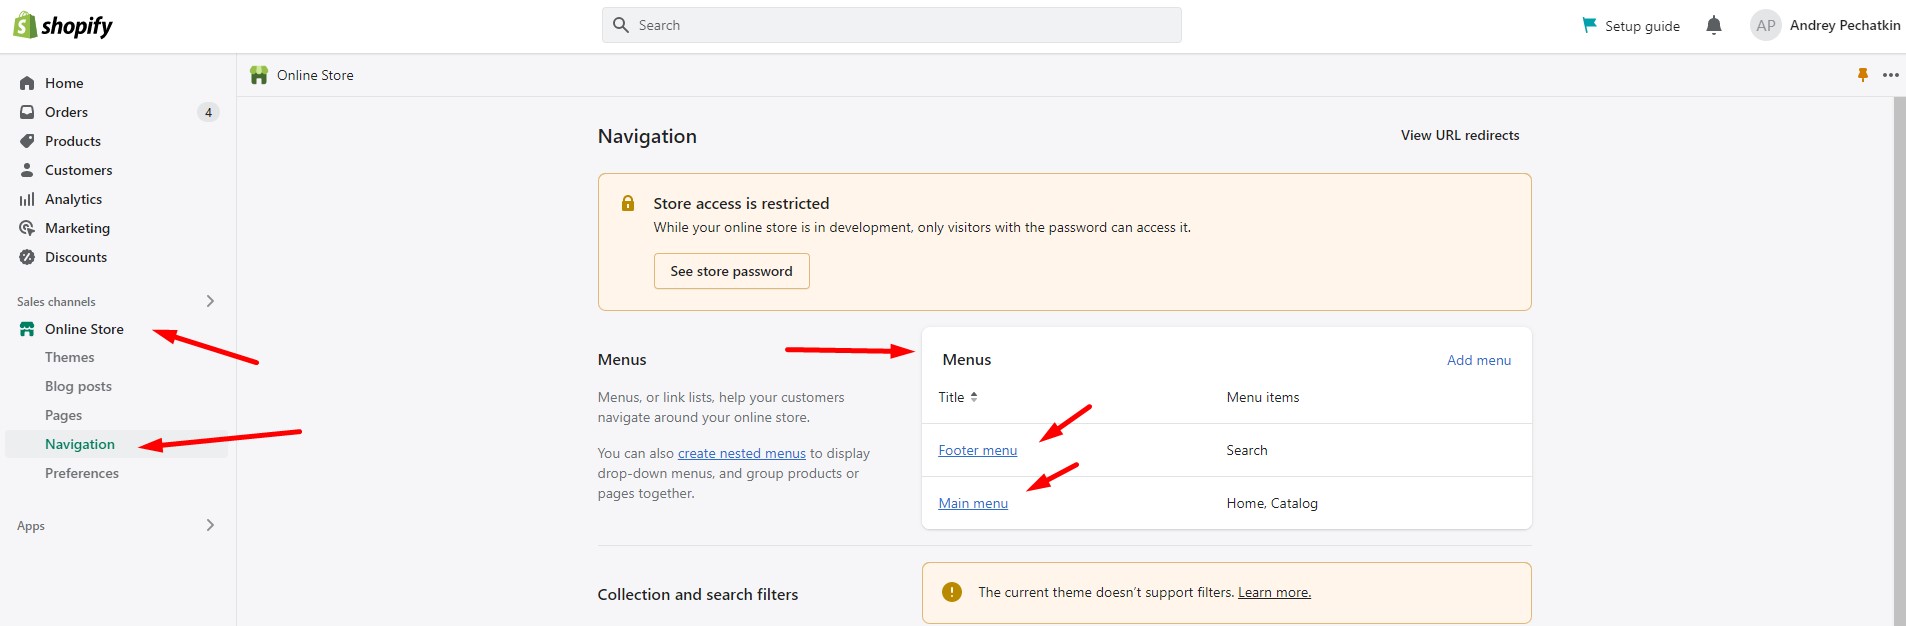
Now, you must add your new collection to the online store navigation to help your customers find it easier on your store pages. This procedure occurs beyond the Collections section of your admin. Follow these steps to add automated collections to pages on Shopify:
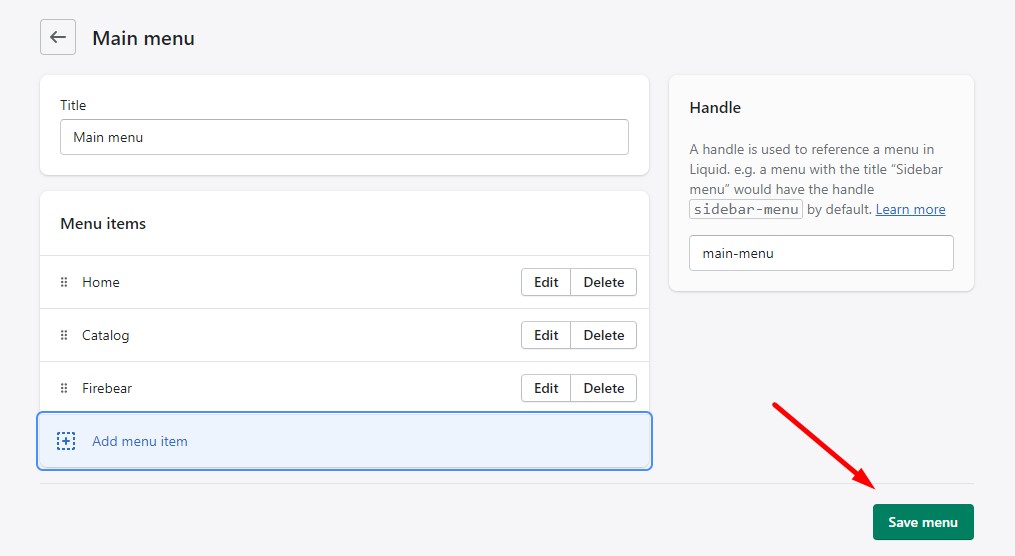
- Go to the Navigation page under your Online Store;
- Click the name of the menu to add your collection.
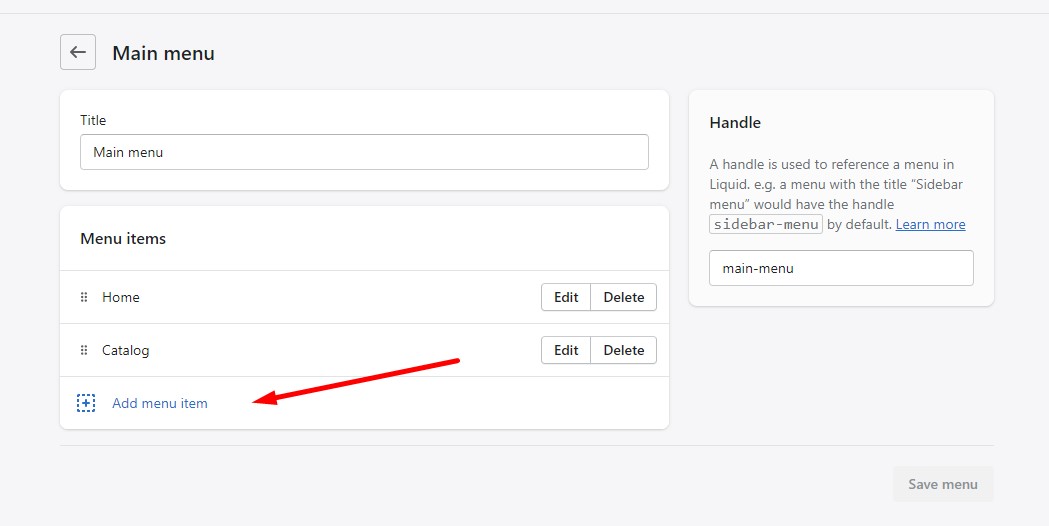
- Proceed to the Menu items section and click Add menu item.
- Proceed to the Name field to specify your collection’s name that displays on the storefront.
- Proceed to the Link list to add a particular collection:
- Choose Collection;
- select the collection to add to your store’s navigation;
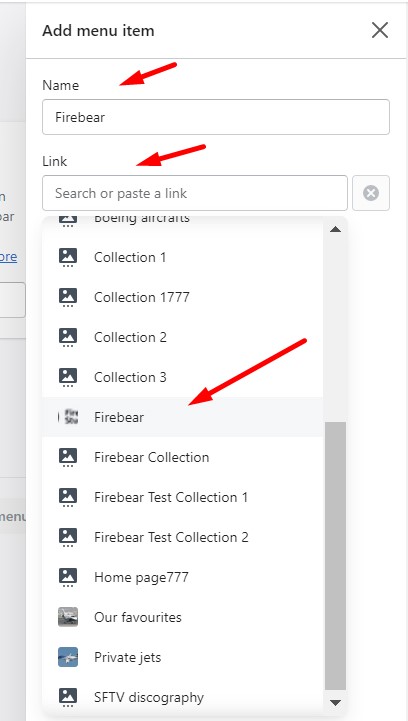
- Hit Add.
- Save your menu.


That’s it! Now, you know how to add collections on Shopify, assign products to them, and add collections to your store’s navigation. Still, there are a few aspects of collection management to be discussed.
How to change a collection’s publish date
Shopify lets you display conditions for a specified period. You need to set a specific publishing date and disable your automated collection’s display on the storefront when necessary. Follow these steps to change a collection’s publish date:
- Visit your Collections screen in the admin.
- Choose a collection you want to schedule.
- Proceed to the Collection availability section;
- Click Schedule availability below the Online Store.
- Set the date and time to publish the collection.
- Click Save.

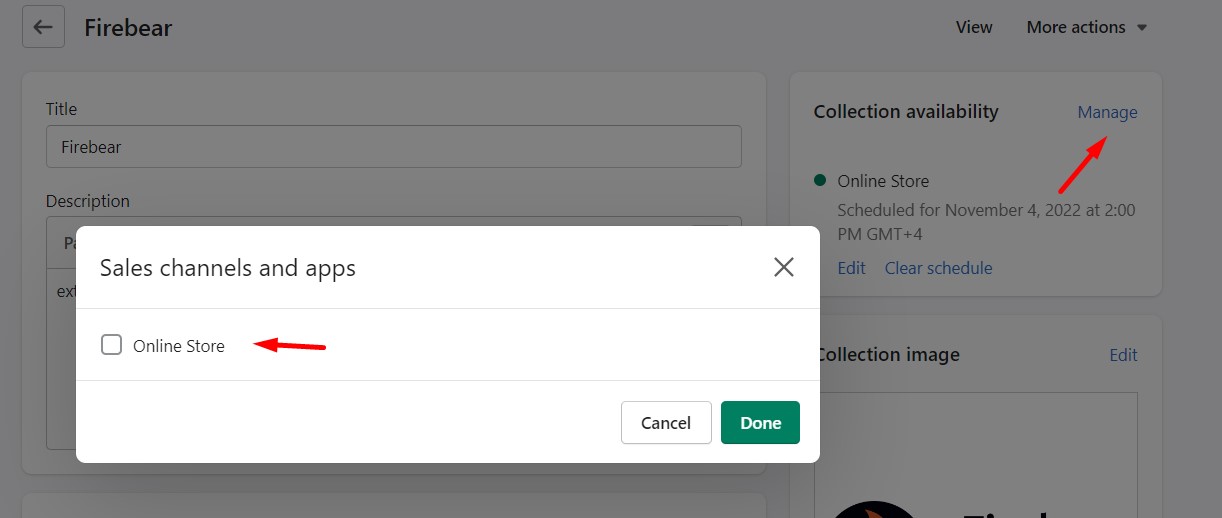
When it’s time to hide your automated Shopify collection from the storefront, do the following things:
- Visit your Collections screen in the admin.
- Choose a collection you want to hide.
- Proceed to the Collection availability section;
- Click Manage.
- Uncheck Online Store.
- Click Done.
- Click Save.

Alternatively, you can hide multiple Shopify collections (both automated and manual) in bulk:
- Visit your Collections screen in the admin.
- Check collections you want to hide.
- Click More actions;
- Click Make collections unavailable.
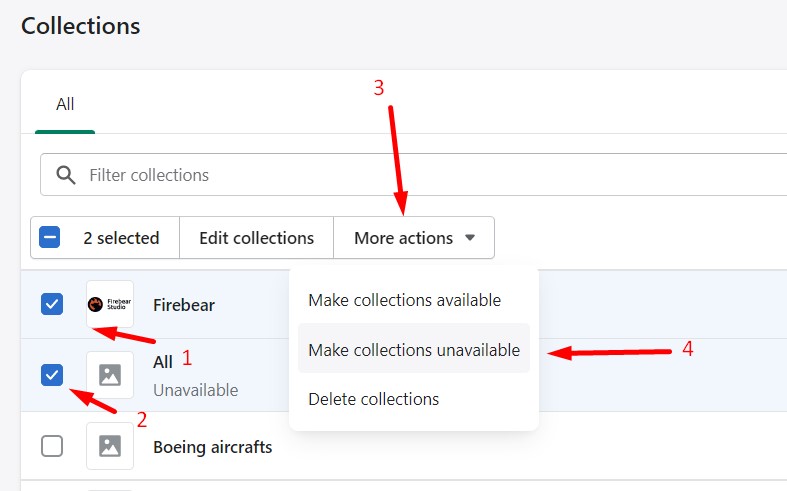

Now, your collections won’t display on the front.
How to replace a product from an automated collection
The first way to replace a product from an automated Shopify collection is associated with adding, editing, or replacing the collection’s conditions. You can do that as follows:
- Go to Products > Collections.
- Open the collection you want to edit.
- Proceed to the Conditions section and apply changes there.
- Click Save. Products that don’t match the new conditions won’t be available in the automated Shopify collection anymore.
Secondly, you can remove a product from a collection by editing it so that it no longer meets the conditions. You can find more information about that here: Editing Shopify Products.
How to replace a manual collection with an automated collection
Although it is impossible to change a collection type, you can replace a manual Shopify collection with an automated one.
- Add a unique tag to products in your manual collection, such as products for replacement. Go to a product details page from the collection and do that manually.
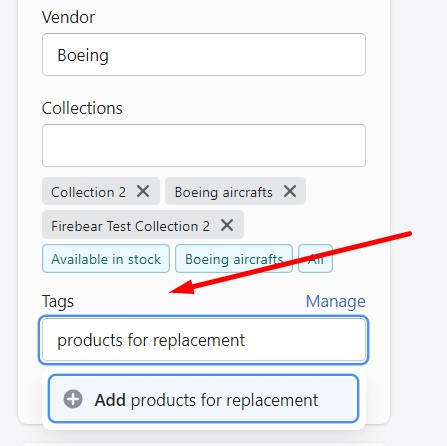
- Create a new automated collection.
- Set this tag as its condition.
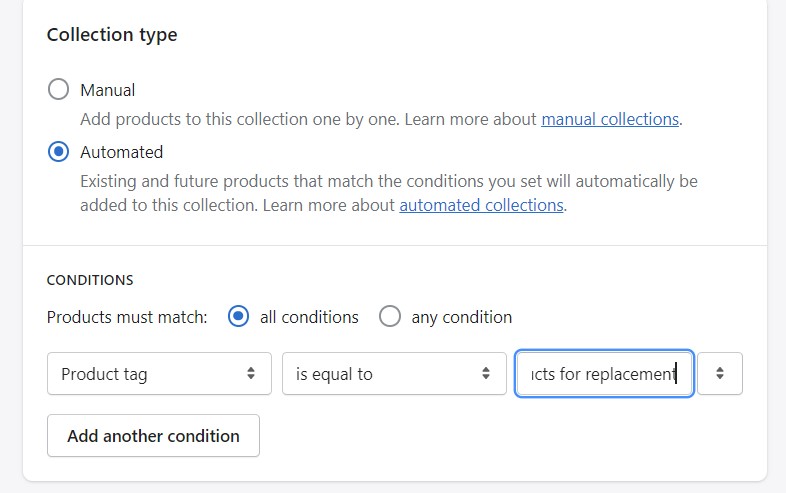
- Add more conditions if necessary.
- Save your new automated collection. The products from your old manual collection are now available here.
- Delete or disable the original manual collection.


How to delete a Shopify collection
By deleting a collection, you permanently remove it from your Shopify admin. You can also hide the collection as we described above. Follow these steps to delete a collection from Shopify:
- Visit your Collections screen in the admin.
- Check the collection you want to delete (Check several records to delete more than one collection).
- Click More actions;
- Click Delete collection.
- Click Delete in the confirmation box.


Note that you remove the collection along with its links in the online store menus.
Conditions for automated collections
Now, let’s say a few more words about conditions for automated Shopify collections. You can add a condition to include a product in a collection based on the following product parameters:
- Title,
- Variant title,
- Type,
- Vendor.
The second drop-down list lets you control how a product needs to match the condition value specified in the third field. Shopify lets you control how a product needs to match the condition value by selecting one of the following options:
| Term | Description |
| is equal to | A product must perfectly match the specified value. |
| is not equal to | A product cannot match the specified value. |
| starts with | The beginning of the product title, type, or vendor matches the specified value. |
| ends with | The end of the product title, type, or vendor matches the specified value. |
| contains | The product title, type, variant title, or vendor contains the specified value (3+ characters long; can’t start or end with spaces). |
| does not contain | The product title, type, variant title, or vendor doesn’t contain the specified value (3+ characters long; can’t start or end with spaces). |
You can also add a condition to include a product in a collection based on another set of product parameters:
- Price,
- Compare at price,
- Weight,
- Inventory.
Shopify lets you control how a product needs to match the condition value by selecting one of the following options:
| Term | Description |
| is equal to | A product needs to match the specified value. |
| is not equal to | A product can’t match the specified value. |
| is greater than | The product is greater than the specified value. |
| is less than | The product is less than the specified value. |
| is empty | The product doesn’t contain a Compare at price value. |
| is not empty | The product contains a Compare at price value even if it is zero or only a single product’s variant has it. |
Manual Shopify Collections
You select individual products for a manual Shopify collection one by one instead of delegating these duties to the platform. Unless you add or delete things items, the collection always includes the same products. You can see if another staff member updated the same collection before by looking at the page’s header.
Since an automatic collection cannot be converted to a manual collection, you can make a manual collection that includes the items you desire. So, how to add collections on Shopify when it comes to manual collections? The process is basically the same as described above, except you need to know how to add products to your collection.
How to create manual collections on Shopify
You can create a manual collection as follows:
- Go to Products -> Collections in your Shopify admin.
- You will see the Create collection button on the top right. Click it.
- Specify your collection’s title and description.
- Proceed to the Collection type section. Choose Manual.
- Click Save.
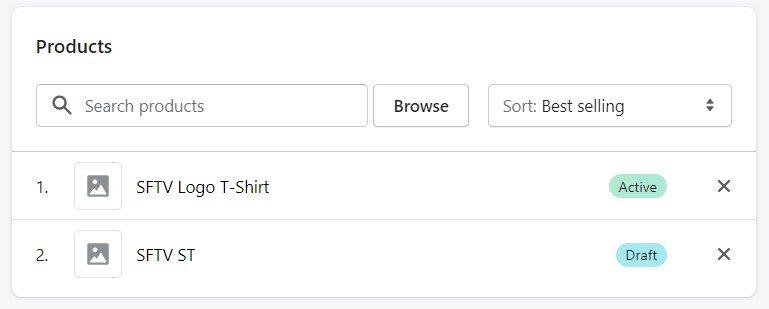
- Proceed to the Products section and search for products. Alternatively, you can click Browse and add the products to the collection. Click X beside a product to remove it from the collection
- Now, you can change product sort order:
- click the drop-down list beside Sort to choose a sort order for products in your collection.
- You can choose Manually to drag the products in any custom order.
- click the drop-down list beside Sort to choose a sort order for products in your collection.
- Choose where your automated Shopify collection is displayed:
- Proceed to the Sales channels section and click Manage;
- Select from your active sales channels. Also, you can schedule your collection’s publish date here (we describe this process below).
- And, of course, don’t forget about the visual representation:
- Proceed to the Collection image section;
- Hit Upload image;
- Add an image for the collection. Your collection images can be any size up to 4472 x 4472 px (20 megapixels) and smaller than 20 MB.
- If you want to optimize your collection’s SEO, follow these steps:
- Go to the Search engine listing preview section;
- Click Edit website SEO;
- Apply changes.
- Click Save.


How to add collections to pages on Shopify
Now, you must add your manual Shopify collections to the online store navigation to help your customers find it easier on your store pages. This procedure takes place outside the Collections section. Follow these steps to add manual collections to pages on Shopify:
- Go to the Navigation page;
- Click the name of the menu to add your collection.
- Proceed to the Menu items section and click Add menu item.
- Proceed to the Name field to specify your collection’s name that displays on the storefront.
- Proceed to the Link list to add a particular collection:
- Choose Collection;
- select the collection to add to your store’s navigation;

- Hit Add.
- Save your menu.

That’s it! Now, you know how to add manual collections on Shopify, assign products to them, and add collections to your store’s navigation. Still, there are a few aspects of collection management to be discussed.
How to add products to a manual collection from its details page
We’ve just described how to add products to your manual collections on the collection details page. However, you can also do that from a product’s page. Follow these steps to add products to a manual collection from a product details page:
- Go to Shopify admin -> Products.
- Choose a product you want to add to a collection and open its details page.
- Proceed to the Collections section and choose one or more existing collections.
- Click Save.
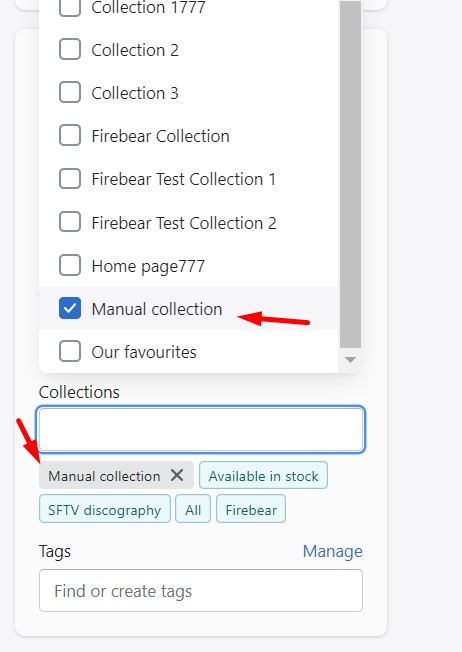

This will add the product to all the selected collections.
How to change a collection’s publish date
Shopify lets you display manual conditions for a specified period. You need to set a specific publishing date and disable your collection’s display on the storefront when necessary. Follow these steps to change a collection’s publish date:
- Visit your Collections screen in the admin.
- Choose a collection you want to schedule.
- Proceed to the Collection availability section;
- Click Schedule availability below the Online Store.
- Set the date and time to publish the collection.
- Click Save.
When it’s time to hide your manual collection from the front end, do the following things:
- Visit your Collections screen in the admin.
- Choose a collection you want to hide.
- Proceed to the Collection availability section;
- Click Manage.
- Uncheck Online Store.
- Click Done.
- Click Save.
Alternatively, you can hide multiple collections (both manual and automated) in bulk:
-
- Visit your Collections screen in the admin.
- Check collections you want to hide.
- Click More actions;
- Click Make collections unavailable.
Now, your Shopify collections won’t display on the front.
How to delete a Shopify collection
By deleting a manual collection, you permanently remove it from your Shopify admin. You can also hide a manual collection as we described above. Follow these steps to delete a manual collection from Shopify:
- Visit your Collections screen in the admin.
- Check the collection you want to delete (Check several records to delete more than one collection).
- Click More actions;
- Click Delete collection.
- Click Delete in the confirmation box.
Note that you remove the manual collection along with its links in the online store menus.
Import & Export Collections on Shopify
Shopify lets you import products right to the collections by default. It provides you with the ability to add an additional column to a CSV file called Collection. This column empowers you to organize products into collections by uploading a modified CSV file.
You can add this column anywhere in a CSV file. It is also possible to leave the column blank. Next, specify the name of the collection to add a product to in this column and upload your CSV. Note that the product should follow the collection conditions to be added. If the collection specified in a CSV file doesn’t exist, Shopify creates a manual collection. In both cases, you can add a product to a single collection only.
As for the collection export, Shopify doesn’t support it. The Collection column is not exported with a CSV file. So you should export Shopify products and add the new column manually. After that, it is possible to re-import this file, transferring products into collections.
However, various third-party apps let you avoid this inconvenience. For instance, the Matrixify App lets you mark to include additional columns of Collections to a product CSV file where each product is listed in:
- Create a new export.
- Select a checkbox to export products with collections.
- Get two additional columns in the exported file: Custom Collections and Smart Collections.
We can also enable similar functionality. Our Improved Import & Export app supports the import and export of Shopify collections. Contact us for more information. If you need to exceed the default limit, want to automate collection exports and imports on Shopify, or need to bulk export Shopify collections, replace the standard data exporter with the Shopify Improved Import & Export application. Along with supporting large files and several data formats, it also enables you to schedule imports and exports and use presets to automatically conform to external standards.
Conclusion
Shopify collections are quite a handy feature when it comes to combining products into new custom “categories” either manually or based on specific parameters. It is possible to create landings for sales, seasonal goods, new drops, etc., where you introduce customers to a precise selection of items.
Now that you know how to add collections on Shopify and how to add products to collections, you can simplify your daily duties and enhance the customer experience you offer.
Shopify Collections FAQ
What are collections in Shopify?
Shopify collections are a variation of product categories common for all e-commerce systems but with a different visual representation and extended functionality, such as the ability to add products automatically if they follow specified parameters for automated collections or create any custom selection of goods for manual collections. Merchants usually group products into collections to make it easier for customers to find them, e.g., clothes for women, items of a certain type, such as sneakers, and seasonal offers, such as Halloween-themed goods.
What is the difference between collections and products in Shopify?
While products are goods that you sell represented on product pages, collections are groups of products combined following specific parameters. Shopify lets group products into collections by price, size, colors, seasonality, etc. On your storefront, a collection is represented as a page with a photo gallery of items. Click on the product image to be redirected to the corresponding product page.
What is the difference between collections and pages in Shopify?
Shopify uses Collections and Pages for different purposes. While Pages contain text + media (e.g, Contact, FAQ, About Us), Collections are developed to display products.
How to add collections on Shopify?
You can add collections on Shopify as follows:
Go to Products -> Collections and click the Create collection button.
Specify your collection’s title and description.
Proceed to the Collection type section. Choose Automated or Manual.
Set the collection conditions for automated collections or add products manually for manual collections.
Click Save.
Change product sort order if necessary.
Proceed to the Sales channels section and select from your active sales channels. Also, choose a date to publish the collection if you don’t want to do that immediately.
Proceed to the Collection image section and upload a collection image.
Go to the Search engine listing preview section to optimize your collection’s SEO.
Click Save.
How to add products to collections on Shopify?
You can add products to Shopify collections manually if it is a manual collection. If it is an automated collection, create conditions to add products to this collection automatically. All products that follow the specified conditions will be displayed in the collection. These are the only two ways how to add products to Shopify collections.
How many collections can you have on Shopify?
You can create up to 5,000 collections on Shopify when it comes to automated collections. And Shopify suggests a limit of 100 000 manual collections. You can create more collections, but they may lead to store and Admin performance issues.
What is the correct Shopify collections image size?
Your collection images can be any size up to 20 megapixels or 4472 x 4472 px and smaller than 20 MB.
How to change order of collections in Shopify?
You can change the order of products in a Shopify collection in its Products section:
Click the drop-down list beside Sort to choose a sort order for products in your collection. You can select from a few sorting options:
Best-selling product (if you haven’t sold any products yet, It sorts products from newest to oldest);
Product title (alphabetical or reverse alphabetical order);
Highest or lowest price;
Newest or oldest product;
Manual.
Choose Manually to drag the products in any custom order.


