If you feel annoyed with all the restrictions of order management activities having on Magento 2 Default, searching for a supportive extension that can get rid of your problems is a good idea.
Mageplaza Order Labels for Magento 2 allows admins to create and customize the label columns on the Order Grid at the backend.
Its purpose is to make the order management process more convenient to store owners with automatic labeling and multiple display options of order labels.

Get Magento 2 Order Labels Extension by Mageplaza
Table of contents
Limitations of Magento 2 Default
Magento 2 is an amalgamation of advanced technology into the eCommerce industry. The benefits this platform brings back to modern retailers are undeniable.
However, going along with the wonderful advancements, the Default version of Magento 2 still has certain limitations that it doesn’t optimize for store owners’ management process.
Some of them are:
- On the Order Grid of Magento 2 Default doesn’t offer enough spaces for illustrating order specifications as store admins can’t create more columns at the order grid
- Store admins can’t add notes, flags, or images on the grid content, which leading the possibility of missing urgent orders
The Mageplaza Order Labels is designed to resolve all these limitations so that store admins can have better visibility of each order on the Order Grid. Read on to understand how this extension works.
Why choose Mageplaza Order Labels for Magento 2?
Provide unlimited columns at the Order Grid
With Mageplaza Order Labels, users can add extra columns for attaching order labels on the Order Grid at the backend. In other words, these newly created columns will display the attached tags corresponding to each order.
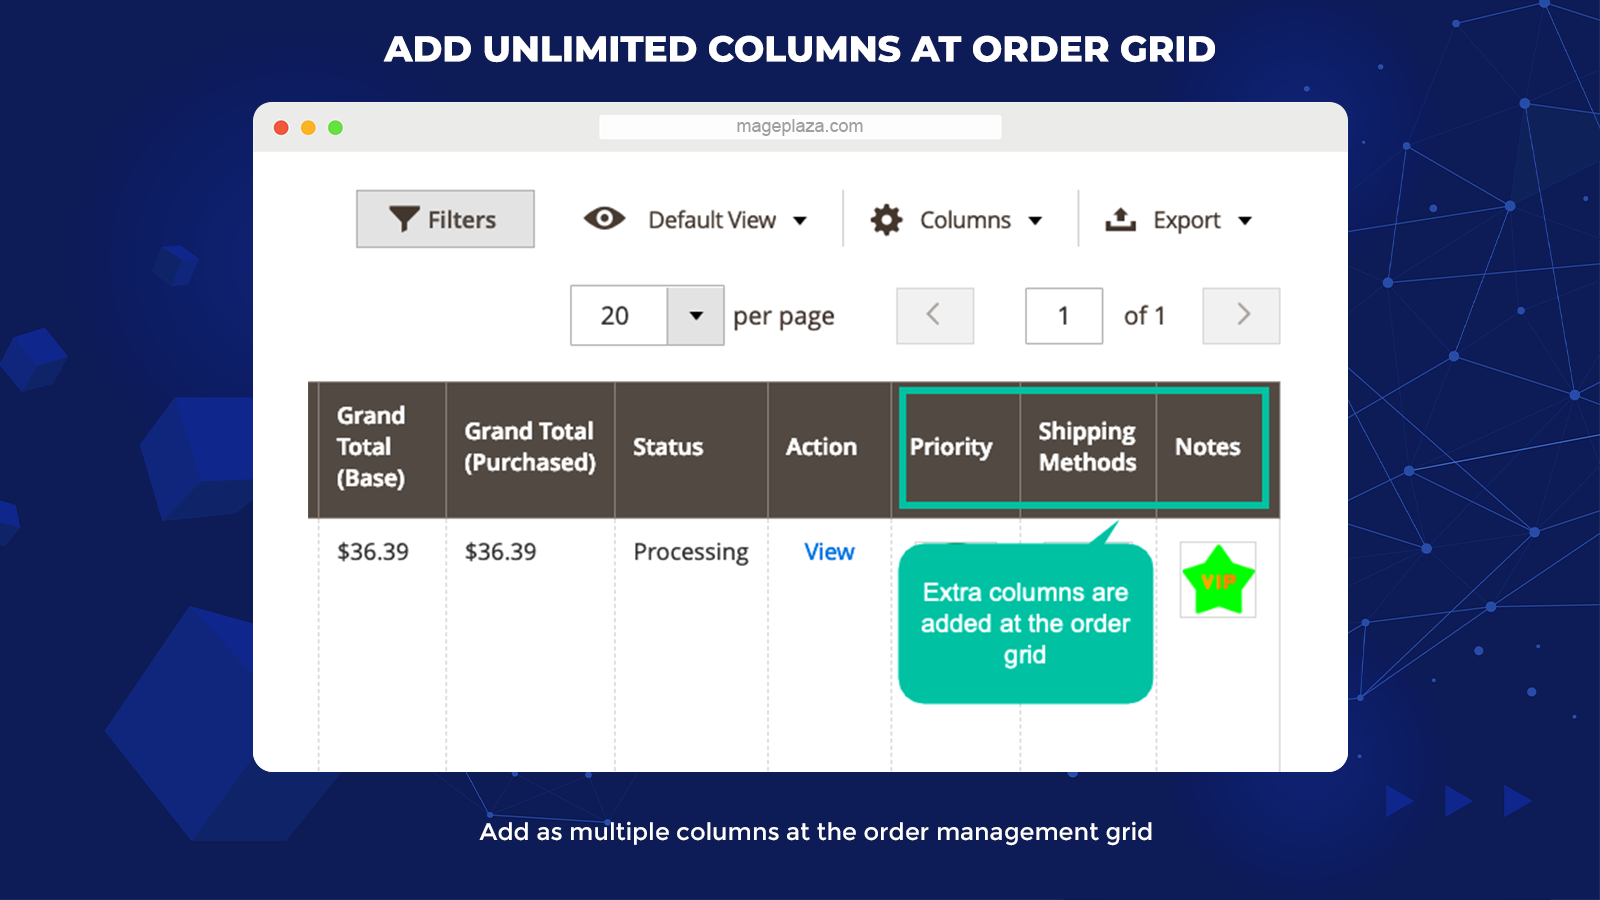
To be more specific, thanks to this feature, admins can:
- Create notes or remarks as labels to increase the efficiency of order management
- Add 3 types of columns, including Priority, Notes, Shipping Methods for different marketing purposes
Thanks to these extra columns and the availability of adding order labels, store admins can save a significant amount of time to view and monitor all the order information more efficiently.
Auto-assign labels for orders by conditions
What’s impressive about Magento 2 Order Labels extension is its auto-assign order labels. In essence, store owners can create conditions that allow the system to assign order labels automatically.
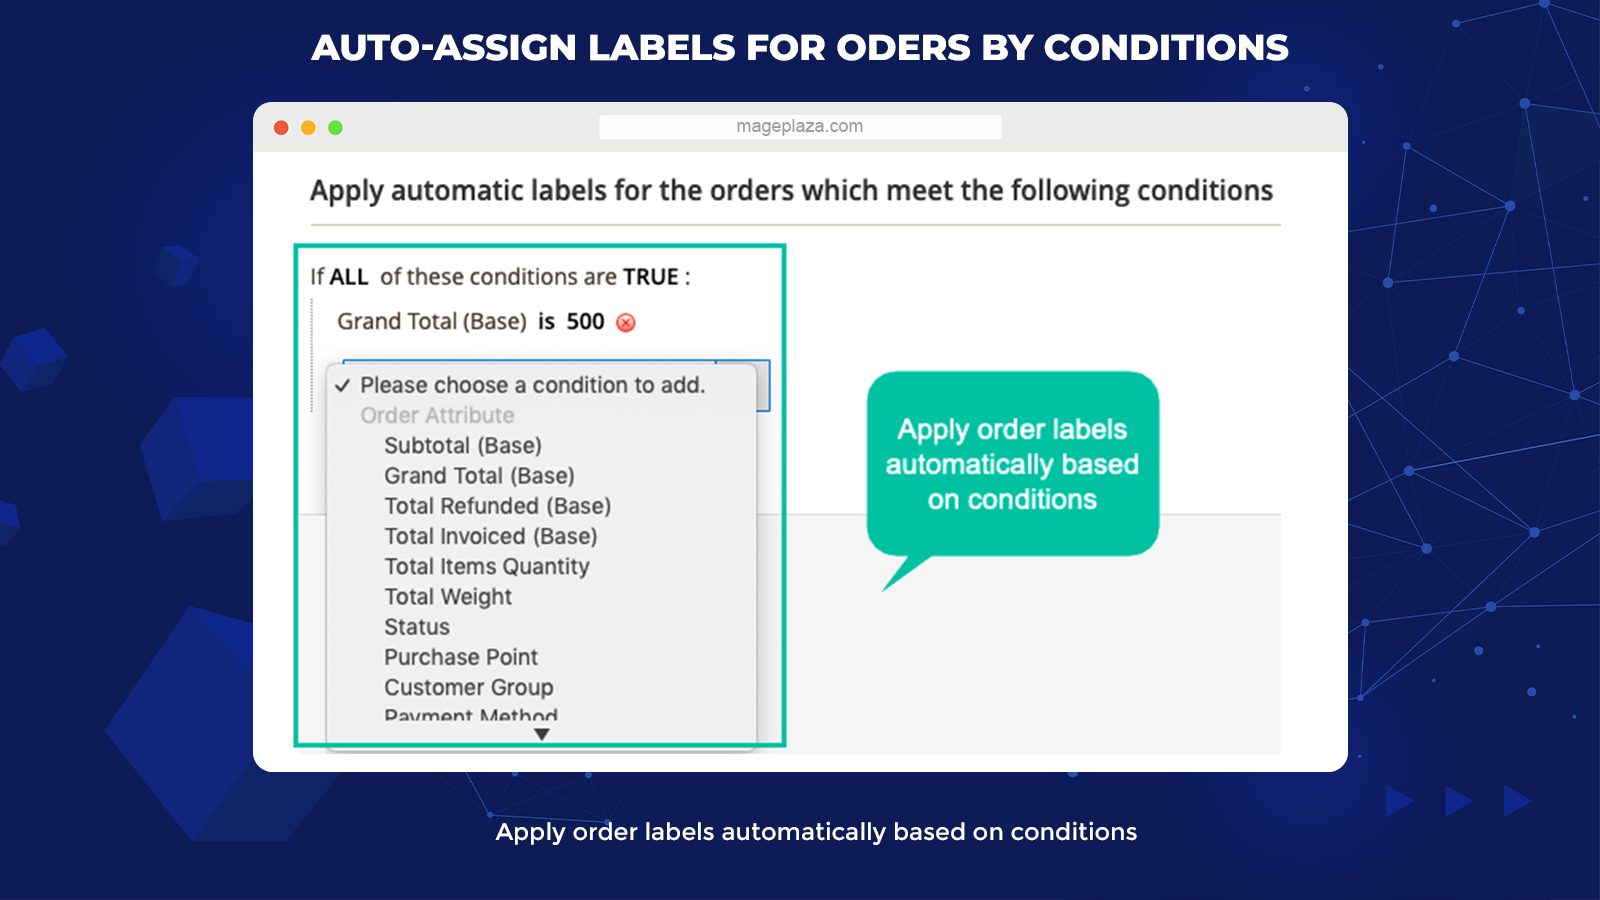
These conditions will be created based on order attributes, including:
- Total: Grand Total, Total Qty, Total Weight, etc
- Status, Customer Group, and Shipping Location
- Payment Method and Shipping Method
This automation process will create accuracy as well as unity for all added labels on the Order Grid. Furthermore, you can focus on other activities without paying too much time manually creating each Label.
Visual customization for labels with lively icons
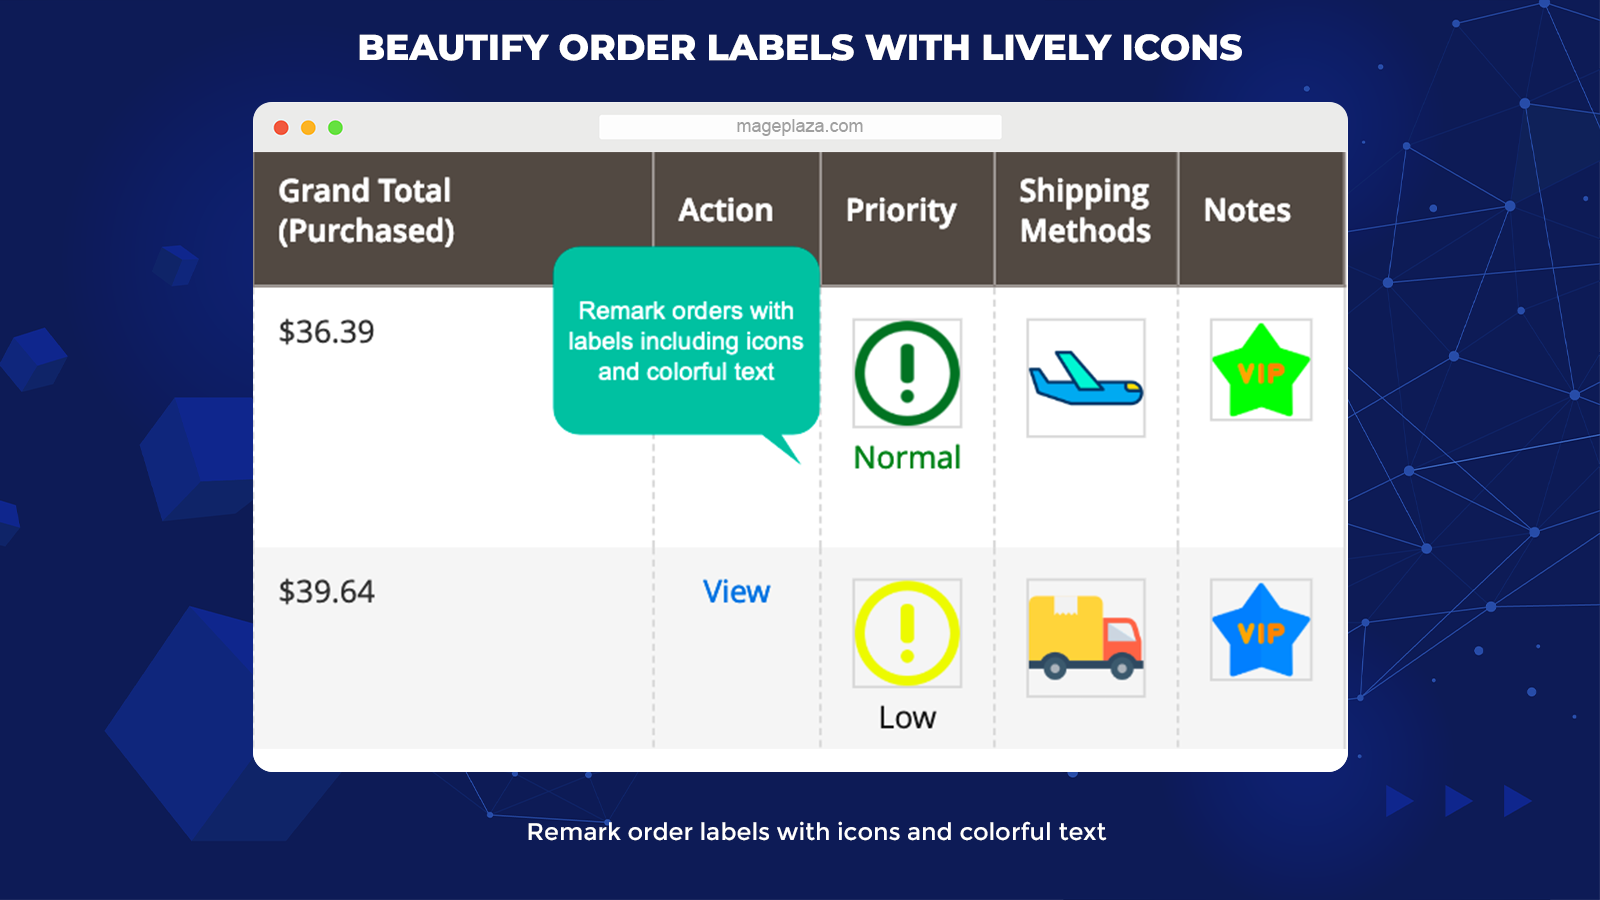
In order to deliver a personalized experience for store owners on the creating process of order labels, Magento 2 Order Labels enables its users to set the order labels in different styles freely:
- Text only
- Image only
- Combination of text and image
As a store admin, you can even customize the text color, background as well as priority levels for the labels, that makes you feel convenient to work with.
For instance, you can set the labels with icons in some colors like red, orange, and yellow to distinguish orders in the same or different priority levels.
Attach images to order status labels
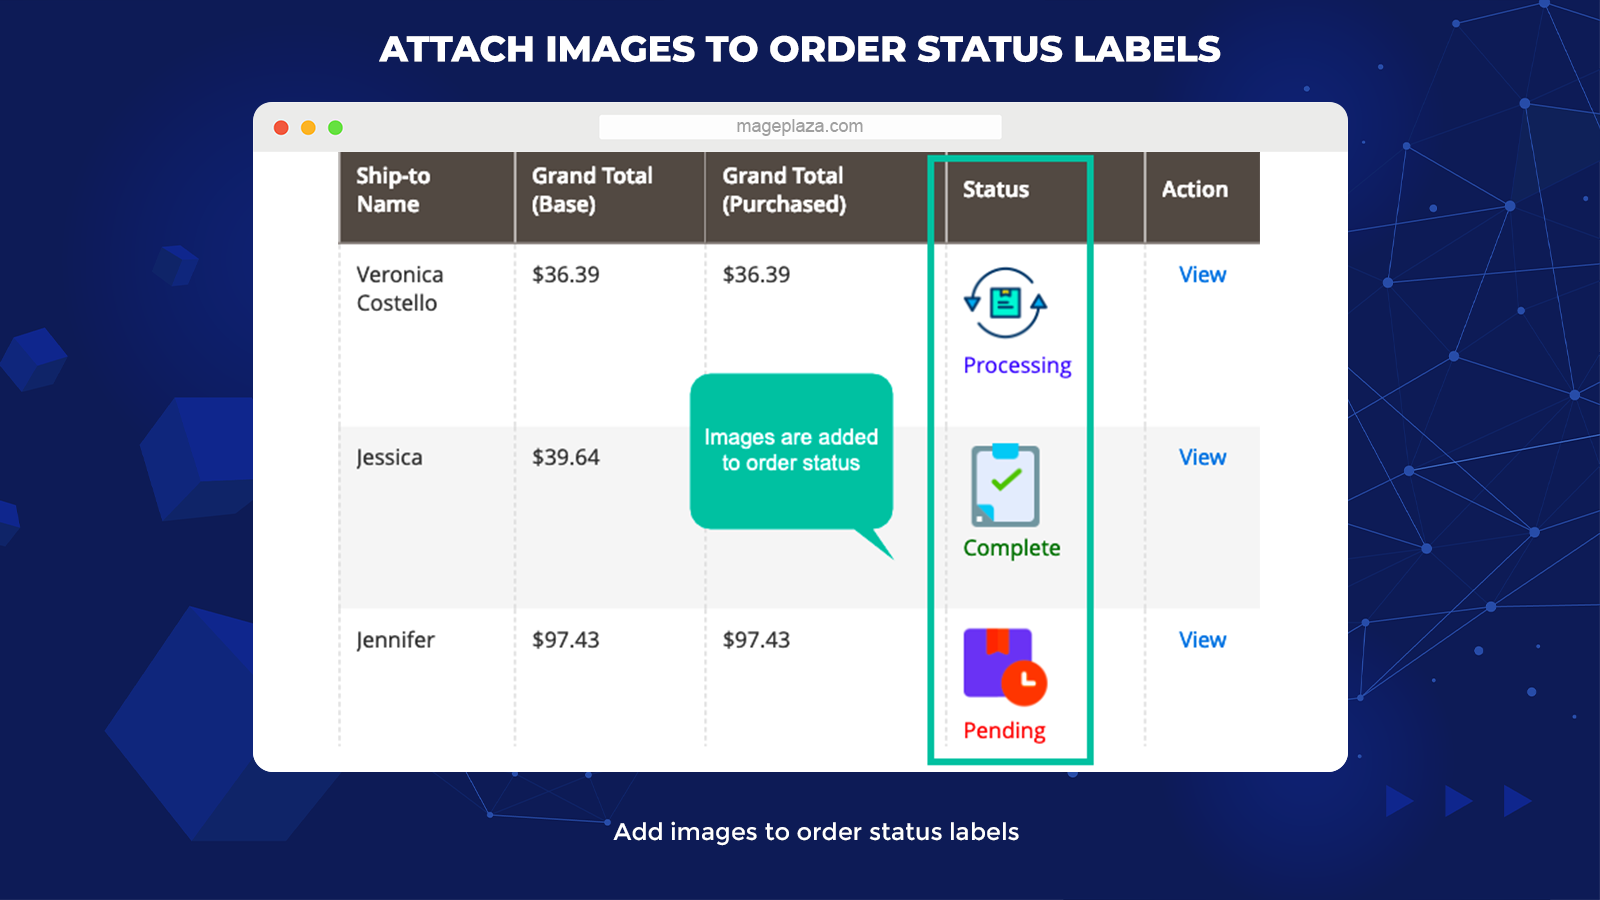
Not only can store admins change the text colors to customize their order labels, but the extension also allows them to modify the labels using icons and images.
For instance, you can add a clock icon to refer to the “Pending” status or a check icon near the “Complete” status.
This feature enables you to search for any order on the Order Grid based on its current status quickly.
Additional features of Mageplaza Order Labels:
- Change labels via pop-up: Admins can easily change the current label setting via configuration pop-up
- Sort order for the Label: Allow setting the order for labels at the pop-up
- Multiple labels per order: Admins can attach various labels for an order
Backend
General configuration

The first thing you need to do in order to use the Mageplaza Order Labels and configure it at the backend is to open Stores > Configurations > Mageplaza Extensions > Order Labels > General Configuration.
Then select Enable = Yes to activate the module.
For the Label’s Columns, the admins can set the following Label’s characteristics
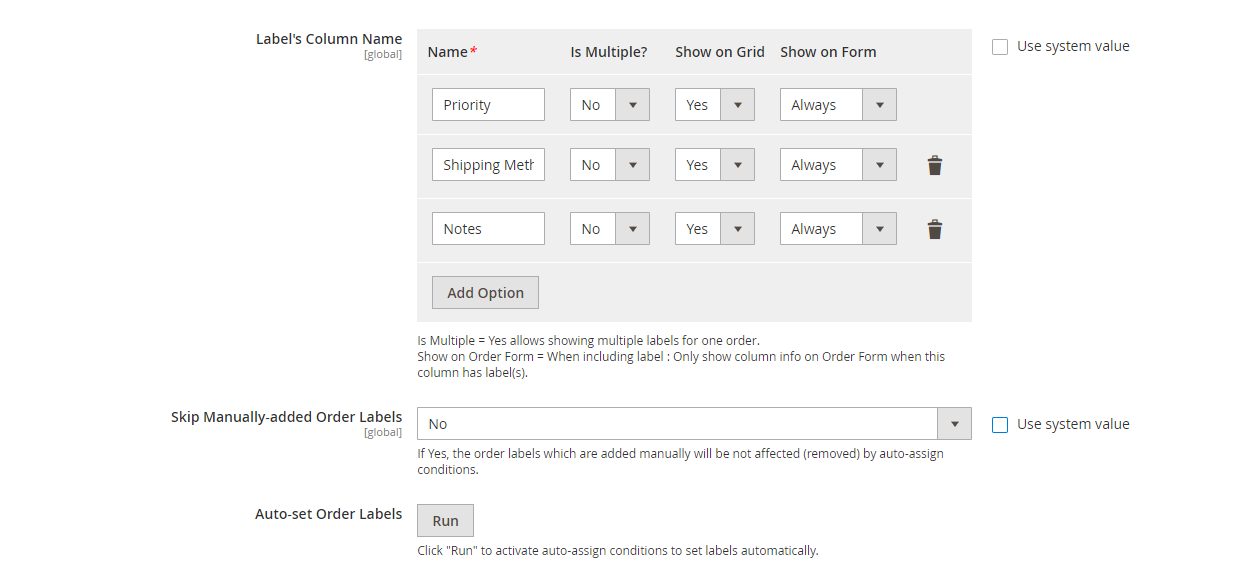
- Name: Set the name of the column that will contain Label (Required field)
- Is Multiple = Yes: you can show many label types on a column for an order
- Show on Grid = Yes: The Column will be shown on the Order Grid
- Show on Form: Choose the position you want to display Column to Order Form, if
- Show on Form = Alway: Always display Column to Order Form
- Show on Form = Only has Label: Only display Column to Order when the Label is available for Column
- Show on Form = No: Do not display Column to Order Form

For the Skip Manually-added Order Labels, if:
- Choose Yes: The manually added Labels will not be affected by the Auto-set labels
- Choose No: The manually added Labels are still deleted if the order status can not satisfy the condition of Auto-set labels
Finally, select Auto-set Order Labels = Run to enable auto-set labels for columns at the order grid.
Management Grid Labels

To open the Labels Grid at the backend, choose Sales > Order Labels > Manage Labels.
Here, you can see the Order Labels that come with all the labels’ most important information such as ID, Name, Column, Sort Order, Action, and so forth.
Some actions you can do with the labels on the Grid:
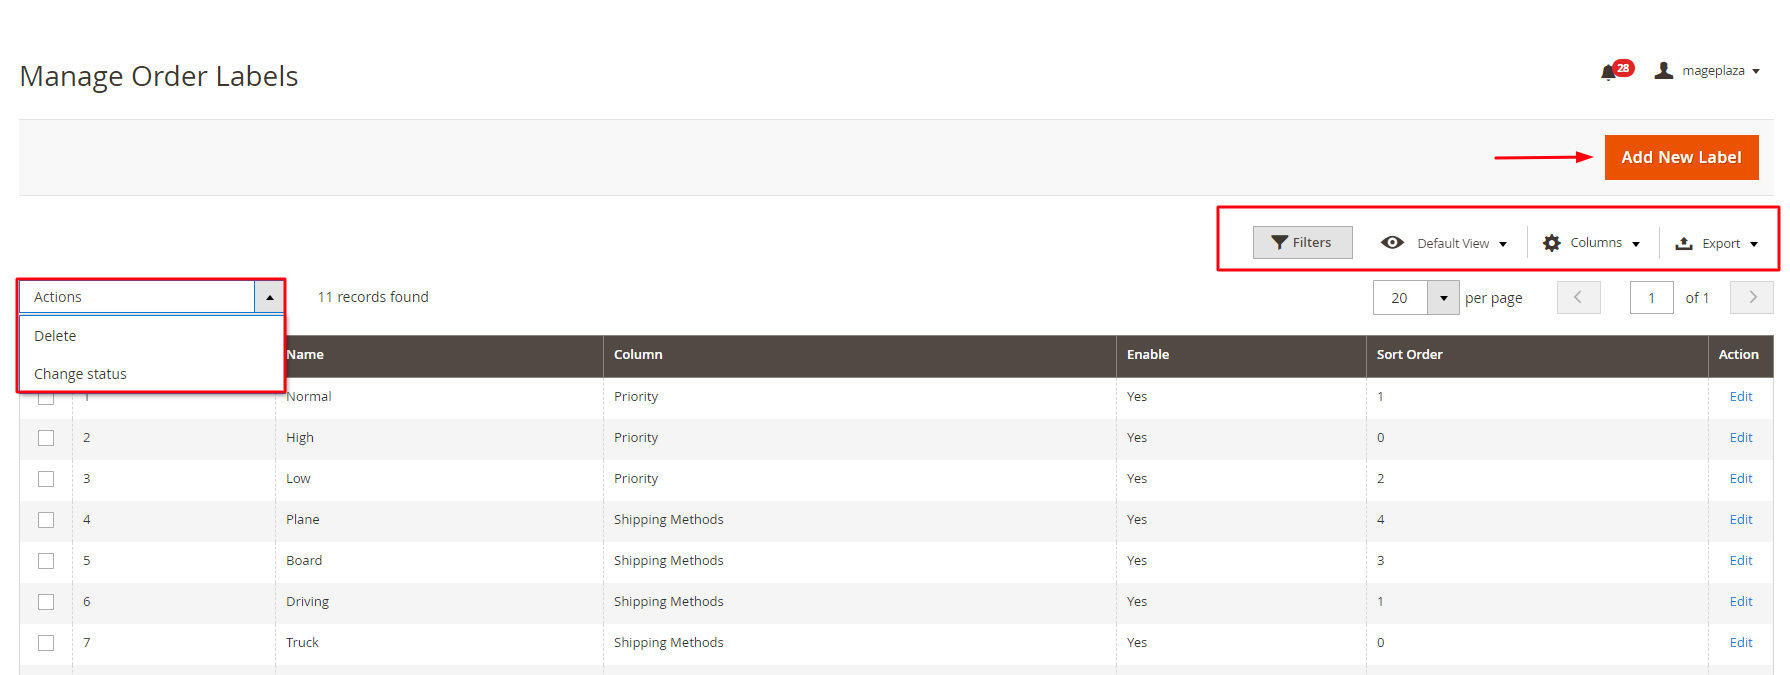
- Delete: Pick the Order Labels you want the system to delete
- Edit: Move your mouse to the Action column and choose Edit on any label you want to make the changes. And the system will redirect you to the previously created Order Label page
- Create New Label: Click on the Add New Label button to create a new Order Label
- Filter, Sort, Search Order Labels: Other choices of Order Label configuration you find on the Order Label menu
Create/ Edit Label
General setting
Firstly, click on the Add New Label button on the Manage Labels page. Then you will be navigated to the Create New Label page.
This is where you set up the display and other important information for the new labels.
For the General Tab:

- Name: Fill in the name you want to call the Label (Required field)
- Code: Insert in this field the code/symbol for Label
- Enable = Yes: Allow the system to display Label on the column
- Select Column: Choose the column you want to display the Label. The column list will be taken from the Configuration section
- Sort Order: Set the display priority of the new Label compared to others in a column (This field is only available if Is Multiple in the Configuration section is enabled)
For the Display Tab:

- Display on: Select a position to display the Label. Admin will have two options for this field (On the Admin Grid and Admin Form)
- Display Type: Choose the types you want the Label to be displayed. The system offers you 4 display types for any Label (Image Only, Text Only, Image + Text, and Text + Image)
- Select Image: Pick the image you want to represent Label. (We recommend you to use a picture of 150×50 px size)
- Background Color: Select the Label background-color
- Text Color: Select the colors for the Label text
Auto Assign Condition

On the Auto Assign Label section, you need to select Use Auto Assign Label = Yes to use this feature.
Then, you need to set the conditions so that the system will automatically assign your newly created Label to the order that satisfies the selected conditions.
Order Status
Order Status Grid
In order to view the order status list, from Admin Panel, choose Stores > Setting > Order Status

From Order Status, you can view the most essential information of Order Status such as Status, Status Code, Default Status, Visible on Storefront, Display, Action.
On the Action column, you can click Unassign in order to unassign the order status. Furthermore, store admin can also do other actions like Filer or Search Order Status.

Create New/ Edit Order Status
To create new order status, move to Stores> Settings> Order Status> Create New Order Status.

In case you want to Edit any previous order status, click on the Order Status you wish to make changes and start editing.
Order Status Information and Store View Specific Labels

- Status Code: Insert in this field the Status Code (A required field)
- Status Labels: Fill in the Status Labels (A required field)
- Store View Specific Labels: Select Store View to display your Labels
Display

- Use Custom = Yes: Enable the Customization feature. Otherwise, if you choose No for this field, all the following fields will not be shown
- Apply on: Store admins will have 3 display options for Order Status (Admin Grid, Admin Form, and Frontend Order View). This field won’t appear if Use Custom = No
- Display Type: Choose the type of Label to display. You will get 4 options for Label display types, including Image Only, Text Only, Image + Text, and Text + Image (Only appear if Use Custom = Yes)
- Select Image: Pick an image to display the Order Status
- Background Color: Choose the background color for the Status name
- Text Color: Choose the text colors
Order configuration
Order Grid
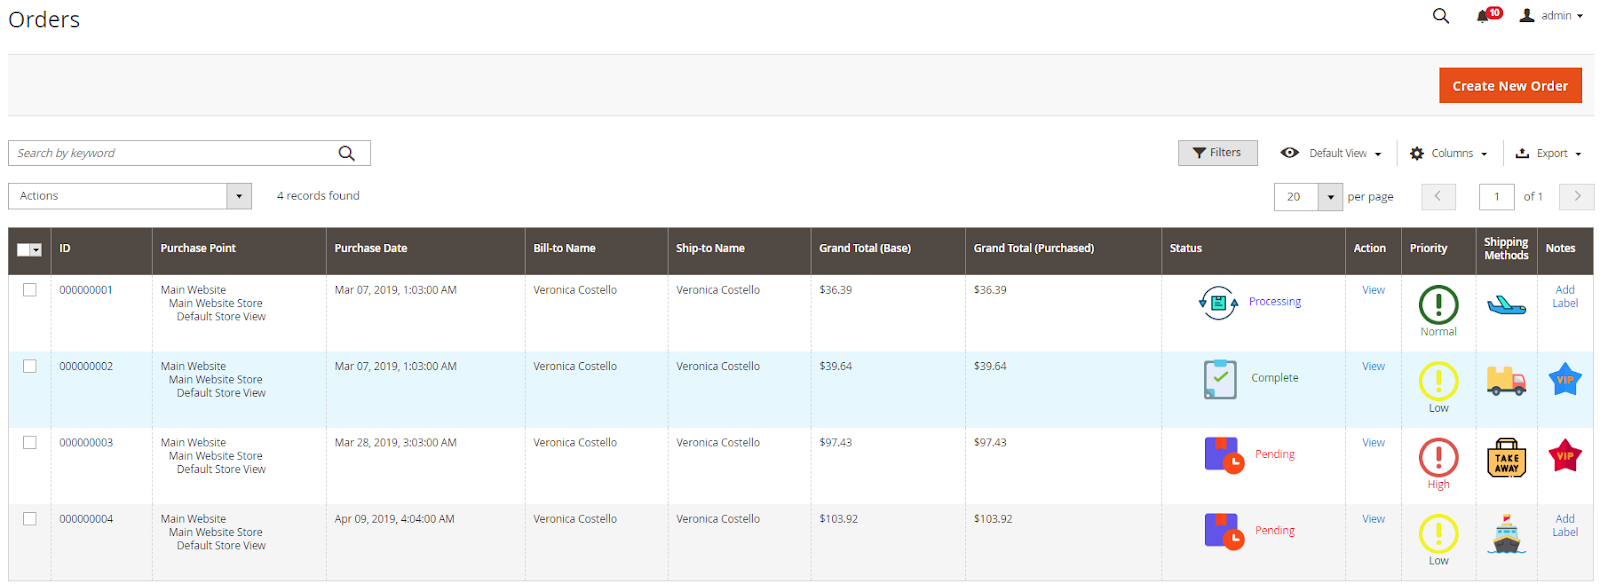
You can see the Order Grid by choosing Sales > Operations > Orders from the backend.
All the Label’s statues you created before will appear in the selected columns in the Order Grid.
Moreover, if you want to edit any label right from the Gird, you just need to move your mouse to the Notes column and click on the Add Label. Then a pop-up will appear for you to edit the selected Label.

Order View
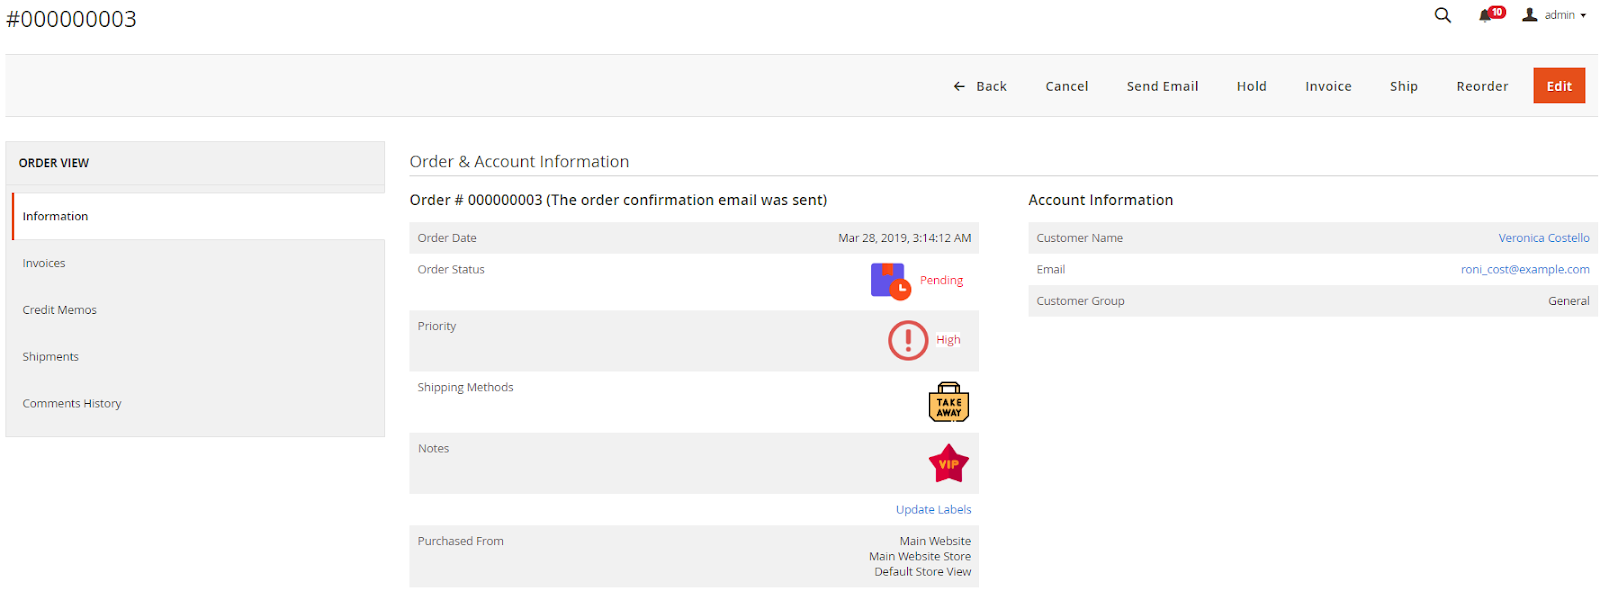
From a record of an Order, click on View in the Action column so that you can view the Order information.
The Information tab will display the complete information of the order. If you want to update the status of the Label, click Update Labels to edit.
Frontend
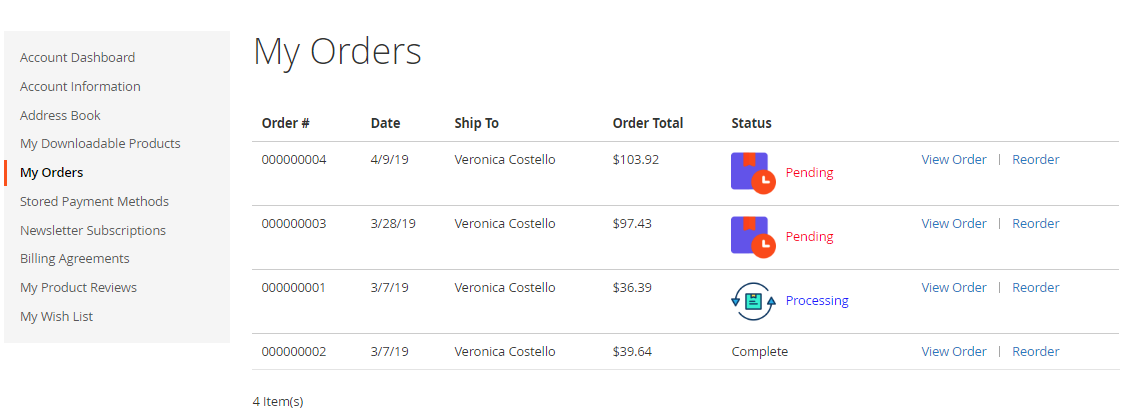
Order Labels display in the Order list
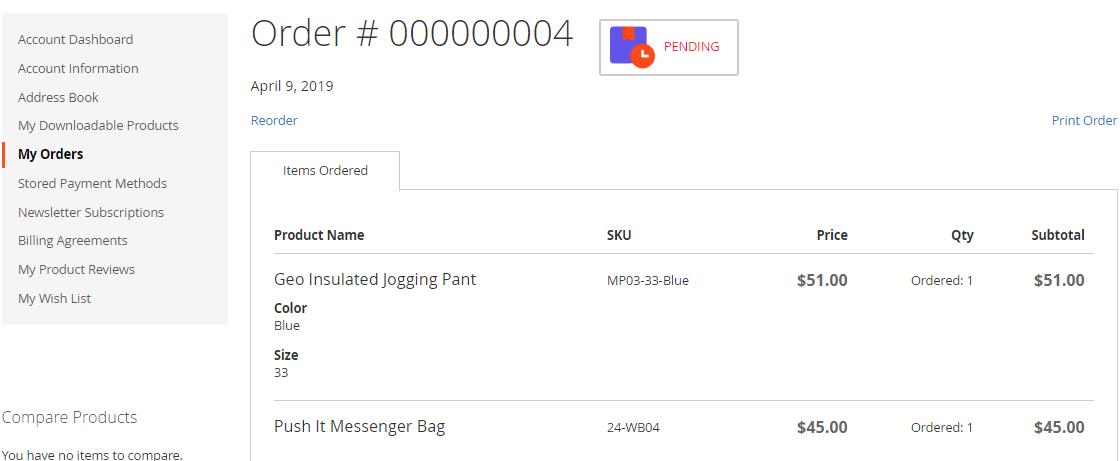
Order Labels display in the Order Detail form
Wrap up!
In conclusion, if you are searching for an extension that helps you clarify all the orders at the backend, Mageplaza Order Labels for Magento 2 will be a great choice.
Integrating the auto-assign feature and several display options for order labels, this module can help you have better descriptions of order information from the backend.
GET YOUR DISCOUNT: Use coupon code FIREBEAR to receive a 10% discount when purchasing.
Get Magento 2 Order Labels Extension by Mageplaza


