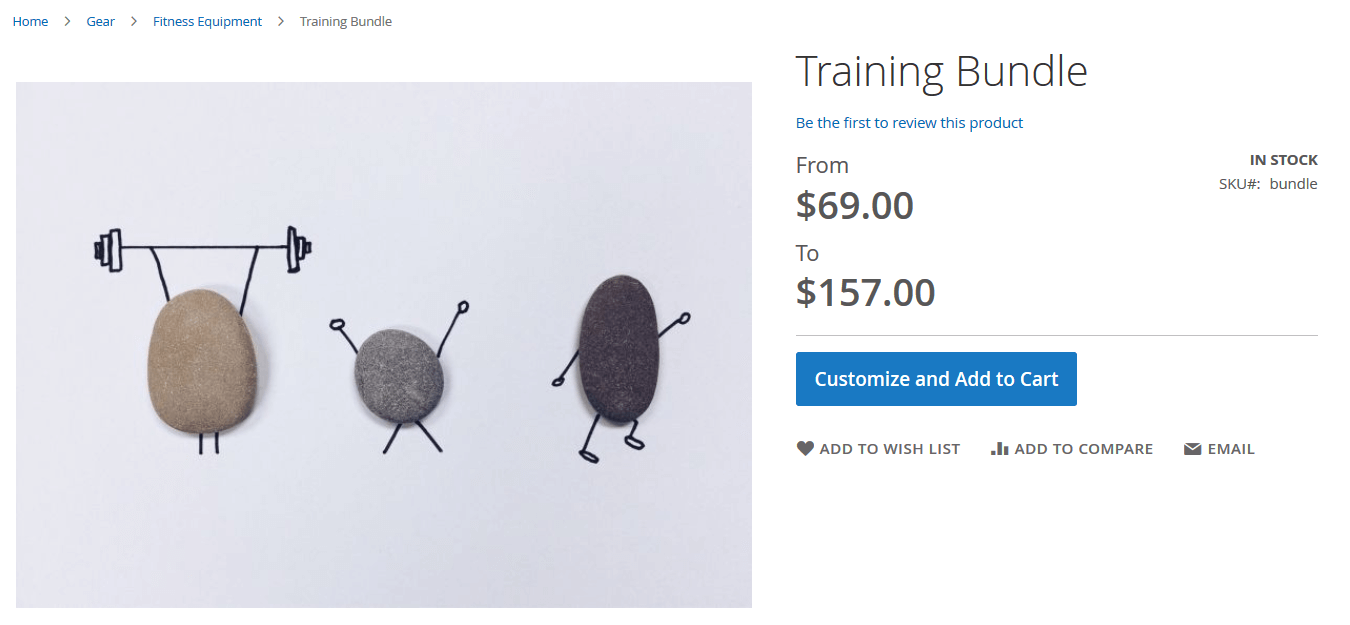
Magento 2 delivers several types of complex products. While configurable items are the first thing that comes to mind in this case, you may also leverage product bundles. Magento 2 bundle products are designed to provide customers with an additional creativity level and exceptional freedom. With this product type, they can create their own item sets from the available options. And while buying bundled products is intuitive and doesn’t differ much from other e-commerce purchases, managing them in the Magento 2 admin is a quite complex routine that needs additional elucidation.
In this guide, we show how to create bundle products and how to import such products to the Magento 2 catalog. The article guides you through the explanation of what bundle products are, focussing on various nuances of this product type. After that, the topic of the publication shifts to another vital aspect: we explain how to create bundle products in Magento 2. The last section of this blog post is dedicated to the bundle product import to Magento 2. It describes specific attributes associated with bundle products and sheds light upon other nuances of transferring items of this type to your e-commerce website. Also, we provide a separate chapter that describes how to import bundle products to Magento 2 from Google Sheets.
 ‘
‘
Table of contents
The complete guide to the bundle products and how to import them continues the line of blog posts for Magento 2 import/export guide list. Each post in the line either covers a particular product type or offers a complete guide to a procedure. Here is a full list of posts:
As it has been mentioned above, the bundle products let customers compose their own set of items. Say a camping set, where customers select a tent for two, three or four persons, decide if they want a boat included, and polish it all with a grill of their liking. Basically, instead of visiting three separate product pages, customers can get ready for camping from a single page.
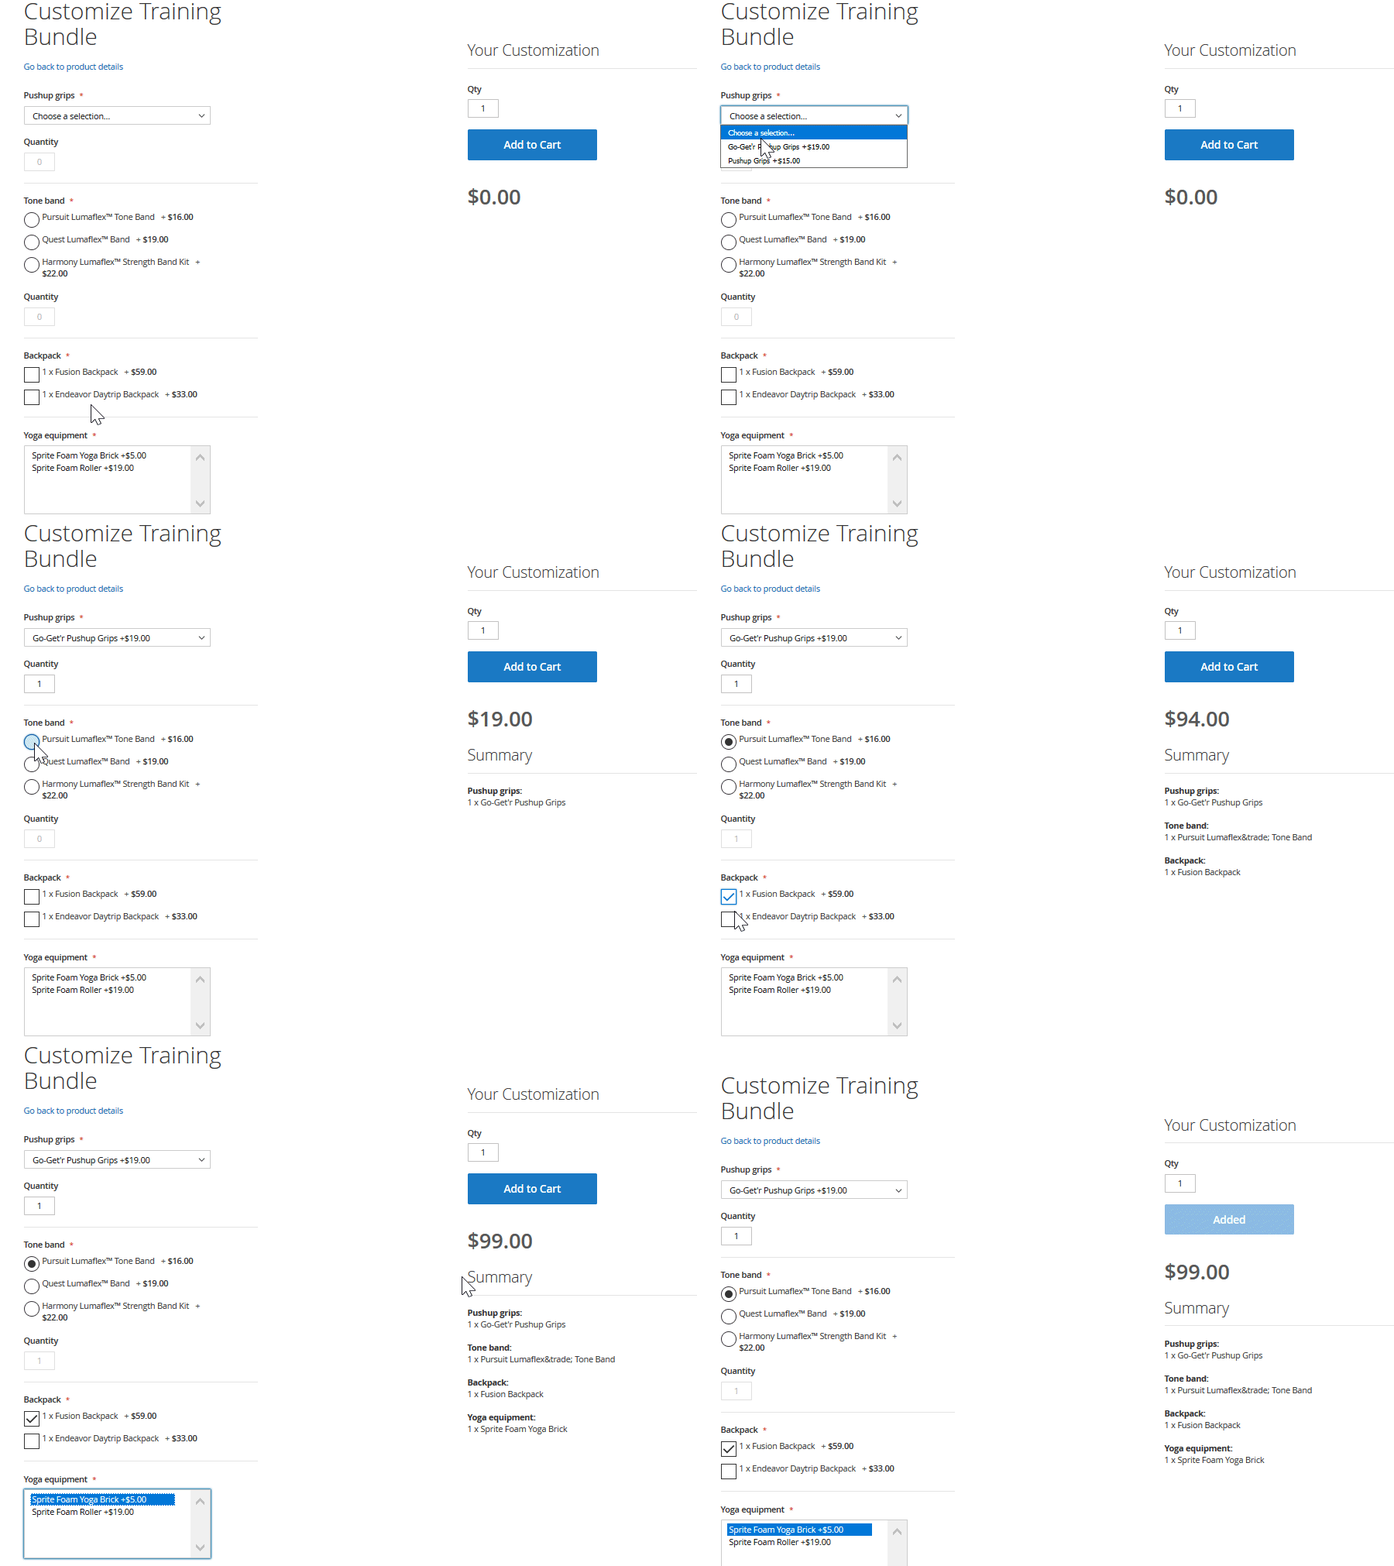
Bundle products are similar to grouped and configurable products in how they work. All three complex product types combine simple products to offer a customer better shopping experience. The main difference is in how the products are delivered to the screen. Configurable products offer multiple variations of a single product, like different colors. Grouped products provide a pre-composed set of products, without variations. Bundle products offer a set of products with variations, unique prices, shipping, and quantity.
Before creating bundle product we first need to make sure that we have created all the simple products that will be assigned to it. In other words, we are not creating a single product; we are first creating products that will be used in the bundle, then we create a bundle.
With simple products, I believe everything is clear. This is the most basic Magento 2 product, and you should be already familiar with it.
Now you should know some of the facts about the bundle products:
- Products composing a bundle can be shipped either separately, or as a bundle;
- Bundle product price can be composed as a total of all selected simple products, or you can set up percent and flat values to be added to the simple product prices;
- Bundle product can assign dynamic SKU suffix to all simple products sold as a part of it. Basically, it will add an SKU of a parent bundle to each simple product at the order details page. This can be helpful if you also sell simple products included in the bundle separately.
So, let’s move directly to bundle products and navigate to Catalog > Products screen. Here, we click Add Product > Bundle Product.
Most of the product attributes available at the bundle product screen can be found within a simple product. To shorten the guide, we will omit such attribute and will only explain how the bundle-specific attributes work.

Dynamic SKU adds the simple product SKU as a suffix to the SKU of the bundle products. The suffix is added to the order details page for quick reference and helpful reporting data.
Dynamic Weight – if enabled the bundle weight is calculated as a total weight of all simple products selected by a customer. If disabled you can specify a set weight manually.
Dynamic price – if enabled the bundle price is calculated as a total of all simple products customer purchases within a bundle. If disabled you can specify flat bundle price and add either flat or percent value to each simple product included in the bundle.
For example:
The bundle product has a set price of $123. Four simple products are included in the bundle:
- Two products with fixed price of $20 and $30;
- Two products with percent price of 5% and 10%. The percent is applied to the price of the bundle product, meaning 5% will be $6.15 and 10% will be $12.30.
Then the total price of the bundle product will be calculated on the following pattern:
Bundle Price + Prices of the selected simple products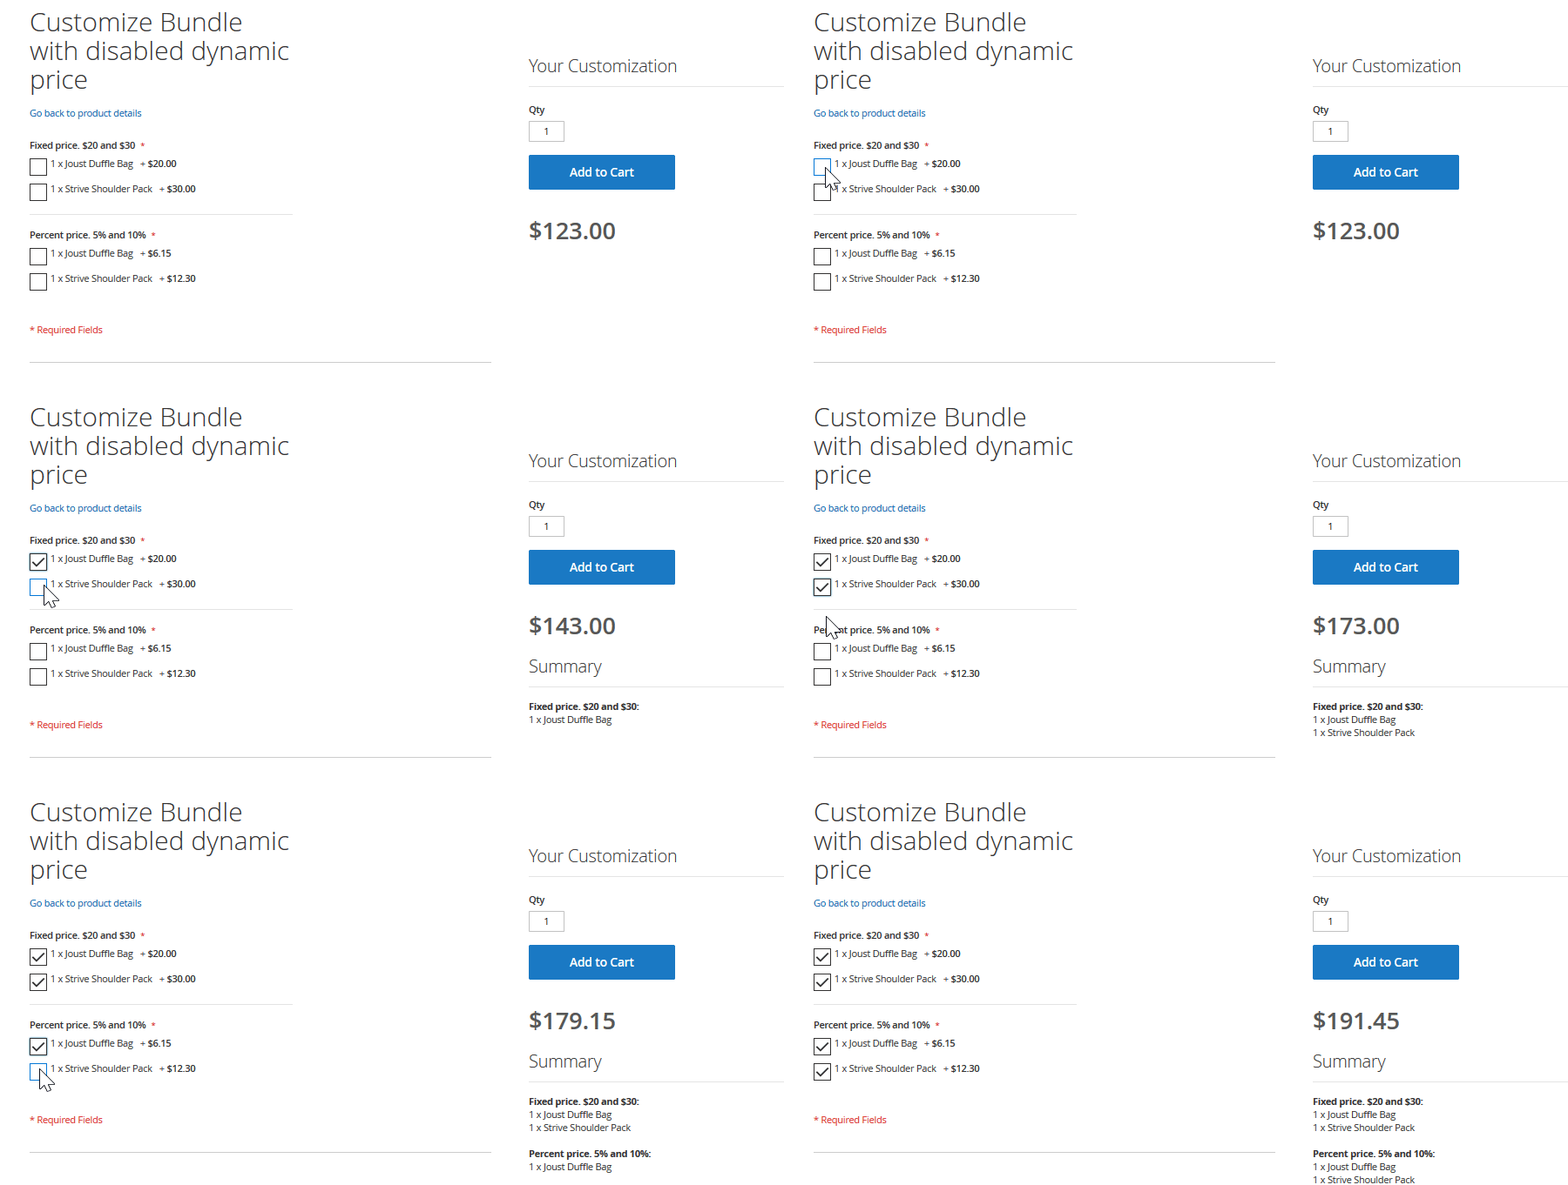
As you can see, the simple product prices we have set manually are added to the set bundle price of $123.
Now, as we are clear with the general bundle product attributes it is time to assign simple products. This can be done from the Bundle Items section.
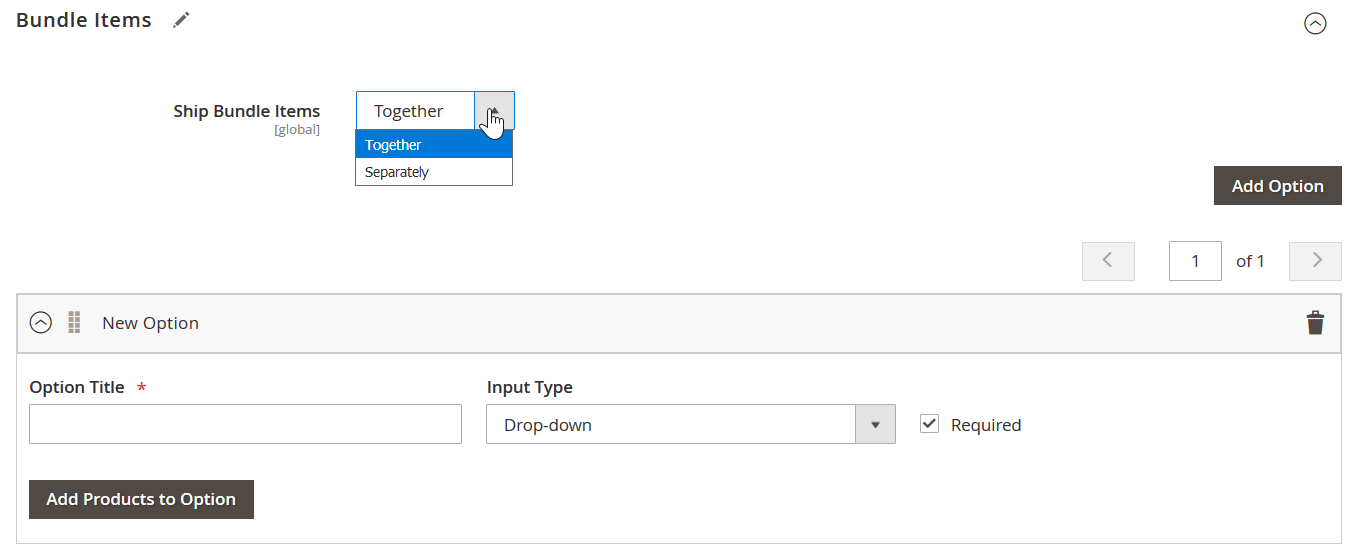
Here, you decide how you want the items shipped, either all itms together, or every item from the bundle will be shipped separately.
Then, we can add the options to the bundle product by clicking ‘Add Option’ button. The option is somewhat of a group within a bundle. You can have several multiple options assigned to each bundle, like in the example with tents and boats.
When the option is added, you can add the simple products by clicking ‘Add Products to Option’ button.
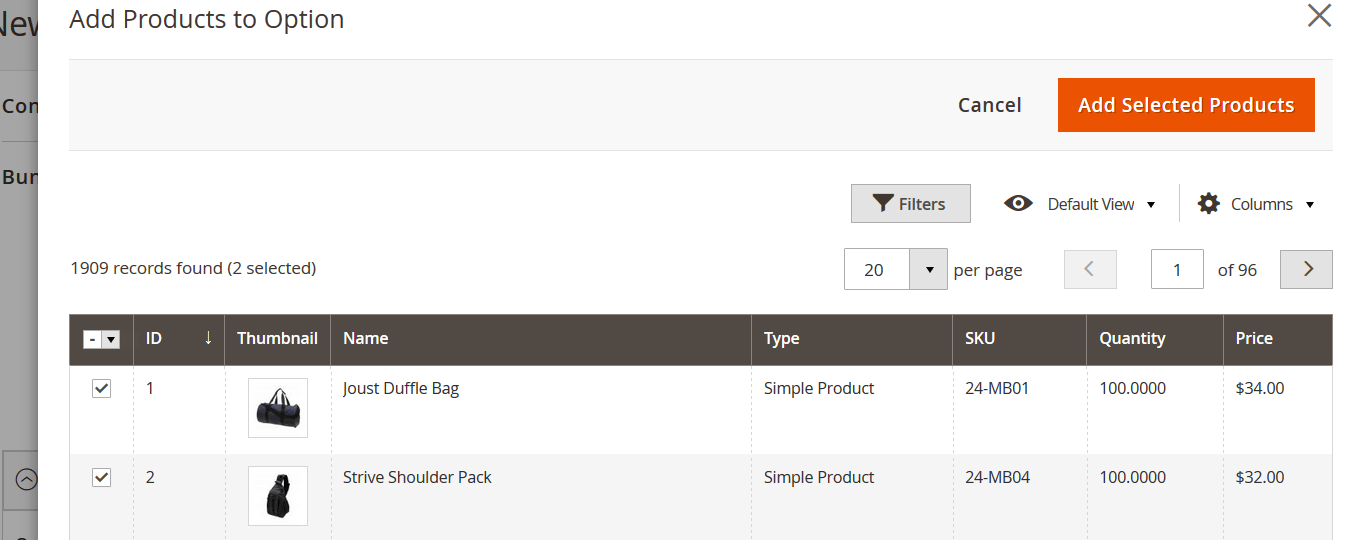
At the Add Products to Option grid, you are represented with the product catalog, where all created products can be found. By applying necessary filters, you can find the simple products you want to be assigned to the option. When done, click ‘Add Selected Products’ button to proceed.
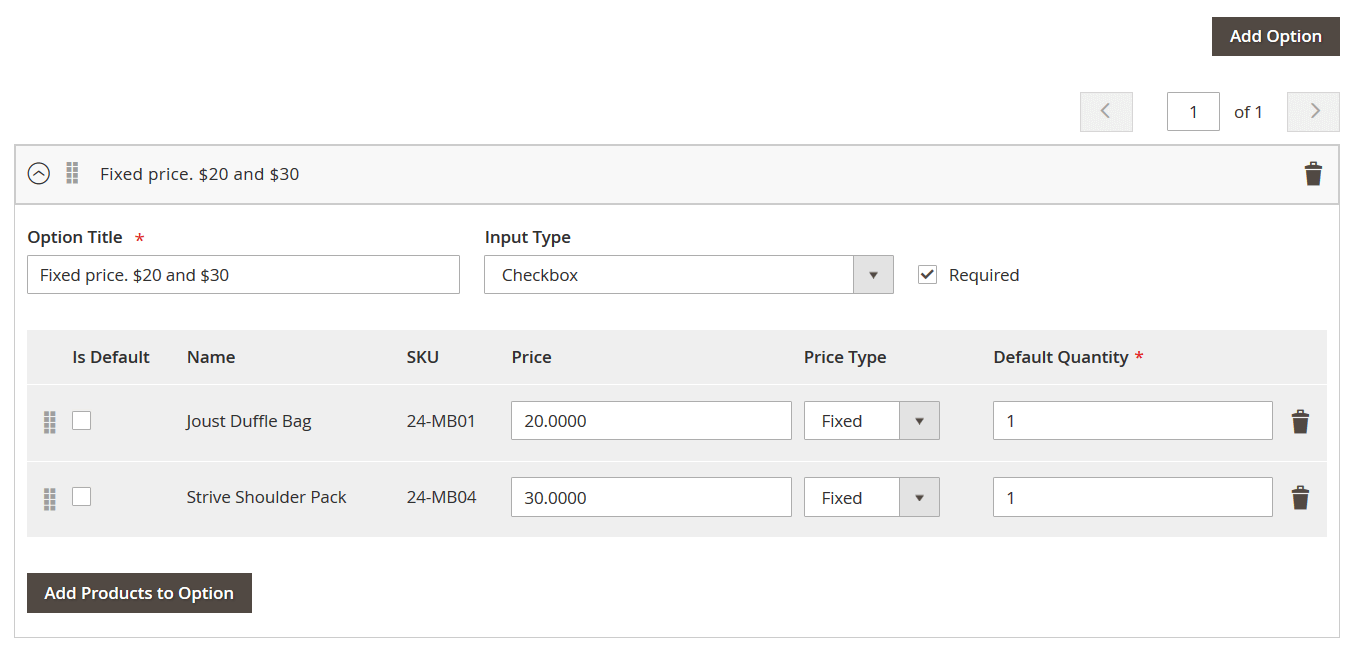
When the products are added, it is time to edit the option. The Input Type for a customer can be:
- Dropdown;
- Radio buttons;
- Checkbox;
- Multiple select.
With Is Default checkbox you can define which products will be pre-selected when the bundle page loads.
Then, if Dynamic Price option is disabled, you can specify the Price of the selected simple products, and define the Price Type: fixed or percent. If Dynamic Price is enabled, Price and Price Type fields will be missing, and set prices of simple products will be used instead.
Next, you can set up Default Quantity. It defines how many simple products will be included in the bundle by default. This can be useful depending on the wares or services you offer.
When done with setting up simple product attributes, you can either add another bundle option or save the product.
Congratulations! You have just finished creating a bundle product.
Before going in depths of import procedure, we strongly advise reading through the Complete Guide to Magento 2 product import/export. In this guide, you will learn basics of product import and export procedures and will learn how to format the CSV table, how to compose the attributes and fill all necessary information.
In this very article, we will focus on the bundle product-specific attributes and will learn how to import bundle products to Magento 2 store and keep all simple product ties. Let’s get to it.
Magento 2 guidelines shed a little on the issue and in some cases shouldn’t even be trusted. For example, Magento 2 team suggests that attribute associated_skus is used to tie simple products to bundle parents; however, it is not. What attribute(s) is used then?
There are six main attributes of the bundle product that are used in the import table:
- bundle_values
- bundle_price_type
- bundle_price_view
- bundle_sku_type
- bundle_weight_type
- bundle_shipment_type
The main attribute that should ALWAYS be in the import table is bundle_values. It contains all the necessary information to tie simple child products with the bundle parent. All other attributes carry other bundle product specific values, however, if absent Magento 2 will put in default values. bundle_values attribute, however, defines how bundle options work, what products are assigned to options and covers product settings. We will break these attributes one by one and explain which values are expected from the store owner to import a fully functional bundle product.
While reading about bundle product attributes feel free to reference any values to the Master Table we have composed in the Google Sheets to make the import process more accessible. One of the sheets is dedicated to the bundle product import, it is fully functional and works like a charm with hints and product attribute description. We will talk about Google Sheet Master Table and import from Google Sheets later in this article.
bundle_values attribute
As it has been said, this is the main attribute which is responsible for tying simple products to the bundle. It is also the most complex attribute of all, as its value is composed of the several options. If your bundle product has two simple products assigned the bundle_values attribute value will look something like this:
name=Pushup grips,type=select,required=1,sku=bundle-grips1,price=10.0000,default=0,default_qty=1,price_type=fixed,can_change_qty=1|name=Pushup grips,type=select,required=1,sku=bundle-grips2,price=10.0000,default=0,default_qty=1,price_type=fixed,can_change_qty=0
It may look overwhelming on the first glance; however, it is pretty simple when you break it down. This attribute value mirrors all the settings available within the Bundle Items configuration section of the bundle product, where we have the following:
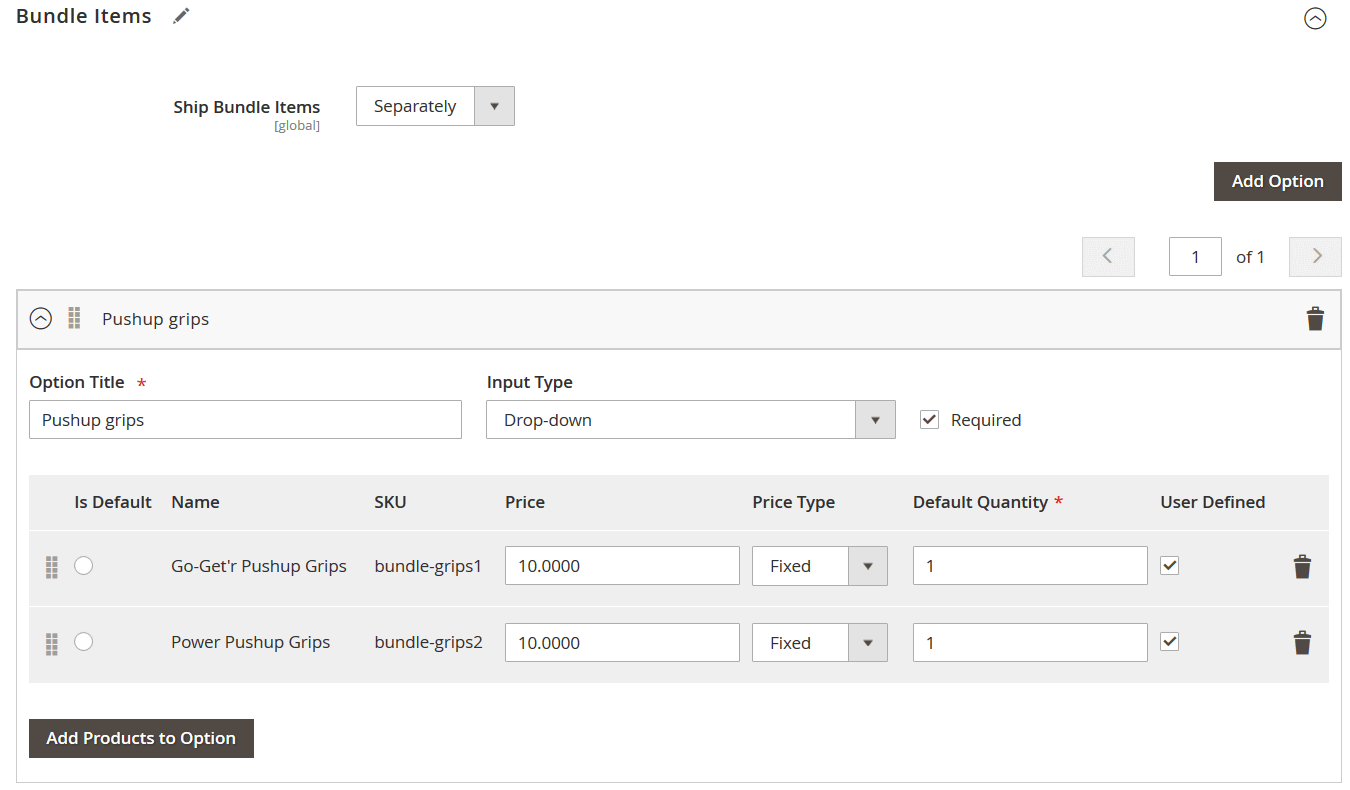
Here we have:
Option title, Input Type, Required, if simple product is pre-selected (is default), SKU of a simple product, price of a simple product, price type of a simple product, default quantity and if qty of a product is user defined. All these values go into the bundle_values attribute for EVERY simple product. Let’s draw a table of these options and their attribute values.
| Option | Attribute value | Allowed symbols | Example |
| Option Title | name | All symbols except pipe | | If you name option ‘Camping tent’, the value should read:
name=Camping tent |
| Input Type | type | For:
drop-down – select radio buttons – radio checkbox – checkbox multiple select – multiselect |
If you want customers select product from drop-down list, the value should read:
type=select |
| Required | required | 1 – option is required
0 – option is not required |
If the option is required, the value should read:
required=1 |
| Is Default | default | 1 – product is default
0 – product is not default |
If the product is set as default, the value should read:
default=1 |
| SKU | sku | All symbols available for composing product SKU | If SKU of the product is ‘ABC123’, the value should read:
sku=ABC123 |
| Price | price | Numerals only | If the price of the product is $12.34, the value should read:
price=12.34 |
| Price Type | price_type | fixed – flat price value
percent – percent value calculated from bundle price |
If the price type for simple product is fixed, the value should read:
price_type=fixed |
| Default Quantity | default_qty | Numerals only | If default quantity of the simple product is set to 10, the value should read:
default_qty=10 |
| User Defined | can_change_qty | 1 – is user defined
0 – is NOT user defined |
If you want to let users define option value quantity: can_change_qty=1
Otherwise: can_change_qty=0 |
Now that we are done with the option values, let’s copy all the examples from the table to compose them together. When done we will see how a single simple product assigned to the bundle will look like in the bundle_values column of the import table:
name=Camping tent,type=select,required=1,default=1,sku=ABC123,price=12.34,price_type=fixed,default_qty=10,can_change_qty=1|
As you can see we used comma to separate attribute values and pipe to end the line. After the pipe we can add another simple product in the same pattern.
Now let’ actually read what have we got in the attribute. We have Option Title ‘Camping tent’, and customers will select from the drop-down, this option is required, and this simple product is default, it is ABC123 simple product, with price of $12.34, the price type is fixed and default quantity is set to 10, and customer can adjust the product quantity. Simple huh?
Now what you should remember:
- Option values are separated by comma: name=123,sku=321,…;
- Products are separated by pipe symbol: …,default_qty=10|name=123,…
- If bundle Dynamic Price is enabled you don’t need price and price_type values. If Dynamic Price is disabled make sure to include price and price_type values.
- If you do not want customers to define product quantity set can_change_qty to ‘0’.
That’s pretty much it, now you can fill in bundle_values for your import table properly. If you still have any questions – make sure to leave a comment in the end of this article.
bundle_price_type
This bundle product attribute defines whether Dynamic Price is enabled or disabled. The allowed values are:
- dynamic – means that the Dynamic Price is enabled;
- fixed – mean that the Dynamic Price is disabled.
bundle_price_view
This bundle product attribute defines how the price of the product will be displayed. The allowed values are:
- price range – from the lowest possible bundle total to the highest. For example: $100-$200.
- as low as – only the lowest possible bundle total will be displayed.
bundle_sku_type
This bundle product attribute defines how the SKUs of the simple product will be composed. The allowed values are:
- dynamic – the SKU of the simple product will be added as a suffix to the bundle product SKU to allow more precise reporting data;
- fixed – only the SKU of a parent bundle product will be displayed on the order details screen.
bundle_weight_type
This bundle product attribute defines how the weight of a bundle product is calculated. The allowed values are:
- dynamic – the weight of the bundle product is calculated as a total of all simple products selected by customer;
- fixed – the weight of the bundle product is always the same and is inputted manually.
bundle_shipment_type
This bundle product attribute defines how the items of a bundle product are shipped. The allowed values are:
- together – all items will be shipped to the customer together in a single parcel;
- separately – items of the bundle product will be shipped to customer separately.
The import procedure of bundle products can be enhanced with the help of Magento 2 Improved Import and Export extension by FireBear Studio. The extension allows to schedule the import and export jobs, allows import from a variety of sources and comes with the table and attribute mapping functionality.
What is also important the extension support import from Google Sheets, and we would like to share with you the Google Sheet Master Table.
Google Sheet Master Import Table for Magento 2
[embedded content]
In the Master Table, we have composed a dedicated table for Bundle Product import. In this table, you can see all the main attributes of the bundle products, how to fill in product attributes, and can use this table as a draft for your import table.

Every product attribute in the table comes with the description and hints on which values are expected from the store owner. If you are new to Magento import procedure or want to make sure your clients understand which values are expected from them, feel free to use the table. It is completely FREE!
So, this is it for Magento 2 bundle products guide. We hope that you have found lots of useful information and your questions have been answered. If still any questions – feel free to leave a comment.
Below, you can see other tips on how to manage Magento 2 bundle products in your admin.
How to import bundle products to Magento 2 automatically?
If you need to transfer bundle products, products of other types, or even other entities to Magento 2 on a regular basis, it is necessary to install a third-party tool, described in the last chapter of this article. Unfortunately, the default import/export solutions don’t let you create import jobs that run on schedule. Therefore, we recommend you use the Improved Import & Export extension to import bundle products to Magento 2 automatically. The extension leverages cron so that you can create a schedule of updates.
How to import bundle products to Magento 2 from external systems?
While the default Magento 2 import solution prevents the import of third-party data that doesn’t follow the system’s requirements, you can use the Improved Import & Export extension to circumvent these restrictions. The module lets you create a mapping scheme matching any external values to the default Magento 2 attributes. Consequently, any external data is easily adapted to the native standards of your e-commerce website. The most intriguing aspect is that you do everything right in your admin. Otherwise, you need to edit your data files following the specific bundle product attributes and other requirements described in this article.
How to import bundle products to Magento 2 via API?
By default, Magento 2 doesn’t let you import any entities using API integrations. You need to leverage the Improved Import & Export Magento 2 extension to transfer bundle products to Magento 2 via API. Our extension lets you create the connection between the two systems transferring the items of this product type. Any import job provides an interface where you can specify the parameters necessary for creating a flow of data.
How to import bundle products to Magento 2 via ODS files?
If the bundle product data is stored in an ODS file, you no longer need to convert it to a CSV file to fit the Magento 2 requirements. With the Improved Import & Export Magento 2 extension, it is possible to import ODS files with any entities including bundle products to your ecommerce website without any necessity to run the conversion.
How to import bundle products to Magento 2 via XLSX files?
If the bundle product data is stored in an XLSX file, you no longer need to convert it to a CSV file to fit the Magento 2 requirements. With the Improved Import & Export Magento 2 extension, it is possible to import XLSX files with any entities including bundle products to your ecommerce website without any necessity to run the conversion.
How to import bundle products to Magento 2 via JSON files?
If the bundle product data is stored in an ODS file, you no longer need to convert it to a CSV file to fit the Magento 2 requirements. With the Improved Import & Export Magento 2 extension, it is possible to import JSON files with any entities including bundle products to your ecommerce website without any necessity to run the conversion.
How to import bundle products to Magento 2 via compressed files?
If the bundle product data is stored in a file archive, you can also transfer it to Magento 2 with the help of the Improved Import & Export extension. However, there are two requirements to follow. Firstly, your compressed file should be tightened following a ZIP or TAR format. Secondly, the compressed data should be stored in a CSV, XML, ODS, XLSX, or JSON file.
How to import bundle products to Magento 2 from Google Sheets?
Use the Improved Import & Export extension and follow the guidelines described in this article to import bundle products to Magento 2 from Google Sheets.
How to import bundle products to Magento 2 from Dropbox?
In addition to Google Sheets, the Improved Import & Export module lets you transfer bundle products to Magento 2 from Dropbox. Your data should be stored in CSV, XML, ODS, XLSX, or JSON. Note that files of these types can be compressed in a ZIP or TAR format.
How to import bundle products to Magento 2 from Google Drive?
In addition to Google Sheets and Dropbox, the Improved Import & Export module lets you transfer bundle products to Magento 2 from Google Drive. Your data should be stored in CSV, XML, ODS, XLSX, or JSON. Note that files of these types can be compressed in a ZIP or TAR format.
 ‘
‘


