
What are Shopify products, you will ask? Well, they include all the familiar things that any online storefront can sell. Various physical items, digital downloads, services, and gift cards are your Shopify products.
How to add products to Shopify? That’s another important question every merchant new to the platform asks. The process is fairly simple. You only need to provide product information and submit product photos to add a product on Shopify. And for each combination of options for your product, such as size or color, you can create a variant. Then, you can make a product available to one or more of your sales channels. It is possible when you are adding or modifying it.
Alternatively, you can add products to Shopify by importing them. And this functionality is delivered with the default tools! So, it is possible to import products to Shopify in a matter of a few clicks from the Product page in your Shopify admin, where you can also browse, add, edit, and manage all of your products and variants.
In the following article, we explore all these procedures. You will learn how to add products on Shopify, what are the nuances of Shopify product import, how to sell digital products on Shopify, etc. We explain what product variants are and how to configure them. And, of course, there is a detailed description of each admin screen with lots of illustrations that show each process down to the smallest detail.

Table of contents
Shopify Products Page
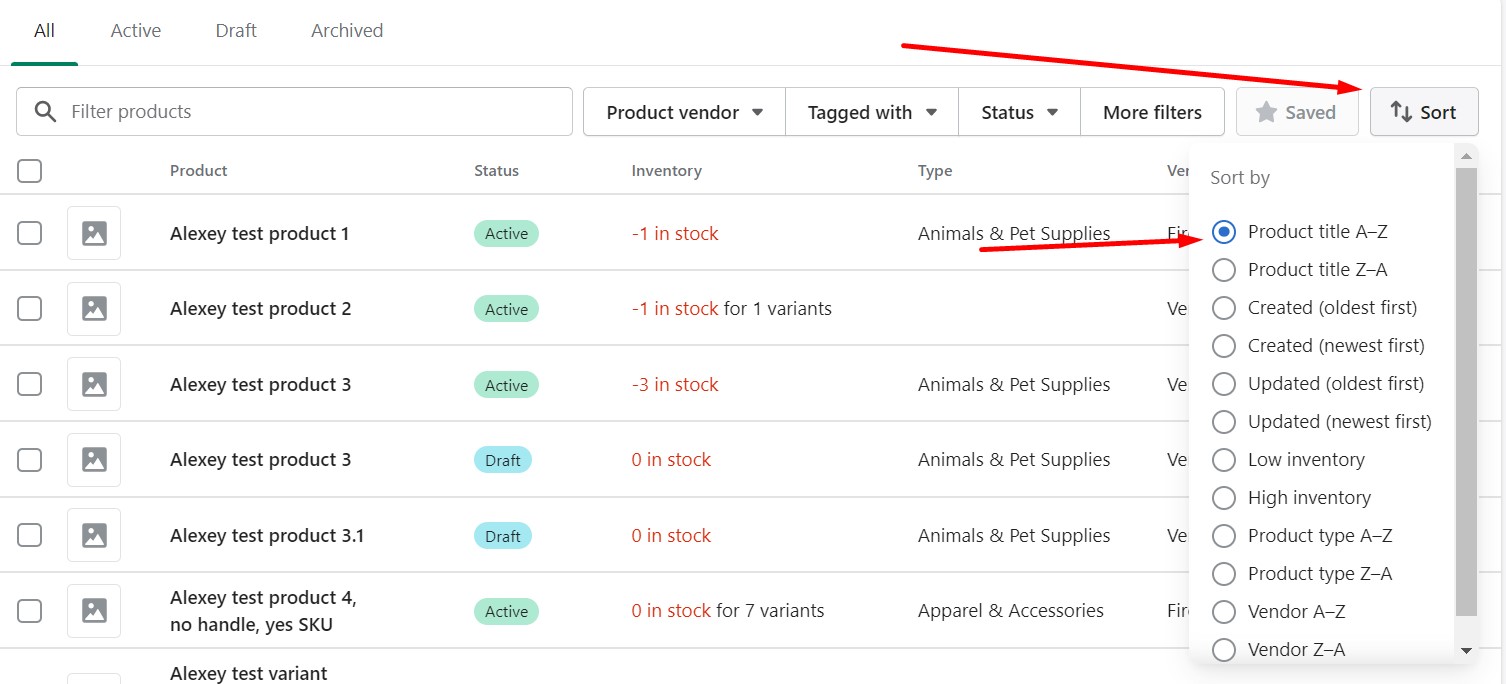
Go to Shopify’s Products section to see where all of your products are listed. There is a grid where each page consists of 50 records – products. You can sort, search, and filter the list of products to organize it and identify specific products. Your product list’s default sort order is alphabetical (from A to Z) by product name. However, you can always change it. Note that the order in which your products are classified or filtered in the Shopify Products section has no bearing on how they appear in your online store. You can only change the sort order for the products in a collection if you need to alter their storefront display.
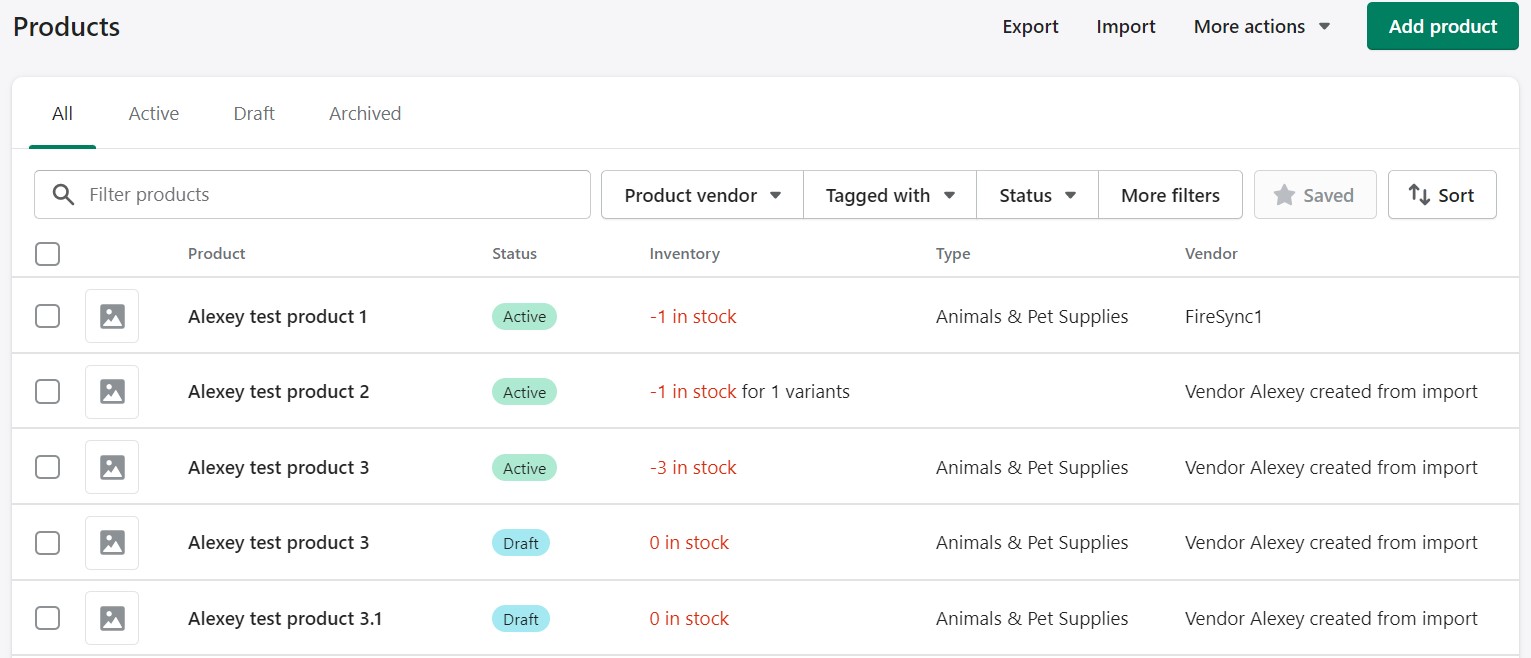
How to sort Shopify products in a product list
You can sort your Shopify products in a product list using the following parameters:
- Product name;
- Date products were created or updated;
- Inventory levels;
- product type;
- Vendor
Sort your product list to find the products that need to be updated or reviewed. For example, to see which of your products are running low in stock, you can sort your product list by inventory.
You can sort your Shopify products in a product list as follows:
- Go to your Shopify admin -> Products;
- Click Sort;
- Choose a sort option.
How to filter Shopify products in a product list
You can narrow down the selection of records in the Shopify Products grid by applying filters to it. It can help you find the specific products that should be edited, reviewed, or updated. Use the following filter options:
- Vendor: Displays the products from the chosen vendor of products.
- Availability: Displays the goods that a sales channel has access to.
- Status: Displays products that are archived, active, or draft.
- Tagged with: Displays products that have the provided value in the “Tagged with” field.
- Type: Displays the items that fall within the chosen product type.
- Collections: Displays products that are part of a collection.
- Publishing error: If you choose a sales channel other than the online store, it displays the products that have publishing problems on it.
- Gift card: Displays the gift cards that are offered by your shop.
Let’s assume that you need to display all t-shirts available on your website, You may use the product type T-shirt as a filter. It will be simpler for you to review and edit that subset of products because only those of that type will be displayed in the product list. Note that only the items that meet every requirement will be displayed if you apply more filters. If, for instance, you use the product type T-shirt as a filter along with a gift card filter, nothing is displayed since a t-shirt cannot be a gift card.
You can narrow down the selection of records in the Shopify Products grid with the help of filters as follows:
- Go to your Shopify admin -> Products.
- Choose one or more filter options:
- Use the Product vendor, Tagged with, or Availability buttons to choose an option to display products matching it.

- If these filters are not enough, click the More filters button to open a complete list of filter categories and use another option to find the particular products.
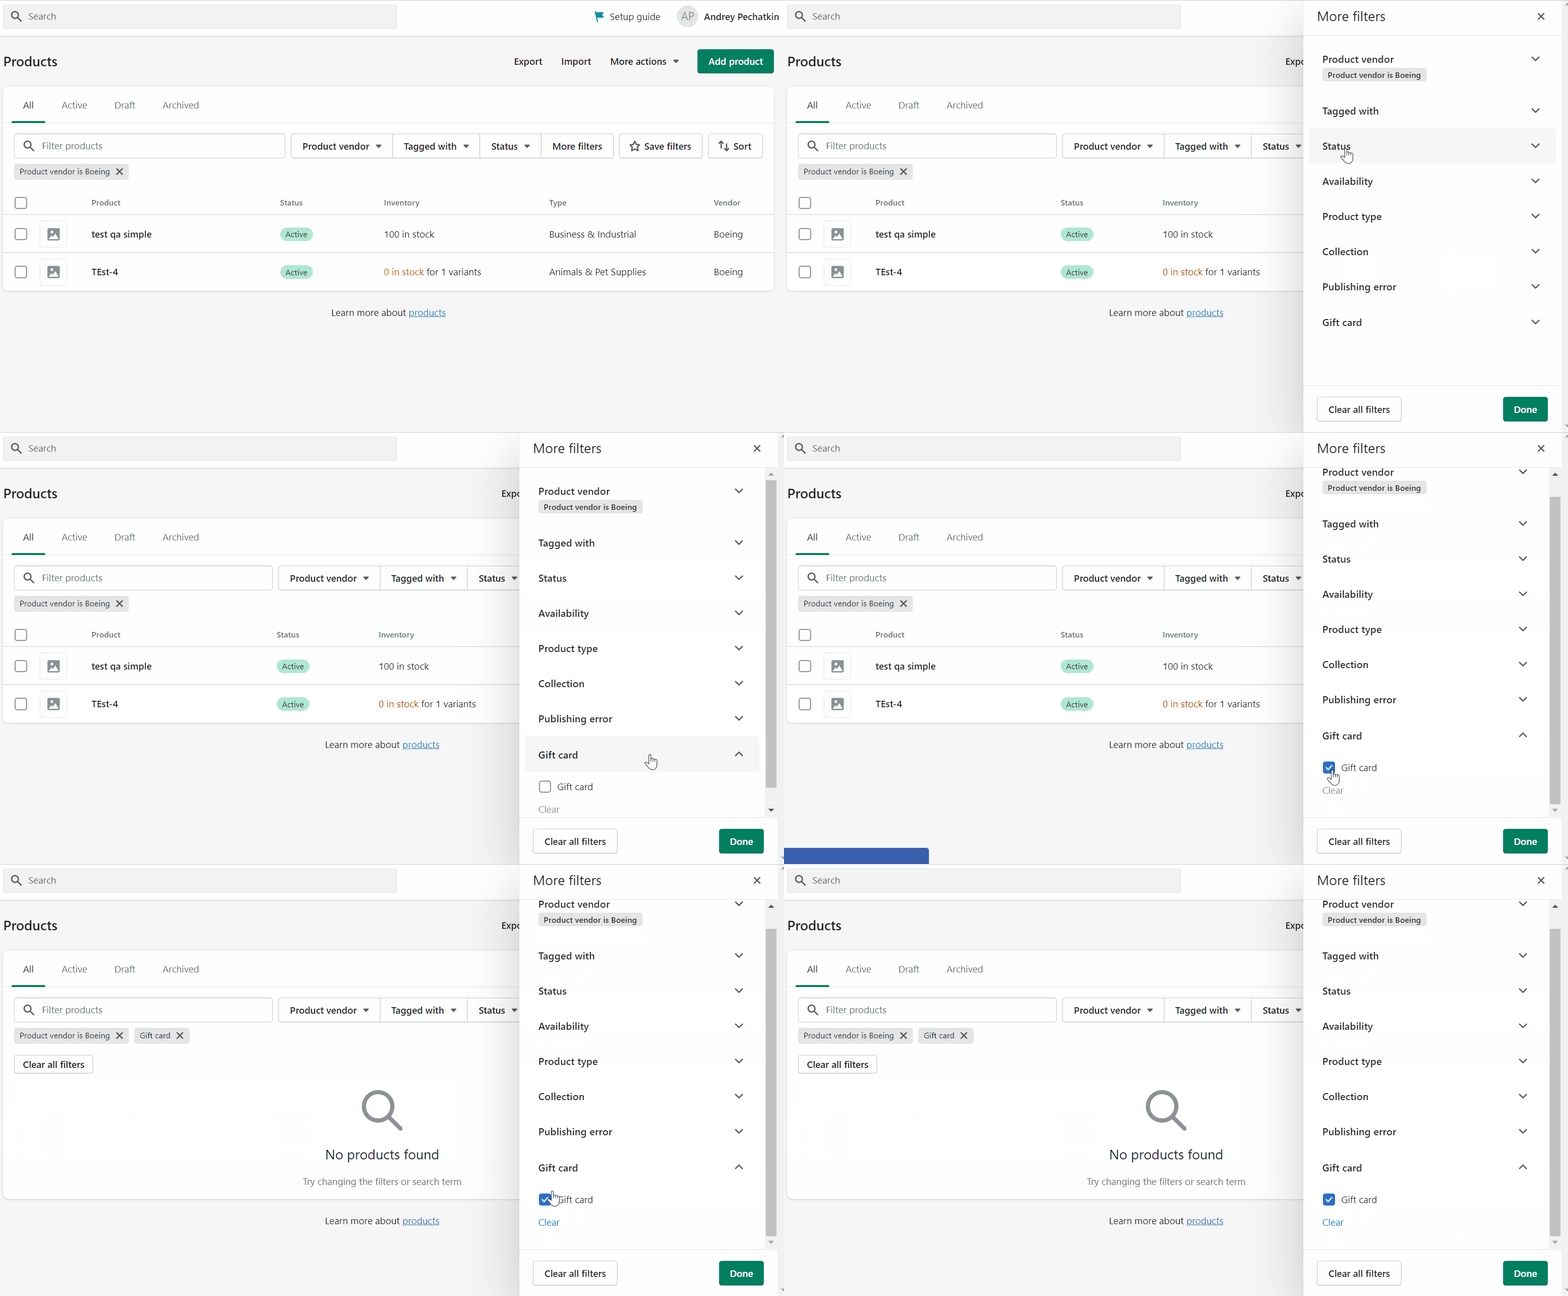
- Also, you can use the All, Active, Draft, and Archived tabs to display products associated with one of these categories.

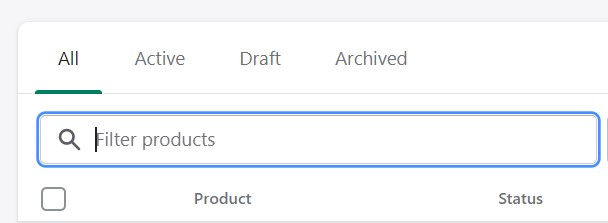
- And note that there is a search field at your disposal. The product list instantly updates to only display items with the specified words in their names, descriptions, or tags.
- Use the Product vendor, Tagged with, or Availability buttons to choose an option to display products matching it.
How to save a product search or filtered product list in Shopify
You can save your search or filter (filter set) to quickly use it again in the future. Click Save filters and give your search a name. It is preserved as a tab available both in your app and on a desktop. However, the Shopify admin lets you save filters only in the browser.

After the search is saved, you can click the tab that is labeled with the search name the next time you need to find the products that match the same search terms or filters. The subset of products will be displayed right away in the product list.
Also, the Shopify Products page provides the ability to import and export products. We explore this functionality in a separate chapter.
How to Add Products on Shopify & Update Them
You can add products on Shopify or update them with such information as price, variants, and availability. The corresponding functionality is available straight on the Shopify Products page of your admin.
Follow these steps to learn how to add products on Shopify:
- Visit Shopify -> Products.
- Click the Add product button at the top.

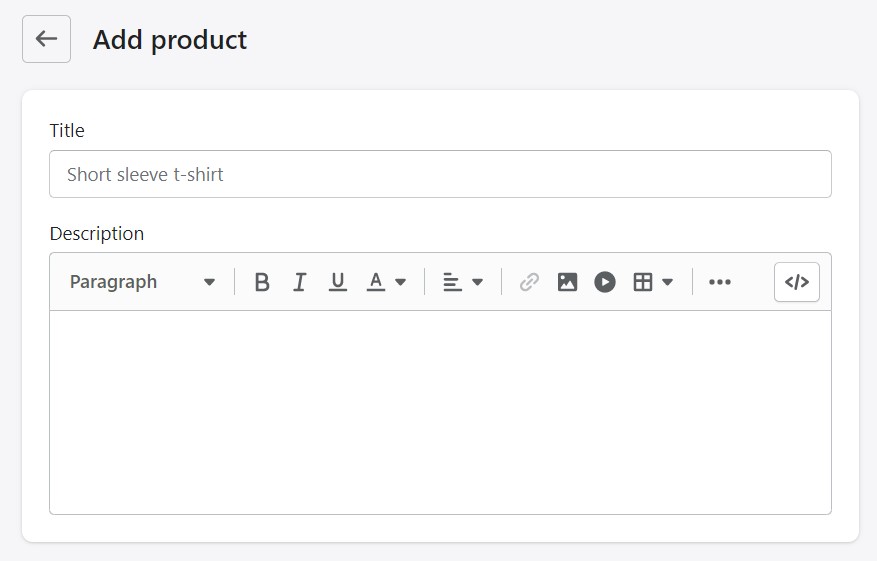
- Name your product and add its description.
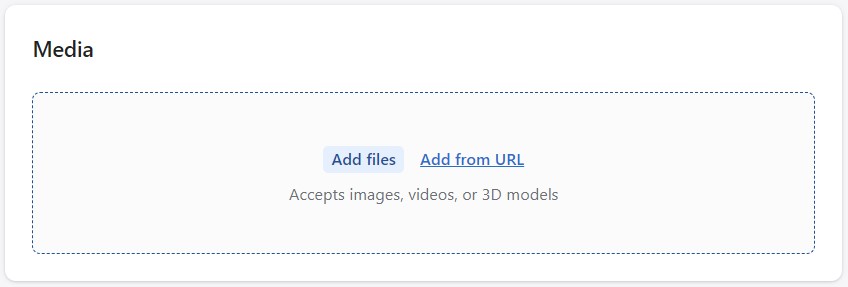
- Add media files. Shopify accepts images, videos, and 3D models.
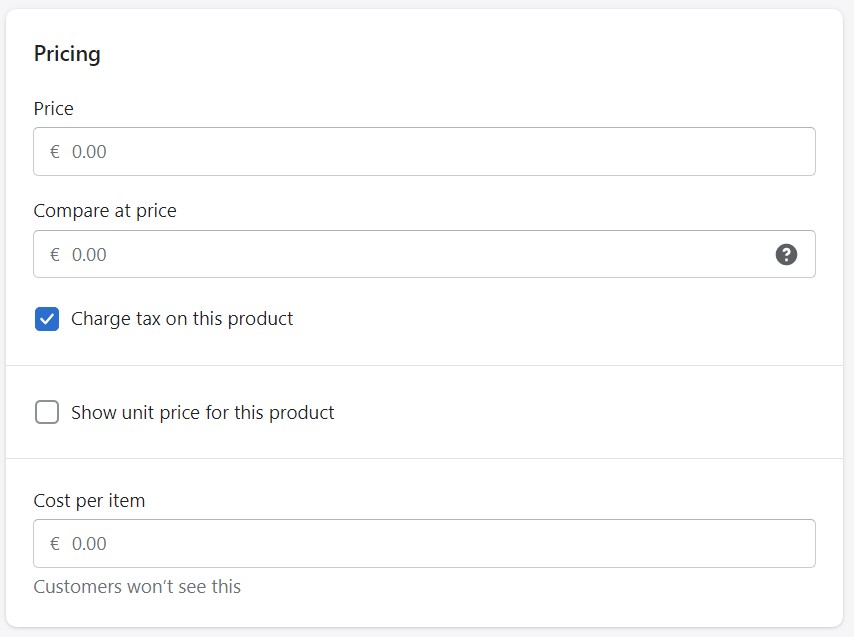
- Specify a product price.
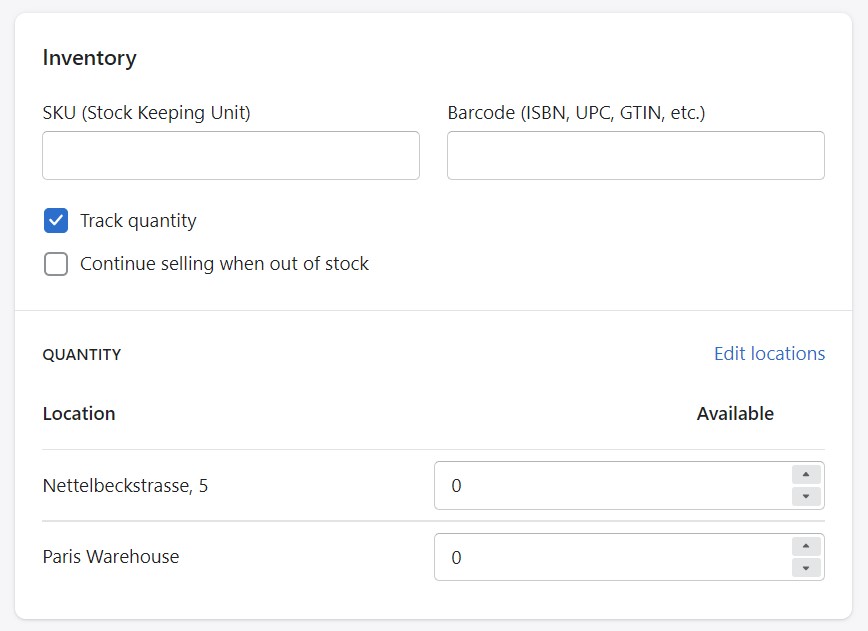
- Add the product quantity per warehouse with other inventory information.
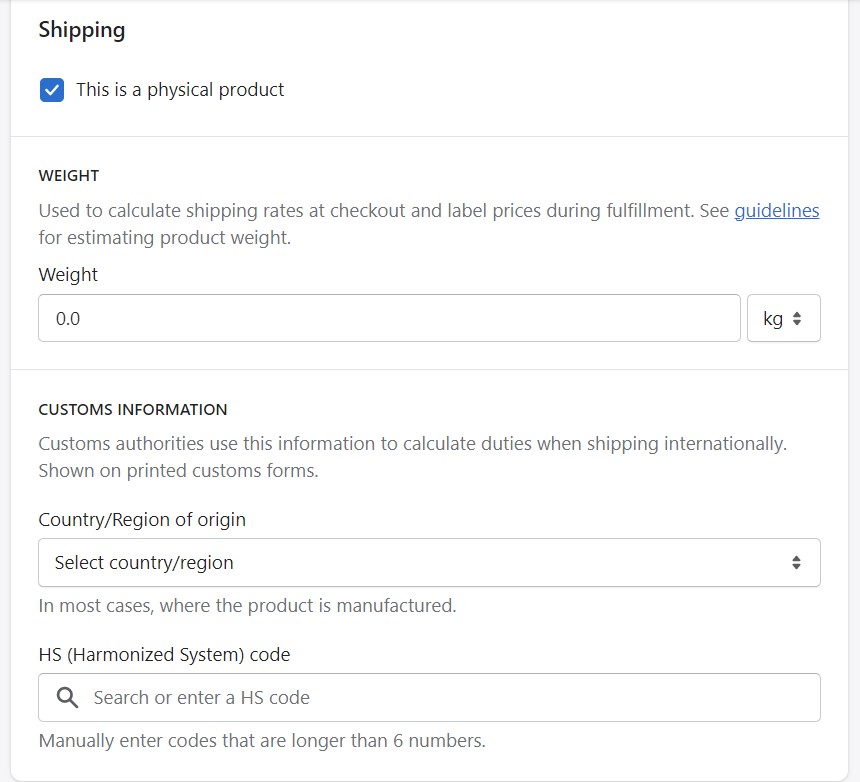
- Specify shipping details, such as product weight and origin.
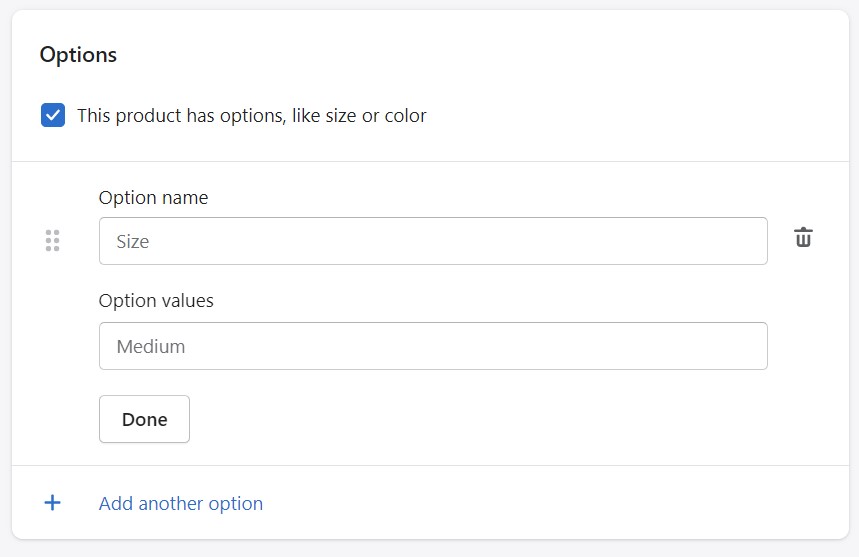
- Add product options if applicable.
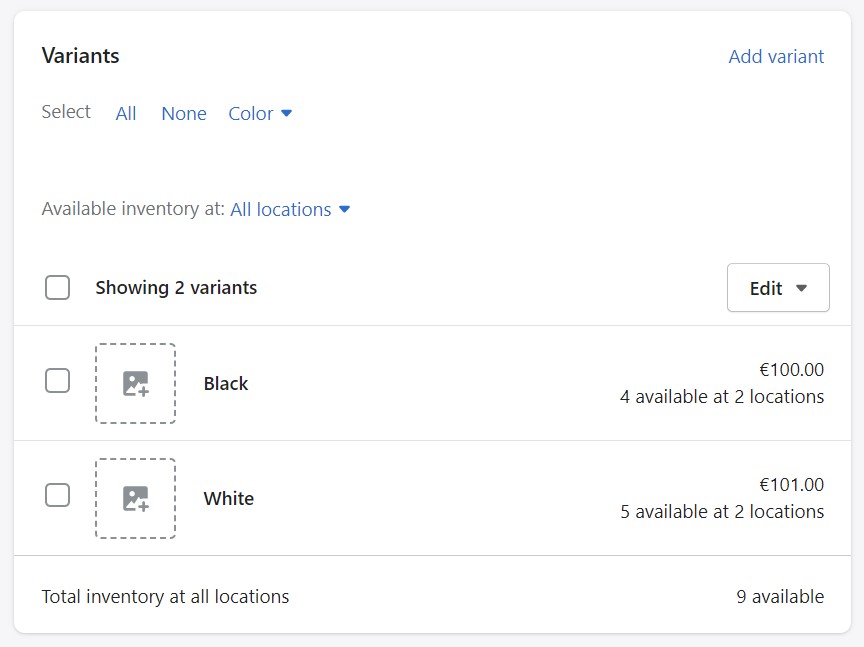
- Edit product variants.
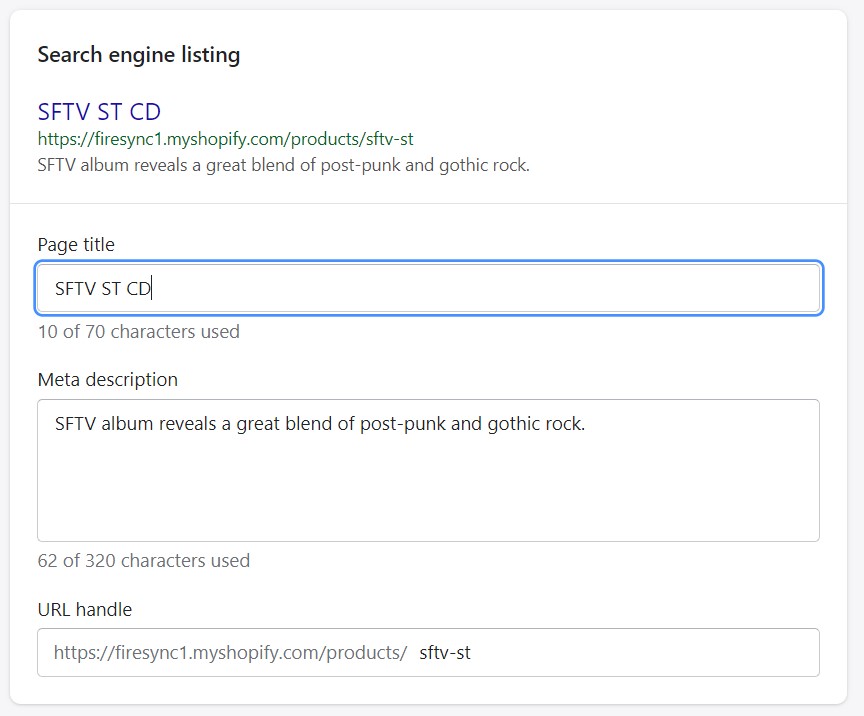
- Edit search engine listing.
- Choose a product status and select channels to add your product to.
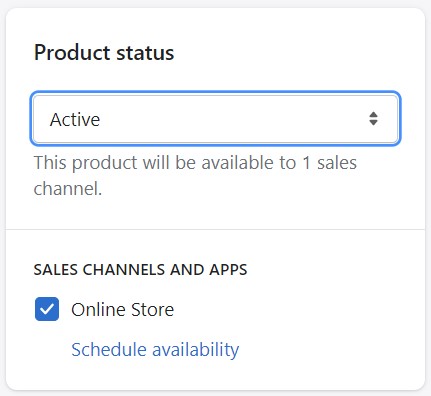
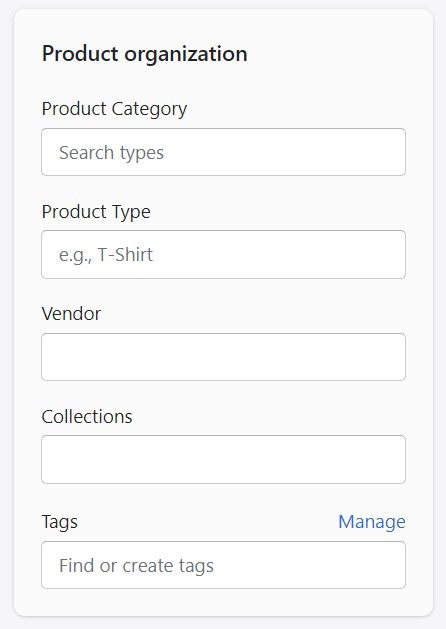
- Configure product organization parameters, such as category, type, vendor, collections, and tags.
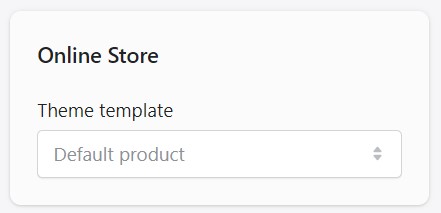
- Select a theme template for your new Shopify product.
- Click Save.

We will describe all these sections in the Shopify Product Details chapter.
Note that in the case of 50+ store locations, you need to save your product before specifying its inventory quantities.
Duplicating Shopify products
You can quickly add a new product on Shopify by duplicating an existing one. Also, instead of creating a duplicate of a product, there are situations when it is better to create a variant by adding options to an existing product, such as color or size.
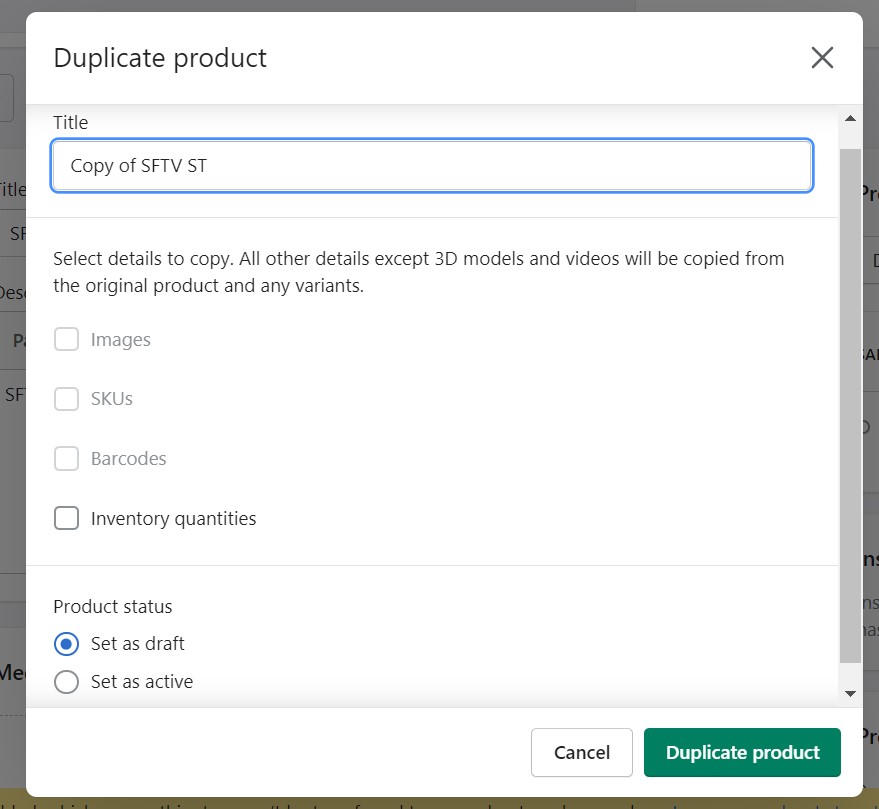
You have the choice to keep one or more of the following things when duplicating a Shopify product:
- Product images;
- Product SKU;
- Product barcode;
- Inventory information.
Note that the corresponding fields are created blank in the duplicate if you don’t select the appropriate options. The other fields are duplicated from the original.
Since the duplicate product’s status is automatically changed to draft and concealed across all of your channels, they cannot access the clone before you activate it. However, the copy can be made accessible through the same channels and applications as the original product. In this instance, the duplicate product may be published as soon as it is made, depending on the sales channel.
You can duplicate Shopify products as follows:
- Go to your Shopify admin -> Products.
- Open a product details page of the item that you want to duplicate.
- Click Duplicate.
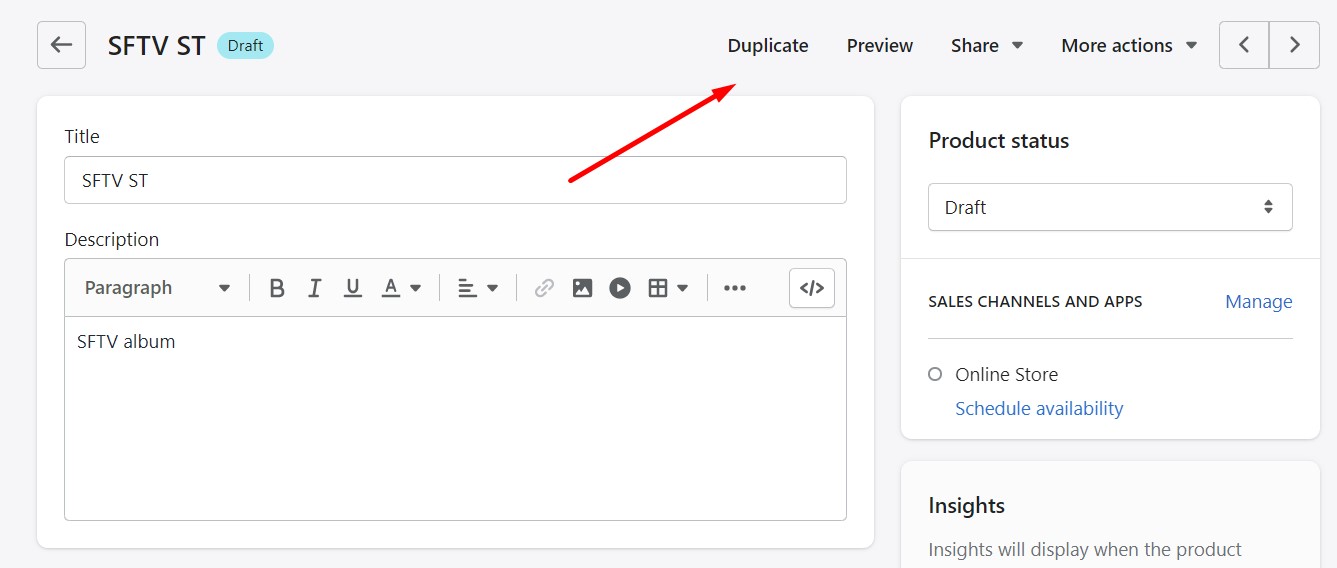
- Name your clone, select details to copy, choose its status and click Duplicate product.
- Edit product details as described above.
- Save your product.
Now, you know how to add products to Shopify by duplicating the existing items.
Editing Shopify products
You can update products on Shopify by changing their names, prices, and other product details. You can alter the product information at any moment, but doing so may impact your reports. Changes are immediately displayed on the frontend after you save them.
Follow these steps to edit products on Shopify:
- Go to your Shopify admin -> Products.
- Open a product view page of the product that you want to edit.
- Edit product details as described above.
- Click Save.
Use the bulk editor to edit several products at once:
- Go to your Shopify admin -> Products.
- Open a product view page of the product that you want to duplicate.
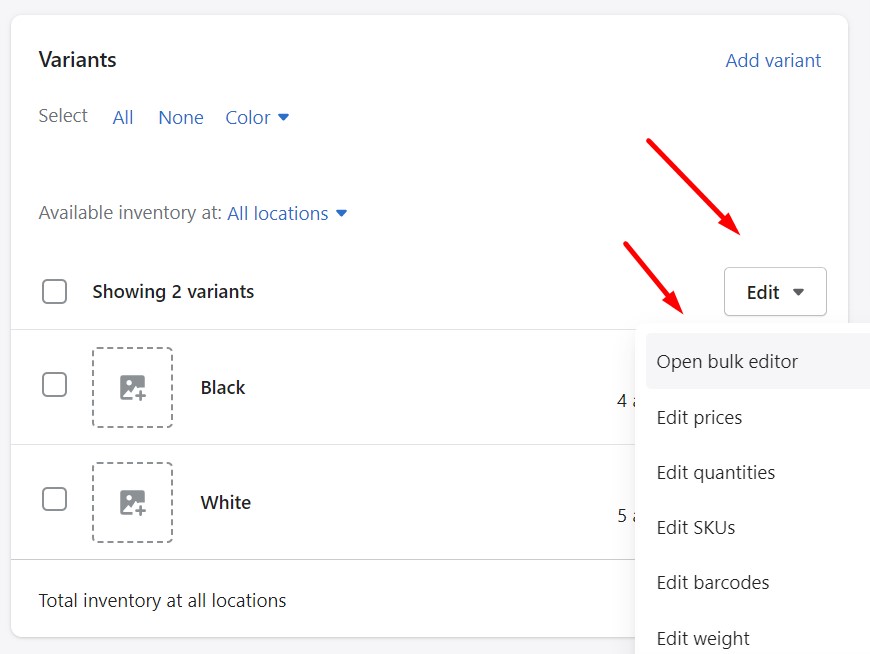
- Go to the product’s Variants section.
- Click the Edit button.
- Select Open bulk editor.
- Apply changes to several products in bulk.

- Click the Columns button and activate more columns to apply more changes to the selected products.
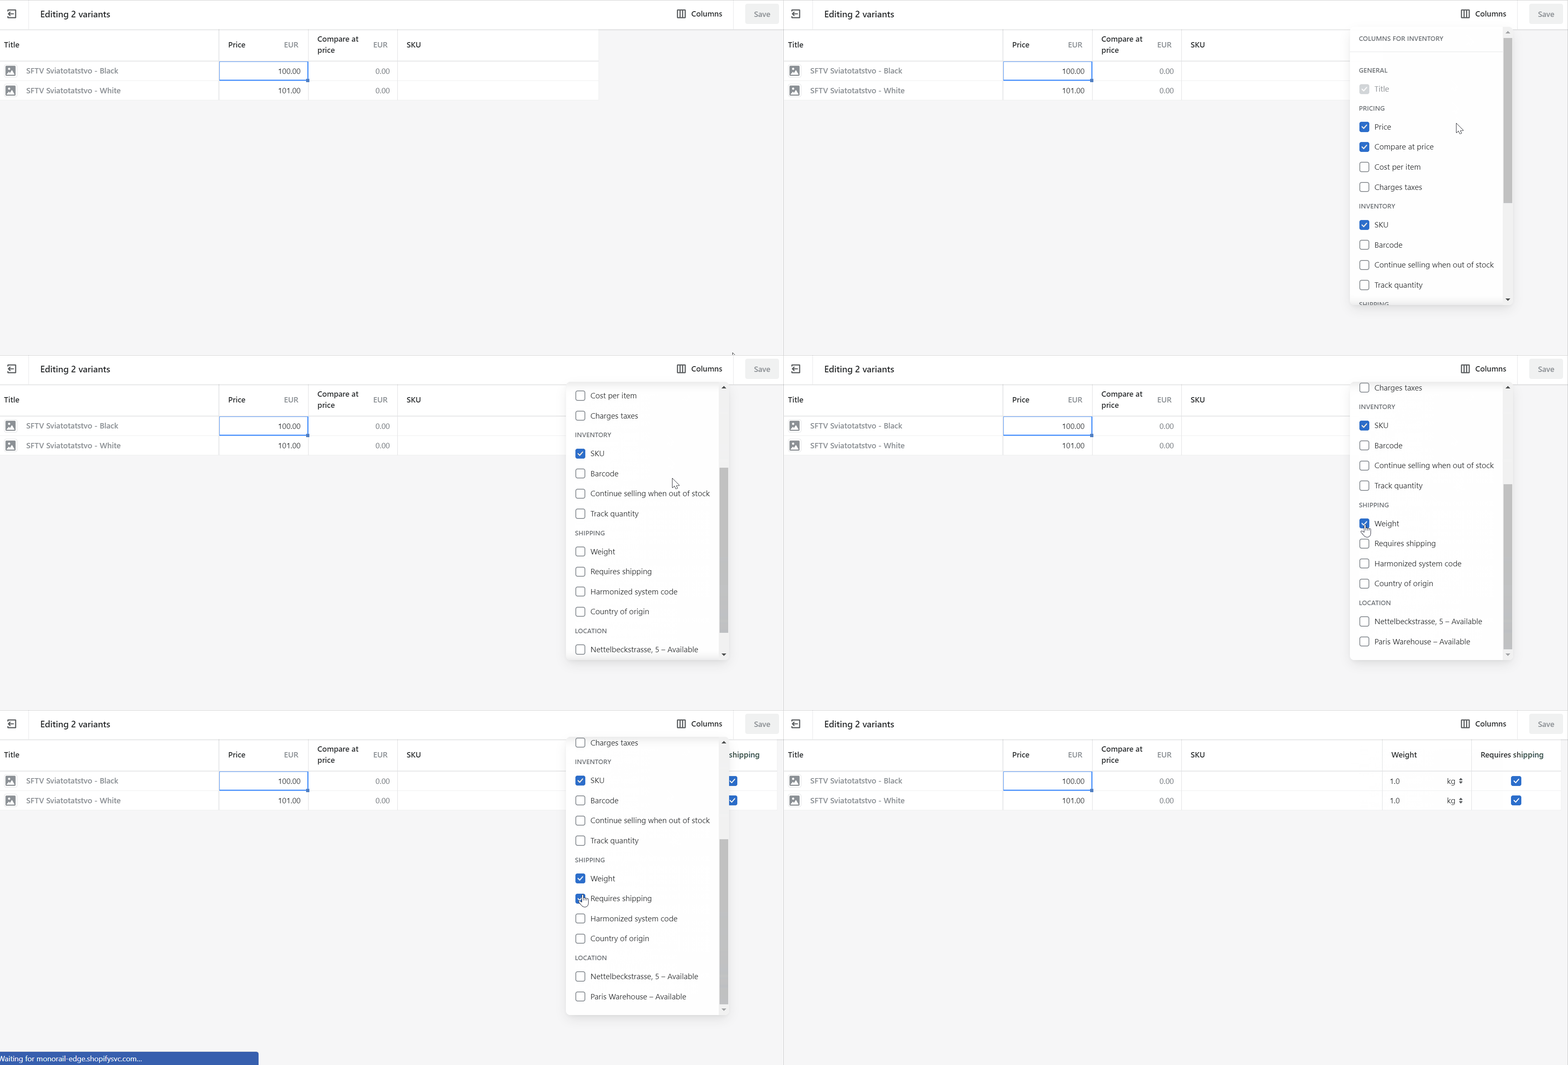
- Save changes.
Changing Shopify product’s availability settings
Why is it necessary to make a product available to specific sales channels? Thus you manage where you sell it. A product will be concealed from the channel’s product catalog if you choose not to make it available through that sales channel. There are several reasons to keep a product hidden. For instance, you may wish to sell a product either online-exclusive or store-exclusive or just don’t want to use a certain sales channel to offer it.
You can view or change a product’s availability settings on Shopify as follows:
- Visit your Admin -> Products.
- Open the product’s view page.
- Scroll to the Product status section.
- Switch the product status to active.
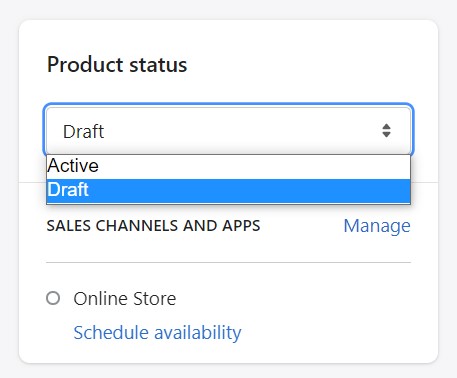
- Hit Manage.
- Choose channels and apps to make the product available to.
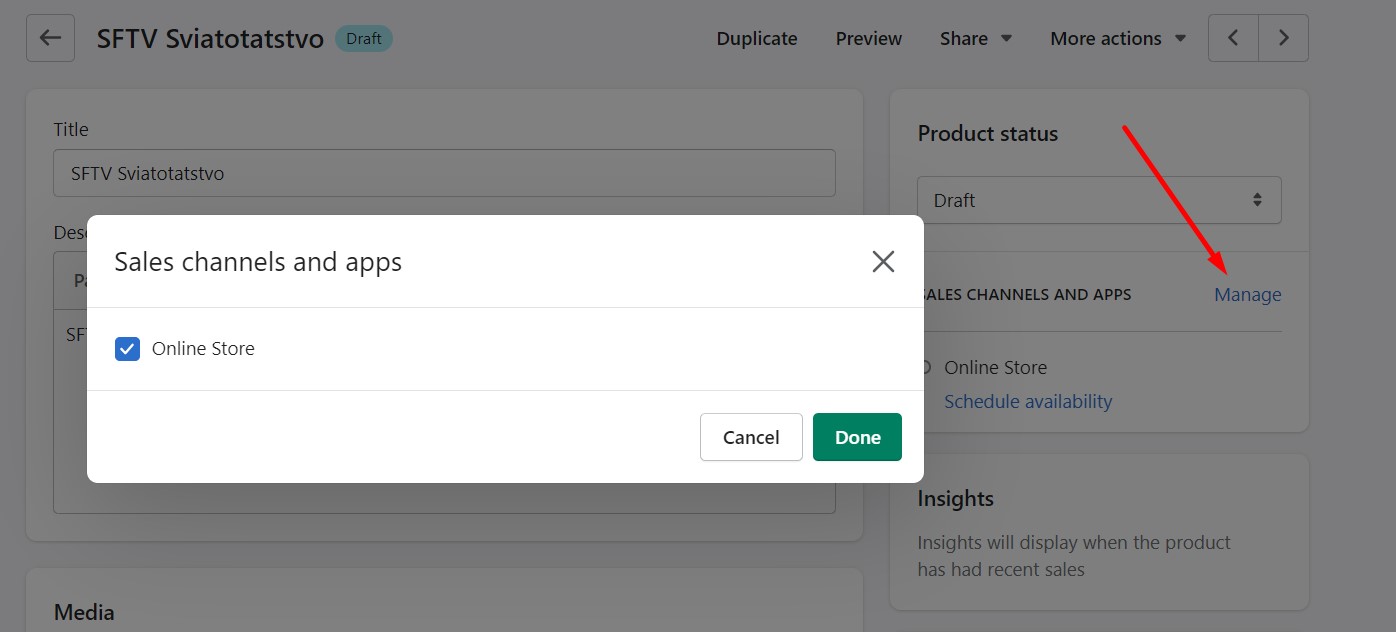
- You can also schedule product availability by selecting a date when the product appears in a sales channel.
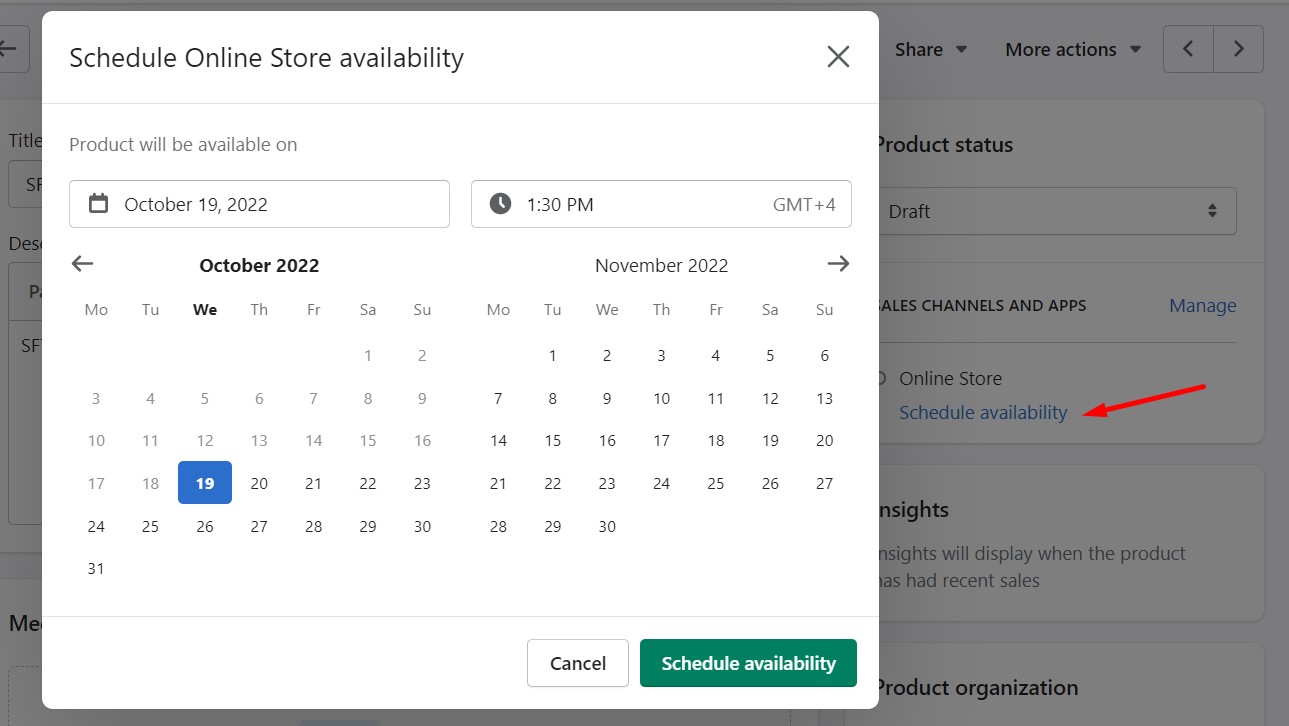
- Click Save when finished.
Shopify uses tags as searchable keywords for various entities, including products. Thus, they can help customers find your products through online store search. From the admin perspective, you can use tags to create automated collections.
It is possible to use up to 250 tags per product unless you are a Shopify Plus store owner. In this case, the number of tags is unlimited.
Follow these steps to add a tag to a Shopify product:
- Visit your admin section and navigate to the Products screen.
- Here, you can choose one of these two options:
- Click the name of a product to add tags to it;
- Create a new product to add tags to it.
- Scroll to the Product organization section and add tags there:
- Use a comma to separate tags;
- Tags are limited to 255 characters;
- You can add only 250 tags.
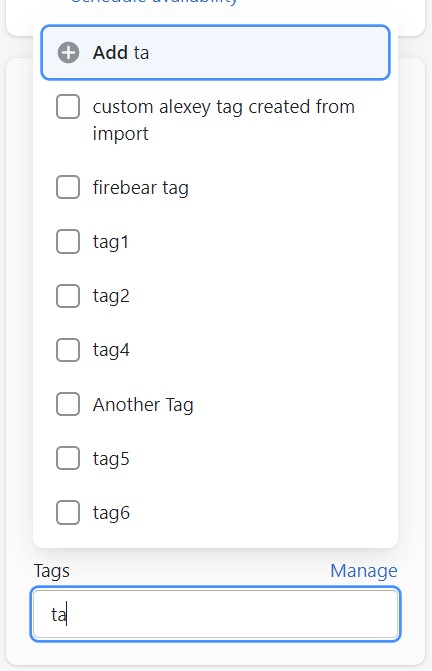
- Start typing a tag to select it from the list of tags that are already used on your website.
- Hit the Manage link to open a tag screen that contains the list of all tags:
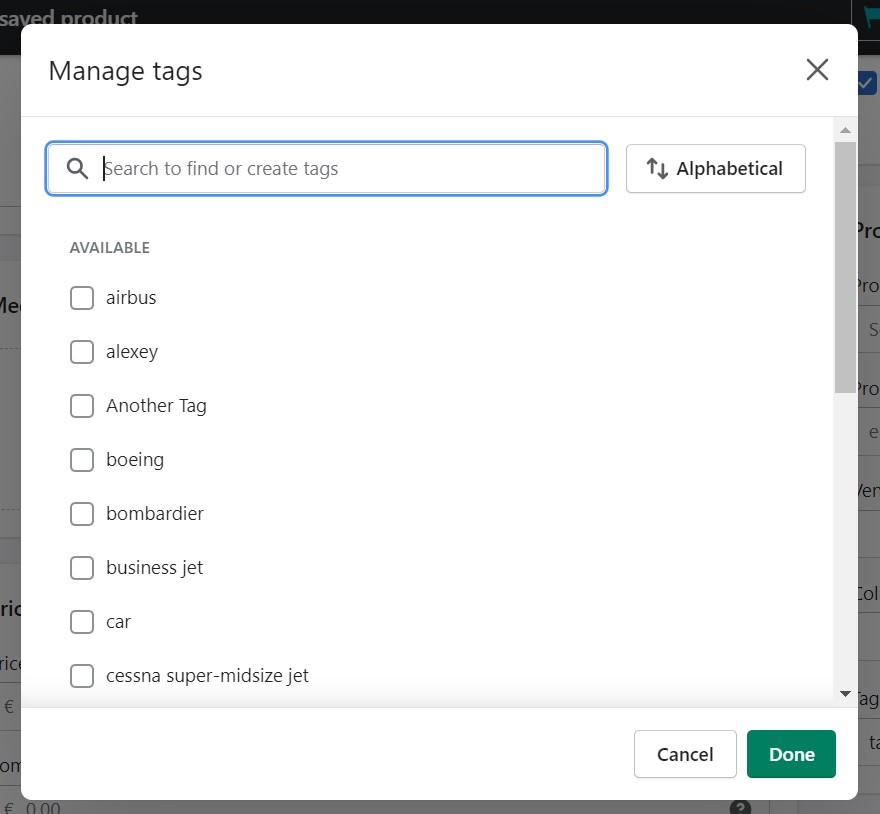
- Click Save when finished.
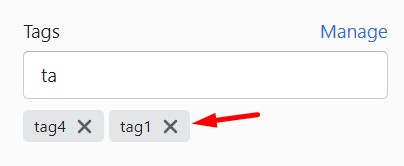
If you want to remove a tag, click the x icon beside the tag name.
Editing a search engine listing
Shopify also lets you edit the way a product appears in search results. To do that, follow these steps:
- Visit your Admin -> Products.
- Open the product’s view page.
- Scroll to the Search engine listing preview section
- Click Edit:
- Page title – specify a title displayed as a link in search engine results (limited to 55 characters).
- Meta description – specify a description for the search engine listing that includes keywords and your business name (limited to 320 characters).
- URL handle – edit the web address of your product page. Make sure to set up URL redirects from the old web address if you apply changes here.

- Click Save.
Scanning barcodes for Shopify products
Instead of providing barcode information manually, you can use your Shopify app to automate this process. You can scan a barcode for a Shopify product as follows:
- Open your Shopify app;
- Visit Products -> All products.
- Create a new product or open an existing one.
- Tap Inventory.
- Scroll to the Barcode field and tap the barcode icon.
- On the camera’s screen, locate a rectangular box so that the barcode appears inside.
- The Shopify app recognizes the barcode, returns to the Inventory screen, and updates the barcode number.
Archiving Shopify products
You can archive a product if you no longer wish to show it in your online catalog but do not wish to permanently remove it. Using a bulk action, you can either archive one product at a time or many products at once. After that, a product is moved to the Archived tab of the Products page if it is archived.
Follow these steps to archive a product on Shopify:
- Visit your Shopify admin -> Products.
- Find a product that should be archived and proceed to its product details page.
- Scroll to the bottom of the page and click Archive product.
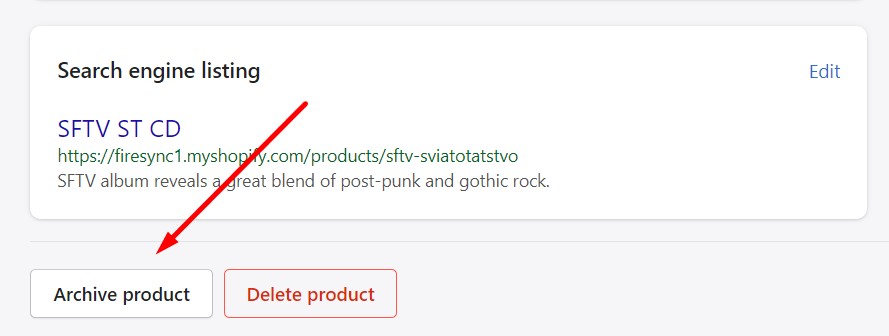
- Confirm your intent.
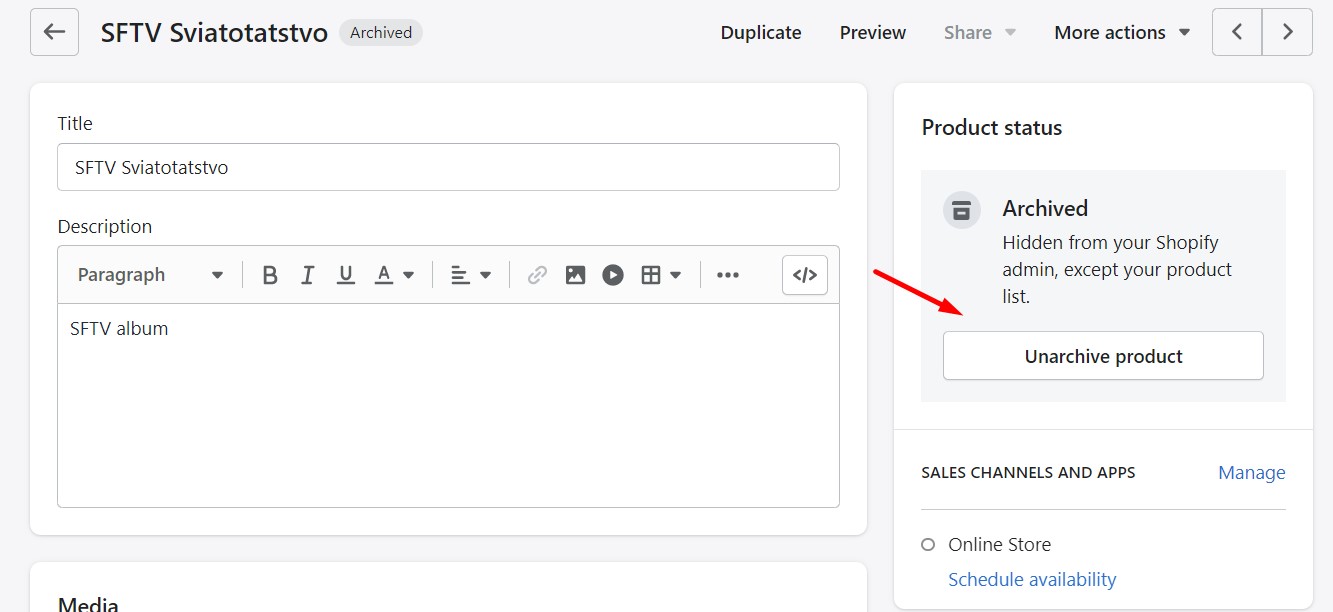
You can find archived products under Admin -> Products -> Archive tab in the grid. To unarchive a product, find the product that you want to unarchive in the Archived tab. Open its product details page and then click Unarchive product either on the right or at the bottom of the page.
Deleting Shopify products
While a single product can be deleted within a few clicks, you can use a bulk operation to remove several products at once. A product that has been deleted can be never restored from within Shopify. However, you can export it before deleting it and then re-import the file to restore the deleted item. However, it is recommended to archive products instead of permanently removing them.
If you still need to eliminate a Shopify product permanently, follow these steps:
- Go to your admin -> Products.
- Open the product you want to delete.
- Scroll down to the bottom of the page and click Delete product.
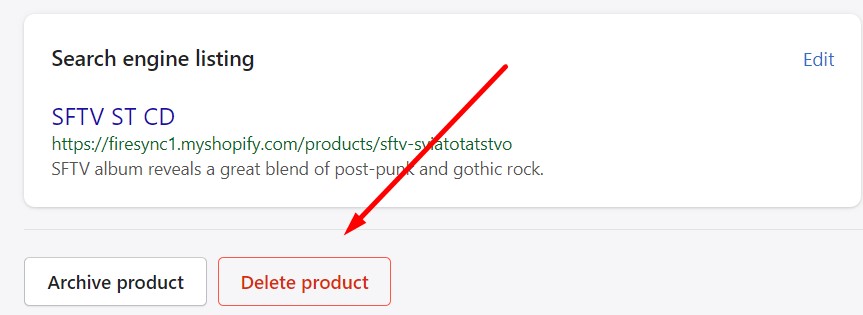
- Confirm your intent.
Adding variants to a Shopify product
You can add variants to a Shopify product in the process of creating it. Follow these steps:
- Go to the Options section of the Add product page.
- Check This product has options.

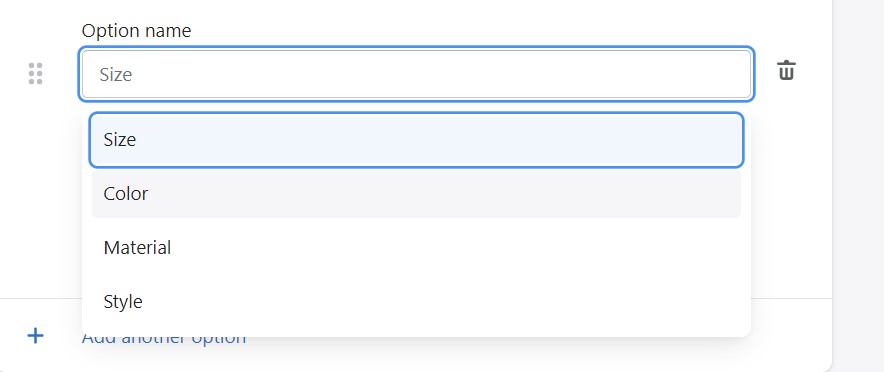
- Next, provide an option name in the Option name field, e.g., Color. The system provides suggestions. Note that the option name is displayed to customers.
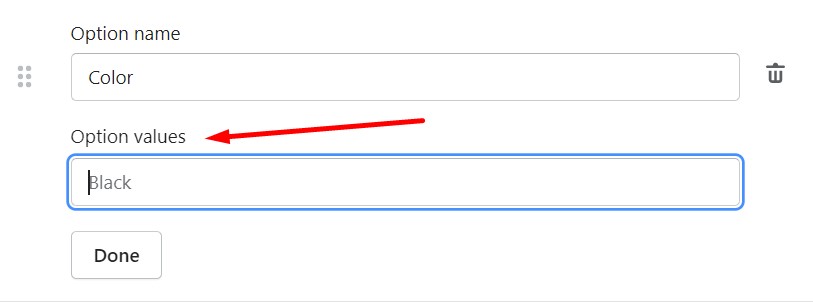
- Now, enter each option value in Option values, e.g., Black, White, Green. Use a separate field per option value. Note that they are displayed to customers.
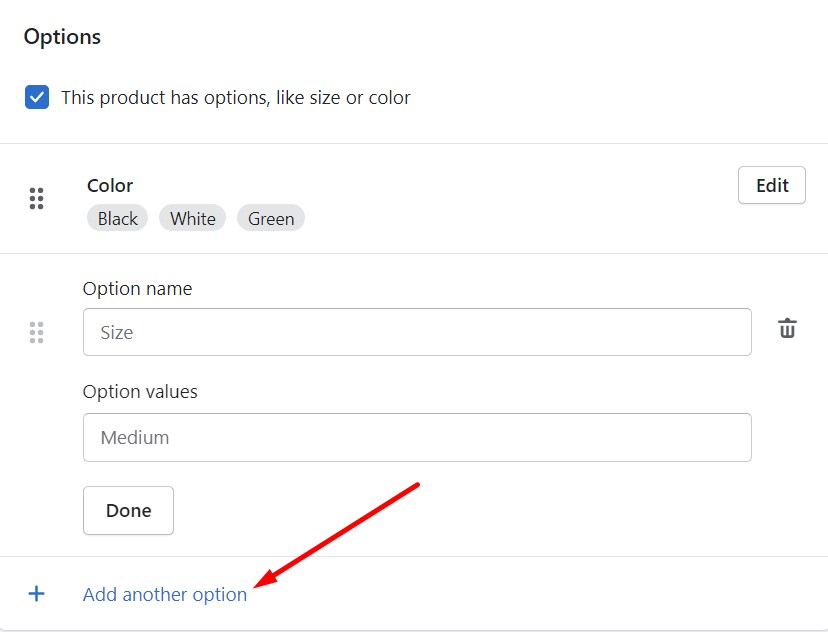
- You can add up to 3 options per product. Click Add another option to add more.
- Click Save.
A list of variants appears simultaneously with the product options. Shopify displays all possible combinations of options as variants. If you don’t want to sell any, uncheck the boxes next to them. Add prices, SKUs, images, and barcodes for individual variants. At the same time, you can use the default options based on the product details.
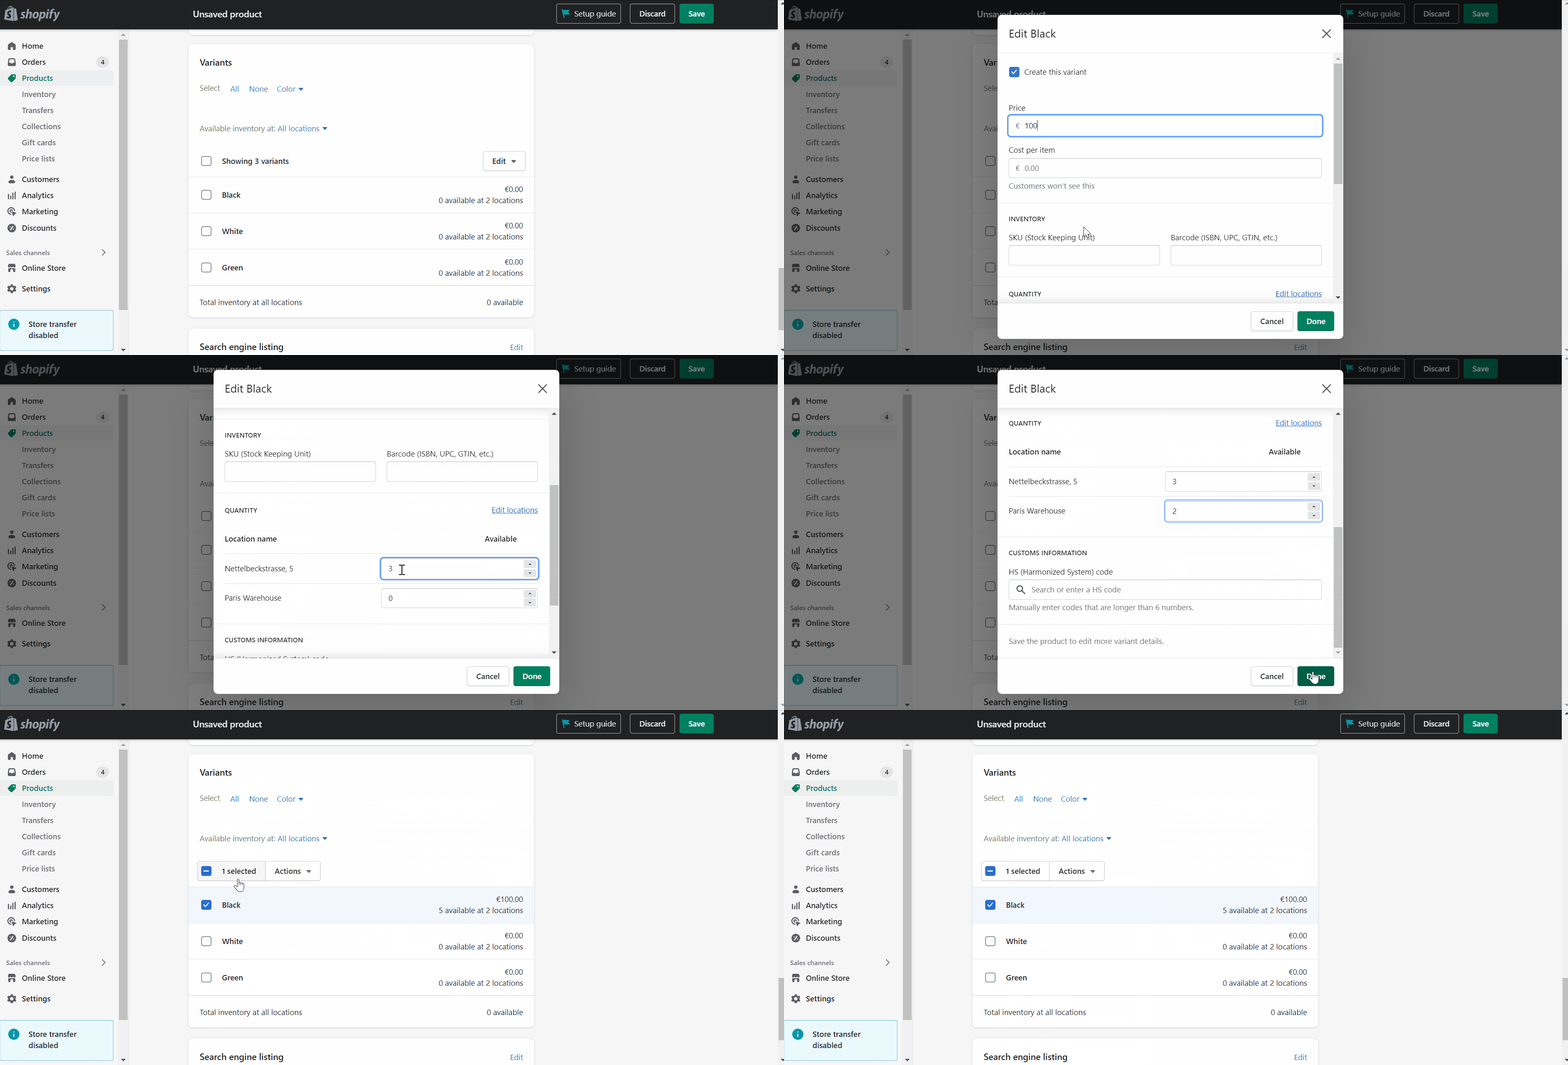
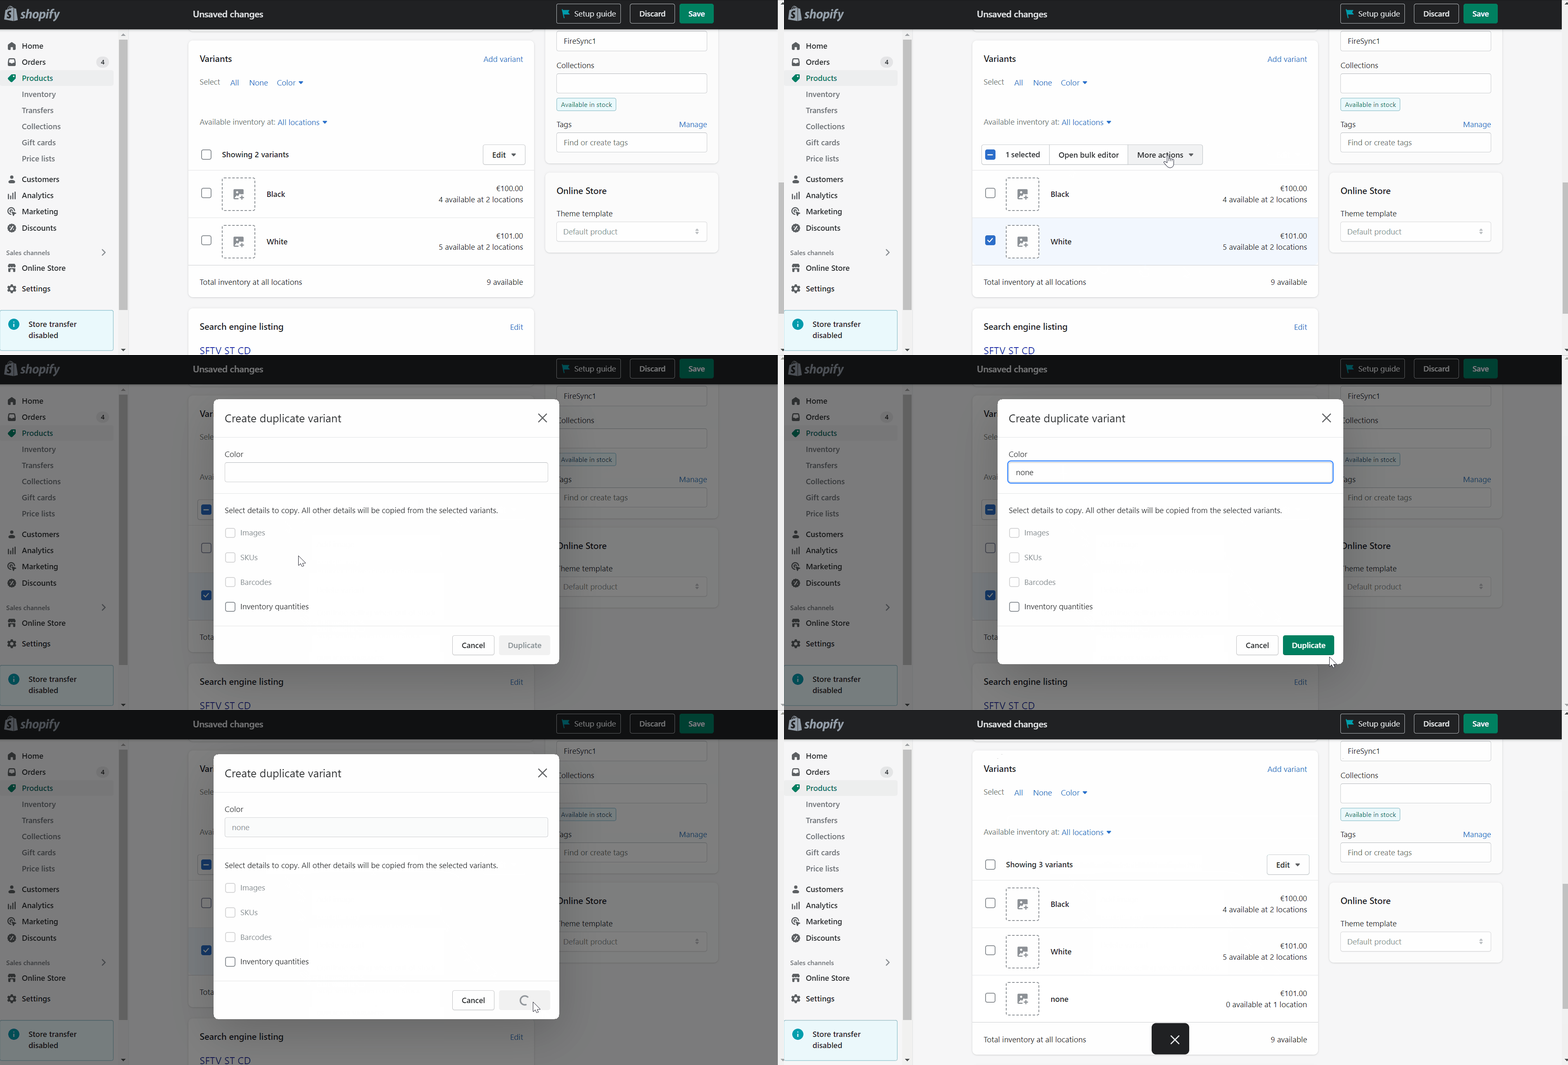
You can also duplicate and edit a variant to save time when adding similar variants. Follow these steps to duplicate product variants in Shopify:
- Go to your admin -> Products.
- Proceed to the product details page of the item that requires another variant.
- Scroll down to the Variants section, select the variant you want to duplicate, and click Duplicate.
- Edit at least one option value. This will create a unique variant.
- Click Save.
Shopify Product Details
The information you provide about each item has an impact on how you find and manage it in the admin and how customers discover it on the storefront. For each product, there is no need to include every detail.
Although the Pricing, Inventory, and Shipping sections are displayed on the product details page for products without any variants, they are hidden if variants are added.
Title and description
- Title: The name you want shoppers to see next to your product.
- Description: You can format the product’s description using the rich text editor. To educate and persuade your potential buyers, describe your offerings in great detail. If you’re a reseller, avoid using a manufacturer’s exact description because you want search engines to recognize your products as being unique.

Media
This section lets you add images, 3D models, and videos to provide your customers with an understanding of how your product looks.

Pricing
- Price: The cost of the goods that you are selling. On the page for general settings, you can change the currency. Click Available in other currencies if you are selling in different currencies. To examine your currency settings, go to Manage Currencies. If the product is taxable, select Charge taxes on this product.
- Compare at price: The original cost of a product that is currently on sale. The product shows a sale price when you enter a compare at pricing.
- Tax code: If you utilize a third-party tax solution for Shopify Plus plans, the product’s tax code is displayed here.
- Cost per item: It is the price you pay for a given product or variant. You can input the amount you paid the manufacturer, minus taxes, shipping, and other expenses, for instance, if you resell a product. You can input a value based on your labor and material costs if you make the product yourself.
Unless you add taxes to your prices, the predicted margin for products with product costs provided is displayed below the Price field on the product details page. ([price – cost] / price) * 100 is the formula for calculating the margin. For instance, the margin (calculated as ([500 – 300] / 500)*100) is 40% if your price is $500 and your cost is $300.
You can get reports to examine the expenses and profit margins of your products if your store is on the Shopify plan or a higher tier. Your cost of goods sold is also accessible (COGS).
However, it’s not necessary to enter the price per item. If you decide to enter your expenses, use the bulk editor or a CSV import to add the numbers to each of your current goods at once. You may maximize the value of your profit reports by updating the data simultaneously.
It is also worth mentioning that gift card products don’t have a cost per item.

Inventory
- SKU (stock keeping unit): the product’s internal product identification code. Each SKU must be unique to provide effective tracking and sales reporting. However, SKUs are not required. Your own SKU format is possible. See SKU formats for additional details below.
- Barcode (ISBN, UPC, GTIN, etc.): a new or current Global Trade Item Number must be used as the identifier (GTIN). Before a product can be published on some sales platforms, a GTIN must be provided.
GTINs are distinctive identifiers that are used globally to store and find product data, such as UPC, EAN, and ISBN. On the product package, the GTIN can be seen either above or below the barcode.
Shopify POS uses the barcode in a store to publish products via the Google channel. You can ask the manufacturer for a GTIN if you don’t already have one for a given product. Visit the GS1 standards website to find out how to acquire a GTIN for a product you make. Avoid creating phony GTINs for your items. - Inventory policy: Shopify provides this setting for inventory tracking.
- Available: This field shows the number of units in stock. For businesses based on multiple locations, the quantity is shown per location.
- Incoming: you can specify incoming units are about to be transferred. You can record incoming inventory after submitting a purchase order (PO) to your supplier or use this parameter to keep track of your inventory while moving it between various locations.
- Committed: this parameter indicates the number of units that are part of an order that should be yet fulfilled. Inventory units of draft orders aren’t counted as such.

SKU format
Shopify provides the ability to use any custom format for product SKUs. But here’s the kicker:
- Characters: Any combination of numbers and letters is acceptable. Avoid using a format where the letters O and I can be mistaken for the digits 0 and 1. Avoid using special characters, symbols, or spaces because searching for products in Shopify by SKU or in other software applications like spreadsheet tools may be associated with issues. Remember that dashes or underscores are helpful to differentiate between sets of numbers and letters that stand in for characteristics of a product, such as style, color, size, pattern, or even a storage area.
- Length: Make sure your SKUs are as brief as you can afford, with no more than 16 characters. You might be able to employ an SKU format with only 4 to 8 characters, depending on how many and what kinds of products you offer.
- Simplicity: Use an SKU structure that your personnel can understand and that will assist in picking and packing orders. In an SKU, each letter and number must serve a specific function.
- Uniqueness: SKUs within your Shopify admin should be distinct, and no two product versions should have the same SKU listed in their information for tracking and sales reporting purposes. The SKU for each variant should be different if you sell an item available in various options represented by a different variant each.
Shipping
- This is a physical product: Uncheck this setting for digital products or services since it indicates whether a product needs to be shipped. Products that you never ship don’t require it.
- Weight: Specify the product’s actual weight here. Note that this field is linked to This is a physical product. If the latter is checked, the product weight needs to be specified.
- Country/Region of origin: This field indicates the country where the item was made or assembled. Specify the country or region where the product takes its essential form if it is made up of components from various other countries or locations.
- HS code: Enter the harmonized system (HS) tariff code if you want to send the item abroad. Customs receives information from these codes so that the appropriate tariffs can be applied to the order. By conducting a keyword search in the HS code section of the product details page, you can discover the HS code for your item.
- Fulfillment service: This field lets you select one of the utilized fulfillment services. If you don’t use any, select Shopify.

Variants
A product with multiple options, such as size or color, exists in several versions called variants in Shopify. A variant for a product can be created from any combination of option values.

Consider that you provide T-shirts in two variations: size and color. Three options are available for size: small, medium, and large. There are two values for the color option: black and white. So, the possible variants are:
- Black S;
- Black M;
- Black L
- White S;
- White M;
- White L.
On a product details page, you can see a list of all these variants. Additionally, using the Inventory section, you can control inventory per variant. Also, Shopify lets you hide variants that you don’t sell. The corresponding section on the product details page lists the available options for a product that includes variants, such as color and size.

Purchase options
You can configure your store to offer your consumers more purchasing options in addition to the standard buy-pay-ship paradigm. Your clients may subscribe to receive an item every month or order a product before its release date. Pre-orders, subscriptions, and try-before-you-buy features are just a few purchase alternatives you can add to your products.
If a purchase option has been applied to a product or any of its variants, the appropriate purchase option settings are displayed in the Purchase options section of the product page.
You can enable both the alternative purchase options and the standard one-time purchase or restrict a product’s availability to alternative options only.
These are three common purchase options:
- Subscriptions: This option lets you sell products and charge your customers for them repeatedly according to a schedule. E.g., cat food.
- Pre-orders: In this situation, your clients get the ability to purchase items that are not ready for fulfillment yet. They pay for an item, and you fulfill it later. E.g., an upcoming record by your band.
- Try before you buy: With this purchase option, you provide customers with the ability to order items without paying right away. Although you fulfill a TBYB order like a regular one, customers pay at a future specified date. E.g., a musical instrument.
Note that these purchase options are not available in your Shopify admin by default. They require installing third-party software, such as Subscriptions by Yotpo.
Search engine listing preview
This section illustrates a sample of your product’s appearance in search engine results. However, you can edit it, improving the SEO of your Shopify product pages. The product title, the item’s online store URL and a portion of the description make up the preview, and you can freely change them here.

Product availability
You may manage the state of your product and the sales channels in which it appears due to product availability determined by its status.
The product status for recently generated products is, by default, set to active. The default setting for the product status for duplicated and unarchived products is draft.
The following states are at your service:
- Active: This product is displayed in the sales channels.
- Draft: You still need to provide additional product details before the product can be displayed in the sales channels.
- Archived: Although the product details are complete, such a product is no longer available in the sales channels.
The Sales channels and apps area illustrates a list of active sales channels where you can make your product available. Since all channels are selected by default, you may need to click Manage to edit sales channel availability.
Note that you set sales channel availability per product, including all its variants.

Organization
Product category is a label that indicates a class that a product belongs to. It is selected from a predefined, standardized list. As a store administrator, you can use product categories for various purposes, such as automated tax rate selection, better product management, easier integration with other channels, etc.
Note that it is possible to set only one category per product, which is applied to all its variants. Shopify often displays product category recommendations to help you select one that fits your product. Since product categories are optional, you can save your product without assigning a category to it.
Product type is a custom label that describes a product category. This parameter provides the ability to use custom product categories. Just like in the case of categories, a product can be associated with only one custom product type.
Vendor shows an organization that provided or produced the product, such as a manufacturer or wholesaler.
Collections is a field that shows the collections a product is included in. Use it to add a product directly to a manual collection. As for automated collections, a product appears in them only if it matches the collection conditions.
Tags is used to add searchable keywords associated with your product. Tags have a few purposes. Firstly, they can help customers find your product through the store search. Secondly, you can use them to create automated collections.

Metafields
Use Metafields to add unique fields to your product pages. You can save customized data that is typically missed by your product pages with their help. For instance, a retailer of candles could wish to include the burn time for their candles on a product page. In addition to placing this information in a product description, it is possible to display it on the storefronts via metafields. The following are additional examples of specialized information:
- Part Numbers;
- Expiration Date;
- Color Swatches;
- Related Products;
- Launch Dates;
- Blog Post Summaries;
- Files For Download.
On a product details page, metafields appear in an editable table. A metafield name specified upon its creation is displayed next to it. The metafield type and its description can be seen by clicking on each table row. After that, you can add value. Furthermore, it is possible to attach metafields to your theme and tailor your pages to the product or variant displayed.
Shopify Digital products
You may offer digital products on Shopify in addition to physical goods. Customers find digital items tempting because they can frequently access them right away after making a purchase. Online services and downloadable assets, such as digital artworks, videos, or audio samples, are examples of common digital products. Additionally, non-fungible tokens (NFTs) are considered Shopify digital products.
However, you need Shopify’s Digital Downloads app to be able to upload and sell digital files like videos, songs, and graphic art. When a customer purchases the digital product, they receive a link to download the file.
When you add a digital product to your store, uncheck This is a physical product in the Shipping section of the product details page. You can still sell a service with the standard Shopify instruments. But if you sell digital products on Shopify, use an app to provide customers with a download link to your product.
As for Shopify NFTs, the situation is even more complicated and requires a separate article highlighting all its nuances.
Importing and exporting products
Use a properly designed spreadsheet to import or export data if you need to move a lot of product information between Shopify and another system. CSV (comma-separated value) files are used by Shopify to carry out this type of bulk operation. And unlike orders, you don’t need any third-party systems to import products to Shopify. Let’s see what opportunities are at your service.
How to import products to Shopify
Why is it necessary to import goods into Shopify? The first reason is that you switched from another platform. The quickest approach to replicate your present product catalog on a new storefront is associated with this method.
Second, you can import Shopify products to update your inventory or product line. To obtain a CSV file that accurately depicts the current situation, it is important to export the relevant information. The modified data can then be edited and imported once more into the system.
Remember that you should always make a backup of your product data to guard against data loss. Therefore, before making any modifications, it is crucial to create a precise copy of your catalog.
Assume for the moment that you have a CSV file containing products from another platform that you need to import into Shopify. Unfortunately, you are unable to do that because the current sheet is set up in accordance with the specifications of the external platform. Adjust it to the CSV file format used by Shopify. Keep in mind that the import will fail even if the header is missing.
A further restriction is related to file size. More than 15MB of product data cannot be imported into Shopify.
At the same time, the import procedure itself is really straightforward. Only these actions need to be taken:
- Visit your admin -> Products and hit the Import button.
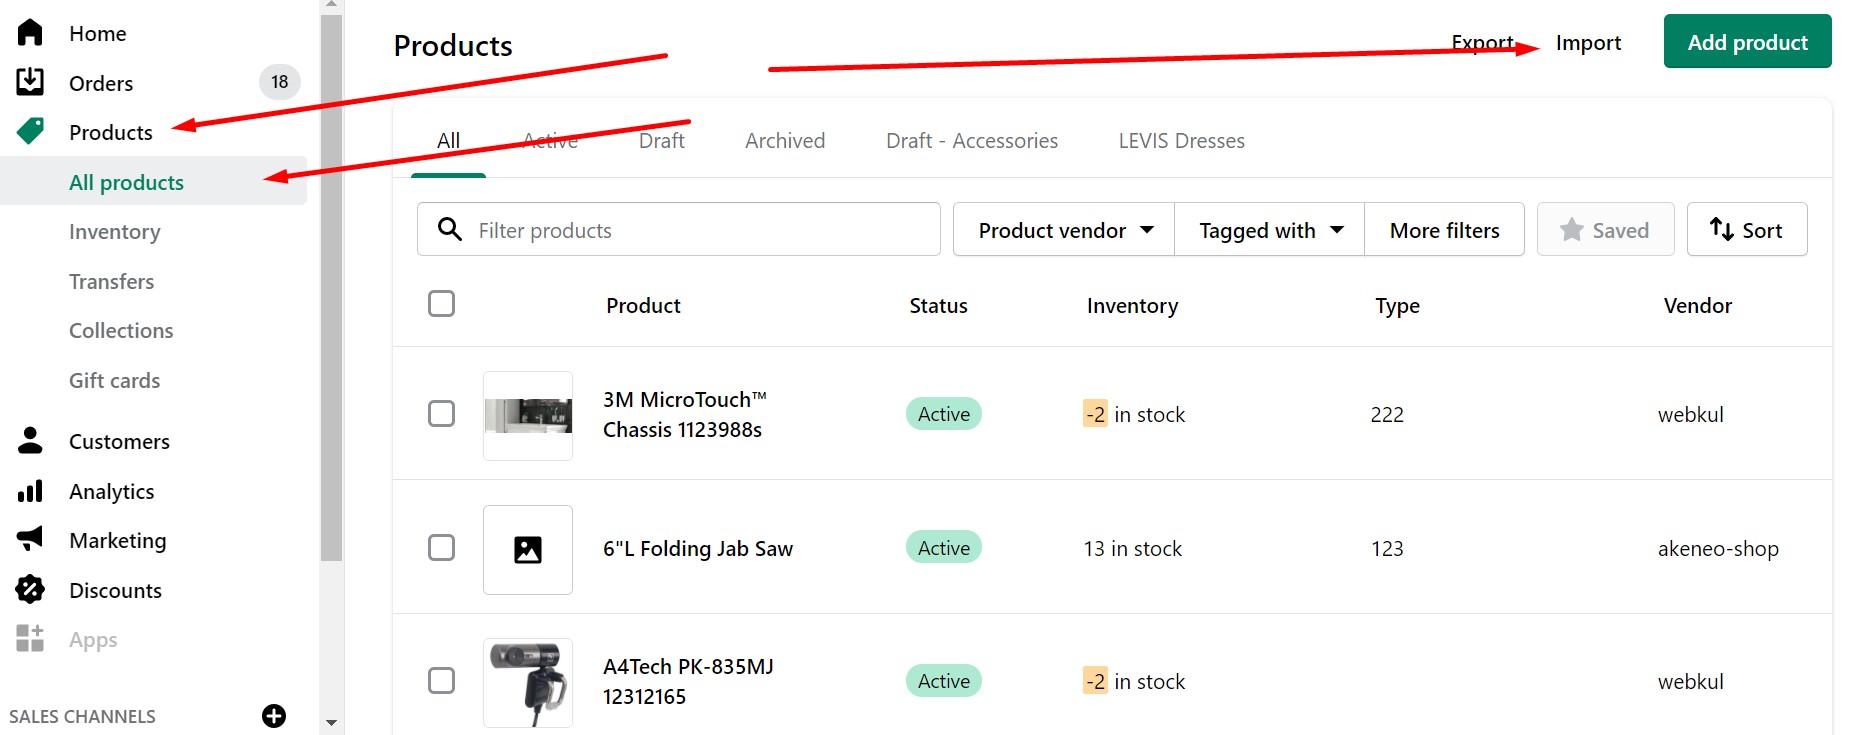
- The system displays the Import products by CSV file window. Click Choose File.
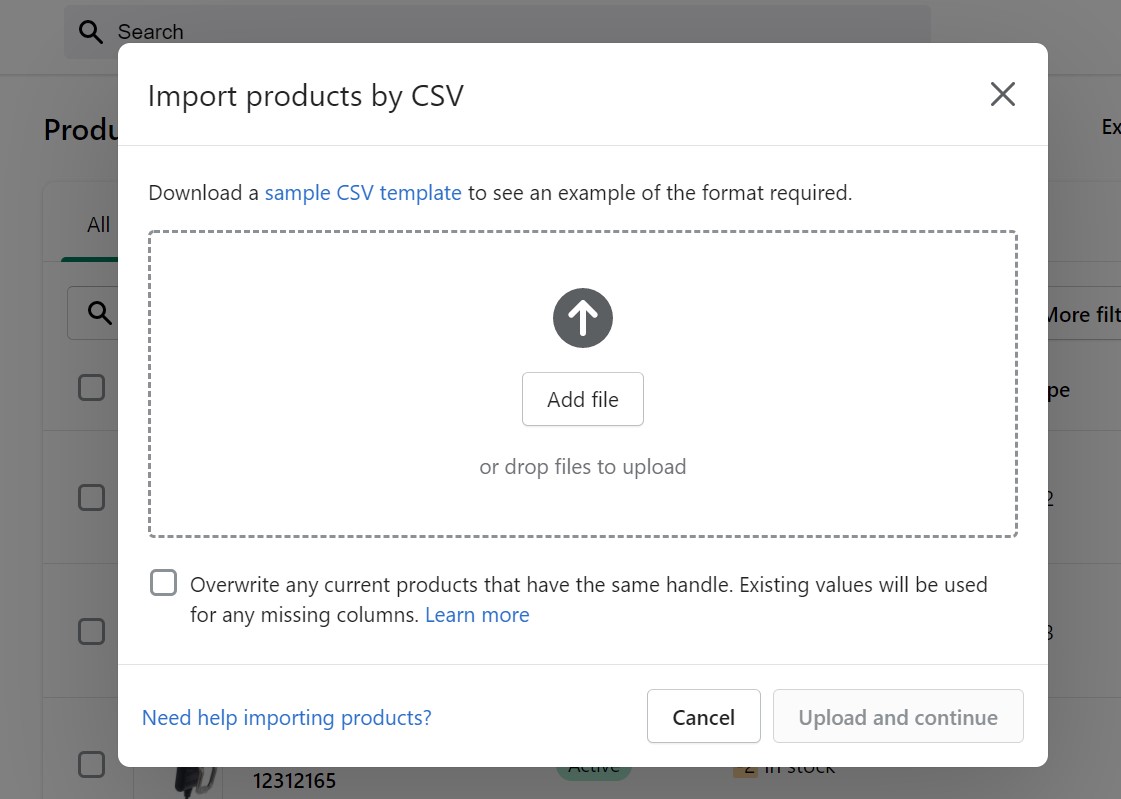
- Now, you need to locate your product CSV and click Open.
- Click Upload and continue to initiate the data update.
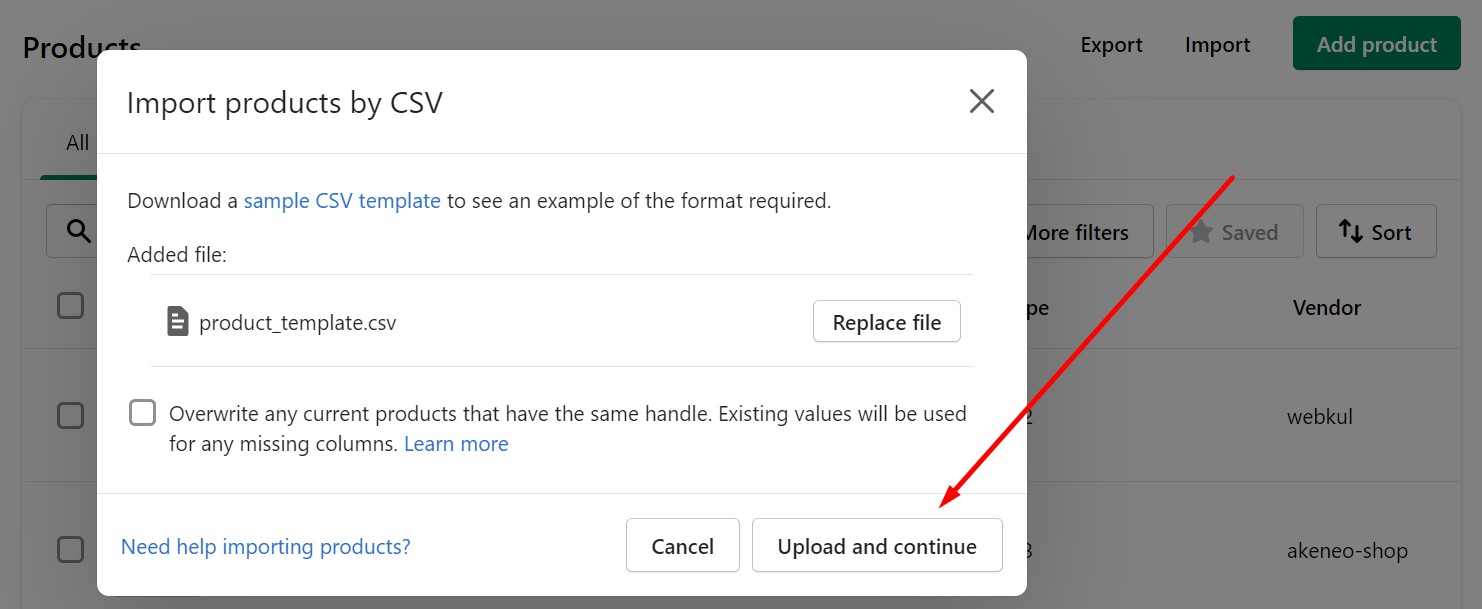
That’s it. When the procedure is complete, you receive a confirmation email. You can find more information on the topic here: How to import products to Shopify.
If you need to exceed the default limit or want to automate product uploads to Shopify, you can replace the standard data importer with the Shopify Improved Import & Export application. It not only supports huge files and multiple data formats but also lets you create update schedules and apply presets to automatically match third-party data to Shopify’s requirements so that products are imported smoothly. Contact us for more information about the tool.
How to Export Products in Shopify
Exporting products from Shopify is another opportunity associated with the platform. To make the next steps easier, you can export your products to a CSV file:
- keeping a copy of your product information;
- transferring the goods from your present Shopify store to outside parties;
- editing a spreadsheet to make substantial changes to your products.
Any changes you make to the items in your product CSV file will be reflected in the product list for your store if you import it into the Shopify admin.
Keep in mind that Shopify has a restriction on how many items can be exported in a data file. If you export up to 50 products, the CSV file is downloaded via browser. If you export 51 and more items, the CSV file is sent to you through email.
The more products you transfer, the longer it takes to export them. For example, exporting less than 100,000 items can be completed in approximately an hour, whereas exporting 500,000 items may take about 5 hours.
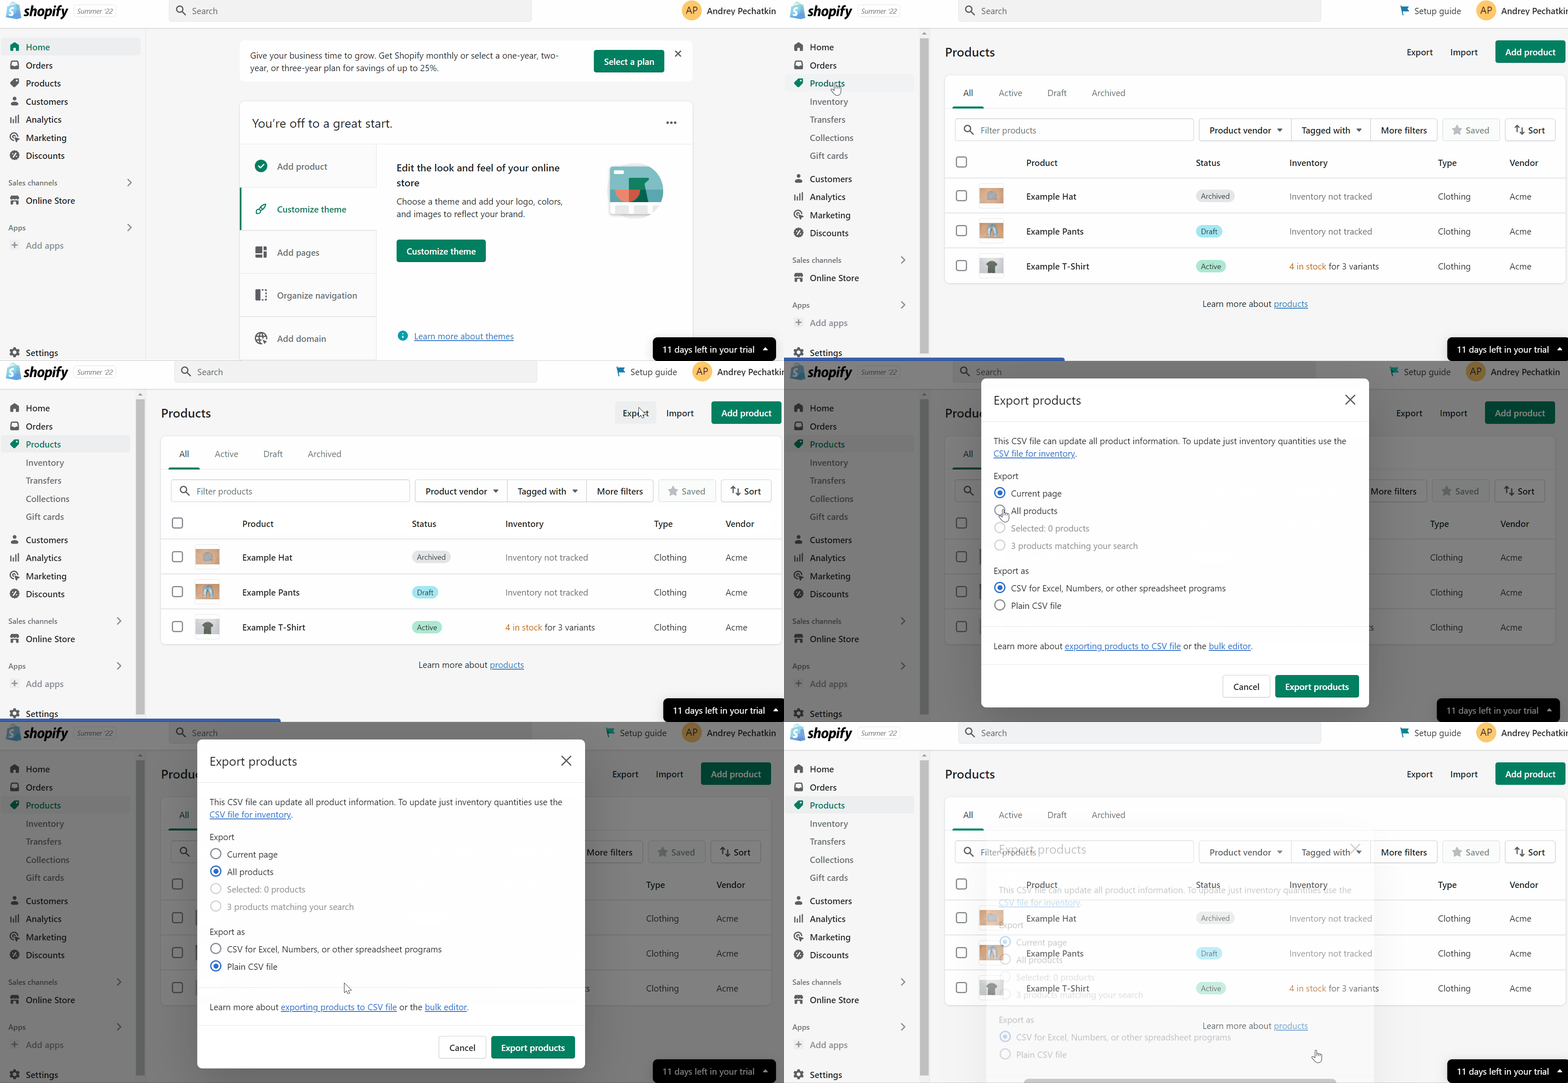
Now, let’s see how to export products in Shopify:
- Go to admin -> Products.
- Hit Export.
- Choose the items to export:
- The current product page;
- Every product;
- Products that meet your search and filter criteria are the ones you’ve chosen.
- Choose the CSV file type to export:
- Advanced file. Excel, Numbers, or any spreadsheet application can use it.
- A simple CSV file. If you intend to utilize a plain-text editor with it, choose this format.
- Press Export Products.
You can find more information on the topic here: How to export products from Shopify.
If you need to exceed the default limit or want to automate product exports from Shopify, you can replace the standard data exporter with the Shopify Improved Import & Export application. It not only supports huge files and multiple data formats but also lets you create export schedules and apply presets to automatically match third-party requirements. Contact us for more information about the tool.
Shopify Product API Reference
Below, you can see a brief take on Shopify Product API. Since it is a huge separate topic, we only provide a few code snippets here and links to more detailed documentation. In Shopify, it is possible to make a GET request for the information of any product with the help of the Ajax Product API.
Note that all Ajax API requests should use locale-aware URLs. Otherwise, your visitors won’t be able to get a consistent experience.
GET /{locale}/products/{product-handle}.js
Use the product handle to get the JSON of a product. Note that all monetary properties are returned in the customer’s presentment currency. You can check the latter via the currency field of the /{locale}/cart.js endpoint.
Example jQuery coding looks as follows:
|
jQuery.getJSON(window.Shopify.routes.root + ‘products/red-rain-coat.js’, function(product) { alert(‘The title of this product is ‘ + product.title); } ); |
Response
The JSON of the product.
|
1 2 3 4 5 6 7 8 9 10 11 12 13 14 15 16 17 18 19 20 21 22 23 24 25 26 27 28 29 30 31 32 33 34 35 36 37 38 39 40 41 42 43 44 45 46 47 48 49 50 51 52 53 54 55 56 57 58 59 60 61 62 63 64 65 66 67 68 69 70 71 72 73 74 75 76 77 78 79 80 81 82 83 84 85 86 87 88 89 90 91 92 |
{ “id”: 329678821, “title”: “Red Rain Coat”, “handle”: “red-rain-coat”, “description”: “<p>Lorem Ipsum.</p>”, “published_at”: “2014-06-12T16:28:11-04:00”, “created_at”: “2014-06-12T16:28:13-04:00”, “vendor”: “Shopify”, “type”: “Coat”, “tags”: [ “Spring” ], “price”: 12900, “price_min”: 12900, “price_max”: 12900, “available”: true, “price_varies”: false, “compare_at_price”: null, “compare_at_price_min”: 0, “compare_at_price_max”: 0, “compare_at_price_varies”: false, “variants”: [ { “id”: 794864229, “title”: “Small”, “options”: [ “Small” ], “option1”: “Small”, “option2”: null, “option3”: null, “price”: 12900, “weight”: 0, “compare_at_price”: null, “inventory_management”: “shopify”, “available”: true, “sku”: null, “requires_shipping”: true, “taxable”: true, “barcode”: “49738645” }, { “id”: 794864233, “title”: “Medium”, “options”: [ “Medium” ], “option1”: “Medium”, “option2”: null, “option3”: null, “price”: 12900, “weight”: 0, “compare_at_price”: null, “inventory_management”: “shopify”, “available”: true, “sku”: null, “requires_shipping”: true, “taxable”: true, “barcode”: “49738657” }, { “id”: 794864237, “title”: “Large”, “options”: [ “Large” ], “option1”: “Large”, “option2”: null, “option3”: null, “price”: 12900, “weight”: 0, “compare_at_price”: null, “inventory_management”: “shopify”, “available”: true, “sku”: null, “requires_shipping”: true, “taxable”: true, “barcode”: “49738673” } ], “images”: [ “//cdn.shopify.com/s/files/1/0040/7092/products/red-rain-coat.jpeg?v=1402604893” ], “featured_image”: “//cdn.shopify.com/s/files/1/0040/7092/products/red-rain-coat.jpeg?v=1402604893”, “options”: [ { “name”: “Size”, “position”: 1 } ], “url”: “/products/red-rain-coat” } |
If your products have selling plans, the following additional properties are available at /{locale}/products/<handle>.js.
|
1 2 3 4 5 6 7 8 9 10 11 12 13 14 15 16 17 18 19 20 21 22 23 24 25 26 27 28 29 30 31 32 33 34 35 36 37 38 39 40 41 42 43 44 45 46 47 48 49 50 51 52 53 54 55 56 57 58 59 60 61 62 63 64 65 66 67 68 69 |
{ “id”:5290511958181, // … “variants”:[ { “id”:34620489400485, // … “requires_selling_plan”:false, “selling_plan_allocations”:[ { “price”:3120, “compare_at_price”:3900, “per_delivery_price”:3120, “selling_plan_id”:360613, “selling_plan_group_id”:14699254537353206000 }, { “price”:3510, “compare_at_price”:3900, “per_delivery_price”:3510, “selling_plan_id”:393381, “selling_plan_group_id”:14699254537353206000 } ] } ], “requires_selling_plan”:false, “selling_plan_groups”:[ { “id”:14699254537353206000, “name”:“Subscribe and Save”, “options”:[ { “name”:“Delivery Frequency”, “position”:1, “values”:[ “Month”, “Week” ] }, { “name”:“Billing Frequency”, “position”:2, “values”:[ “Month”, “Week” ] } ], “selling_plans”:[ { “id”:360613, “name”:“Pay every month, delivery every month | save 20%”, “description”:“No commitment · Auto-renews · Skip or cancel anytime”, “options”:[ { “name”:“Delivery Frequency”, “position”:1, “value”:“Month” }, { “name”:“Billing Frequency”, “position”:2, “value”:“Month” } ], “recurring_deliveries”:true }, { |
For further information on Shopify Product API, check the official documentation: Product API reference.
Conclusion
Now, you know what Shopify products are, feel the difference between physical and digital products, and understand how to add products on Shopify no matter if they have variants or not.
As you can see, it is possible to import products to Shopify to simplify your daily duties as well as export them right in your Shopify admin, where you can browse, add, edit, and manage all the items available in your catalog or hidden from it.
As you can see, working with Shopify products is quite straightforward and intuitive. You need neither coding skills nor previous experience with content management. Your store’s administration section is very admin-friendly, and if you don’t know something, guides like ours are at your service. And if you have any inquiries regarding importing Shopify products or exporting them, contact us. We will help you with data transfers of any complexity.
Shopify Product FAQ
We summarize all the basic facts about Shopify products in the following FAQ section.
What are Shopify products?
Shopify products are all items, including physical goods, digital downloads, services, and gift cards, that you sell. Provide product information and submit product photos to add a product on Shopify. For each combination of options for your product, such as size or color, you can create a variant.
Is Shopify good for selling products?
It is definitely one of the top ecommerce platforms available right now. Shopify is made to assist users in creating their customizable online store with a huge selection of apps and hundreds of built-in features. Adding and selling products on the platform is a breeze.
Where are Shopify products?
To search for your products on mobile, follow these steps:
– Open your Shopify app;
– Go to Products > All products.
To reach your products on Shopify from a desktop, do the following:
– Log in to your Shopify admin.
– Go to the Products screen using the navigation section on the left.
Is it free to sell on Shopify?
Shopify provides the ability to create an online store for free without any coding skills. After a 14-day free trial, you have to select one of its plans.
How much does Shopify take per sale?
Shopify offers three pricing plans:
– Shopify Basic costs $29 per month, with 2.9% + 30¢ per online transaction;
– Shopify plan costs $79 per month, with 2.6% + 30¢ per transaction;
– Advanced Shopify costs $299 per month, with 2.4% + 30¢ per transaction.
How to add products to Shopify?
You can add products to Shopify as follows:
– Visit Shopify -> Products.
– Click the Add product button at the top.
– Name your product and add its description.
– Apply other changes.
– Save your product.
How to sell digital products on Shopify?
You need to install an additional application to be able to sell digital products on Shopify. Also, don’t forget to uncheck This is a physical product because you deal with a digital product.
How to import products into Shopify?
You can import Shopify products right from the Products screen. Hit the Import link, provide a CSV file suitable for Shopify, configure other import parameters, and launch the data transfer. Alternatively, you can import products automatically according to a schedule. Contact us for more information.


