Shopify
Today, we are going to explore the world of Shopify metafields – an integral part of the Shopify admin and storefront. You will learn what a Shopify metafield is and what metafield types are available. After that, we proceed to a step-by-step guide on how to add metafields to a product page in Shopify. The last chapter of this article explains how to import metafields to Shopify.

Table of contents
- 1 What is Metafield in Shopify?
- 2 Shopify Metafield Types
- 3 How to Add Metafield to Product in Shopify
- 3.1 I Create Metafield in Shopify Admin
- 3.2 II Add Metafield to Product
- 3.3 III Display Metafields on Product Page
- 4 Shopify Metafield Import & Export
- 4.1 Shopify Metafield Import
- 4.2 Shopify Meatfield Export
- 5 Conclusion
What is Metafield in Shopify?
So, what is a metafield in Shopify, you will ask? Well, it is a handy addition to a product page that can help you customize the functionality and appearance of your Shopify store.
Shopify metafields let you save specialized information that isn’t common for the Shopify admin. As a result, it is possible to use metafields for the following two purposes:
- Internal tracking;
- Customized information display.
Sounds a bit confusing, isn’t it? Well, we need to be more specific, then.
Let’s suppose you sell candles. Different candles are associated with varying times of burn. While a default product page doesn’t contain this information, you can use a corresponding metafield of Shopify to display this parameter.
Also, you can use Shopify metafields for part numbers, color swatches, files for download, etc. The platform lets you add metafields to individual product pages, collections, orders, or other parts of your store, directly from your Shopify admin.
Shopify uses the following parts to define metafields:
- Namespace and key – the combination of namespace and key is a unique identifier for your metafield. Namespace and key should be separated by a “.”, and can only contain letters, numbers, underscores (_), and hyphens (–). Use a namespace to group similar metafields. E.g., namespace products + the keys expiration_date and rating. The namespace and key combination must be unique.
- Value – this part characterizes the type and format of information that’s contained in your metafield. E.g., plain text, URL, or integer. Note that each metafield type is associated with specific values.
- Description – it is an optional component of a Shopify metafield that can help you input the correct values in the admin.
- Validation – it is another optional parameter used to limit the values that your metafield can contain.
Shopify Metafield Types
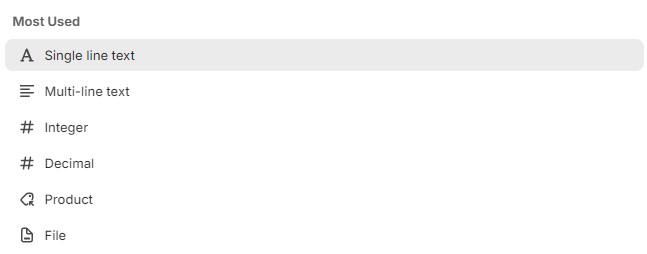
Now, let’s look at metafield types of Shopify. Different types are suitable for different situations since each type accepts a range of supported values. Below, you will find a table that contains the most common Shopify metafield types along with their supported values, example use cases, and the ability to be used as a metafield list.
| Metafield Type | Description | Example |
| Collection reference | Link to an existing collection. Supports linking to one or multiple collections in a metafield list. Can be used in a list. | Include a “Complete the look” collection for fashion products on your online storefront. |
| Color | RGB values in #RRGGBB format. Can be used in a list. | Store the color of a product and set the product page background to the same color. |
| Date | Date values in ISO 8601 format, without a time zone. Can be used in a list. | Use this Shopify metafield type to add product expiration dates, order delivery dates, or customer birth dates. |
| Date and time | Date values in ISO 8601 format and time values in UTC. Can be used in a list. | Use it for launch events or product release dates. |
| Decimal | Decimal values in the range of +/-9999999999999.999999999, with up to 13 digits before the decimal and up to 9 digits after. Can be used in a list. | Use this Shopify metafield to add a carat weight for jewelry. |
| Dimension | Dimensions in metric or imperial units of measurement. Both whole number and decimal values are supported. Can be used in a list. | Use it for box heights or product lengths, such as the length of a scarf. |
| File reference |
Can be used in a list. |
You can use it to add a PDF file for assembly instructions or a video guide instead. |
| Integer | Integer values in the range of -4,611,686,018,427,387,904 to 4,611,686,018,427,387,903. Can be used in a list. | For instance, it can be a page count for books. |
| JSON | Raw JSON data for advanced use cases. Cannot be used in a list. | With this Shopify metafield, you can add a table of specifications that has different columns for each product. |
| Metaobject reference | A link to a single or multiple metaobject entries. Can be used in a list. | Add and display a custom influencer profile. |
| Mixed reference | References of any type. Developer support is needed. Can be used in a list. | Use it for dynamic landing pages. |
| Money | Whole numbers and decimal values are supported. The currency code must match the store currency. Cannot be used in a list. | Track product cost details, such as distributor cost or ship-to-warehouse cost. |
| Multi-line text | Plain text with line breaks. Cannot be used in a list. | Use it to place shipping notes or return policies on product pages. |
| Page reference | A link to an existing page. Linking to a single or multiple pages in a metafield list is possible. Can be used in a list. | Add your policy page or a detailed care guide to product pages. |
| Product reference | Linking to one or multiple products in a metafield list. Can be used in a list. | Store and display featured products on product pages or collection pages. |
| Product variant reference | Linking to one product variant. Can be used in a list. | Store and display other clothing items in the same color on product pages. |
| Rating | Supports decimal values along a given scale. Can be used in a list. | Display an audience score or a star rating for a product. |
| Rich text | Text with line breaks and inline styling.
Can only be connected to theme settings that work with rich text. Cannot be used in a list. |
Add long-form stories with styling about your brand or product. |
| Single line text | Plain text with no line breaks. Limit single-line fields to preset choices. Can be used in a list. | Use this Shopify metafield to add short notes and announcements to store pages. |
| True or false | A checkbox for selecting whether a condition is true or false. Cannot be used in a list. | Add this metafield to let customers select additional services, such as engraving. |
| URL | HTTP, HTTPS, and mailto: URLs. Can be used in a list. | Add a link to book reviews or product videos. |
| Volume | Whole numbers and decimal values in metric or imperial units of measurement. Can be used in a list. | Specify the volume capacity of a water bottle. |
| Weight | Whole numbers and decimal values in metric or imperial units of measurement. Can be used in a list. | Specify the weight of a product or ingredient, for example, grams of sugar. |
How to Add Metafield to Product in Shopify
Adding metafields to products in Shopify involves the following steps :
- Create a metafield in your store admin;
- Add the metafield to products;
- Display the metafield on product pages.
Let’s assume you have a furniture store selling products with different shared parameters (not variants), such as materials, designers, and dimensions. Follow these steps to display them on your product detail page.
I Create Metafield in Shopify Admin
You can prepare a new Shopify metafield in the store admin under Settings -> Custom data as follows:
- Proceed to the Metafields section;
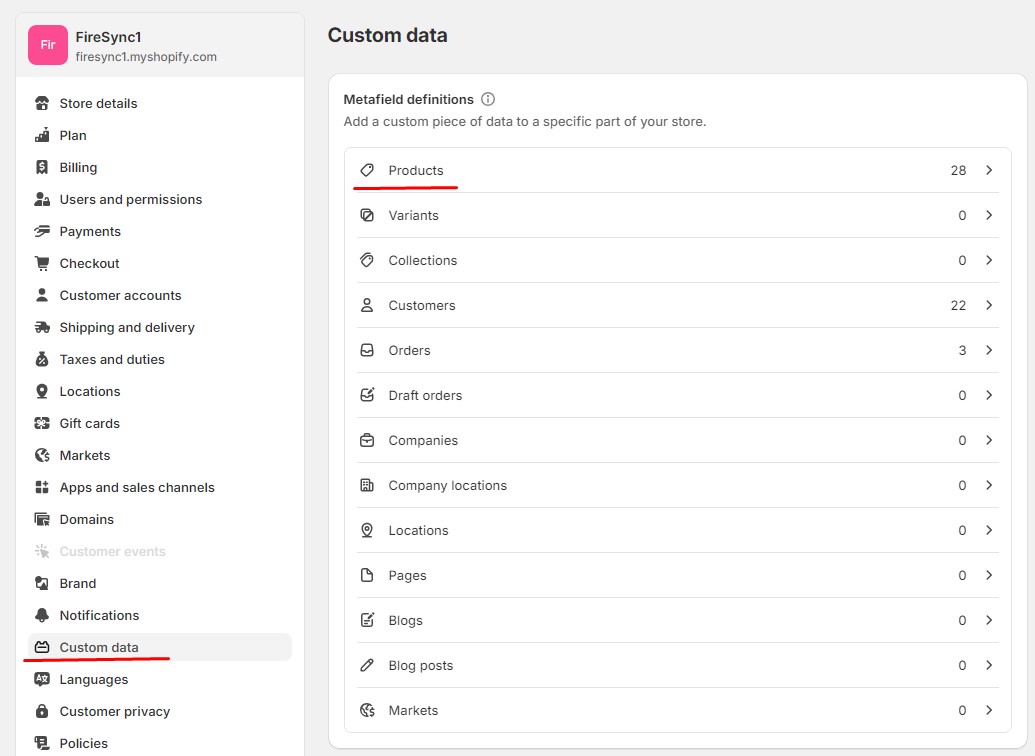
- Select Products;
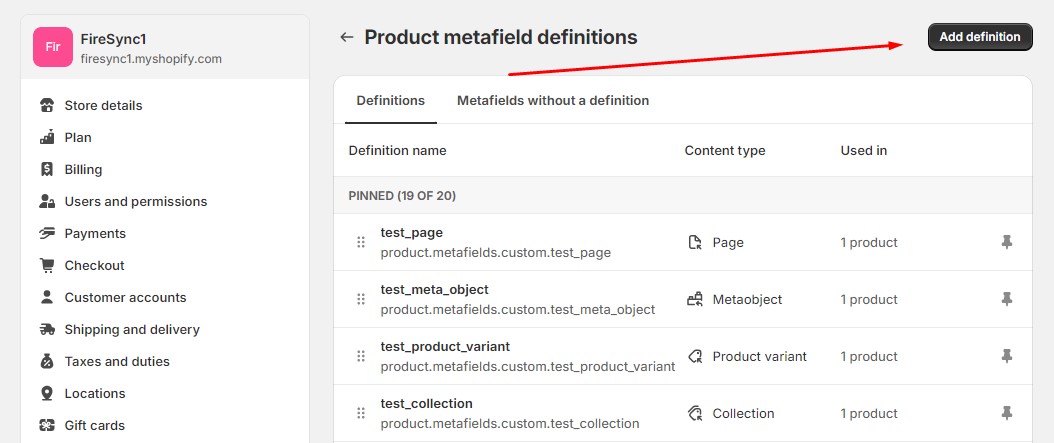
- Click on Add definition.
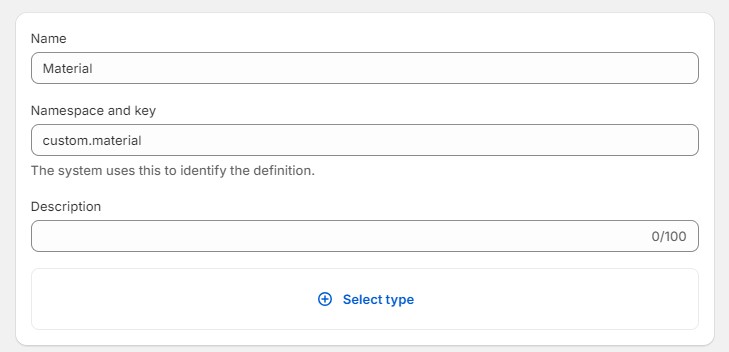
- Enter a metafield name (i.e., Material), namespace & key, and description;
- Select a Shopify metafiled type (i.e., Single line text);
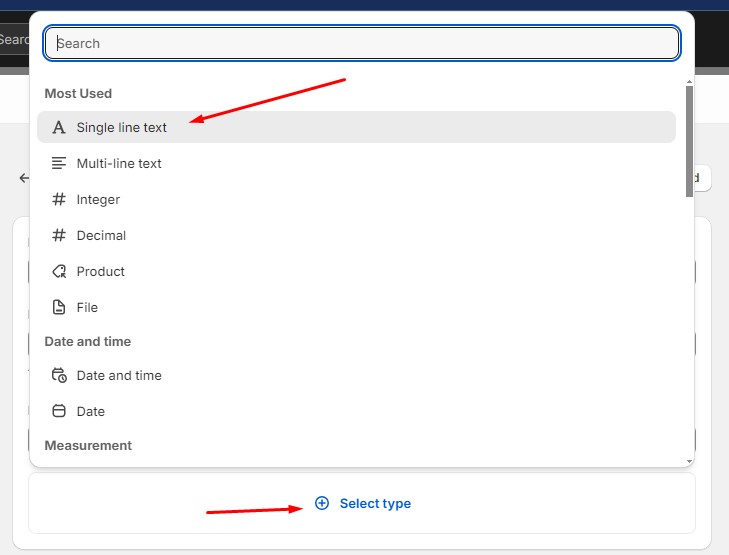
- Configure other parameters: decide whether it is a one-value definition or a list of values, specify character count, etc.
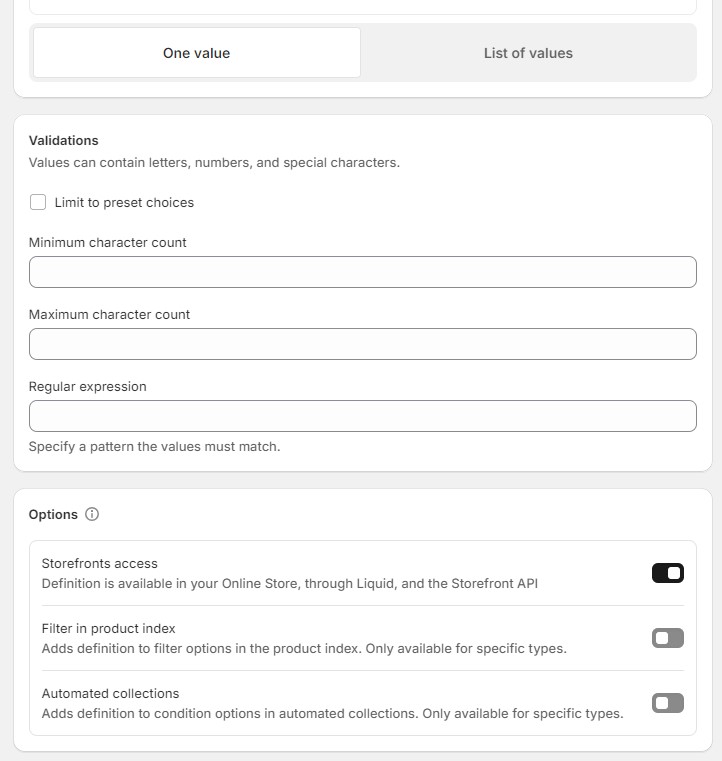
- Repeat these steps to create as many new metafields as your case requires.
To save time, you can use the “Limit to preset choices” in the Validations section of the metafield definition. Activate the feature and provide the options for this metafield. 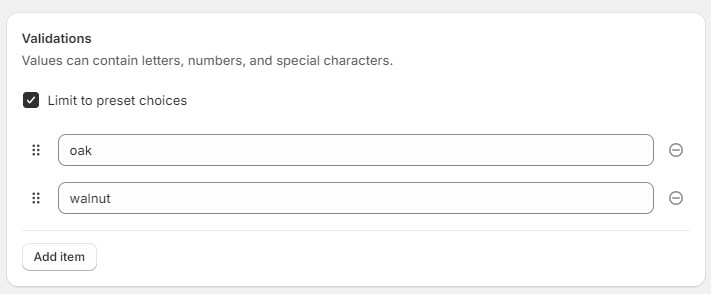
Now, you won’t need to type these values every time you configure a product, selecting them from the drop-down instead.
II Add Metafield to Product
Once you create all the necessary metafields, add them to your products – chairs in our example. Follow these steps to add metafields to a product in Shopify:
- Go to your Admin > Products;
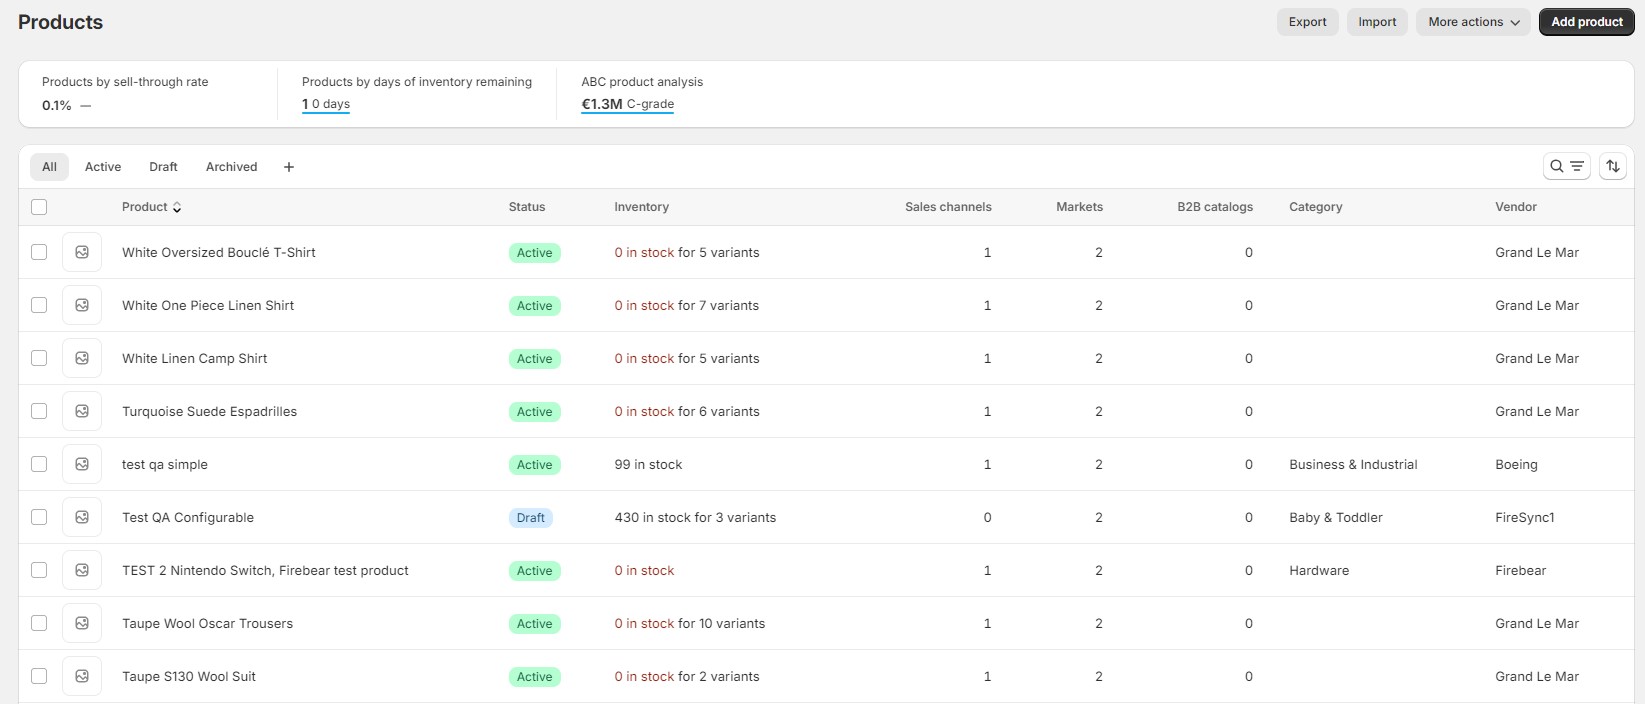
- Locate a product for which you want to add metafields;
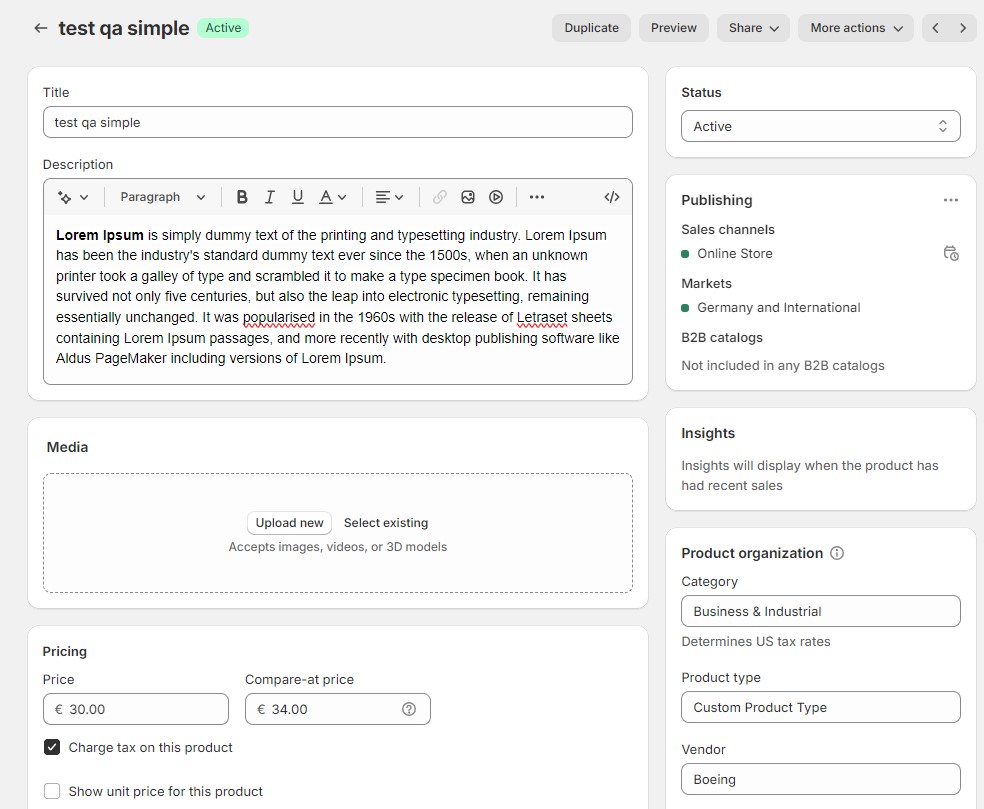
- Scroll to see available metafields
- Specify relevant data for this particular product;

- Add as many metafields as your product requires.
- Repeat these actions for other products.
- Click Save.
III Display Metafields on Product Page
During this final step, you will learn how to display the information from metafields on a product page in Shopify. Follow these steps:
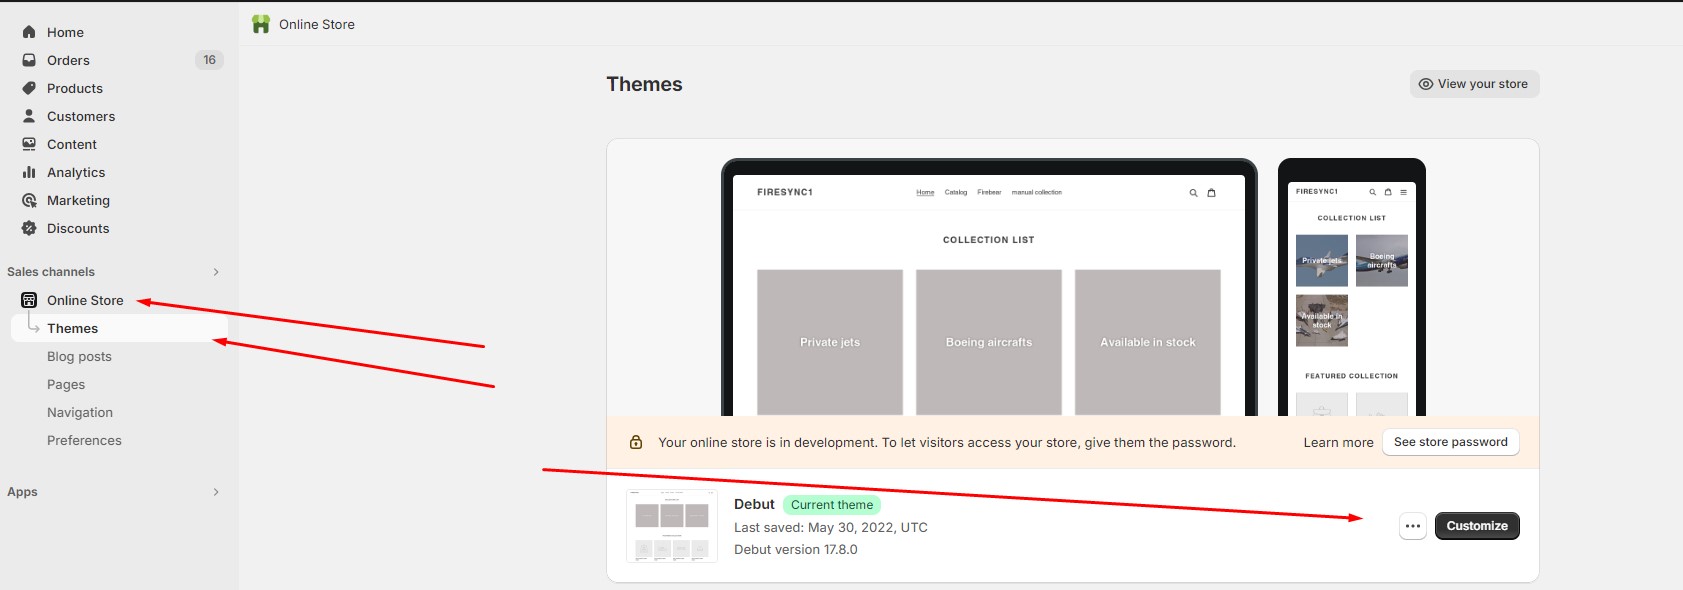
- Go to Admin > Online Store > Themes > Customize;
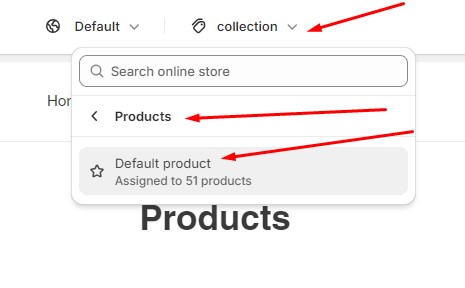
- Select Products > Default product in the top-middle template menu;
- Add a new block under the Product page;
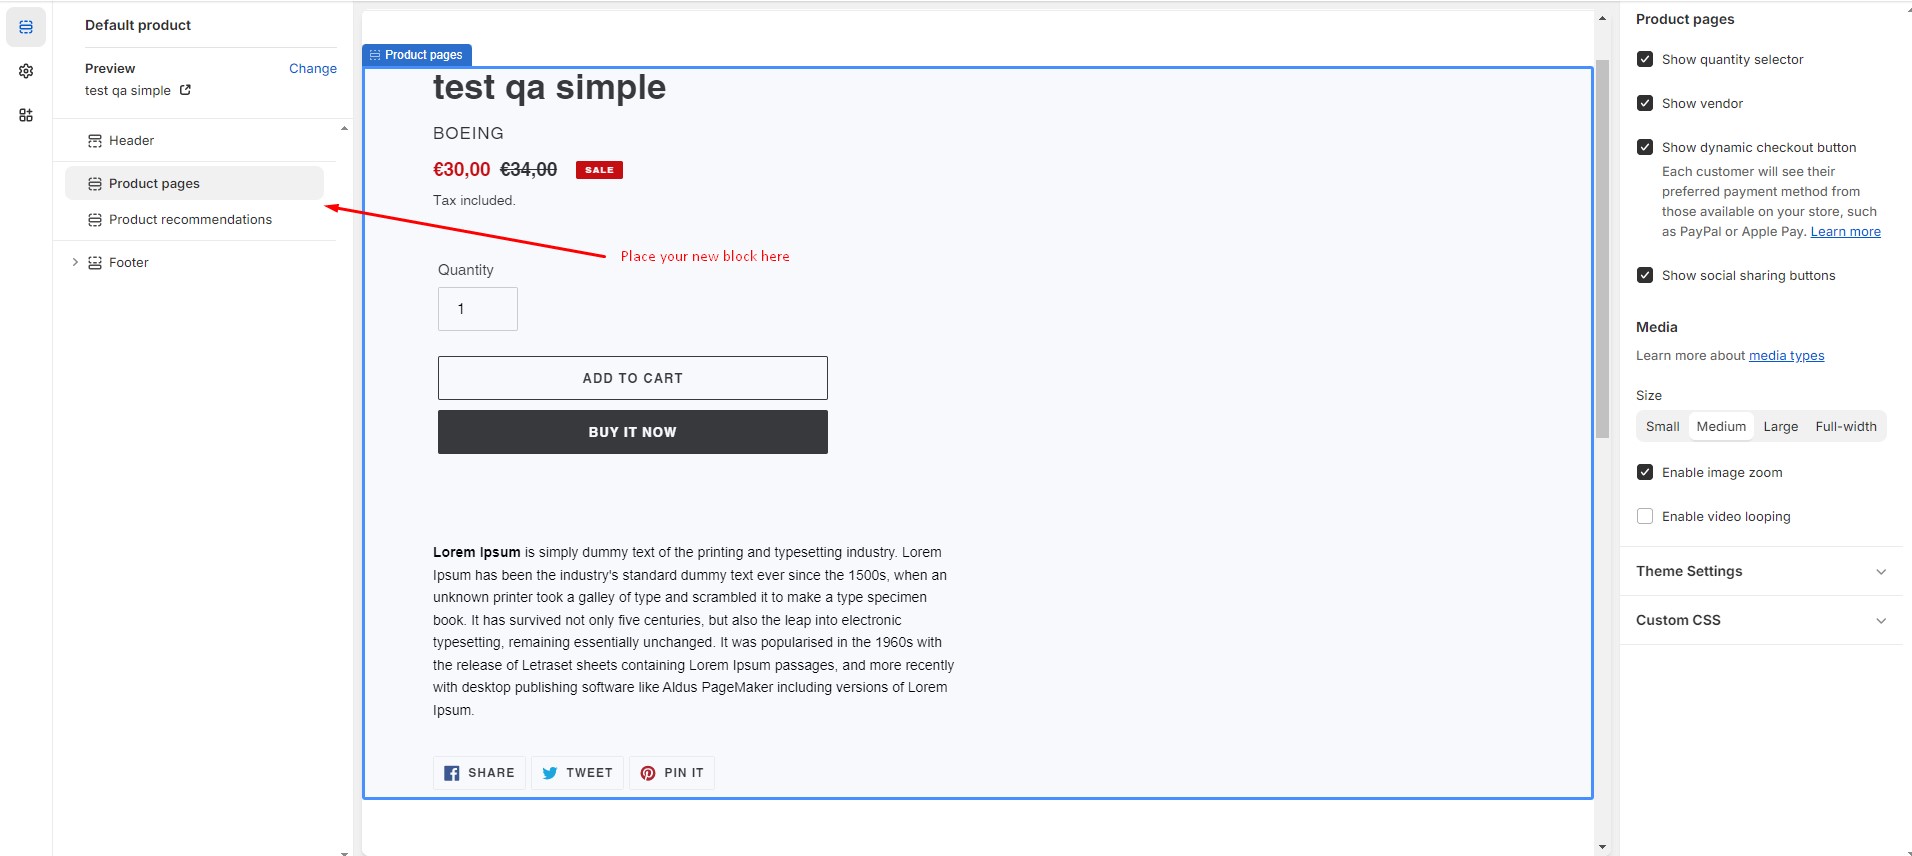
- Click on the “burger” icon to add metafields content.
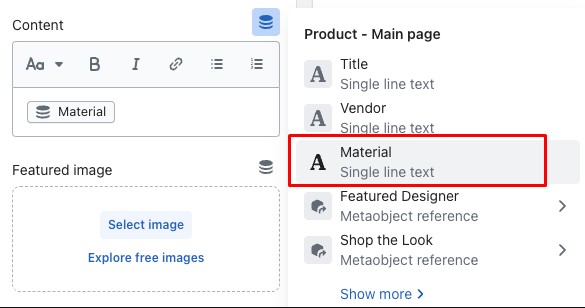
That’s how you can add the metafields, displaying them in any way you like.
Shopify Metafield Import & Export
Let’s see how to import and export metafields to Shopify. You need the Import & Export Tool by Firebear to enable this process. Next, it is possible to import and export Shopify metafields as a part of a Product CSV.
Shopify Metafield Import
When it comes to the Shopify metafield import, your update file should have columns with the meatafield data that follow this structure:
mf_<namespace>.<metafield key>
Next, the following processes are at your service:
- You can use the import to update metafield values in Shopify;
- You can use the import to create a product with metafields;
- You can use the import to clear metafield values. Place metafield values in a quotation mark (“”).
Note that Shopify cannot delete product metafields in bulk.
The following table contains examples of Shopify meatafield columns and their values suitable for import:
| Content Type | Attribute | Value Example |
| Multi-line text | mf_custom.test_ml_text | Test text |
| Integer | mf_custom.test_int | 5 |
| Decimal | mf_custom.test_dec | 4.0 |
| Product | mf_custom.test_entity | gid://shopify/Product/7682399010997 |
| File | mf_custom.test_file | gid://shopify/MediaImage/29058352742581 |
| Date and time | mf_custom.test_datetime | 2024-03-05T18:00:00Z |
| Date | mf_custom.test_date | 2024-03-06 |
| Dimension | mf_custom.test_dim | {“value”:5.0,”unit”:”MILLIMETERS”} |
| Weight | mf_custom.test_weight | {“value”:4.0,”unit”:”GRAMS”} |
| Volume | mf_custom.test_volume | {“value”:7.0,”unit”:”MILLILITERS”} |
| True or false | mf_custom.test_bool | true |
| Color | mf_custom.test_color | #59ca22 |
| Rating | mf_custom.test_raiting | {“scale_min”:”1.0″,”scale_max”:”10.0″,”value”:”4.0″} |
| URL | mf_custom.test_url | https://admin.shopify.com/store/firesync1/products/7682412871861 |
| Money | mf_custom.test_money | {“amount”:”4.00″,”currency_code”:”EUR”} |
| JSON | mf_custom.test_json | {“name”:”John”,”age”:30,”car”:null} |
| Rich text | mf_custom.test_rich_text | {“type”:”root”,”children”:[{“type”:”paragraph”,”children”:[{“type”:”text”,”value”:”test”}]}]} |
| Single line text | mf_custom.test_single_line_text | Test text |
| Collection | mf_custom.test_collection | gid://shopify/Collection/236417155253 |
| Product variant | mf_custom.test_product_variant | gid://shopify/ProductVariant/43712193462453 |
| Metaobject | mf_custom.test_meta_object | gid://shopify/Metaobject/56229429429 |
| Page | mf_custom.test_page | gid://shopify/OnlineStorePage/73557213365 |
When your update file is prepared, run a standard product import associated with the Import & Export Tool.
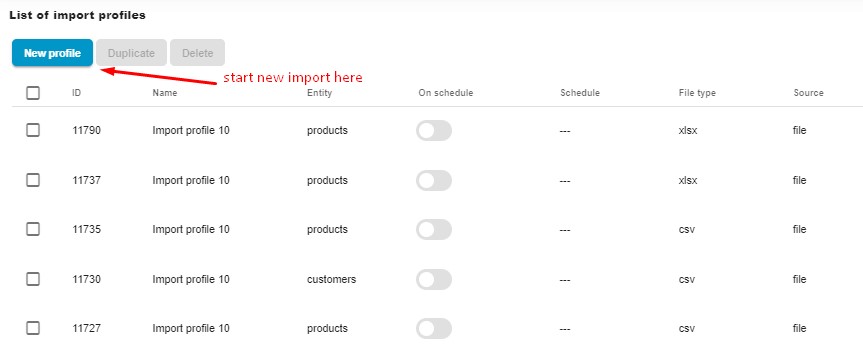
- Proceed to Apps -> Firebear Import & Export Tool -> Import;
- Hit the New Profile button to create a new import profile for Shopify metafields.
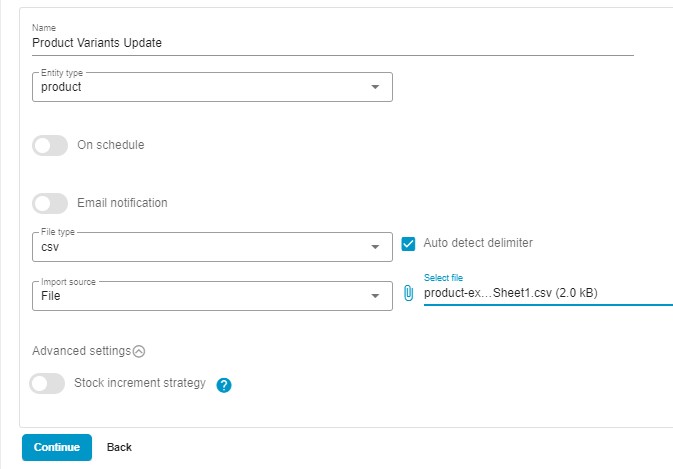
- Now, apply basic configurations to initiate the update:
- Name your new import profile: Shopify Metafield Import.
- Choose the entity to import: Products.
- Note that you don’t need to enable Shopify import automation or notifications – these features are optional.
- Select a file format: CSV if you’ve used it for storing your metafields data or XLSX, XML, and Google Sheets. In the case of CSV, activate the auto-detect delimiter feature.
- Choose your import source depending on where you store your update. If it’s your computer, choose File from the Import source dropdown, click the paperclip icon, navigate to your file, and select it. You can also import metafields to Shopify via FTP or from Google Drive, Google Sheets, or URL.
- Keep the Stock Increment Strategy toggle disabled to transfer the current product qty specified in your update file.
- You don’t need to do anything with your mapping section if your update is suitable to the Shopify requirements.

- Examine whether your Shopify metafield update is correct on the Preview screen. The Import & Export Tool displays the products you import even before uploading them.

- Click the “Save” button to save your import profile. Next, click the “Import” button to import metafields to Shopify.
Shopify Meatfield Export
As for the Shopify metafield export, it is also a basic product export procedure associated with the Import & Export Tool. Follow these steps to transfer metafields data from your e-commerce website:
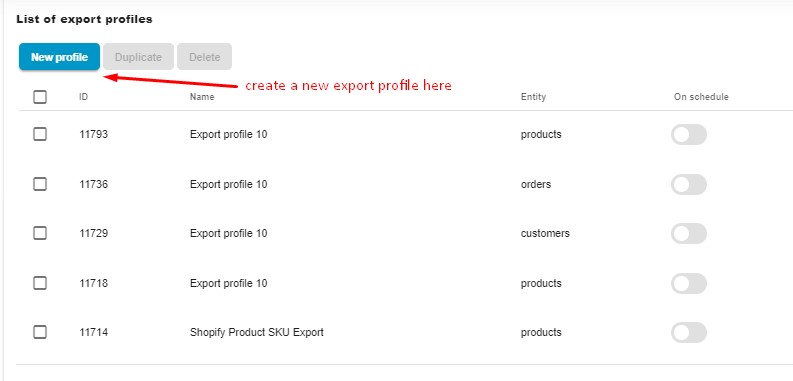
- Create a new export profile: go to Shopify Admin -> Apps -> Firebear Import & Export Tool -> Export and click the New Profile button.
- Follow these steps on the Configure export screen:
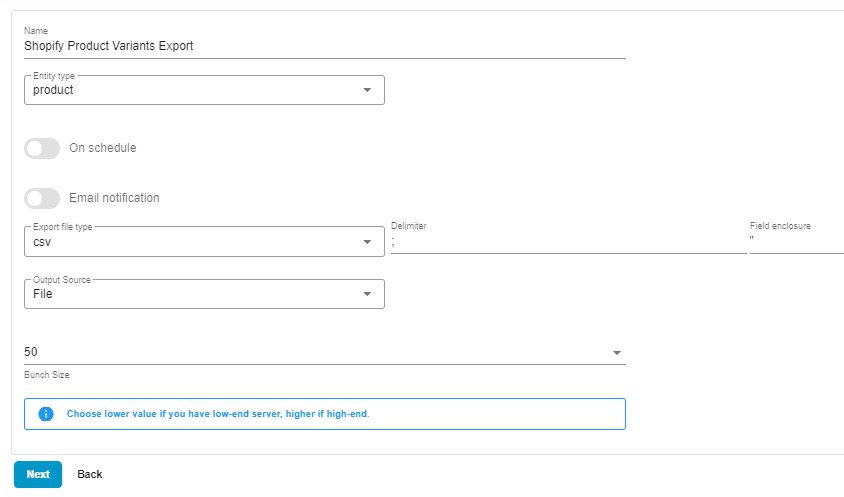
- Specify a name for your profile, for instance, Shopify Metafield Export.
- Choose an export entity – Products.
- Don’t automate your Shopify metafield export if it is not a regular procedure.
- Skip email notifications because it is not mandatory.
- Choose your file format: CSV, XML, XLSX, or Google Sheets. In the case of CSV, you can also specify a custom delimiter and field enclosure.
- Choose File as your export source to download your metafields from Shopify. Alternatively, you can send your data over FTP, straight to Google Drive, or to a Google Sheets spreadsheet.
- For a server with limited resources, choose a lower bunch size to reduce the load.
- Click “Continue” to proceed to the mapping screen.
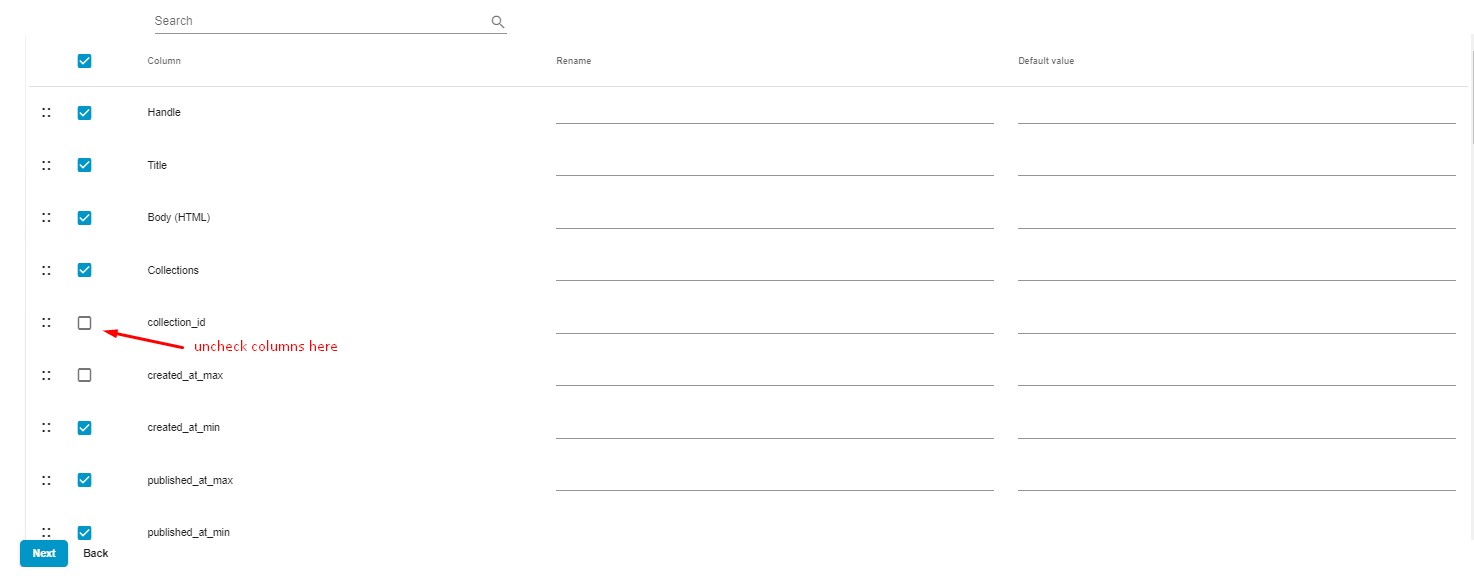
- Use the mapping screen to export only the columns essential for your update. Unselect the columns that you don’t need.
- Use filters to transfer only particular products with metafields. Hit the + button to create a new filter. Choose a filtering parameter, such as a vendor, and then specify values to narrow down the selection of products in your export file.

- Click the Save & Close button to save your Shopify metafield export profile and Export to transfer metafields from Shopify.
Conclusion
Understanding metafields in Shopify is a relatively complex task that may take time. Therefore, it is recommended to start with simple items and learn the basics. Once you get a grip, you can create more complex product pages with lots of metafields. You will be amazed at how much manual work they can save. At the same time, it is also possible to import metafields to Shopify to reduce any manual interactions in this area. For further information on the Shopify metafields import and export, contact us and read our Improved Import & Export Tool Manual.
Get Import & Export Tool for Shopify

Please enable JavaScript to view the comments powered by Disqus.


