E-Commerce, Magento 2, Our extensions

In the following article, we explain what a requisition list of Magento 2 is – a feature exclusively available in Adobe Commerce with B2B extension only. Besides, we describe the Magento 2 requisition list functionality and provide several small tutorials on managing this type of content. Next, we shed light on how to import and export Magento 2 B2B requisition list data. Since you cannot freely transfer B2B entities in Magento with its default tools, you need a third-party tool and a CSV file prepared according to specific requirements. We offer a solution that works best for the requisition list import to Magento 2. You will also find a sample CSV with all the necessary attributes and a table that defines all the Magento 2 B2B requisition list columns below, but let’s define Magento 2 requisition lists first and then gradually proceed to other sections of this guide.

Table of contents
- 1 What is a Magento 2 B2B Requisition List?
- 2 Magento 2 Requisition List Workflow
- 2.1 How to Enable Requisition Lists in Magento 2
- 2.2 How to Create a Magento 2 Requisition List
- 2.3 How to Add Products to a Requisition List
- 2.4 How to View the Updated Requisition List in Magento 2
- 2.5 How to Add Products to the Cart from a Requisition List in Magento 2
- 2.6 How to Move Items Between Requisition Lists
- 2.7 How to Remove Items from a Requisition List
- 2.8 How to Rename a Magento Requisition List
- 2.9 How to Print a Requisition List
- 3 How to Import And Export Magento 2 Requisition Lists
- 3.1 Download Magento 2 B2B Requisition List Sample Table
- 3.2 Learn Magento 2 Requisition List Attributes
- 3.3 Import Requisition List Data to Magento 2
- 4 Final Words
What is a Magento 2 B2B Requisition List?
The Magento 2 B2B extension (which can only be installed on Adobe Commerce) comes with the Magento 2 requisition list functionality, providing store visitors with the ability to create multiple lists of frequently purchased items and use them for order placement. So, a Magento 2 B2B requisition list is a kind of wishlist that lets buyers re-order items periodically. Note that both logged-in users and guests can leverage this functionality. Thus, you dramatically improve the buying experience of your clients by simplifying the way they order goods.
Consider the following difference between requisition lists and wishlists in Magento 2.
- Unlike a wish list, a requisition list is not purged after a customer sends items to the shopping cart. Thus, it can be leveraged for placing multiple orders.
- Besides, the UI of a requisition list in Magento 2 is adapted to a compact view to display a larger number of items.
- As a Magento 2 merchant, you can configure a maximum number of requisition lists per customer.
- Customers can define product quantity and add all products to the cart at once, speeding up the B2B shopping experience.
Thus, the main purpose of a requisition list is to save time while ordering frequently purchased products, for example, when purchasing monthly office supplies.
A customer can add items to the shopping cart directly from the requisition list. Besides, they can maintain multiple lists focused on products from different vendors, buyers, teams, campaigns, etc.
The maximum number of requisition lists maintained for each company account is 999, but you can reduce it by applying a specific configuration.
Magento 2 Requisition List Workflow
Below, we shed light on how to manage requisition lists. Let’s take a look at how to enable them.
How to Enable Requisition Lists in Magento 2
To enable requisition lists in Magento 2, go to Stores -> Configuration -> General > B2B Features. Set the Enable Requisition List setting to Yes to allow customers to use requisition lists.
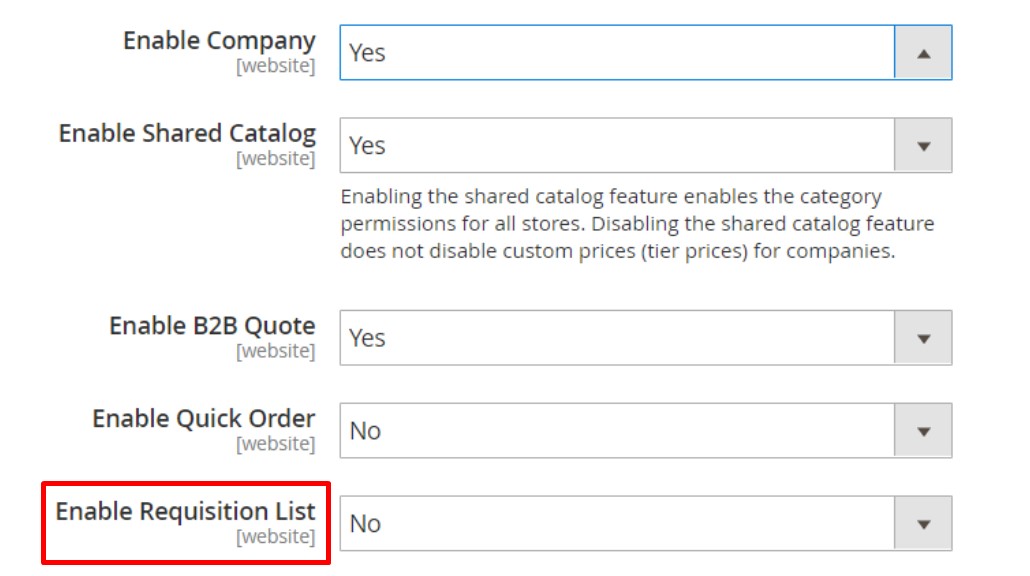
How to Create a Magento 2 Requisition List
There are two ways to create a Magento 2 B2B requisition list. You can either do that from your account dashboard or right from a product page.
From the account dashboard:
- Choose ‘My Requisition Lists’ in the sidebar.
- Next, click ‘Create New Requisition List’ on the Requisition Lists page.
When on a product page:
- Find the appropriate button – Add to Requisition List – and click it.
- Hit Create New Requisition List.
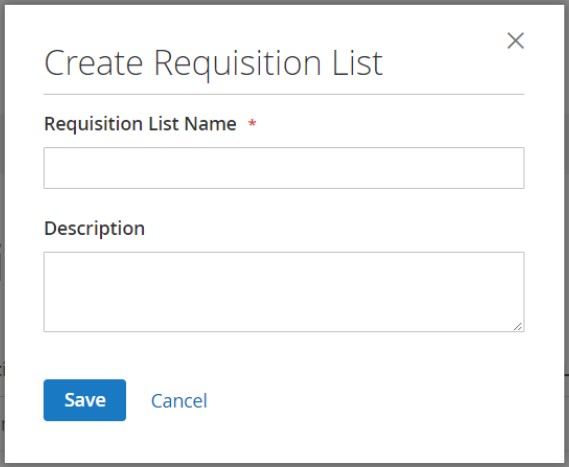
Despite the selected method, you have to enter the Requisition List Name and Description and tap Save.
How to Add Products to a Requisition List
Now, when you have a brand new Magento 2 requisition list, we should say a few words about adding products to it. There are two ways of doing that:
- From a product page;
- From an existing order.
From a product page:
- Go to a page of a product you want to add to a requisition list.
- Click Add to Requisition List.
- Choose an existing requisition list or create a new one.
- The QTY of the product customer specified at the product page will also be considered. Thus, if the qty of the product is set to ’10’ and the customer adds the product to the requisition list – the product with QTY=10 will be added.
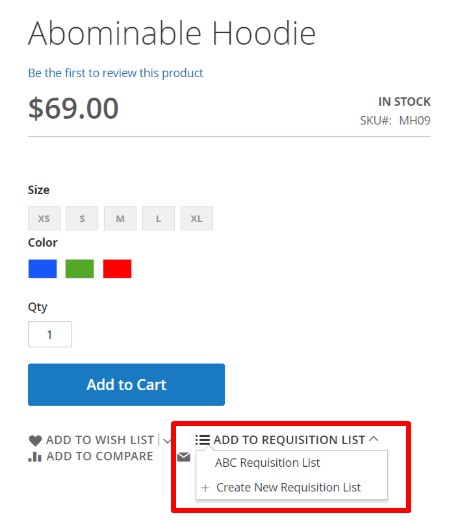
From an existing order
- In your account dashboard, go to My Orders.
- Click Add to Requisition List.
- Choose an existing requisition list or create a new one.
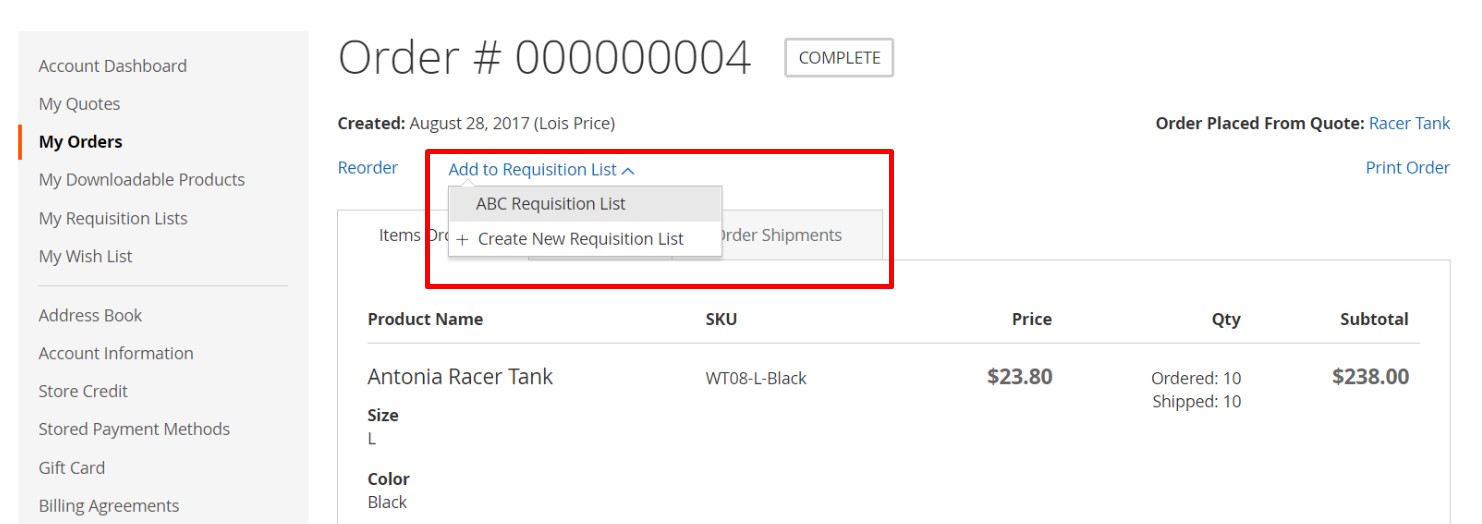
At the same time, Magento 2 allows adding products to a requisition list from the shopping cart. The procedure is also straightforward.
How to View the Updated Requisition List in Magento 2
To view the updated requisition list in Magento 2, go to your customer account page, select My Requisition Lists, and click View under Actions.

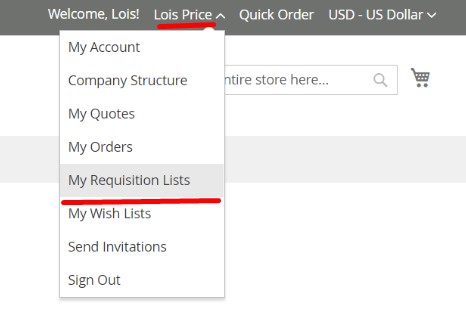
At the same time, you can use the quick links bar at the top of a store page. Click your username and choose My Requisition Lists.
For further information, follow this link: Magento 2 Requisition Lists.
How to Add Products to the Cart from a Requisition List in Magento 2
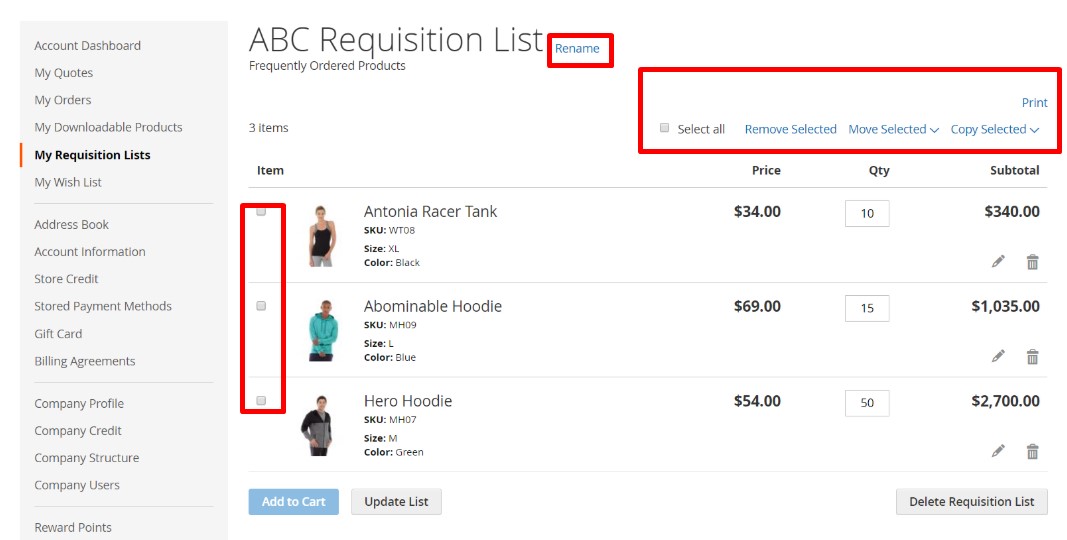
To select products to add them to the shopping cart when in a requisition list, mark the checkbox of each item or use Select All.
Next, you should type the number of items added to the cart for each product.
If you want to change any product options, do the following:
- Click Edit for the selected item;
- Modify options you want to change;
- Hit Update Requisition List.
Next, you should tap the Add to Cart button.
How to Move Items Between Requisition Lists
If you want to move items between two Magento 2 B2B requisition lists, it is also a manageable task. Mark the checkbox of each item to be moved and then click Move Selected. Next, you can transfer the selected items to an existing requisition list or create a brand-new one.
At the same time, it is possible to copy items to a different requisition list within just a few clicks. As in the case below, mark the checkbox of each item to be copied and hit Copy Selected. Next, you can duplicate the selected items to an existing requisition list or create a brand-new one.
How to Remove Items from a Requisition List
As for deleting items from a requisition list, the procedure is similar: you mark the checkbox of each item to be removed, click the Remove Selected button, and tap Delete when prompted to confirm.
How to Rename a Magento Requisition List
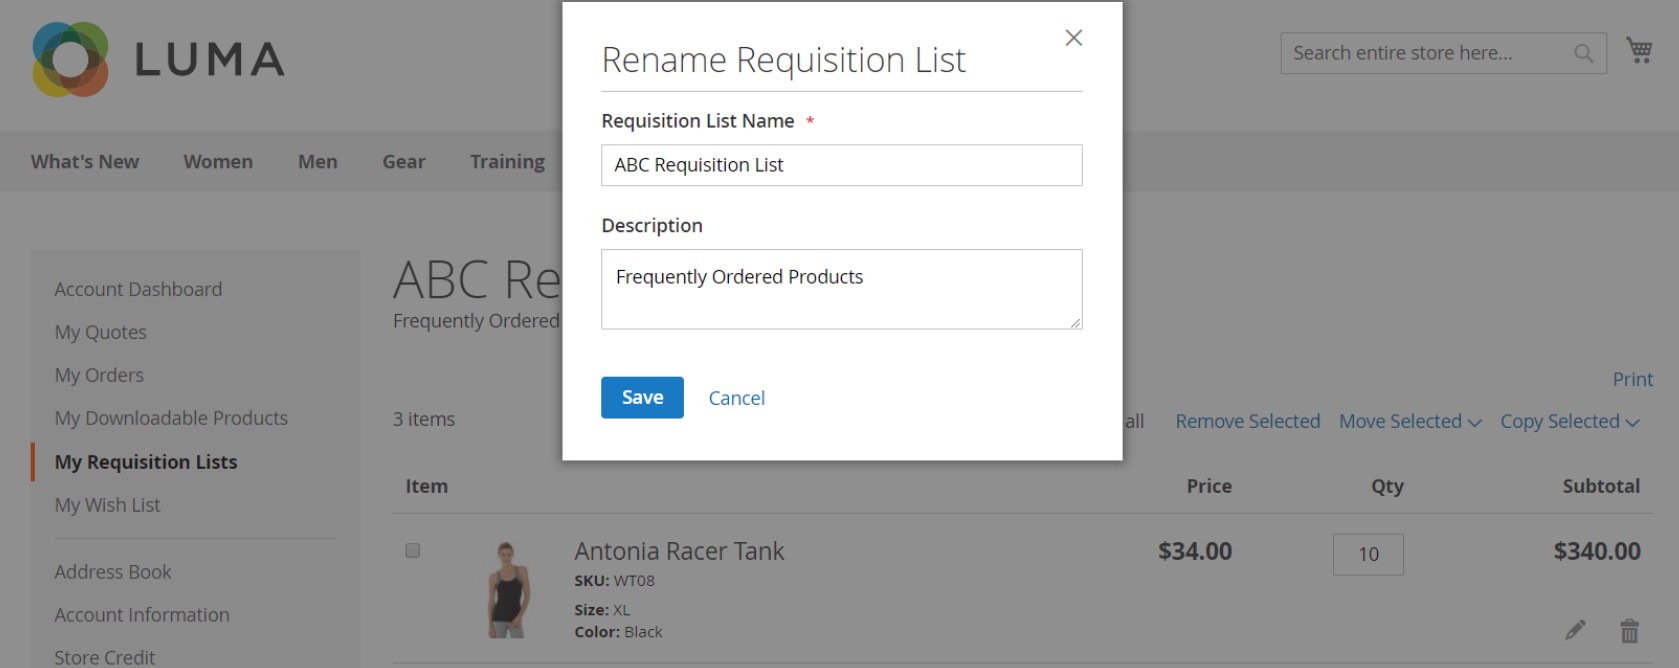
If it is necessary to rename an existing requisition list, use the corresponding option. Click Rename after the list title, enter a new name, and tap Save. That’s it.
How to Print a Requisition List
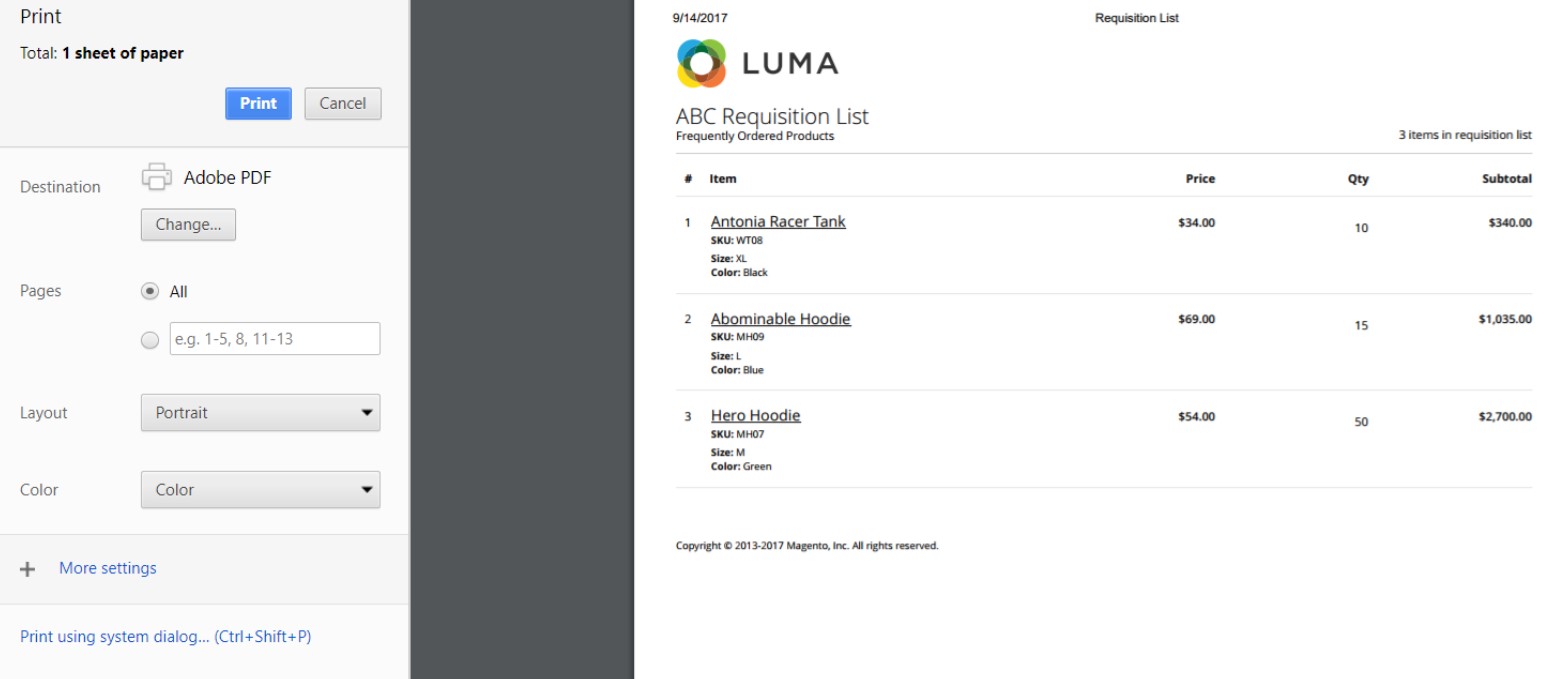
The last option we’d like to draw your attention to is the ability to print Magento 2 requisition lists. The corresponding option is available in the upper-right corner of each list. Find it, verify the output device, and click Print.
For any further information, follow this link: How To Manage Magento 2 Requisition Lists.
How to Import And Export Magento 2 Requisition Lists

Now, let’s see, how to import requisition lists to Magento 2. You need to install the Improved Import & Export Magento 2 extension and its B2B Add-On.
As for a correct CSV file with the requisition list data, it is provided below.
Download Magento 2 B2B Requisition List Sample Table
See the Magento 2 B2B Requisition List sample table for an example of a requisition list table suitable for Adobe Commerce import.
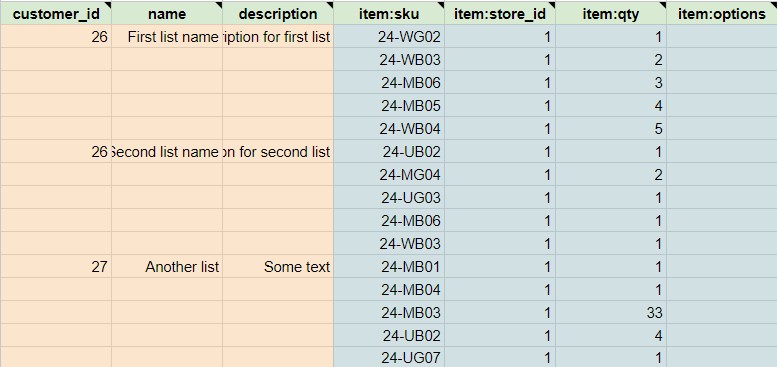
We have also composed a B2B Master Google Table with all B2B attributes described per each sample CSV:
Magento 2 B2B sample Google Sheet
Learn Magento 2 Requisition List Attributes
You can find the B2B requisition list attributes defined in this table:
| Attribute Name | Reference | Values | Value Example |
| customer_id | The ID of the customer the requisition list belongs to | Make sure to specify the IDs only for the existing customers. Else you might get errors | 26 |
| name | Name of the requisition list | Can be any value | John |
| description | Description of the requisition list | Can be any value | Office monthly |
| item:sku | SKUs of the items added to the requisition list | Make sure to add only the items from the product catalog available for the customer | ITM001 |
| item:store_id | The ID of the store view the product in the requisition list belongs to.When adding products make sure that products are available for the proper store views. | Make sure to add only existing store view IDs | 10 |
| item:qty | Qty of the items in the requisition list | Only numerals are allowed | 15 |
| item:options | If the product has options, make sure to specify them for the requisition lists | Codes of the complex product variations. Such as variations of configurable products. |
After composing a table with these attributes, you can import B2B requisition lists to Magento 2, using the standard import procedure of the Improved Import & Export extension.
After composing a table with requisition lists, follow these steps to import them to Magento 2:
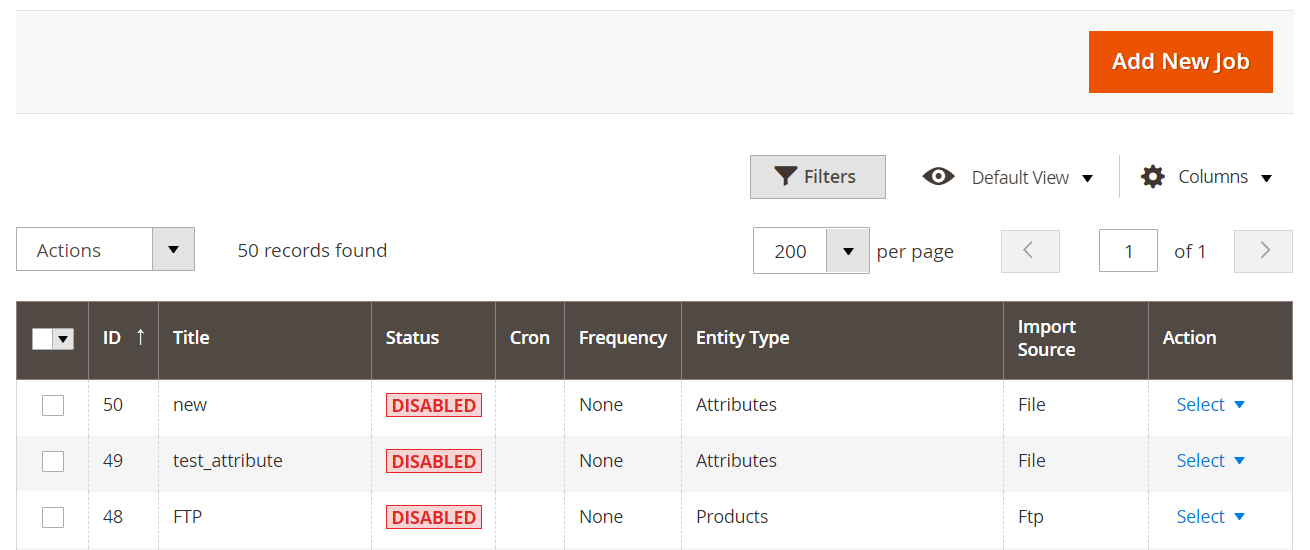
- Proceed to System -> Improved Import / Export -> Import Jobs and hit the Add New Job button.
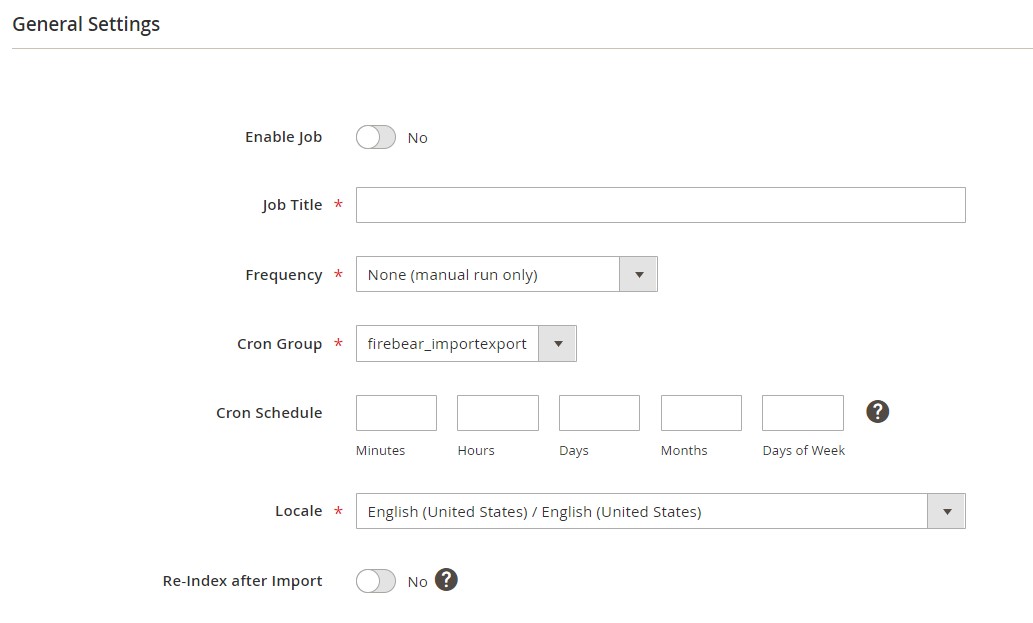
- Configure General Settings. You can name your import job and automate the Magento 2 requisition list import if it is a regular process.
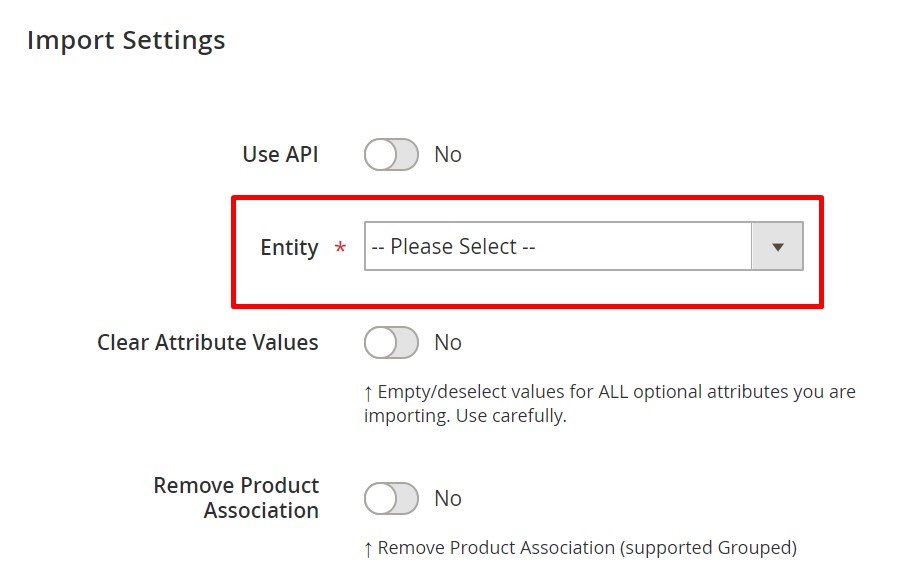
- Visit the Import Settings section to select Requisition Lists in the Entity dropdown as your import entity.
- Choose Add/Update to add new requisition lists to Magento 2 and update the existing ones.
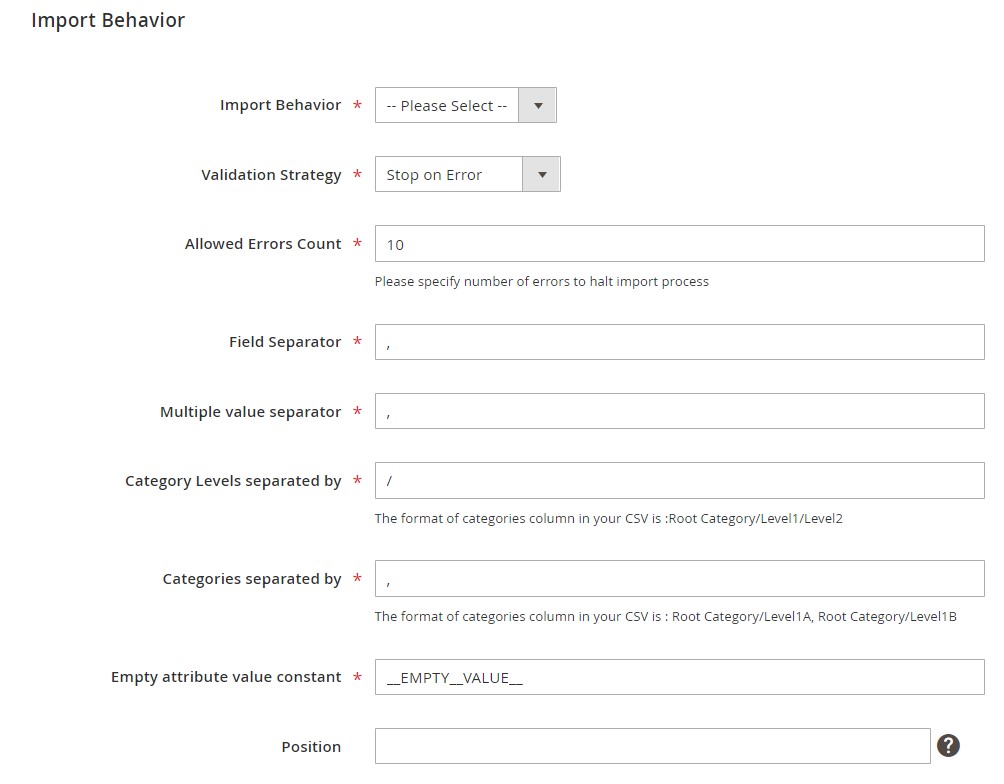
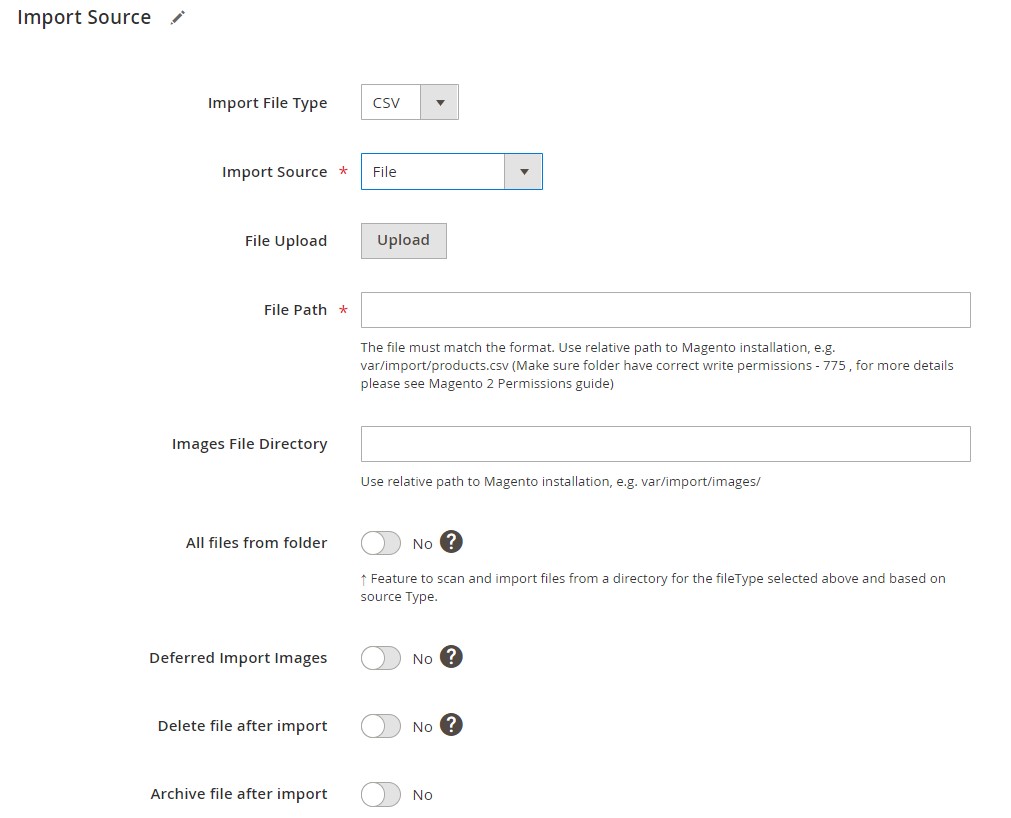
- Now, select a file type, data source, and a couple more parameters. If you use a CSV file and want to upload it manually, select CSV and File, and then browse your Magento 2 B2B requisition list CSV.
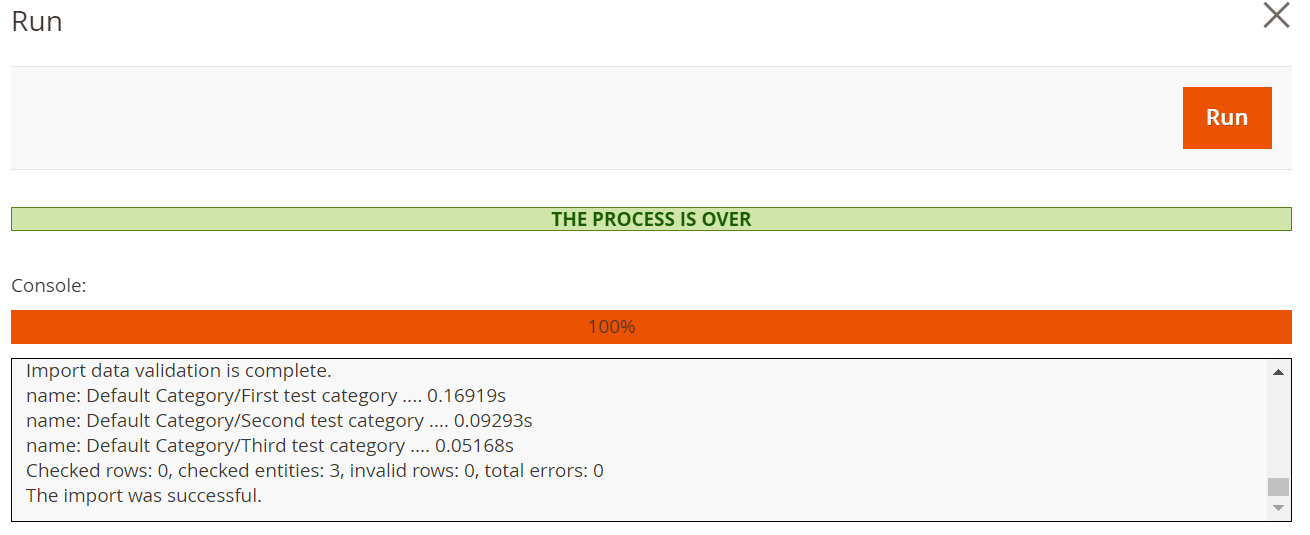
- Save the job, and run the Magento 2 requisition list import.
Final Words
As you can see, Magento 2 B2B requisition lists are a handy improvement that dramatically simplifies the ordering process. Your customers can rapidly add frequently purchased items without surfing the entire catalog. And if you want to import or export Magento 2 requisition lists, it is no longer a problem. The Improved Import & Export even lets you automate this process. If you have any questions regarding the Adobe Commerce import/export and our plugin, follow the link below and contact our support:
Get Improved Import & Export Magento 2 Extension
Get Improved Import & Export B2B Add-on

Please enable JavaScript to view the comments powered by Disqus.


