

In the following material, we explore the profile setting of the Shopware 6 administration interface. It is a tiny part of your backend that carries information about a user logged into your Shopware 6 installation and offers several exclusive features. So what are Shopware 6 profile settings, and how to configure them? You will find the answers below. The article sheds light on how to get to your profile settings in Shopware 6. Next, it describes the information hidden in your profile settings. Also, you will learn how to edit profile settings in Shopware 6.

Note that we provide Shopware integration with external platforms. Contact our support for further information or try our Improved Import & Export Extension for Shopware.
Get Improved Import & Export for Shopware by Firebear Studio
Explore Shopware

Table of contents
How to Get to Profile Settings in Shopware 6
Your profile settings are available in the lower-left corner of the Shopware 6 administration. Follow these steps to reach your Shopware 6 profile settings:
- Hit the arrow button situated on the right from the admin name.
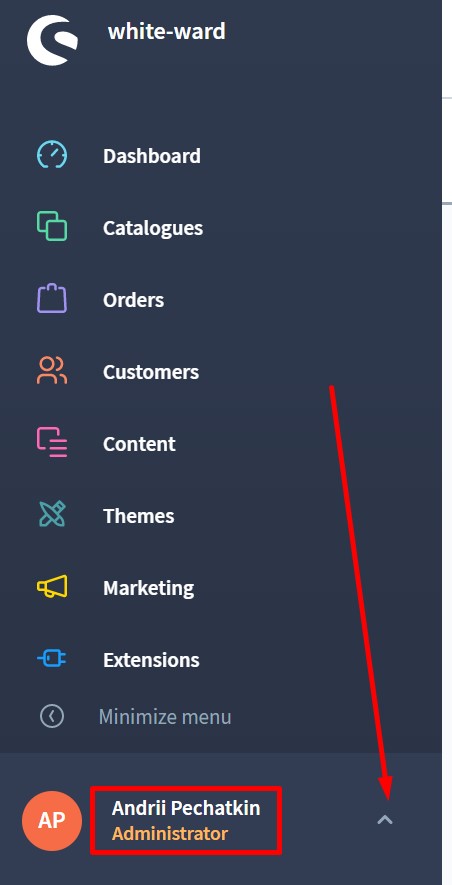
- Click Your profile link.
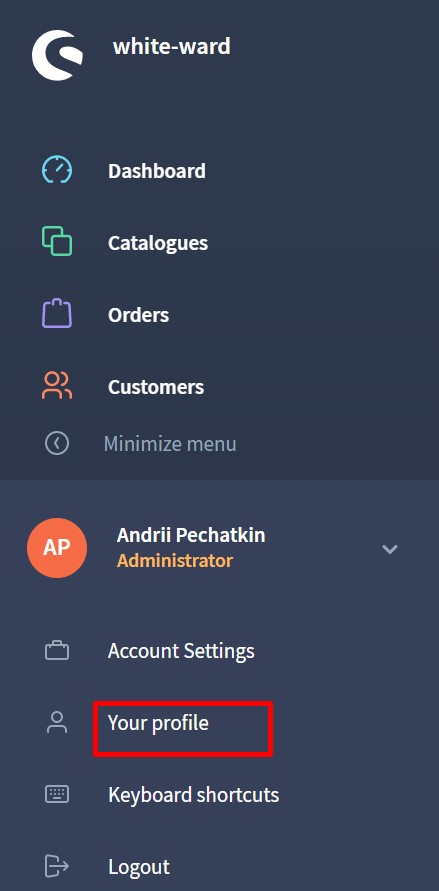


Now, Shopware 6 redirects you to the profile settings screen that looks as follows: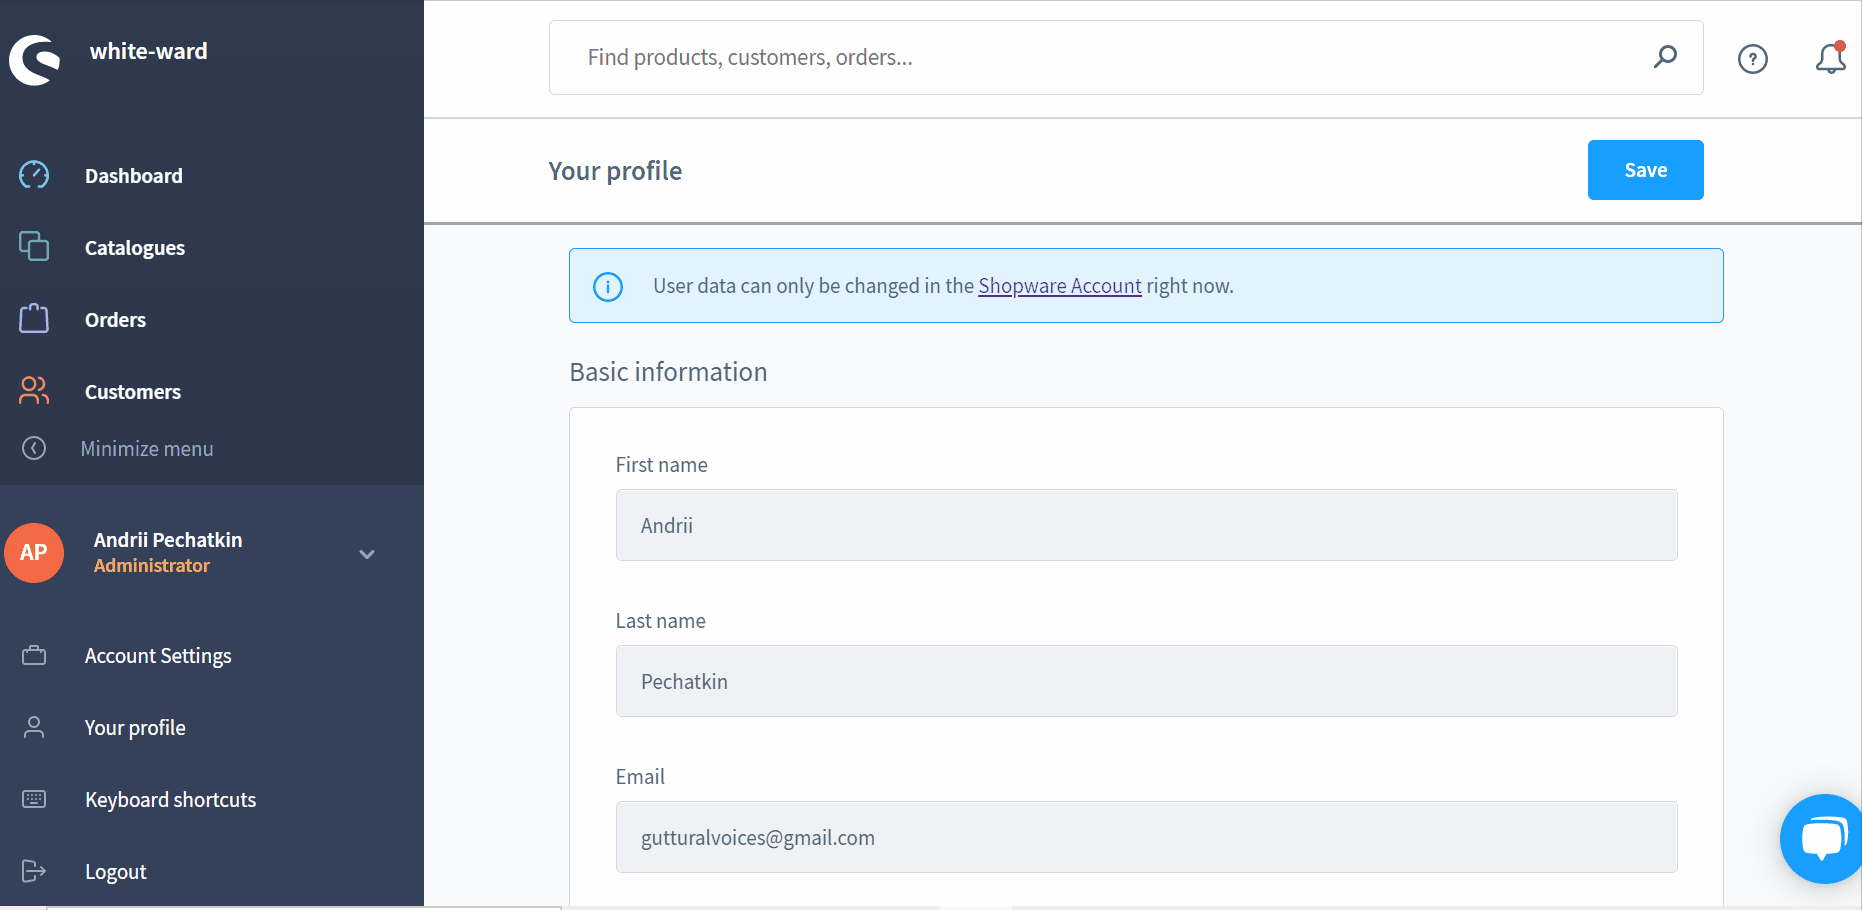
Every user’s profile settings are stored like that. However, you cannot apply any changes here since user data can only be modified in the Shopware Account settings. Hit the corresponding link in the alert message to edit your user information (we will return to this step later).
Your Profile Settings in Shopware 6
Your profile settings in Shopware 6 contain the following basic information:
- First name;
- Last name;
- Email;
- User interface language (you can change it);
- Administrator switch;
- Job title;
- Roles (you can apply user roles to all users except admins).

There is also the Account Settings section, but it is a topic of another article.
How to Edit Profile Settings in Shopware 6
As we’ve already mentioned, it is impossible to edit profile settings in your Shopware 6 installation in the admin section. You need to go to your Shopware account situated under https://account.shopware.com/. Alternatively, you can hit the link in Your Profile that redirects to the same location.
Log in to your Shopware account.

Now, go to My Data.

Here, you can apply changes to User Data to edit Profile settings in your Shopware 6 administration.

Shopware lets you upload an avatar image and edit the following fields:
- Salutation;
- First name;
- Last name;
- Language;
- Password.
Note that you cannot change your email address here. All other changes that you apply here are transferred to your Shopware 6 profile in your e-commerce website’s administration section. Don’t forget to save your work when finished. You can find more Shopware 6 guides here: Shopware 6 Guides & Materials.
How to Import Any Data to Shopware 6
Although you cannot import profile settings from another platform to Shopware 6, there are still many more entities that you will need to transfer to your e-commerce website. And while the admin section of your Shopware 6 website contains import and export tools, you will need some advanced instruments to run more complex data transfers. Therefore, it is necessary to install a third-party extension that delivers the missing functionality. For instance, you can rely on our Improved Import & Export Extension for Shopware to simplify and automate any data transfer. Contact our support for more details.
Shopware 6 Essentials FAQ
How to create a Shopware ID?
Before going to your profile settings, it is necessary to create a Shopware ID. Shopware 6 provides it along with a new Shopware account. Below, you will find out how to create it.
How to create a Shopware account?
To create a Shopware account, visit the registration page, hit the Register Now link, and fill in the registration form. After that, you will need to confirm your intent via email.
What is Shopware master data?
Shopware master data is all the information you provide when setting up your account. It usually includes your contacts and company details, such as an address, email, phone, company name, etc.
How to add a shop in Shopware?
If you want to add a new Shopware 6 shop, go to your merchant area’s start-screen and click the corresponding link. Choose between a cloud storefront or an on-premise website. Fill in the form, providing information about your new Shopware shop.
How to add a payment method to your Shopware account?
In Shopware 6, a payment method is used for creating a deposit that lets you purchase extensions and themes. You can add a payment method under Basic Information -> Accounting. Choose PayPal, credit card, or direct debit to add a payment method to your Shopware account.
How to create a deposit in Shopware?
You can pay in advance for your purchases under Merchant Area -> Shops. Specify a shop to add funds to and click Open Account Details to transfer money to your account.
How to purchase Shopware extensions?
Now, when the deposit is placed, you can purchase extensions for your Shopware website. Go to the Shopware Marketplace or use the Plugin Manager. In both cases, you need to choose a tool you want to buy and complete the purchase.
How to get support in Shopware?
Send inquiries about account and license to info@shopware.com. You can get help regarding accounting and financial services at financial.services@shopware.com. Alternatively, it is possible to use the following phone numbers: +49 2555 9288 50 and +49 2555 9288 510 correspondingly.
How to migrate to Shopware 6?
If you’ve just created a new Shopware website and need to migrate to it from an existing storefront, you will need a third-party extension. The default import and export tools cannot cope with all data transfers required during the fully-fledged migration. However, you can replace them with the Improved Import & Export extension for Shopware 6. Contact us for more information.
How to automate import and export processes in Shopware 6?
If you deal with recurring import and export processes, it is a good idea to automate them. Install the Improved Import & Export extension for Shopware 6 to create a schedule of updates and assign it per data transfer. After that, all import and export processes associated with a particular schedule will be launched automatically.
How to integrate Shopware 6 with external systems?
If you need to connect your e-commerce website to external platforms, it is also necessary to install the Improved Import & Export extension. Our module will help you integrate your Shopware storefront with external systems via API. Thus, you can connect it to ERPs, CRMs, accounting systems, and other similar tools. As we’ve just mentioned above, our module automates import and export processes. Also, it applies changes to the transferred data according to the requirements of your Shopware store and the connected platforms.
Get Improved Import & Export for Shopware by Firebear Studio
Explore Shopware


