Although setting up tier prices in Magento 2 is an exhausting task, you can dramatically simplify the related chores. But why is it so time-consuming? Setting up advanced pricing in Magento 2 requires going through the products one by one, submitting values in a dedicated window, and then saving. The more products you have, the more actions you need to apply. However, the Magento 2 import procedure lets you save hours of manual management time. In this article, we describe how to import advanced pricing to Magento 2. Below, you will find a sample advanced pricing import table described. Next, we provide advanced pricing attributes used in Magento 2. With this information in mind, you can proceed to importing Magento 2 tier prices.
Unfortunately, the default Magento 2 import tools only let you import products and advanced prices separately. It means that you need to upload one file with product data except for tier prices which are provided via another spreadsheet. You must admit that it is not very convenient, especially when you move the entire catalog.
To address this issue, we describe another procedure, involving the Improved Import and Export extension. With this tool, you can import both products and tier prices in a single file. Importing Magento 2 products with tier prices in a single file is based on the following steps. Firstly, prepare an import table, following our recommendations. After that, create a new import job as described in this blog post.

Table of contents
How to Import Magento 2 Advanced Pricing post continues the line of guides for Magento 2 import/export guide list. The other articles in the line are:
There are two ways of importing tier prices (or advanced pricing) to Magento 2:
With the native Magento 2 import process everything is clear. As for Improved Import and Export it brings more enhancements to the import process and allows importing tier prices along with products, with native doesn’t. First and foremost it allows you to schedule the import jobs to run automatically. Second it supports more import sources including Google Sheets, meaning that you can work together with your colleagues or supplier on a single sheet, then paste it and schedule automatic updates.
The full list of features includes:
- Import of numerous entities, including: categories, CMS pages, Cart Price rules
- Support of Google Sheet, direct URL and FTP/SFTP as import sources
- Support of CSV and XML files
- Import scheduling with cron from the admin panel
- Price adjustments for imported products
- Dedicated configurable product import allowing creating configurable products during import
- Export of orders, invoices and shipping data
- Possibility to handle millions of products on single file
- Average import speed ~3000 products/min.
Buy Improved Import Magento 2 Extension
Yes, the import procedure requires preparations. Some. Actually you only need to get a properly formatted CSV or XML table.
You can get the import table with properly set up separators and sample data the following ways:
- In your Magento 2 backend. Login, navigate to System > Import > select Advanced Pricing > Download sample file.
- In GitHub. Navigate to FireBear Studio GitHub and download the sample import table.
- In Google Sheets. Navigate to Master Google Table and save it to your Google Drive.
We recommend you to use Google Sheet. This sample table comes with Advanced Pricing attribute description and clues on which values are required in every column.
Read more about Google Sheet Master Table
If you for some reason want to create an import table from a scratch – stick to the following formatting settings:
| Character set | Unicode (UTF-8) |
| Field separator | Comma, Tab |
| Text delimiter | ” |
Remember, you can use your own import table formatting and map the field separator and text delimiter later during the import process. Meaning that if you are working with the custom table provided by your supplier you can still get it to work. We will talk about it a bit later.
Now that we have a properly formatted table it is time to fill it with the Advanced Pricing attributes, i.e. name columns and submit proper values.
Advanced Pricing or tier prices are applied per product, meaning that you will need to specify the product SKU for reference and then advanced pricing attributes.
| Attribute name | Reference | Values | Value example |
| sku | SKU is the first field of the table and canNOT be removed.
For every instance of Tier Price you need to specify a separate product line. Meaning that if product has two tier prices these will be imported in two lines |
Can be up to 64 characters in length.
It must be a unique value for every product. It is used to identify the product and is the only mandatory field. You can find SKUs for products already in the catalog at Catalog > Products. Mind the letter case! |
TST-Conf-Simp-S-Gray |
| tier_price_website | Defines the websites where the tier price is available.
If specifying multiple websites, separate each with a comma and without a space |
Website code can be found under Stores > All Stores > next, click required website and find “Code” field. | base |
| tier_price_customer_group | Defines customer group for which the tier prices are available | When typing in customer groups mind the case.
If specifying multiple groups, – use a separate row with the same SKU. The rule is – one price per one group. ALL GROUPS – if the tier price should be applied to all customer groups |
Customer Group |
| tier_price_qty | The quantity of the product that must be ordered to receive tier price | Can be any numeral value | 5 |
| tier_price | The Price value for particular amount of the products added to the cart | Can be any numeral value | 10 |
| tier_price_value_type | The type of the discount applied when customer adds particular number of items to the cart | Fixed – product price becomes fixed value specified in the tier_price column
Discount – product price is discounted by the percent value specified in the tier_price column |
Discount |
As you can see from the table above the Magento 2 import procedure uses SKU to identity the product and then tier price attributes to apply proper discounts to it.
In this chapter we will talk about how to import tier prices with native Magento 2 import. We will be using the import table composed by the FireBear team in the Master Google Sheet.
NOTE:
If you want to use the same sample table, make sure you have imported or created products with same SKUs. Otherwise the import will fail as it only allows adding tier prices to existing products.
Another important notice, is that every tier price should be imported in a dedicated row. What it means is that you cannot import two tier price conditions for a single product in a single row of the import table.

At the screenshot you can see that in the rows 2 and 3 we are importing two tier prices for product with SKU:TST-Conf-Simp-S-Gray, and in rows 4 and 5 tier prices for product with SKU:TST-Conf-Simp-S-Green. Take it into the account if you want to import multiple tier prices for a single Magento 2 product.
Now to the import itself.
Step 1: settings and behavior
Log in to your Magento 2 admin panel and navigate to System > Import. That’s where the magic happens.

In the Entity Type field select Advanced Pricing and scroll a bit down to the Import Behavior settings.
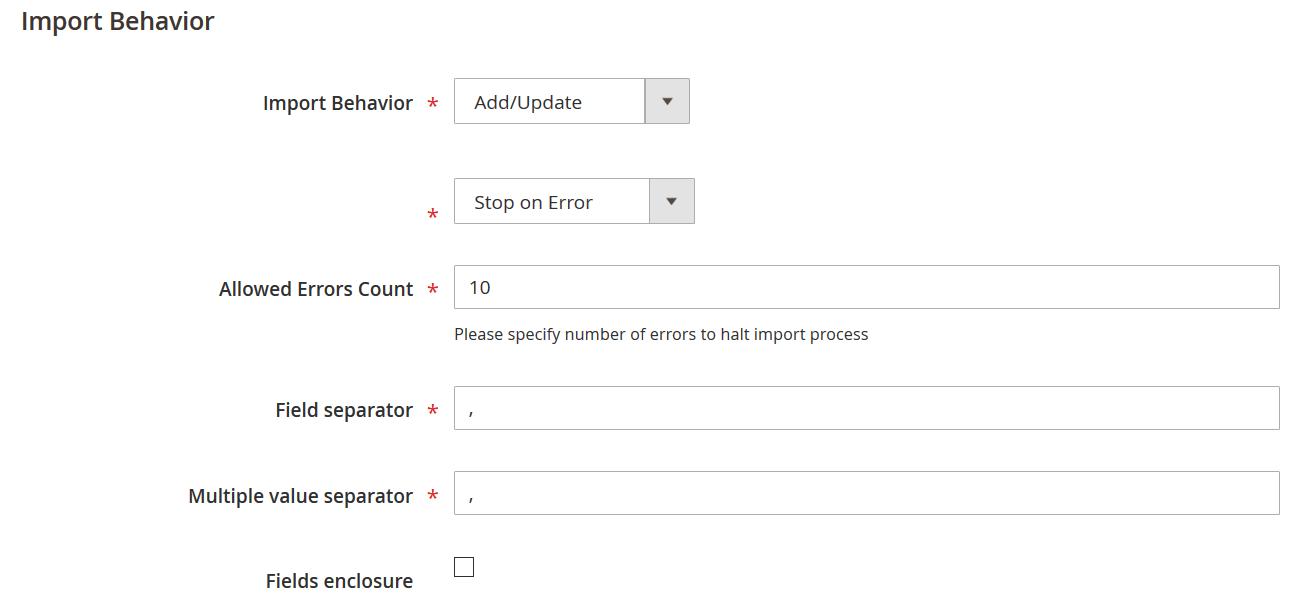
Here you need to select Import Behavior. Whether you want to add, replace or delete tier prices from the import table. And decide whether the import should stop if any errors.
Next, if you are using different table formatting from the one supported by Magento 2, you need to set proper Field and Multiple value separators.
You can skip the Fields enclosure checkbox as it is only used for product attribute ‘additional_attributes’.
Step 2: upload and import
When you are done with import behavior scroll to the last configuration section File to Import.

Here you need to click ‘Choose File’ button and locate the import table you have prepared. You can ignore Images File Directory field, as you won’t be importing product image.
Once done, click ‘Check Data’ button in the upper right corner. You should get a message that looks something like that:

If you have any errors Magento 2 will let you know which rows or columns contain them. If everything is correct and the file is valid you can click ‘Import’ button to start the import process.
After the import process is finished Magento 2 will display a success message:

That’s it! You have just imported tier prices for your products. Now if you want to learn how to import tier prices along with products, in a single file, – read the next chapter.
Default Magento 2 import only allows to import products and tier prices in the separate files. Which may not be convenient if you are migrating the whole store, or want to import the list provided by your supplier.
With Improved Import and Export extension you can import both products and tier prices in a single file.
Read more about Improved Import and Export extension
The extension uses import jobs – an import entity that can be run manually or scheduled to run automatically.
Follow the steps below to learn how to do it.
Step 1: prepare the import table
We will be importing tier prices along with products and will need a new import table for this task. You have guessed right, we will be using product attributes in a single table with tier_prices attribute introduced by Improved Import and Export extension.
You can get a sample Product+Advanced Pricing import table at the Master Google Sheet. In the table you will find a set of simple products with tier prices and a description with explanatory text.
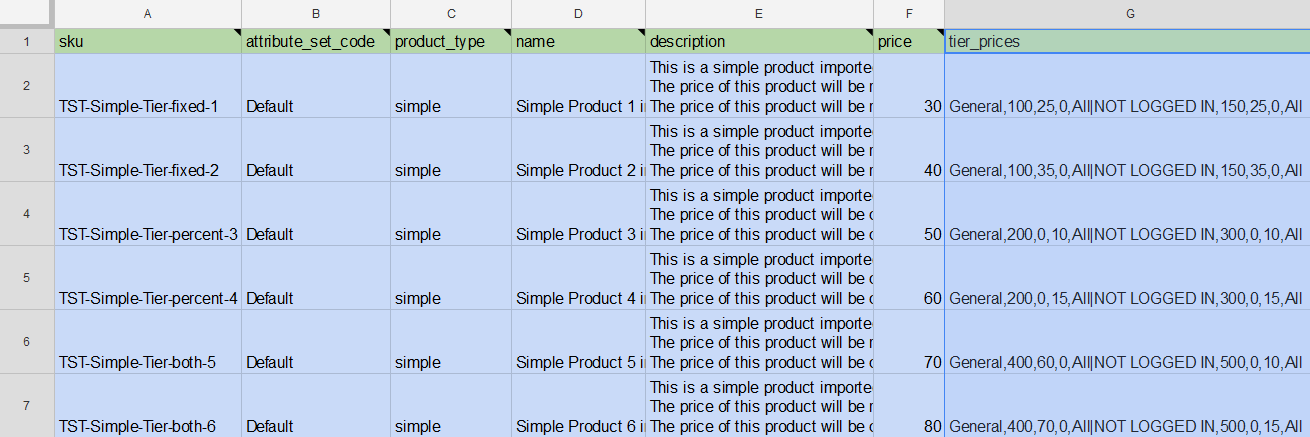
At the screenshot above you can see that we will be using custom attribute tier_prices to import Advanced Pricing along with products. This attribute allows importing multiple tier prices and has the following structure:
Customer Group,Product qty,Discounted price,Discount percent,Website|Another tier
Where:
- Customer Group – is the name of the customer group the tier price will be applied to. Mind the letter case when typing customer group name.
- Product qty – product quantity customer has to add to the cart to be a subject for the tier price.
- Discounted price – fixed price of the product that will be applied once customer adds to the cart required quantity of the product.
- Discount percent – a discount that will be applied to the product price once customer adds to the cart required quantity of the product.
- Website – the code of the website the tier price is applied to. You can find the code of the website at Stores > All Stores > Click required website in the grid > Copy the value in ‘code’ field. Use ‘All’ to apply to All Websites.
Use comma to separate tier price attributes and pipe to separate multiple tier prices.
NOTE:
You can only use either a Discounted price or Discount percent.
- If you want to use Discounted price – set Discount percent value to ‘0’;
- If you want to use Discount percent – set Discounted price value to ‘0.
For example:
We have a product we want to import tier prices for. And we want to import it on the following conditions:

Then, according to the conditions the value for tier_price attribute of this product will look like:
| tier_price pattern | Customer Group,Product qty,Discounted price,Discount percent,Website|Another tier |
| tier_price value | General,400,80,0,All|NOT LOGGED IN,500,0,15,All |
Note, how the first tire price is a ‘Fixed’ value and the second is ‘Discount’ and see how we composed the tier_price value.
Composing such values is pretty simple if you have a visual reference before you. Try composing tier price values yourself and remember to use this Google Sheet as a live example.
Step 2: create an import job
Log in to your Magento 2 admin panel and navigate to System > Improved Import / Export > Import Jobs. You will see the import jobs grid where you will edit and manage your import jobs. Click ‘Add New Job’ button to proceed.
The new job screen will welcome you with the General settings:
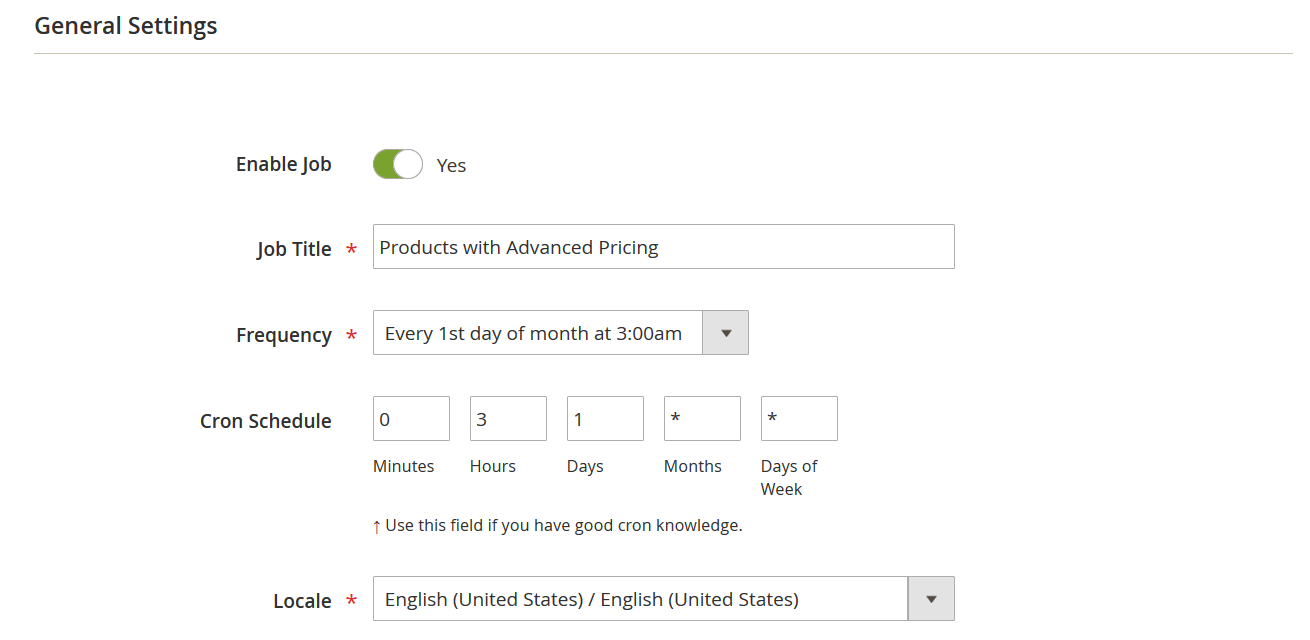
Here you will need to name the import job to identify it later. Set the job frequency using the cron scheduler. You can read more about how to set up cron in the extension manual. And select the locale of the store you will be importing products with advanced pricing to.
There are two additional switches:
- Generate Unique Url if Duplicate – allows to increment URLs of the imported products if products with similar URLs already exist in your store;
- Re-Index after Import – allows rebuilding store indices after the import process is complete. May be required for some stores – consult your developer for more information.
Step 3: setup job settings, behavior and source
After the General settings you are suggested to select an entity you will be importing:

Note how we are importing products and not Advanced Pricing. As we have mentioned before Improved Import and Export extension allows importing products along with tier prices.
Next, you are to configure Import Behavior:
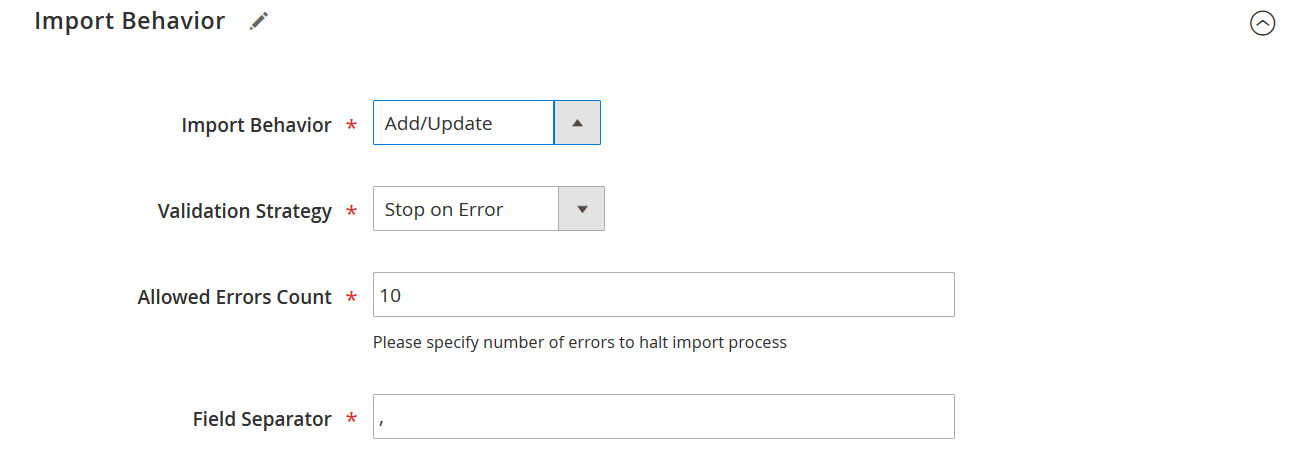
Here you can decide on whether you want to:
- Add/update product catalog
- Only update products from the catalog
- Replace products in the catalog with the imported ones
- Or delete products in the import table from the catalog.
Decide on the validation strategy – if the import job should stop if a set amount of errors encountered. And set field, multiple value and category separators, if you are using a table of custom formatting.
At last, in the Import Source you upload the import table.
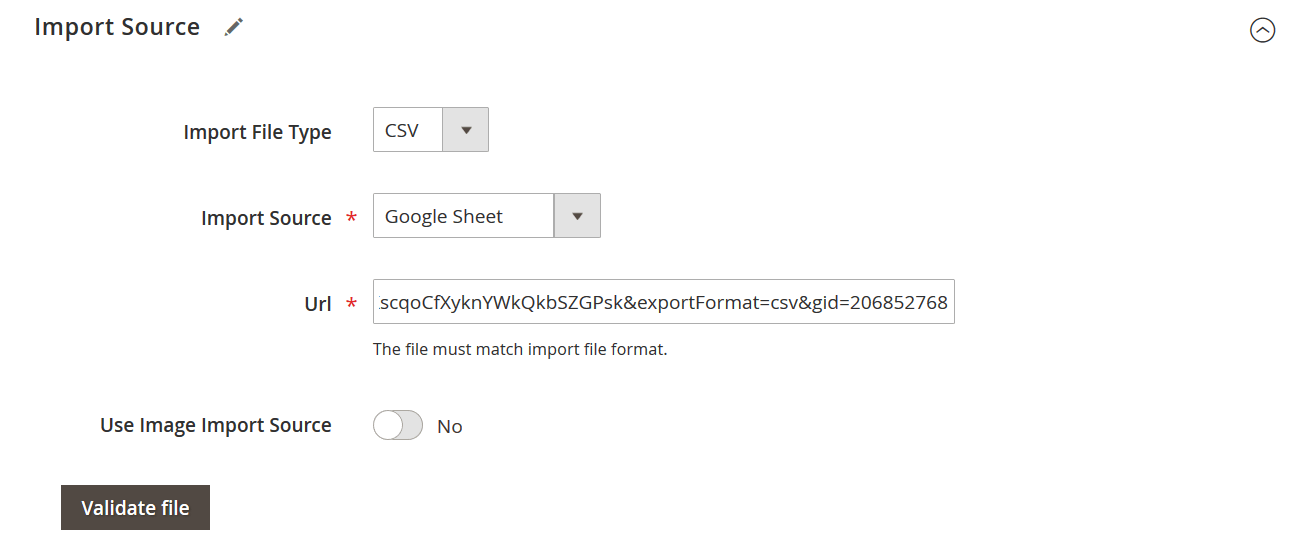
You can upload the import table from local folder, direct URL, FTP/SFTP, Dropbox or paste the link from the Google Sheets. Don’t forget to click ‘Validate’ button once the path to the import table is specified. More information on every import source can be found in the extension manual.
Step 4: save and run the job
When importing products you can also set up category and attribute mapping, decide how configurable products should be imported and created. However, in this guide, we will only cover general import job settings. For the full list of instructions read Improved Import and Export manual.
Now, you only need to run the import job we have composed. To do this hit ‘Save & Run’ button in the upper right corner. And then ‘Run’ button at the popover. The extension will execute import procedure and provide you with the job log.
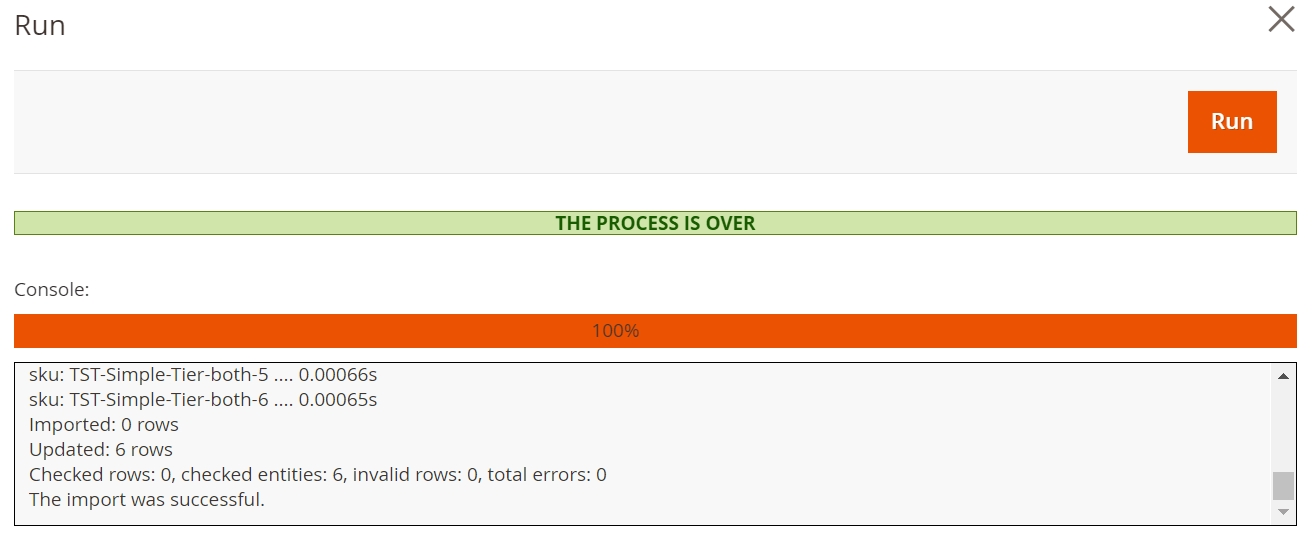
In the job log, you can get an idea of how the import process went. The log can later be accessed from the Edit Job screen or at var/log/firebear folder at your store FTP.
That covers Advanced Pricing import to your Magento 2 store. In this article, you have learned how to import tier prices using native Magento 2 import and Improved Import and Export extension.
Buy Improved Import Magento 2 Extension
If you require instructions on how to import other entities to your Magento 2 store read through the dedicated blog articles.
Magento 2 Advanced Pricing Import FAQ
Below, we provide answers to questions that Magento 2 users often ask when it comes to the benefits of advanced pricing import with the Improved Import & Export Magento 2 extension.
How to import advanced pricing to Magento 2 automatically?
If you need to transfer advanced pricing to Magento 2 on a regular basis, it is necessary to install a third-party tool. Unfortunately, the default import/export solutions don’t let you create import jobs that run on schedule. Therefore, we recommend you use the Improved Import & Export extension to import advanced pricing to Magento 2 automatically. The extension leverages cron so that you can create a schedule of updates. Next, the module does everything for you.
How to import advanced pricing to Magento 2 from external systems?
While the default Magento 2 import mechanisms block the import of third-party data that doesn’t follow the system’s requirements, you can use the Improved Import & Export extension to circumvent these restrictions. The module lets you create a mapping scheme matching any external values to the default Magento 2 attributes. Consequently, any external data is easily adapted to the native standards of your e-commerce website. The most intriguing aspect is that you do everything right in your admin.
How to import advanced pricing to Magento 2 via API?
You need to use the Improved Import & Export Magento 2 extension to import advanced pricing to Magento 2 via API. Our extension lets you create the connection between the two systems transferring any data, including advanced pricing. Any import job provides an interface where you can specify the parameters necessary to put the two systems together.
How to import advanced pricing to Magento 2 via ODS files?
If the advanced pricing data is stored in an ODS file, you no longer need to convert it to a CSV file to fit the Magento 2 requirements. With the Improved Import & Export Magento 2 extension, it is possible to import ODS files to your ecommerce website without any necessity to run the conversion.
How to import advanced pricing to Magento 2 via XLSX files?
If the advanced pricing data is stored in an XLSX file, you no longer need to convert it to a CSV file to fit the Magento 2 requirements. With the Improved Import & Export Magento 2 extension, it is possible to import XLSX files to your ecommerce website without any necessity to run the conversion.
How to import advanced pricing to Magento 2 via JSON files?
If the advanced pricing data is stored in an ODS file, you no longer need to convert it to a CSV file to fit the Magento 2 requirements. With the Improved Import & Export Magento 2 extension, it is possible to import JSON files to your ecommerce website without any necessity to run the conversion.
How to import advanced pricing to Magento 2 via compressed files?
If the advanced pricing data is stored in a compressed file, you can also transfer it to Magento 2 with the help of the Improved Import & Export extension. However, there are two requirements to follow. Firstly, your file archive should be in a ZIP or TAR format. Secondly, the compressed data should be stored in a CSV, XML, ODS, XLSX, or JSON file.
How to import advanced pricing to Magento 2 from Google Sheets?
If your advanced pricing data is stored in Google Sheets, it is no longer a problem. There is no need to export it from the service and then transfer the output to Magento 2. The Improved Import & Export lets you move the corresponding information straight from Google Sheets to your e-commerce website. It is only necessary to specify the address of the corresponding data table.
How to import advanced pricing to Magento 2 from Dropbox?
In addition to Google Sheets, the Improved Import & Export module lets you transfer advanced pricing to Magento 2 from Dropbox. Your data should be stored in CSV, XML, ODS, XLSX, or JSON. If it is a compressed file, it should be in a ZIP or TAR format.
How to import advanced pricing to Magento 2 from Google Drive?
In addition to Google Sheets and Dropbox, the Improved Import & Export module lets you transfer advanced pricing to Magento 2 from Google Drive. Your data should be stored in CSV, XML, ODS, XLSX, or JSON. If it is a compressed file, it should be in a ZIP or TAR format.
How to export advanced pricing from Magento 2
You can also export advanced pricing data from Magento 2 with the help of the Improved Import & Export extension. Ask our specialists for further information.


