Your Magento 2 store consists of CMS blocks and pages. While creating a new store or updating the existing one, you probably compose new blocks, assign them to pages, and decide where you want these pages to be displayed. Below, we shed light on how to import CMS blocks to your Magento 2 store to simplify the chores mentioned above. Although this procedure is unavailable if you use the default data transfer solutions of Magento 2, it is possible to implement the missing functionality with the help of the Improved Import & Export extension. Besides, it lets you export static blocks from Magento 2. The module provides the ability to work with all kinds of CMS blocks, including those composed with the help of the Magento 2 Page Builder.
Along with the step-by-step instructions, the article provides explanations on every static block attribute. Also, you will find sample files that you can use as a reference. We describe prerequisites for importing/exporting statics blocks in Magento 2. After that, you will learn how to transfer CMS blocks between Magento 2 websites. Additionally, we touch upon the topic of composing and editing static blocks tables.

This blog post about importing and exporting static blocks to Magento 2 is a part of educational blog posts about Magento 2 import and export processes. The rest of the posts can be found in:
Table of contents
Magento 2 import and export Guide List
So, static blocks or CMS blocks as they were called back in Magento 2 days. These are your ‘Lego-blocks’ when composing and building store content. Static blocks can be anything: widgets, banners, sliders, etc.
When it comes to optimizing workflows, if you are building several typical stores, or want to migrate from one to another, composing static blocks manually take much more time than intended. That’s why in this article we will describe how to import static blocks.
What you need to import/export statics blocks to Magento 2
For importing and exporting static blocks, including blocks composed with Magento 2 Page Builder, we will be using Improved Import and Export extension for Magento 2. The extension is a full-featured import/export tool that can help you reduce the store management time by offering automated product catalog updates, order updates, and import and export of every Magento 2 entity you can think of.
The extension comes with the following features:
- Import and export of all product types, product attributes, orders, categories, static blocks, CMS pages, cart price rules, MSI and other.
- Import and export of B2B entities, such as: companies, requisition lists, shared catalogs, quotes and negotiable quotes.
- Support of direct file upload, FTP, SFTP, direct URL, Dropbox and Google Sheets as import sources.
- Support of CSV, XML, Json, XLSX, ODS file formats.
- Mapping of CSV file separators and attribute mapping.
- Filers and conditions including price, category, and other entity attributes.
- Import speed of ~3000 per minute on a decent server configuration.
This is just a small part of all the features available in Improved Import and Export extension. For the full feature list refer to the product page.
Sample import tables with static blocks
There are two ways to get sample tables with static blocks for Magento 2:
- In the Master Import Table for Magento 2 – a Google Sheet table where we have gathered sample tables with every Magento 2 entity. Every attribute of every entity comes with a description, explaining how to use this attribute, and a sample value to give you better understanding of how the table works.
- In the Firebear Studio GitHub. At the GitHub we have gathered sample tables of different formats including CSV, XML, Json, XLSX, ODS with every Magento 2 entity you can import and export. You can also find other sample files with XSLT templates and a readme file explaining how everything works.
Alternatively, if you have already installed Improved Import and Export extension you can try exporting the static blocks you already have at your Magento 2.
Exporting static (CMS) blocks from Magento 2
Once installed, Improved Import and Export extension introduces its sections to System > Improved Import/Export. There you can get access to the import and export jobs – a basic set of settings that let you perform manual or automatic import or export of required entity, in a required file format, on set conditions.
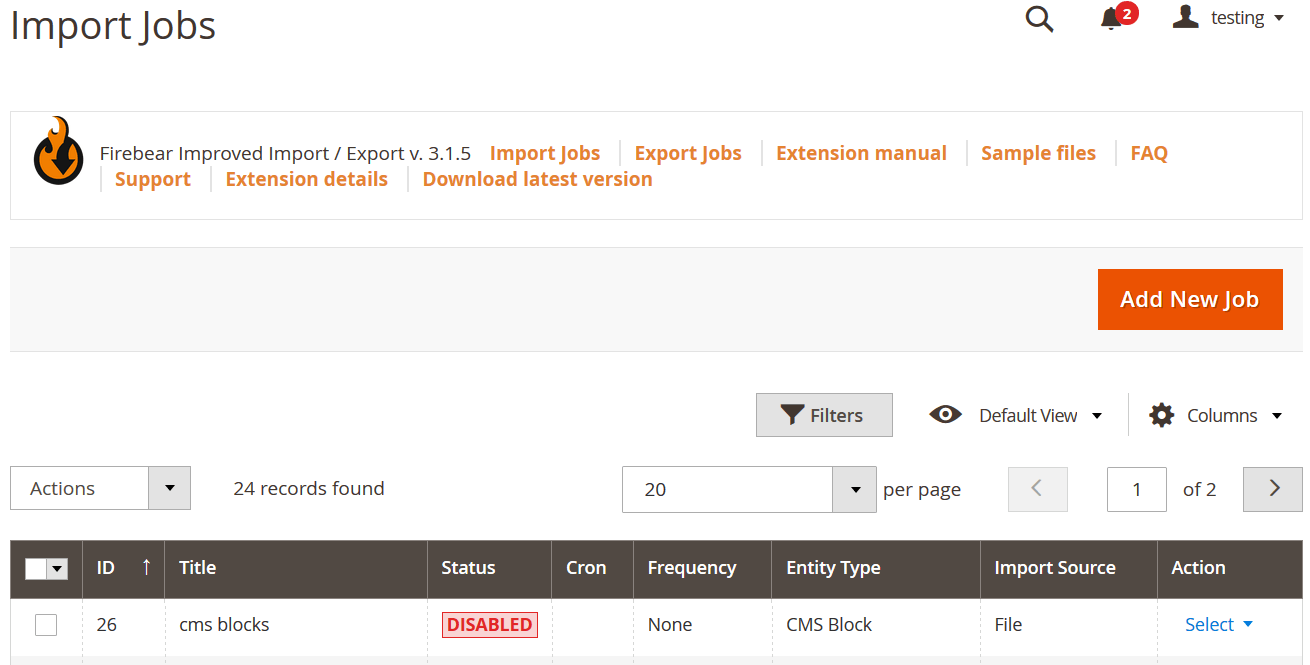
If you proceed to System > Improved Import/Export > Export jobs you will see an export job grid where you can create new jobs and manage existing jobs.

The export job grid comes with the set of filters and mass actions just as every other Magento 2 grid.
To create a new job click ‘Add New Job’ button.

In the General Settings of the export job you are suggested to specify the job name, set the job schedule if you want to execute it manually, and if the schedule is set – enable or disable the job to run automatically.

Below the General Settings, you will find Export settings. Here you decide which entity you want to export, in this article, we will be exporting CMS blocks; however, there are more entities available:
You can also set up a Consecutive Export – if it is enabled and the export job is set to run automatically, every consecutive execution of the job will only export NEW entities, that have been created in Magento 2 since the last execution of the job.
For example, if you are running the export jobs on a weekly basis, the consecutive jobs will let you export only the entities that you have created in your Magento 2 store the last week.

In the Export Behavior, you decide on the file format you want to export the data into and set the export file separator values.
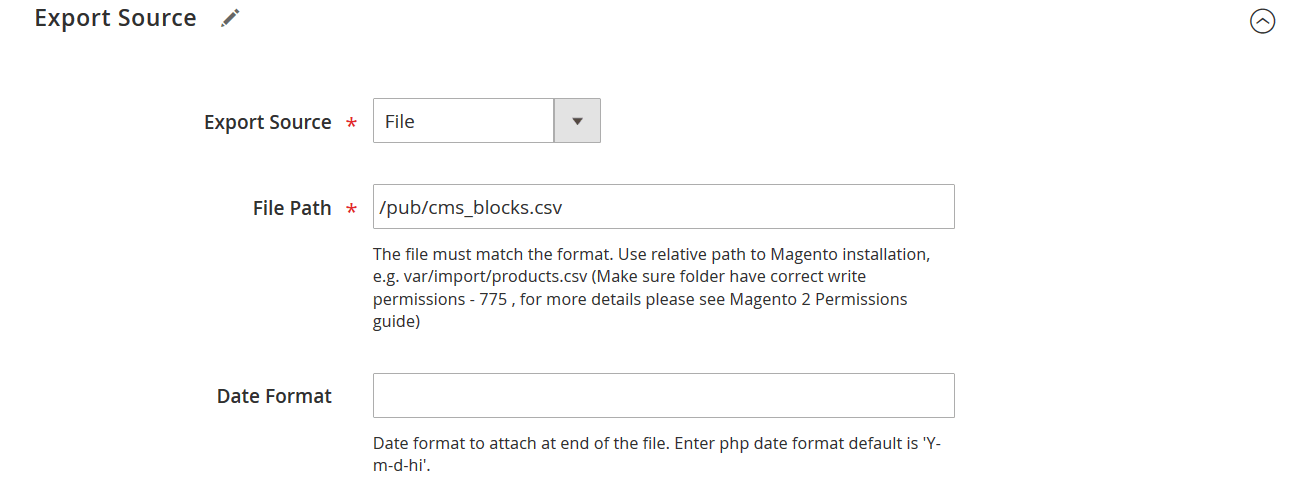
In the Export Source configuration section you select the export source:
- File
- Dropbox
- FTP
- SFTP
- Url
And specify the path to the file the data should be exported to. The files are created automatically and can be downloaded right from the export job screen after the export is complete.
There are also other settings available in the export jobs, such as attribute mapping and filters. You can find a description of all these settings in the Improved Import and Export extension Manual.
Once you are done with the export job settings, click ‘Save & Run’ button and execute the job. The static blocks will be exported to the specified file format.
Composing and editing static blocks table
So, you have either exported or downloaded a table with static blocks. Now we can proceed to explain how one can edit such tables. Below, I will be explaining all attributes available for static blocks and how to edit them.
For reference you can use Static Blocks sample table from the Google Master Import table.
| Attribute name | Reference | Values | Value example |
| block_id | Unique Static Block ID | In the administrator panel, can be found in the link of the static block preferences page. For example:
/index.php/admin/cms/block/edit/block_id/19/ Where ‘19‘ is the block ID. |
13 |
| content | Content of the static block | Can contain any symbols and references. Just as when you create and edit a static block. | <p>Content of the <strong>custom static block #1</strong>.</p>
<p> </p> |
| creation_time | The time the static block has been created | Only the following date format is allowed:
YYYY-MM-DD HH:MM:SS |
2/10/2019 7:29:55 |
| identifier | Static block ‘Identifier’. A unique name of the static block that is used as a reference for internal purposes. | Can be up to 64 latin characters in length, without spaces, can contain “-“, “_”. | custom-block-1 |
| is_active | ‘Enable Block’ setting of the static block. Defines if the block is enabled or disabled. | Allowed values:
1 – enabled 0 – disabled |
1 |
| title | ‘Block Title’ of the static block. Can contain any value. A name of the static block. | Can contain any value. A name of the static block. | Custom static block #1 |
| update_time | The time the static block has been last updated | Only the following date format is allowed:
YYYY-MM-DD HH:MM:SS |
2/10/2019 7:29:55 |
| store_view_code | The code of the store view the static block belongs to. | Can contain multiple store view codes separated by comma without spaces.
Store View Code can be found under: Stores > All Stores > next, click required store view and check “Code” column. |
Store View 1,Store View 2,German Store |
NOTE: you can export and import blocks composed using Magento 2 Page Builder without any issues. The contents of such blocks are stored regularly in the ‘content’ column. You can also edit these contents manually if required.
That’s it, these are all the static block attributes that can be exported, edited and imported.
Importing static (CMS) blocks to Magento 2
The import process is similar to that of the export. To import static blocks using Improved Import and Export extension proceed to System > Improved Import/Export > Import jobs screen to find the import grid.
The import grid offers the same functionality as the export grid. You can filter already created jobs, edit the jobs directly from the grid, or create new jobs. Create a new job by clicking ‘Add New Job’ button.
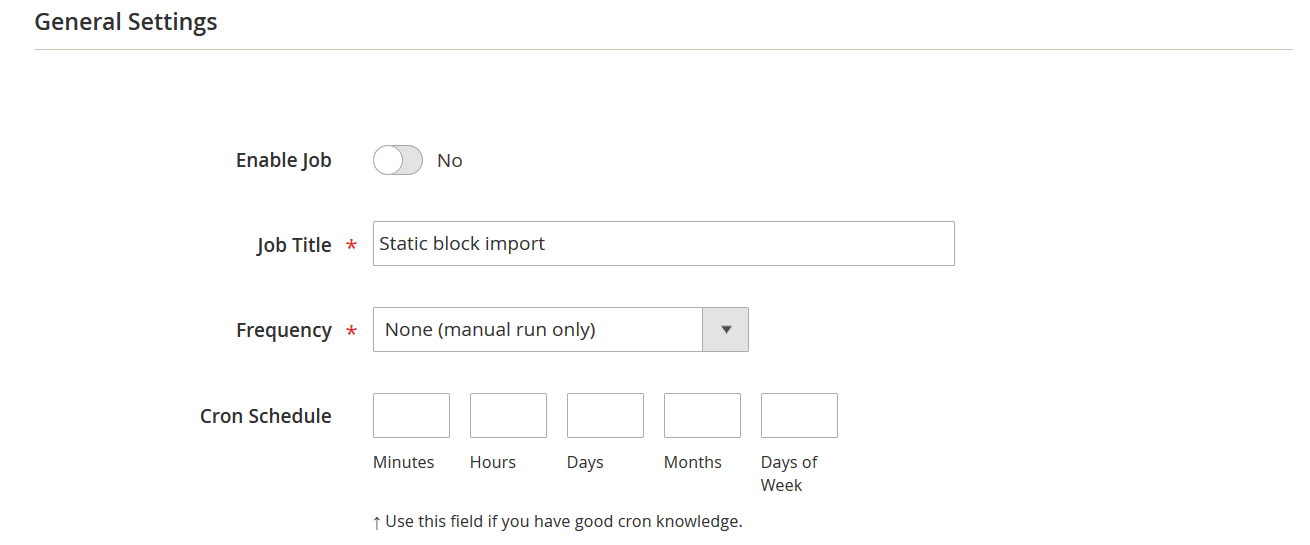
In the General Settings of the job you are suggested specifying job name, schedule and other settings that can be found in the Improved Import and Export manual.

In the Import Settings you decide whether you want to use API connection, REST or SOAP, and specify the entity you are importing. In this blog post, we stick to the CMS blocks.
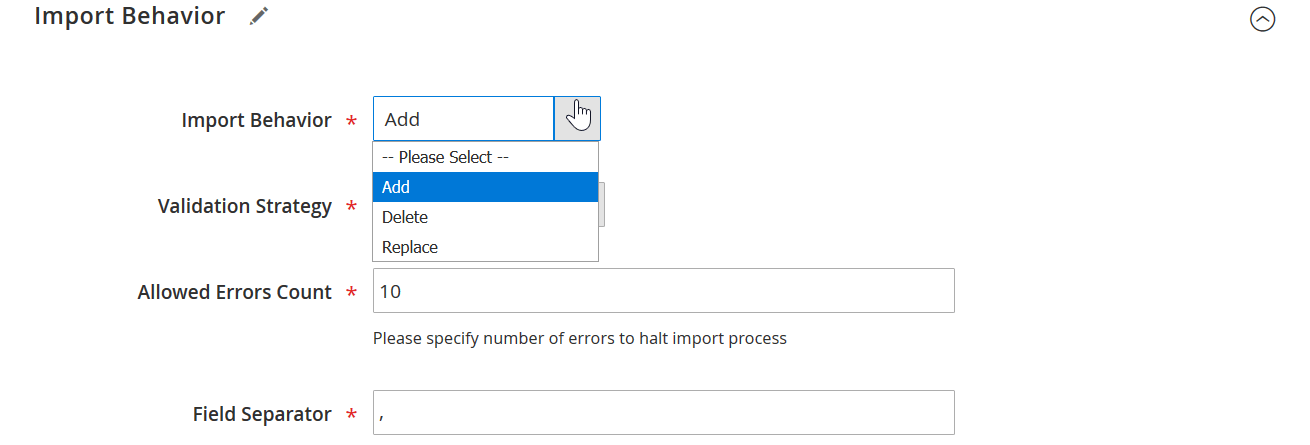
In the Import Behavior, you specify how the extension should treat the entities in the table you about to upload. A set of available behavior differs per imported entity. For static blocks the behavior includes:
- Add – new entities will be added to the existing ones, if entities with same ID and identifier already exist, such entities will be updated
- Delete – entities from the imported table will be removed from the store.
- Replace – entities with the same ID and identifier will be replaced.
Along with the behavior you control allowed error count and can map imported file for separators.
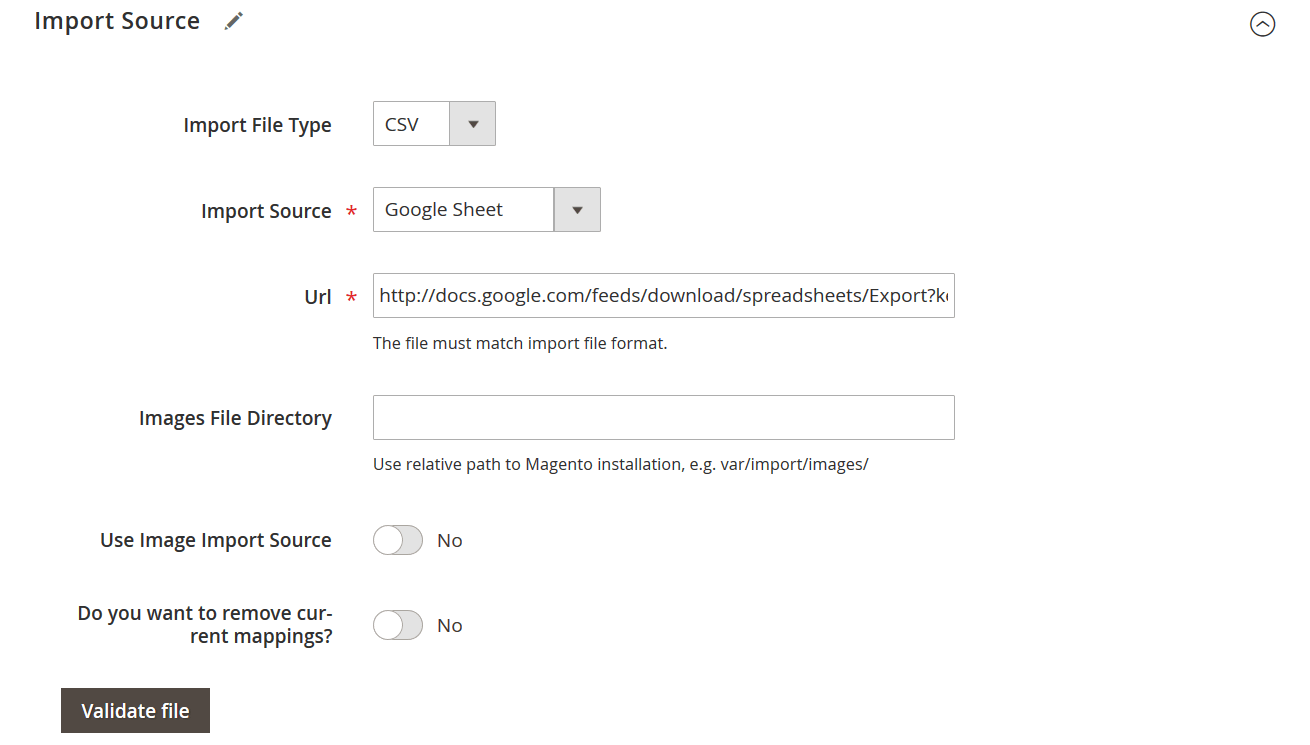
In the Import Source section, you specify the format of the file you will be uploading: CSV, XML, Json, XLSX, ODS. Specify the import source:
- File
- FTP/SFTP
- Dropbox
- Direct url
- Google Sheets
If you are following these blog article instructions, you can import the sample static block table from the Google Sheet Master Import table we’ve talked about earlier.
When the table you are importing is uploaded you hit the ‘Validate file’ button and let the extension check the file for proper data format. Then you can click ‘Save & Run’ button and execute the import job.
There are other settings available for import jobs, to learn more about them – refer to the Improved Import and Export user guide.
That’s it. You now know and understand how to import and export CMS static blocks to your Magento 2 store. If you require further assistance or have any questions – don’t hesitate to contact us via chat or support ticket.
Read other import/export Guide List posts.
Read other import/export Guide List posts
Magento 2 CMS Block Import FAQ
Below, we provide answers to questions that Magento 2 users often ask when it comes to the benefits of CMS blocks import with the Improved Import & Export Magento 2 extension.
How to import CMS blocks to Magento 2 automatically?
If you need to transfer CMS blocks to Magento 2 on a regular basis, it is necessary to install a third-party tool. Unfortunately, the default import/export solutions don’t let you create import jobs that run on schedule. Therefore, we recommend you use the Improved Import & Export extension to import CMS blocks to Magento 2 automatically. The extension leverages cron so that you can create a schedule of updates. Next, the module does everything for you.
How to import CMS blocks to Magento 2 from external systems?
While the default Magento 2 import mechanisms block the import of third-party data that doesn’t follow the system’s requirements, you can use the Improved Import & Export extension to circumvent these restrictions. The module lets you create a mapping scheme matching any external values to the default Magento 2 attributes. Consequently, any external data is easily adapted to the native standards of your e-commerce website. The most intriguing aspect is that you do everything right in your admin.
How to import CMS blocks to Magento 2 via API?
You need to use the Improved Import & Export Magento 2 extension to import CMS blocks to Magento 2 via API. Our extension lets you create the connection between the two systems transferring any data, including CMS blocks. Any import job provides an interface where you can specify the parameters necessary to put the two systems together.
How to import CMS blocks to Magento 2 via ODS files?
If the CMS block data is stored in an ODS file, you no longer need to convert it to a CSV file to fit the Magento 2 requirements. With the Improved Import & Export Magento 2 extension, it is possible to import ODS files to your ecommerce website without any necessity to run the conversion.
How to import CMS blocks to Magento 2 via XLSX files?
If the CMS block data is stored in an XLSX file, you no longer need to convert it to a CSV file to fit the Magento 2 requirements. With the Improved Import & Export Magento 2 extension, it is possible to import XLSX files to your ecommerce website without any necessity to run the conversion.
How to import CMS blocks to Magento 2 via JSON files?
If the CMS block data is stored in an ODS file, you no longer need to convert it to a CSV file to fit the Magento 2 requirements. With the Improved Import & Export Magento 2 extension, it is possible to import JSON files to your ecommerce website without any necessity to run the conversion.
How to import CMS blocks to Magento 2 via compressed files?
If the CMS block data is stored in a compressed file, you can also transfer it to Magento 2 with the help of the Improved Import & Export extension. However, there are two requirements to follow. Firstly, your file archive should be in a ZIP or TAR format. Secondly, the compressed data should be stored in a CSV, XML, ODS, XLSX, or JSON file.
How to import CMS blocks to Magento 2 from Google Sheets?
If your CMS blocks are stored in Google Sheets, it is no longer a problem. There is no need to export it from the service and then transfer the output to Magento 2. The Improved Import & Export lets you move the corresponding information straight from Google Sheets to your e-commerce website. It is only necessary to specify the address of the corresponding data table.
How to import CMS blocks to Magento 2 from Dropbox?
In addition to Google Sheets, the Improved Import & Export module lets you transfer CMS blocks to Magento 2 from Dropbox. Your data should be stored in CSV, XML, ODS, XLSX, or JSON. If it is a compressed file, it should be in a ZIP or TAR format.
How to import CMS blocks to Magento 2 from Google Drive?
In addition to Google Sheets and Dropbox, the Improved Import & Export module lets you transfer CMS blocks to Magento 2 from Google Drive. Your data should be stored in CSV, XML, ODS, XLSX, or JSON. If it is a compressed file, it should be in a ZIP or TAR format.
How to export CMS blocks from Magento 2
You can also export CMS blocks from Magento 2 with the help of the Improved Import & Export extension. Ask our specialists for further information.