A throwback to Google I/O 2019…
One of the most exciting changes that Google announced this year at Google I/O 2019 is CameraX. It is an API that will bring a slew of new features and, supposedly, makes implementing camera features easier on Android.
But how is this better than the current Camera2 API? Does CameraX really have a lot to offer or is it just a gimmick?
Let’s find out in this article. But first, let’s take a peek at how the Camera2 API is being implemented in apps these days.
Note: The Camera2 API, which replaced the legacy Camera API, gives you more control over your device’s camera. But also keep in mind that the Camera2 API supports Lollipop 5.0 and above, so if you want to support devices lower than that, you’d have to stick to the legacy Camera API.
The (now-outdated?) Camera2 API
We will be focusing on capturing photos with a custom camera UI in Android in this article. We will be leaving out videos since a video implementation in Android requires a separate article of its own.
Let’s take a look at a basic implementation for capturing photos with the Camera2 API.
First, we’d have to set up a TextureView and Button in our layout to capture the image:
<RelativeLayout xmlns:android="http://schemas.android.com/apk/res/android" xmlns:tools="http://schemas.android.com/tools" android:layout_width="match_parent" android:layout_height="match_parent"> <TextureView android:id="@+id/texture_view" android:layout_width="match_parent" android:layout_height="match_parent" … /> <Button android:id="@+id/btn_capture" android:layout_width="wrap_content" android:layout_height="wrap_content" … />
</RelativeLayout>
Then, we’d have to setup a camera preview, like so:
try { val texture = texture_view.getSurfaceTexture() texture.setDefaultBufferSize(imageDimension.getWidth(), imageDimension.getHeight()) val surface = Surface(texture) captureRequestBuilder = cameraDevice.createCaptureRequest(CameraDevice.TEMPLATE_PREVIEW) captureRequestBuilder.addTarget(surface) cameraDevice.createCaptureSession(Arrays.asList(surface), object:CameraCaptureSession.StateCallback() { fun onConfigured(@NonNull cameraCaptureSession:CameraCaptureSession) { if (null == cameraDevice) { return } cameraCaptureSessions = cameraCaptureSession updatePreview() } fun onConfigureFailed(@NonNull cameraCaptureSession:CameraCaptureSession) { Toast.makeText(this@AndroidCameraApi, "Configuration changed!", Toast.LENGTH_SHORT).show() } }, null)
} catch (e:CameraAccessException) { e.printStackTrace()
}
We still need to:
- Get an instance of the
CameraManager - Get the
CameraCharacteristicsandStreamConfigurationMap - Setup a
CameraDevice.StateCallbackandCameraCaptureSession.CaptureCallbackfor the image preview and image capture respectively - Setup the
TextureView.SurfaceTextureListenerfor the preview on theTextureView - Open the camera
- Write code for taking the picture
- Write code for updating the preview
- Close the camera when it isn’t in use
Phew! That sounds like a lot of work! I wouldn’t want to spend the rest of this article going on about how to implement the Camera2 API. So let’s cut it short here and talk about why Camera2 API is a real pain to implement in an Android app:
- It requires a ton of code, as you can infer from above. This is a huge drawback if you’re new to implementing camera in Android.
- It’s just too complex. A lot of the code in the API could be simplified, but because the API was designed to provide more control over the camera, it has become too difficult to comprehend for developers who are new to implementing camera in their app.
- It requires you to implement a lot of states, and you’ll be required to execute a bunch of specific methods to handle when these states change. You can take a look at the exhausting list of states here.
- It also introduces some bugs in the flashlight part of your camera. There’s a lot of confusion regarding the differences between a “torch” mode and a “flash” mode in Camera2.
- If this isn’t already enough to drive new developers from Camera2, there are a lot of bugs that are vendor-specific that require fixing and hence, more code. These are also known as device compatibility issues, which require the developers to write device-specific code to manage a work-around to the solution.
While the legacy Camera API is easier to use and supports lower Android OS devices, it doesn’t provide a lot of control over the camera. It isn’t short of its own bugs and vendor-specific issues either. It shares a lot of the same unpredictable issues as the Camera2 API and hence, isn’t a good idea to implement in your custom camera.
With these hurdles in mind, Google introduced the new CameraX API to solve these issues.
Say hello to the CameraX API! 👋
As mentioned above, CameraX makes building a custom camera much easier. It also brings with it, a whole new list of features that are simple to implement.
Note: The CameraX API is still in the alpha stage, so this API is subject to change in the coming months. Use it with caution. ⚠️
Here are some of CameraX’s top features so far:
Simplicity
The CameraX library provides a simple and easy-to-use API. This API is consistent across most Android devices running Lollipop 5.0 and above.
Solves device compatibility issues
CameraX also aims to solve problems that show up on specific devices. With Camera2 and legacy Camera, developers often had to write a lot of device-specific code. They can now say goodbye to writing that code, thanks to CameraX!
Google achieved this by testing CameraX in an automated test lab, on lots of different devices from many manufacturers.
Leverages all Camera2 API features
While CameraX solves the problems that Camera2 had, interestingly enough, it also leverages all the Camera2 API features. This fact alone makes it hard for me to think of a reason to not migrate to CameraX in the coming months.
Less code
This is a boon to developers who want to get started with the CameraX API. You write less code, compared to both Camera2 and legacy Camera API, to achieve the same level of control over the camera.
Use cases in CameraX
Using CameraX is a delight, owing to the fact that its usage can be broken down into 3 use cases:
- Image Preview: Previewing the image on your device before taking a picture.
- Image Capture: Capturing a high-quality image and saving it to your device.
- Image Analysis: Analysing your image to perform image processing, computer vision, or machine learning inference on it.
CameraX Extensions
This one is my personal favorite. CameraX Extensions are little add-ons that lets you implement features like Portrait, HDR, Night Mode, and Beauty Mode with just 2 lines of code!
Now that we’ve covered the features that CameraX brings to camera development, let’s get into a basic implementation of the same.
Before we dive into coding, you can find the demo repository for the app that’s featured in this article here, in case you want to clone it and skip right ahead to the code.
Adding CameraX to your app
Add the following dependencies to your app-level build.gradle file:
def camerax_version = "1.0.0-alpha02"
// CameraX core library
implementation "androidx.camera:camera-core:${camerax_version}"
// CameraX library for compatibility with Camera2
implementation "androidx.camera:camera-camera2:${camerax_version}"
Let’s also add the following two permissions in the AndroidManifest.xml file:
<uses-permission android:name="android.permission.CAMERA" />
<uses-permission android:name="android.permission.WRITE_EXTERNAL_STORAGE" />
Using CameraX in your app
Building a basic UI
Let’s setup the same basic layout for your MainActivity as below:
<RelativeLayout xmlns:android="http://schemas.android.com/apk/res/android" xmlns:tools="http://schemas.android.com/tools" android:layout_width="match_parent" android:layout_height="match_parent"> <TextureView android:id="@+id/texture_view" android:layout_width="match_parent" android:layout_height="match_parent" … /> <Button android:id="@+id/btn_capture" android:layout_width="wrap_content" android:layout_height="wrap_content" … />
</RelativeLayout>
Requesting for required permissions
Now that we’ve built the basic UI, you should request for CAMERA and WRITE_EXTERNAL_STORAGE permissions in your app. You can learn how to request permissions in Android here, or you can refer to my Github repo for this project instead.
Setting up TextureView
Next, implement LifecycleOwner and set up TextureView in your MainActivity, as followed:
class MainActivity : AppCompatActivity(), LifecycleOwner { override fun onCreate(...) {
if (areAllPermissionsGranted()) {
texture_view.post { startCamera() }
} else {
ActivityCompat.requestPermissions(
this, PERMISSIONS, CAMERA_REQUEST_PERMISSION_CODE
)
} texture_view.addOnLayoutChangeListener { _, _, _, _, _, _, _, _, _ ->
updateTransform()
}
} private fun startCamera() { // TODO: We’ll implement all the 3 below use cases here, later in this article.
// Setup the image preview val preview = setupPreview() // Setup the image capture val imageCapture = setupImageCapture() // Setup the image analysis val analyzerUseCase = setupImageAnalysis() // Bind camera to the lifecycle of the Activity CameraX.bindToLifecycle(this, preview, imageCapture, analyzerUseCase)
} private fun updateTransform() { val matrix = Matrix() val centerX = texture_view.width / 2f val centerY = texture_view.height / 2f val rotationDegrees = when (texture_view.display.rotation) { Surface.ROTATION_0 -> 0 Surface.ROTATION_90 -> 90 Surface.ROTATION_180 -> 180 Surface.ROTATION_270 -> 270 else -> return } matrix.postRotate(-rotationDegrees.toFloat(), centerX, centerY) texture_view.setTransform(matrix) } override fun onRequestPermissionsResult(requestCode: Int, permissions: Array<String>, grantResults: IntArray) { if (requestCode == CAMERA_REQUEST_PERMISSION_CODE) { if (areAllPermissionsGranted()) { texture_view.post { startCamera() } } else { Toast.makeText(this, "Permissions not granted!", Toast.LENGTH_SHORT).show() finish() } } } private fun areAllPermissionsGranted() = PERMISSIONS.all { ContextCompat.checkSelfPermission(baseContext, it) == PackageManager.PERMISSION_GRANTED } companion object { private const val CAMERA_REQUEST_PERMISSION_CODE = 13 private val PERMISSIONS = arrayOf(Manifest.permission.CAMERA, Manifest.permission.WRITE_EXTERNAL_STORAGE) }
}
Implementing Image Preview
As with any other camera app, we first need to see a preview of the image before capturing in our camera app. To achieve this, we need to create an instance of PreviewConfig via PreviewConfig.Builder.
So let’s get started with writing our setupPreview() in MainActivity:
private fun setupPreview(): Preview { val previewConfig = PreviewConfig.Builder().apply { // Sets the camera lens to front camera or back camera. setLensFacing(CameraX.LensFacing.BACK) // Sets the aspect ratio for the preview image. setTargetAspectRatio(Rational(1, 1)) // Sets the resolution for the preview image. // NOTE: The below resolution is set to 800x800 only for demo purposes. setTargetResolution(Size(800, 800)) }.build() // Create a Preview object with the PreviewConfig val preview = Preview(previewConfig) // Set a listener for the preview’s output preview.setOnPreviewOutputUpdateListener { // val parent = texture_view.parent as ViewGroup // Update the parent View to show the TextureView parent.removeView(texture_view) parent.addView(texture_view, 0) texture_view.surfaceTexture = it.surfaceTexture updateTransform() } return preview
}
And voilá! You can now see a live image preview on your device. To customise the experience of the image preview feature, go through the docs here. Here is the list of public methods for PreviewConfig.Builder from the official docs: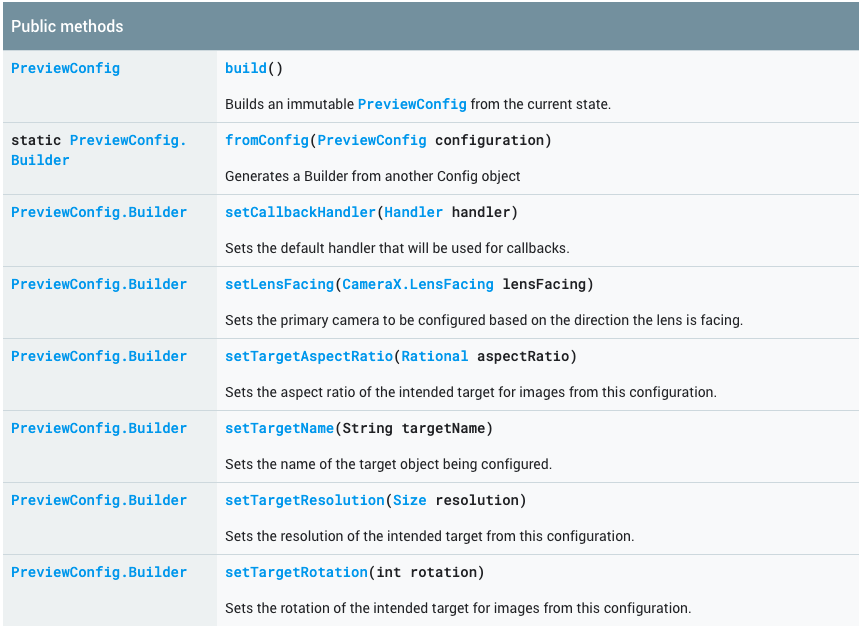
Now that we have our image preview setup, let’s work on capturing and saving images with our new camera.
Implementing Image Capture
To do this, you first need to get an instance of ImageCaptureConfig, and an ImageConfig object.
Let’s write our code for setting up image capture in the setupImageCapture() method in MainActivity.
private fun setupImageCapture(): ImageCapture { val imageCaptureConfig = ImageCaptureConfig.Builder() .apply { setTargetAspectRatio(Rational(1, 1)) // Sets the capture mode to prioritise over high quality images // or lower latency capturing setCaptureMode(ImageCapture.CaptureMode.MAX_QUALITY) }.build() val imageCapture = ImageCapture(imageCaptureConfig) // Set a click listener on the capture Button to capture the image btn_capture.setOnClickListener { // Create the image file val file = File( Environment.getExternalStoragePublicDirectory(Environment.DIRECTORY_PICTURES), "${System.currentTimeMillis()}_CameraXPlayground.jpg" ) // Call the takePicture() method on the ImageCapture object imageCapture.takePicture(file, object : ImageCapture.OnImageSavedListener { // If the image capture failed override fun onError( error: ImageCapture.UseCaseError, message: String, exc: Throwable? ) { val msg = "Photo capture failed: $message" Toast.makeText(baseContext, msg, Toast.LENGTH_SHORT).show() Log.e("CameraXApp", msg) exc?.printStackTrace() } // If the image capture is successful override fun onImageSaved(file: File) { val msg = "Photo capture succeeded: ${file.absolutePath}" Toast.makeText(baseContext, msg, Toast.LENGTH_SHORT).show() Log.d("CameraXApp", msg) } }) } return imageCapture
}
You can read more on how to customise the image capturing experience here. Additionally, here’s a table of the public methods for the ImageCaptureConfig.Builder class from the official docs: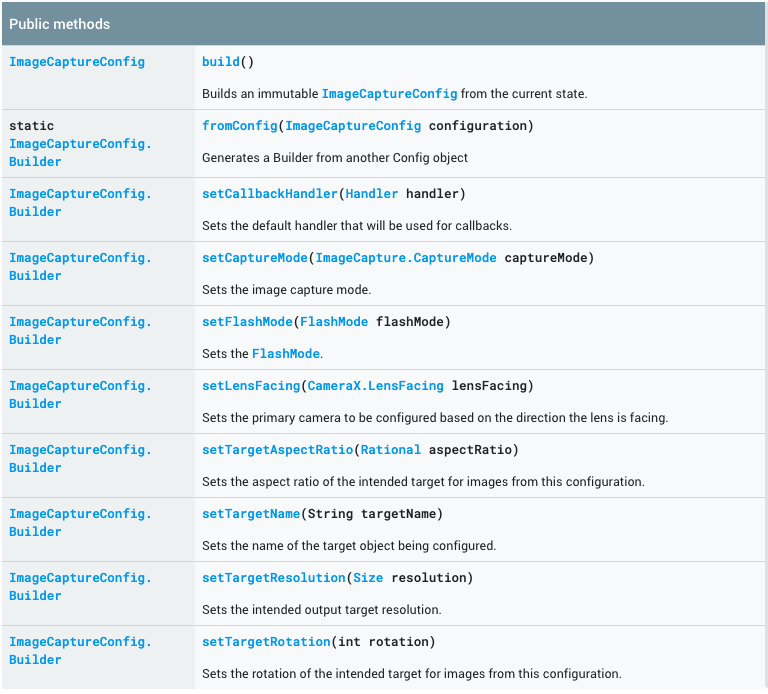
Implementing Image Analysis
Now that we’ve got the basic use cases down, let’s learn how to analyse images in our camera app. For the sake of this demo, we’ll be analysing the amount of red pixels our live image preview has.
To achieve this, you need an instance of ImageAnalysisConfig, which we’ll build with the ImageAnalysisConfig.Builder class.
First, we’ll need to write our image analyzer, which should implement ImageAnalysis.Analyzer:
class RedColorAnalyzer : ImageAnalysis.Analyzer { private var lastAnalyzedTimestamp = 0L // Helper method to convert a ByteBuffer to a ByteArray private fun ByteBuffer.toByteArray(): ByteArray { rewind() val data = ByteArray(remaining()) get(data) return data } override fun analyze(image: ImageProxy, rotationDegrees: Int) { val currentTimestamp = System.currentTimeMillis() if (currentTimestamp > lastAnalyzedTimestamp) { val buffer = image.planes[0].buffer val data = buffer.toByteArray() val pixels = data.map { it.toInt() and 0xFF0000 } val averageRedPixels = pixels.average() Log.d("CameraXPlayground", "Average red pixels: $averageRedPixels") lastAnalyzedTimestamp = currentTimestamp } }
}
Now let’s write the setupImageAnalysis() method:
private fun setupImageAnalysis(): ImageAnalysis { val analyzerConfig = ImageAnalysisConfig.Builder().apply {
// Create a HandlerThread for image analysis val analyzerThread = HandlerThread( "RedColorAnalysis" ).apply { start() } setCallbackHandler(Handler(analyzerThread.looper)) // Set the image reader mode to read either the latest image or next image setImageReaderMode(ImageAnalysis.ImageReaderMode.ACQUIRE_LATEST_IMAGE) }.build() // Create an ImageAnalysis object and set the analyzer return ImageAnalysis(analyzerConfig).apply { analyzer = RedColorAnalyzer() }
}
You can now see the amount of red pixels in your live image preview in your Android Logcat!
Customise your image analysis experience and build your own image analyzer by going through the official docs here. Below is the table for public methods in ImageAnalysisConfig.Builder from the official docs: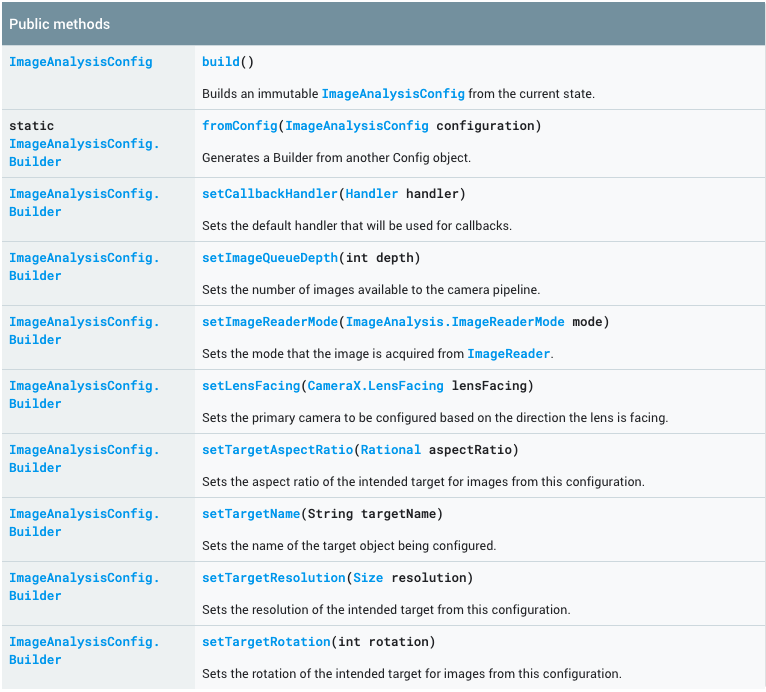
Binding CameraX to the lifecycle
We’ve covered how to use all the 3 use cases in CameraX so far, but don’t forget to bind CameraX to the Activity’s lifecycle. We can do this easily by calling the bindToLifecycle() method, like so:
// Bind camera to the lifecycle of the Activity
CameraX.bindToLifecycle(this, preview, imageCapture, analyzerUseCase)
We’re passing this as the first parameter here, and our bindToLifecycle() method takes a LifecycleOwner as the first parameter in its call. Since we’ve implemented LifecycleOwner in our MainActivity, this is handled by the Activity for us.
The bindToLifecycle() method also takes 3 other parameters which correspond to the aforementioned use cases. Here are the possible combinations of use cases that can be used with a call to this method, right from the official CameraX architecture docs:
CameraX Extensions
Keep in mind that CameraX Extensions are only supported on some devices as of now. Hopefully, Google is aiming to extend this support to more devices later this year.
While the API isn’t ready with implementation for CameraX Extensions yet, you can read more about it here.
Conclusion
You can find the code to the demo app in this tutorial here. Clone the repository and play around with the customisations that CameraX has to offer for yourself!
While the CameraX API is still in alpha stages, you can see how it’s already better than the Camera2 API and the legacy Camera API. With that in mind, take caution and use it carefully, if you decide to use it in production right away.
I’m awaiting more news by Google about more customizations in the API, new devices that will support CameraX Extensions, and how the API will change over the coming months. CameraX does sound very promising to developers, both new and experienced.
Here’s to better camera development in Android! 🚀


