Magento 2 FPC Hole Punching using Section
Today we are going to talk about how to get refreshed data for your block from the server by doing FPC hole punching using sections. We had the similar requirement on our Shipping Bar, Cashback and Product Scheduler extensions.
As we all know full page cache is brilliant but sometime you want to change data based on certain events like add to cart, remove from cart, update qty and many more. As you might have noticed Magento 2 changes mini cart with item count and total information every-time you add / update / remove items from the basket.
Similarly in our shipping bar extension we wanted to show different messages to customer based on adding / updating / removing items from the basket.
For example –
Initial message – “Get Free Shipping for the order over $200”
After adding item to basket – “Only $140 left for you to qualify for free shipping”
As you can see messages are changing based on the event in this case add to basket event which means these messages can’t be part of full page cache and require full page hole punching.
Magento 2 Section
– This is where Magento 2 Section helps creating hole punching / dynamically update data after the page is fully loaded.
As usual lets crack on with our step by step implementation to implement Magento 2 Section -:
Step 1 – Create di.xml file under appcodeScommerceCustometcfrontend with the following -:
 <?xml version="1.0"?>
<config xmlns:xsi="http://www.w3.org/2001/XMLSchema-instance" xsi:noNamespaceSchemaLocation="urn:magento:framework:ObjectManageretcconfig.xsd"> <type name="MagentoCustomerCustomerDataSectionPoolInterface"> <arguments> <argument name="sectionSourceMap" xsi:type="array"> <item name="scommerce_custom" xsi:type="string">ScommerceCustomCustomerDataCustomSection</item> </argument> </arguments> </type>
</config>
Step 2 – Create CustomSection.php file under appcodeScommerceCustomCustomerDataCustomSection with the following -:
 /** * Scommerce Mage - getting data for custom module from get section data function * * @category Scommerce * @package Scommerce_Custom * @author Scommerce Mage <core@2572495e08.nxcli.net> */ namespace ScommerceCustomCustomerData; use MagentoCustomerCustomerDataSectionSourceInterface;
use MagentoFrameworkDataObject; class ShippingBarSection extends DataObject implements SectionSourceInterface
{ /** * CustomSection constructor. * @param array $data */ public function __construct( array $data = [] ) { parent::__construct($data); } /** * @return array */ public function getSectionData() { return ['message'=>'This is message from section']; }
}
Step 3 – Create section.xml file under appcodeScommerceCustometcfrontend with the following -:
<?xml version="1.0"?>
<config xmlns:xsi="http://www.w3.org/2001/XMLSchema-instance" xsi:noNamespaceSchemaLocation="urn:magento:module:Magento_Customer:etc/sections.xsd"> <action name="*"> <section name="scommerce_custom"/> </action>
</config>
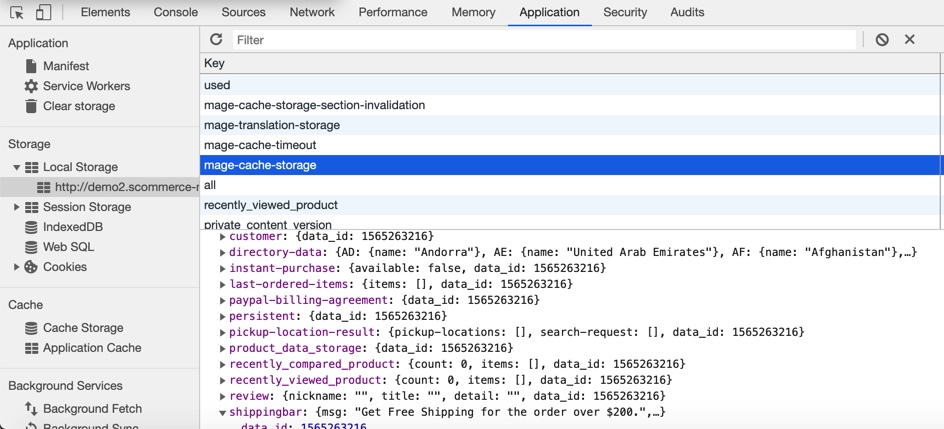
The above three steps will show you scommerce_custom section in your local storage which you can see under application -> storage -> local storage as shown on the image below -:

Step 4 – Create default.xml file under appcodeScommerceCustomviewfrontendlayout with the following -:
 <?xml version="1.0"?>
<!-- /** * Scommerce Mage Custom * @category Scommerce * @package Scommerce_Custom * @author Scommerce Mage (core@2572495e08.nxcli.net) */ -->
<page xmlns:xsi="http://www.w3.org/2001/XMLSchema-instance" xsi:noNamespaceSchemaLocation="urn:magento:framework:ViewLayoutetcpage_configuration.xsd"> <body> <referenceContainer name="content"> <block class="MagentoFrameworkViewElementTemplate" name="custom-message" template="custom.phtml" after="-"> </block> </referenceContainer> </body>
</page>
Step 5 – Create custom.phtml file under appcodeScommerceCustomviewfrontendtemplate with the following -:
<div data-bind="scope: 'section'"> <span class="message" data-bind="text:custom().message"></span> </div> <pre> <img src="data:image/gif;base64,R0lGODlhAQABAIAAAAAAAP///yH5BAEAAAAALAAAAAABAAEAAAIBRAA7" data-wp-preserve="%3Cscript%20type%3D%22text%2Fx-magento-init%22%3E%0A%20%20%20%20%20%20%20%20%7B%0A%20%20%20%20%20%20%20%20%20%20%20%20%22*%22%3A%20%7B%0A%20%20%20%20%20%20%20%20%20%20%20%20%20%20%20%20%22Magento_Ui%5Cjs%5Ccore%5Capp%22%3A%20%7B%0A%20%20%20%20%20%20%20%20%20%20%20%20%20%20%20%20%22components%22%3A%20%7B%0A%20%20%20%20%20%20%20%20%20%20%20%20%20%20%20%20%20%20%20%20%22section%22%3A%20%7B%0A%20%20%20%20%20%20%20%20%20%20%20%20%20%20%20%20%20%20%20%20%20%20%20%20%20%20%22component%22%3A%20%22Scommerce_Custom%5Cjs%5Ccustom%22%0A%20%20%20%20%20%20%20%20%20%20%20%20%20%20%20%20%20%20%20%20%20%7D%0A%20%20%20%20%20%20%20%20%20%20%20%20%20%20%20%20%20%20%20%7D%0A%20%20%20%20%20%20%20%20%20%20%20%20%20%20%20%20%7D%0A%20%20%20%20%20%20%20%20%20%20%20%20%7D%0A%20%20%20%20%20%20%20%20%7D%0A%3C%2Fscript%3E" data-mce-resize="false" data-mce-placeholder="1" class="mce-object" width="20" height="20" alt="<script>" title="<script>" /> </pre>
Step 6 – Create custom.js file under appcodeScommerceCustomviewfrontendwebjs with the following -:
 define([ 'uiComponent', 'Magento_Customerjscustomer-data', 'jquery'
], function (Component, customerData, $) { 'use strict'; return Component.extend({ /** @inheritdoc */ initialize: function () { this._super(); customerData.reload('scommerce_custom', true); this.custom = customerData.get('scommerce_custom'); } });
});
Now you should be able to see the message This is message from section on all the pages on your website
Hope this article helped you in some way. Please leave us your comment and let us know what do you think? Thanks.


