If you are familiar with the Magento community or own a Magento 1 store then you must be aware that Adobe has stopped the support for Magento 1 platform altogether. This version has been officially deprecated as of July 2020. Hence, those of us who are still running Magento 1 must migrate to a significantly improved version of Magento i.e Magento 2. It has several new as well as improved features such as the addition of new technologies, better performance, mobile-friendly, popular payment gateways, and tons of other new features. Today, we will discuss data migration from Magento 1 to Magento 2 step by step. So that you can do it yourself without running into errors.
To simplify this entire process, we will break it down in two major steps. First is preparation, which is the most crucial step for successful data migration. If you make even a tiny bit of mistake in this step then you will run into errors. The second step is to run commands which are pretty straightforward. We highly recommend that you take a backup of the database before performing a data migration. Let us look at both of these steps in further detail.
Data Migration From Magento 1 to Magento 2: Preparations
The preparation phase comprises a few small but crucial steps that you need to take care of before beginning the process. First and foremost, you need to have both the Magento 1 and Magento 2 database on your local machine. You have a Magento 1 database that you want to migrate to Magento 2. You get Magento 1 database out of the box and preferably a fresh install of Magento 2 as it will be much faster. However, if you have been working on the development on your local then make sure you have not performed data migration before. Once you have both the databases then you are ready. Now follow the steps below:-
Preparing the database and Copying Media Files
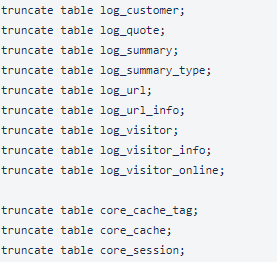
Generally, people who have been running Magento 1 stores have a lot of data hence it would take more time to complete the import process. We can optimize this process by truncating the unnecessary data from the database. Find all the tables with unnecessary data and run the database truncate command as shown below.
Once you have optimized your database, it is time to copy all the media files from Magento 1 to Magento 2. Media files located in <Magento 1>/ media directory. Copy all the files into <Magento 2>/pub/media directory. Remember both of these directories contain their own .htaccess file but you must not replace the Magento 2 .htaccess file. Especially if you are copying your media through a zip file then do not override the .htaccess file. It could take some time depending upon the size of your data.
Installing the Migration Tool
Now, it is time to install the migration tool. Magento provides the migration tool unique to each version of the software. Hence, you need to install the right tool specific to your version of Magento. Check the version using the command given below:-
php bin/magento --version
Suppose you are running Magento version 2.3.2 then you need to install the migration tool for version 2.3.2. You can install this tool using the composer as shown below. Notice, here the version of the tool is exactly the same as our version of Magento.
composer require magento/data-migration-tool:2.3.2
Creating the Configuration File
The last step of preparation is to create and modify the config.xml file. In order to do that, you will have to first determine the version of your Magento 1. You can do that by signing in to the admin panel, the version number is displayed in the footer.
- Once you have done that navigate to the migration tool directory ( vendor/Magento/data-migration-tool )and then into etc. Here, you will notice three folders namely commerce to commerce, opensource to commerce, and opensource to opensource. Magento comes in two versions, community and enterprise which is paid. if you want to migrate from enterprise to enterprise then go to commerce to commerce folder. If you want to migrate from community to enterprise then go to the opensource to commerce folder. Otherwise, if you want to migrate from community to community then go to the Opensource to Opensource folder.
- Once you are in the right folder, navigate to the folder that corresponds to the version of your Magento 1. For instance, our version is 1.9.4.3. This folder contains three files config.xml.dist, map.xml.dist, and map.tier.xml.
- Now create a config.xml file and copy and paste the contents from config.xml.dist file. If you open this file you will see several lines of code. Navigate to the <source> and <destination> tags. Now insert your Magento 1 and Magento 2 database credentials. See the below image for reference:-

- Lastly, navigate to <crypt_key> tag and paste your key obtained from Magento 1. You can obtain this key from <magento1_root>appetclocal.xml file.

Data Migration From Magento 1 to Magento 2: Commands
After finishing the preparations carefully, you are now ready to start the data migration process. Follow the commands given below:-
- We will run a command to import the configurations settings first.
php bin/Magento migrate:settings vendormagentodata-migration-tooletcopensource-to-opensource1.9.4.3config.xml
- Next, we will run the below command to import the data.
php bin/Magento migrate:data -a -r vendormagentodata-migration-tooletcopensource-to-opensource1.9.4.3config.xml
- If your process stops in between then do not worry about it. It usually happens when you are importing large amounts of data. Run the command below to continue the process from where it stopped.
php bin/Magento migrate:delta vendormagentodata-migration-tooletcopensource-to-opensource1.9.4.3config.xml
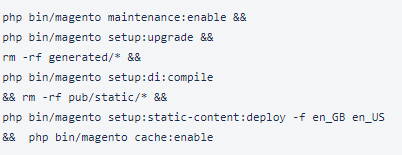
- Clear the static files, run step upgrade, deploy static content, and clear the cache.
- Lastly, run the indexer command.
php bin/magento indexer:reindex
After completing all the steps above your data migration should be successful. Keep in mind that the commands above are for Magento 1 version 1.9.4.3 and hence if you have a different version then replace the version number with your own. If you still run into problems then you can contact us HERE.


