Shopware 6 offers various opportunities for using a customer’s VAT ID in your e-commerce business. First of all, you can access it in your administration. Shopware 6 provides the ability to view and edit VAT ID information here. The same opportunities are possible for the frontend. Your registered buyers can apply changes to VAT ID through a customer account. Also, you can output a VAT ID on invoices as a store administrator. Let’s take a look at all these e-commerce chores. You can find more useful materials about Shopware 6 here.

Note that we provide Shopware integration with external platforms. Contact our support for further information or try our Improved Import, Export & Mass Actions.
Get Improved Import, Export & Mass Actions for Shopware by Firebear Studio
Explore Shopware
Table of contents
VAT ID defined
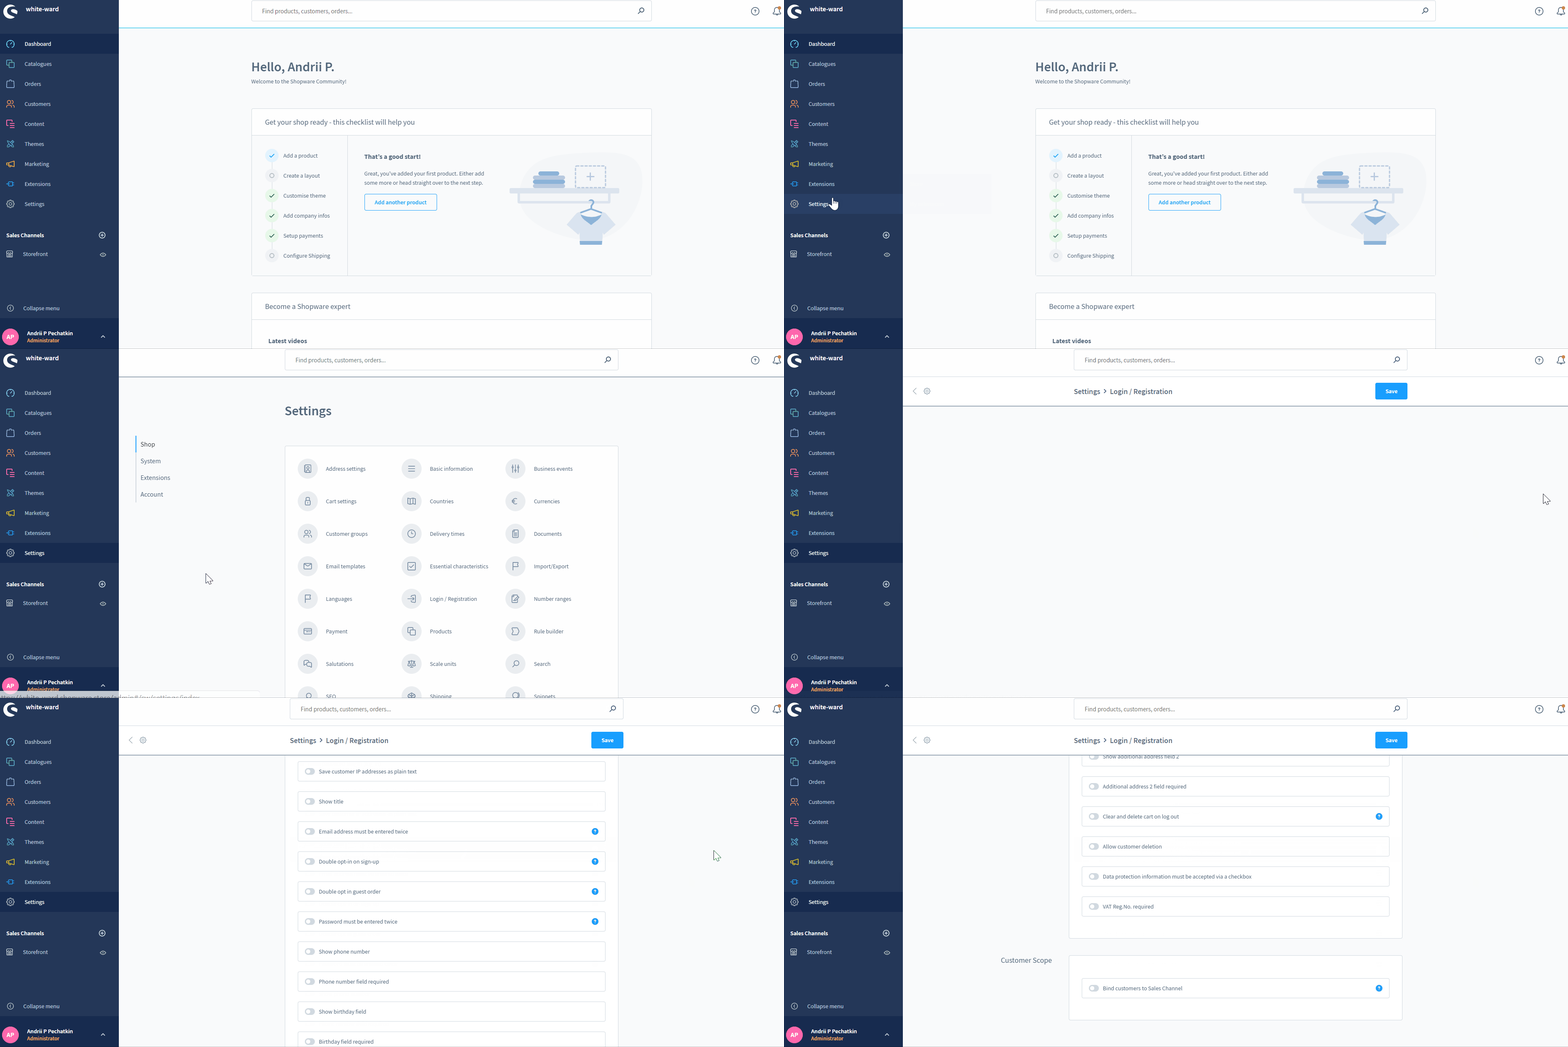
VAT ID is a value-added tax identification number. This identifier is used in many countries all over the globe for value-added tax purposes. Usually, you can always verify it online at official websites. From the e-commerce perspective, only commercial customers need to provide a VAT ID. Shopware 6 hides the corresponding input fields for private customers. Therefore, you need to enable the Show selection between commercial and customer account option in the settings of the Login / Registration area to enable customers to register as B2B clients. The following gif image shows how to get to the corresponding admin area:
You can see the desired setting below:
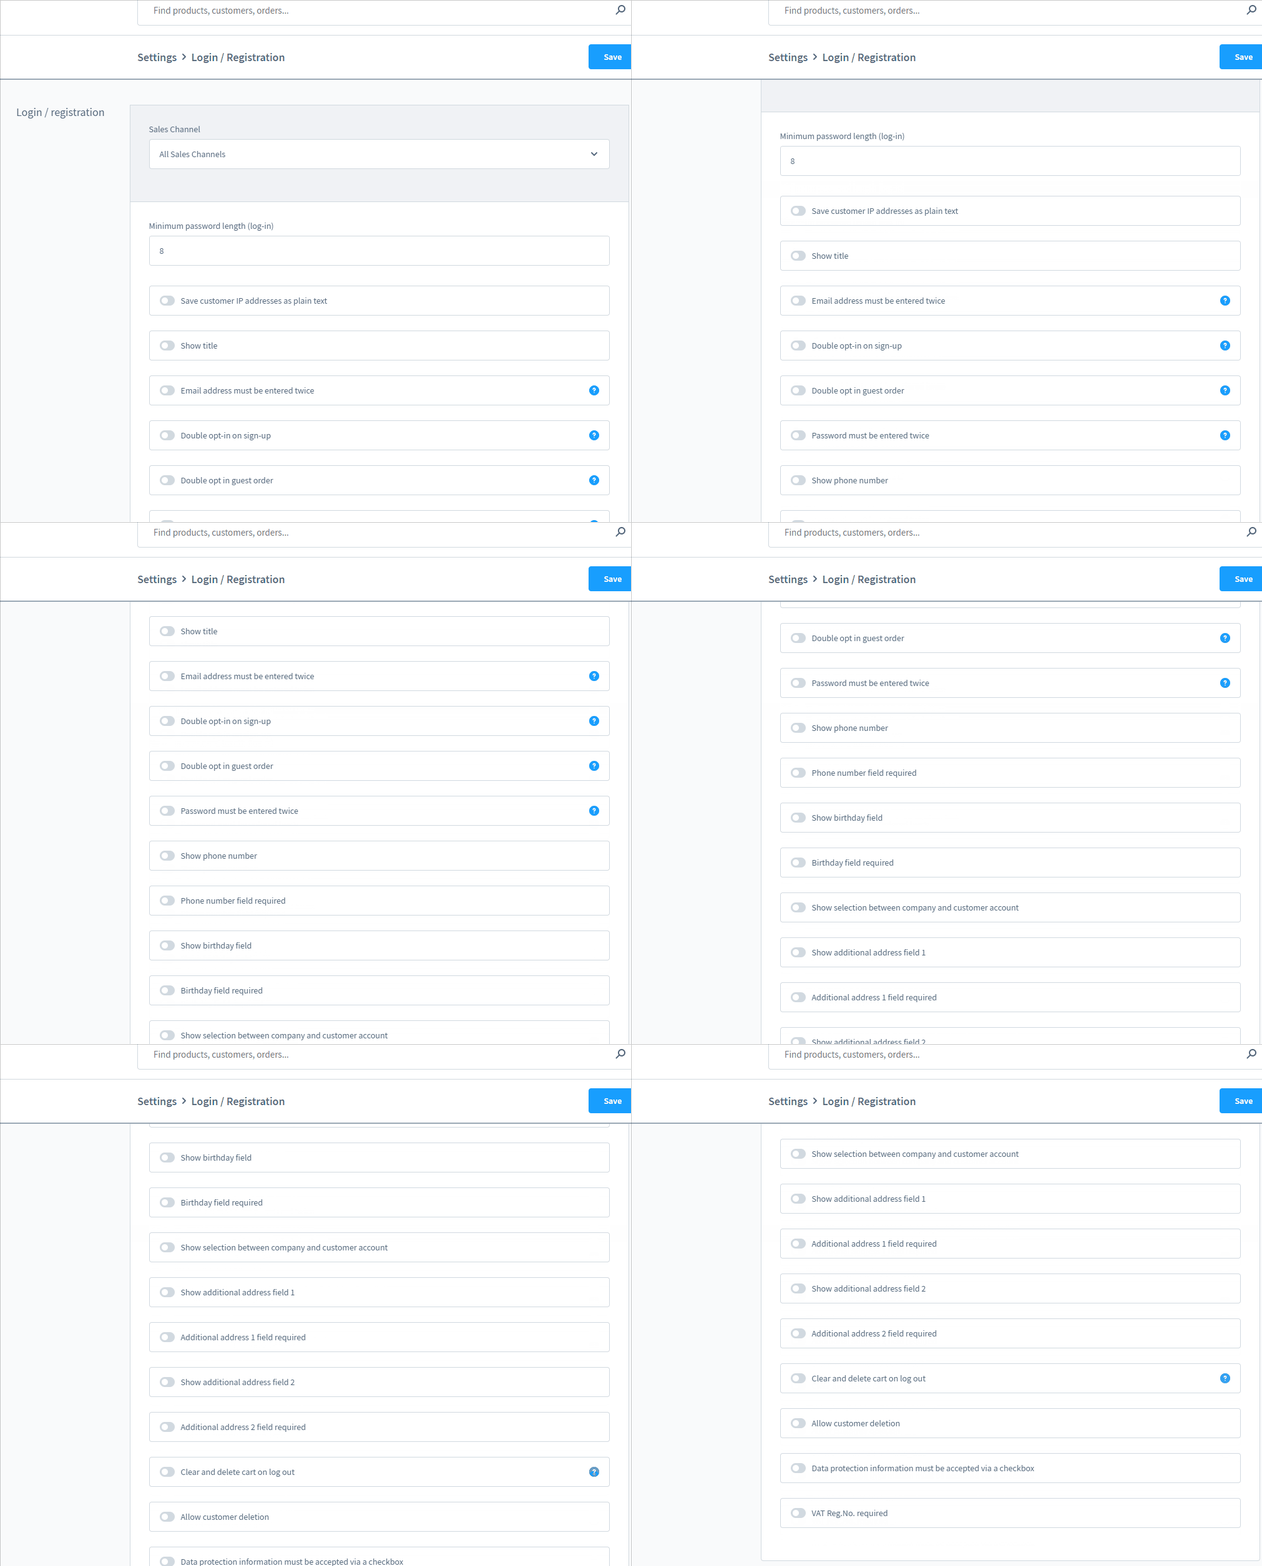
Read this article: Shopware 6 Login / Registration Settings for further information.
How to show and edit VAT ID in the Shopware 6 admin
If B2B accounts are enabled on your Shopware 6 website, and you already have registered commercial clients, you can find their VAT IDs on a customer overview screen.
You can view a business customer in Shopware 6 as follows:
- Go to the Customer Overview screen;
- Open the context menu for a commercial customer you want to view;
- Choose View.
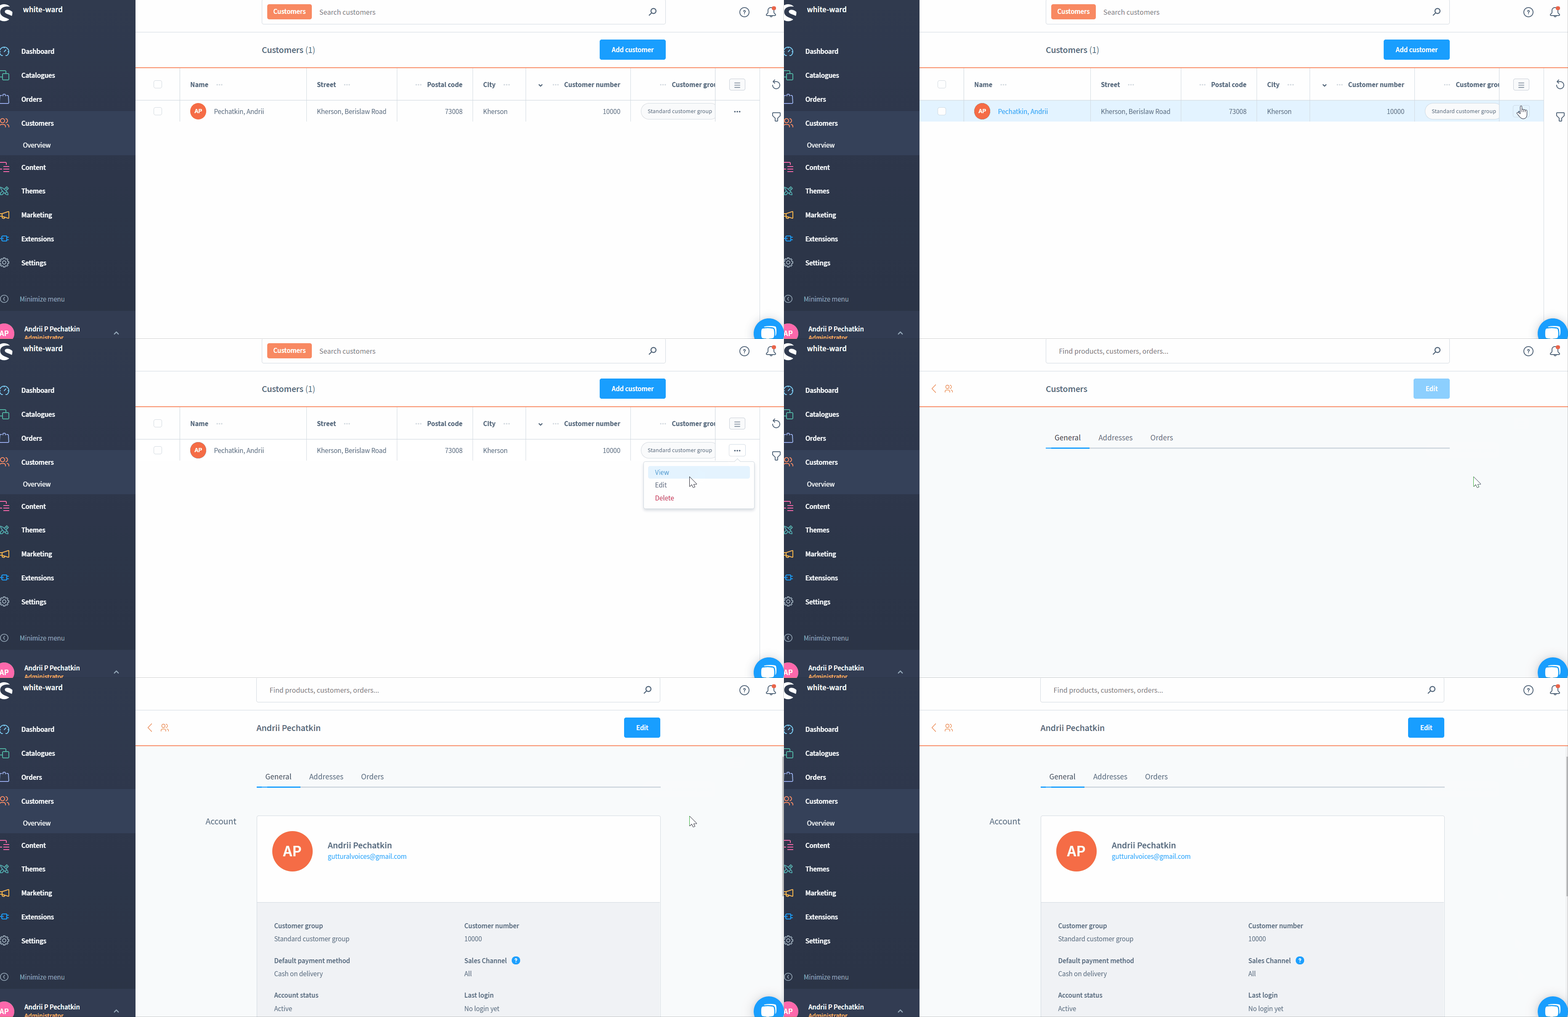
The detailed overview contains all the data about your B2B client divided into the following three sections:
- General;
- Addresses;
- Order.
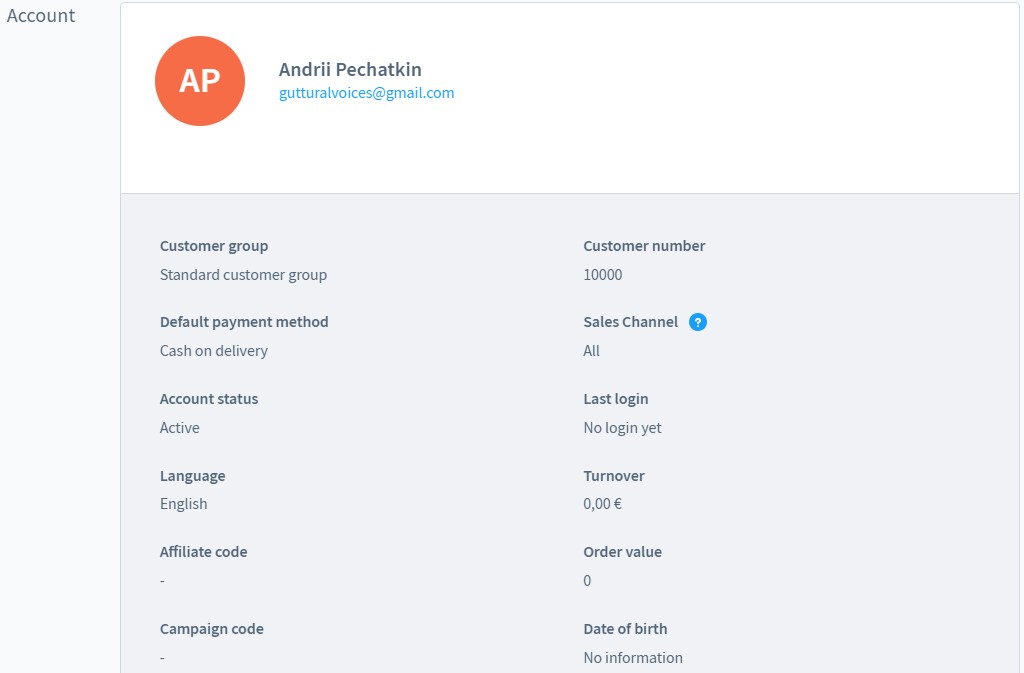
The customer VAT ID is stored under the General tab. It is necessary to activate the edit mode to see it.
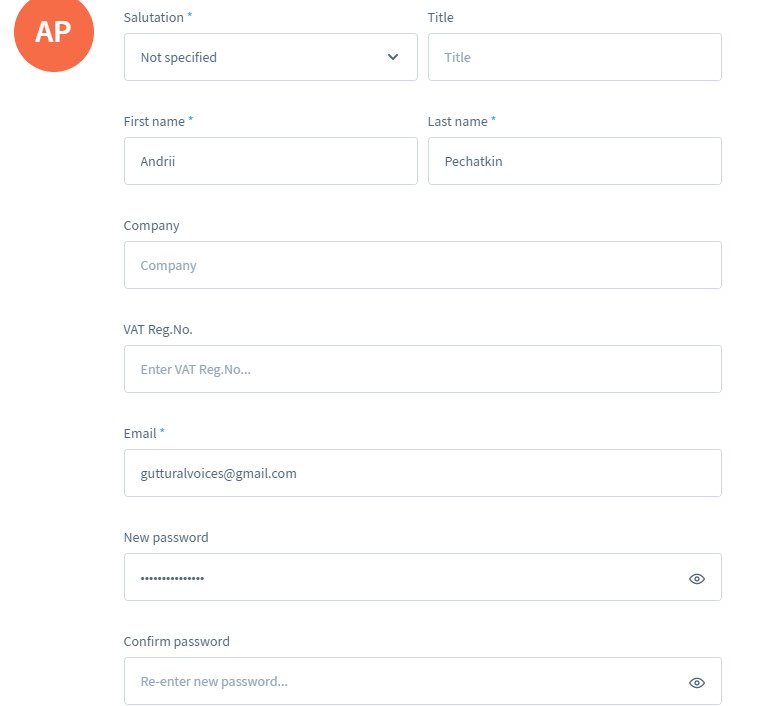
The editing window displays the VAT ID. You can change it and save it.
How to display and edit VAT ID in a customer account in Shopware 6
As a customer, you also get access to your VAT ID information in Shopware 6. It is stored straight in your customer account in the general profile information. You can view and edit your VAT ID in the overview by clicking the Change profile button.
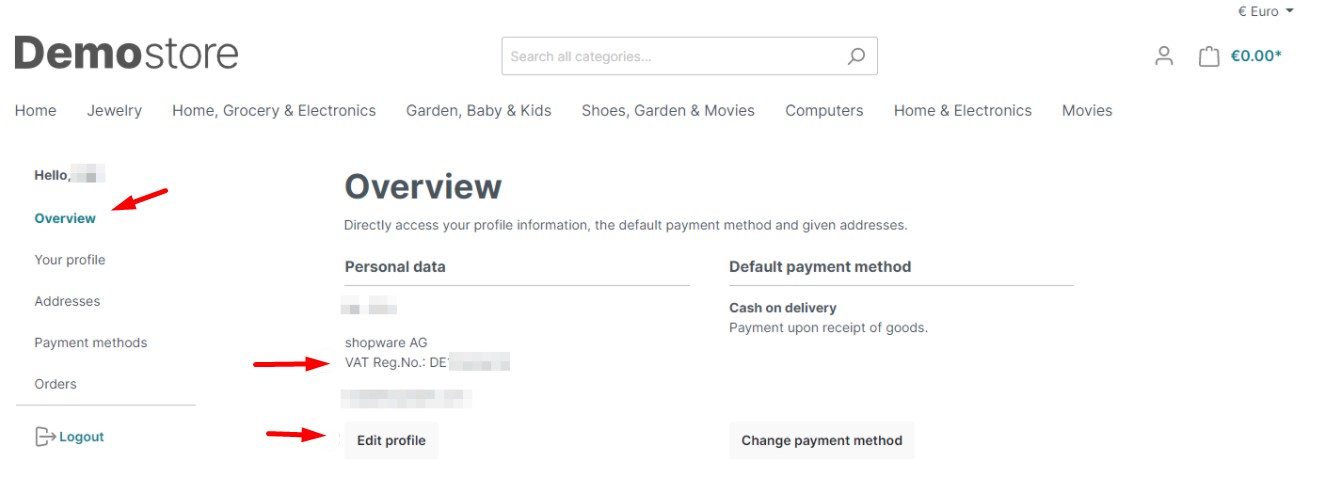
You can adjust your VAT ID and save the change as a commercial customer.
Output VAT ID on the invoice
In earlier Shopware 6 versions, it was necessary to edit an invoice template to add a VAT ID. Starting from Shopware 6.3.5.0, the system adds it automatically. Therefore, it is necessary to disable the previously made adjustment to the document template to avoid a situation when the ID is printed twice.
How to Import Customers to Shopware 6
If you need to transfer already registered customers to your Shopware 6 website along with their VAT IDs, you’ve come to the right place. With the Firebear team, there is no need to manually recreate all the related information. You can simplify and automate this process. Contact our support for more details and try our Improved Import & Export Extension for Shopware. It lets you import any entity to Shopware 6.
Furthermore, it is possible to create a schedule of updates for recurring import and export processes. As a result, all data transfers are launched automatically according to the specified time frames. You also get mapping presets or schemes that teach the system to treat unsupported data. Specify what replacement to use, and the module will do all the work for you, transferring commercial customers with VAT IDs. Please, consult our specialists regarding moving customers to Shopware 6 before using the extension.
Shopware 6 Essentials FAQ
How to create a Shopware account?
You need to create a Shopware account before working with B2B clients and collecting their VAT IDs in Shopware 6. Visit the registration page, hit the Register Now link, and fill in the form to create a new account. After receiving a confirmation email, follow the instructions provided in it.
What about a Shopware ID?
You will get your Shopware ID upon registration automatically. The procedure requires no additional steps.
What is Shopware master data?
Shopware master data is all the information about your company and business. It includes physical addresses, phone numbers, emails, etc.
How to add a new Shopware shop?
You need to create a Shopware shop to work with both B2C and B2B clients. Visit your merchant area, click the corresponding link, choose the type of your new shop (a cloud storefront or an on-premise installation), and provide all the information the system requires.
How to add a payment method to your Shopware account?
Shopware requires a payment method associated with your account and used for internal purposes. You can add it under Basic Information -> Accounting. Select PayPal, credit card, or direct debit as a way to transfer funds to your account.
How to create a deposit in Shopware?
A working payment method lets you create a deposit for purchasing extensions and themes. Go to your Merchant Area -> Shops, choose a shop to provide funds to, click Open Account Details, and transfer a deposit that covers the amount of your purchase.
How to purchase Shopware extensions?
You can use the Plugin Manager to buy extensions and themes for Shopware 6. Alternatively, it is possible to do that on the Shopware Marketplace. In both cases, you need to create a deposit in advance that equals the amount of your future purchase. Next, select a tool you want to buy and complete the checkout.
How to get support in Shopware?
With license inquiries, you can contact shopware via info@shopware.com or call +49 2555 9288 50. If you need help with accounting and financial issues, reach the support department: financial.services@shopware.com and +49 2555 9288 510.
How to automate import and export processes in Shopware 6?
You can automate data transfers with the help of the Improved Import, Export & Mass Actions extension. The module automates recurring data transfers with the help of update schedules. Also, it offers mapping presets that edit external data automatically, following the Shopware requirements.
How to migrate to Shopware 6?
Use the Improved Import, Export & Mass Actions module to migrate to Shopware 6, transferring data from your existing website to the new platform. The extension lets you migrate from other e-commerce systems or Shopware’s previous versions. Note that we also offer export solutions for systems like Magento and Shopify, so you can simplify your data transfers between them and Shopware. Contact us for more information.
How to integrate Shopware 6 with external systems?
The Improved Import, Export & Mass Actions plugin is also suitable for the Shopware 6 integration with ERPs, CRMs, accounting tools, and other similar platforms. The module can help you automate repetitive import and export processes due to schedules and mapping presets. The presets help you modify data according to the requirements of your Shopware store during import as well as follow the rules of the connected platform during export.
Get Improved Import & Export for Shopware by Firebear Studio
Explore Shopware


