Enhanced Ecommerce or Universal Analytics from Google is a solution to track a customer’s behavior in your store. It collects crucial data from the customers browsing experience on the store such as products viewed, products added to cart or removed from cart, promotions, products clicked, and more. This data is then transferred to Google Analytics for detailed reports and analysis. Based on this report store owners or merchants can formulate strategies and enhance their stores to increase sales and conversions. It is high time to implement Magento 2 Universal Analytics(UA) to enhance your ecommerce stores. In this guide, we will cover everything you need to know about setting up Magento 2 Universal Analytics(UA) using Google Tag Manager(GTM).
You can also follow the Google Documentation alongside this guide to get the optimum results. Before getting started with the GTM setup you need to implement data layers for each of the measurements on your store’s web pages. Each of the measurements includes a sample data layer preview. We have also built an extension of the entire setup Magento 2 Google Enhanced Ecommerce Tracking. Check it out if you do not want to go through the manual setup.
How to Create a Universal Analytics(UA) tag in GTM?
You need to create a Universal Analytics tag and provide the Google Analytics ID to connect GTM with Google Analytics. We will store the Google Analytics ID in a variable so let us create this variable.
Setting Up GA ID Variable
Step 1:- From the left navigation select Variables. Click on New to create a new variable. Enter the variable name as “GA ID”.
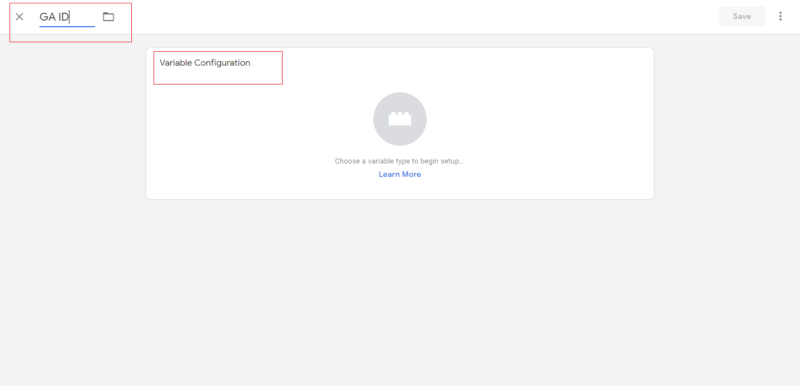
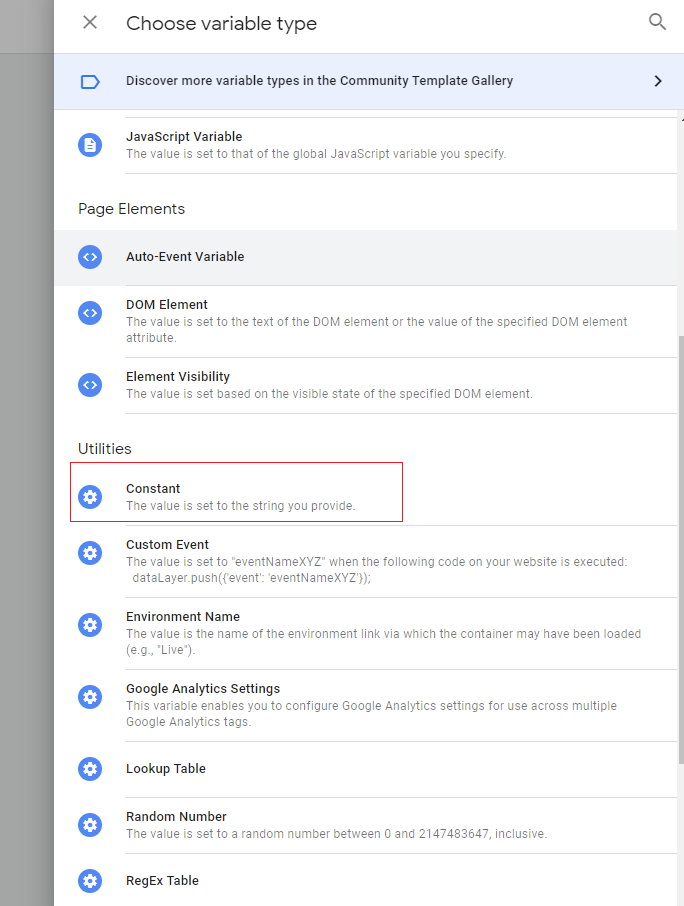
Step 2:- Click on Variable Configuration. A popup window will open, here choose variable type as “constant”.
Step 3:- In the Value input box enter the UA Id or Google Analytics ID eg:- UA-XXXXXX (we will mention how you can get this id in the below steps)

Step 4:- Lastly click on save and your GA ID variable is created.
Setting up Trigger
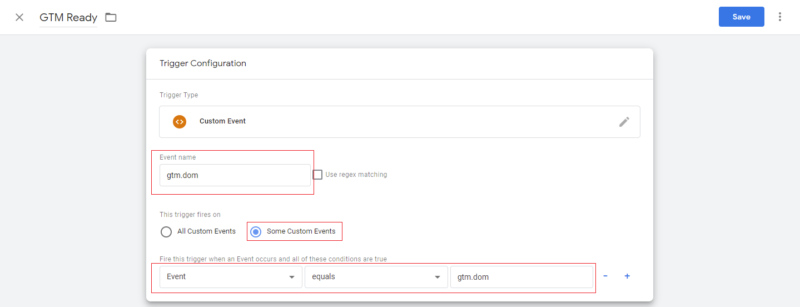
Step 1:- From the left navigation select Triggers. Click on New to create a new trigger. Enter the Trigger name as “GTM Ready”.
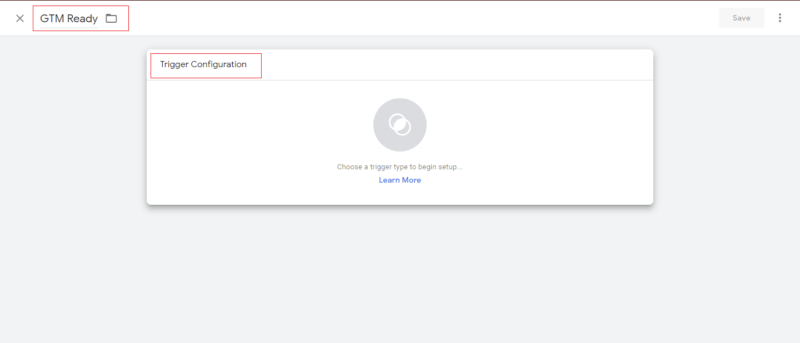
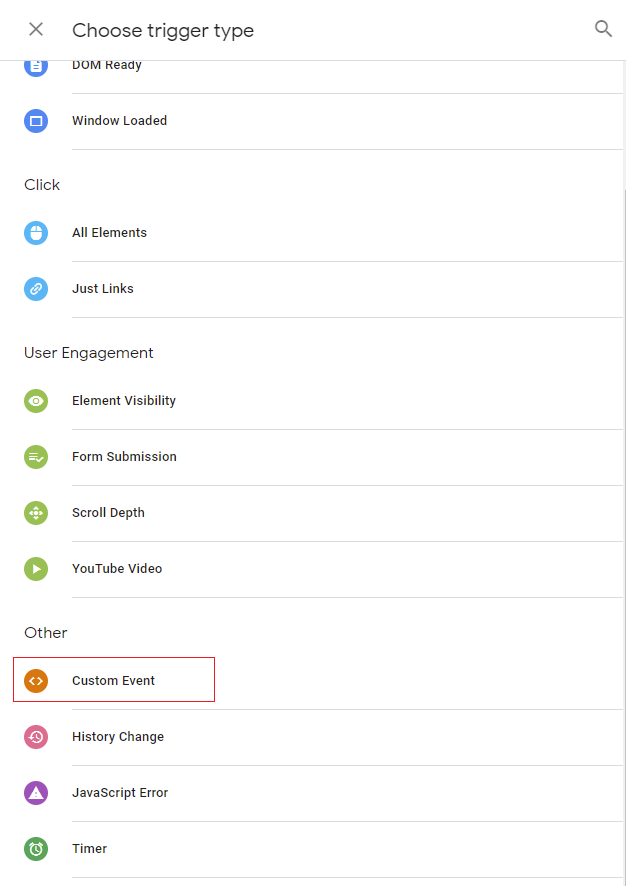
Step 2:- Click on Trigger Configuration. In the popup choose trigger type as “Custom Event”
Step 3:- Enter Event Name as “gtm.dom” and select “Some Custom Events” in This trigger fires on and enter Event Equals gtm.dom in the below input boxes. Refer to the image below:-
Step 4:- Finally click on Save to complete the trigger setup.
Setting Up Tag
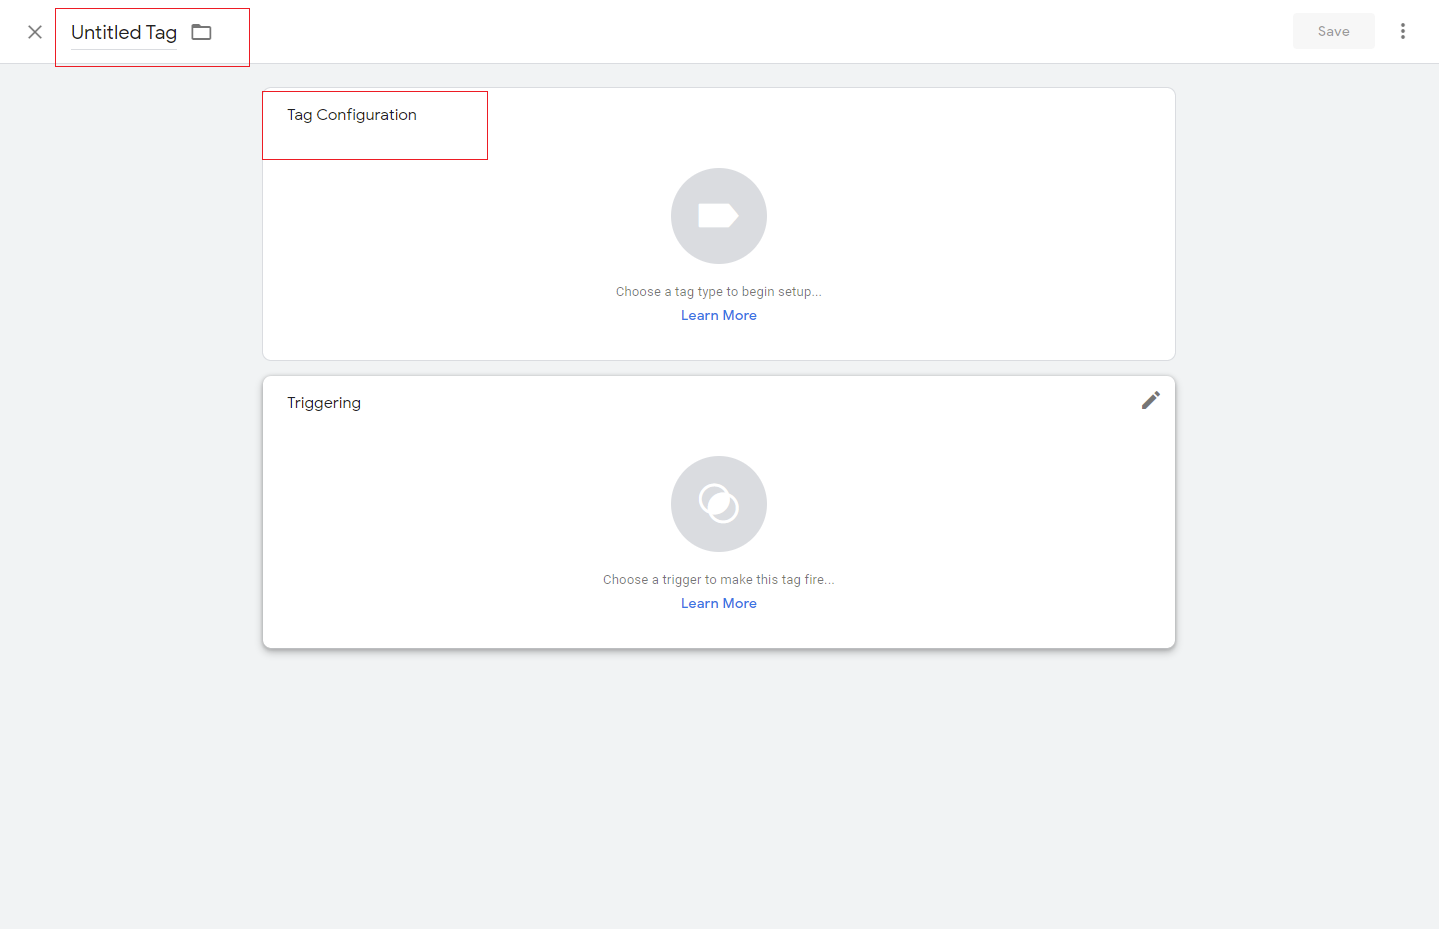
Step 1:- Go to Tags from the left navigation. Click on New to create a new tag. In the popup window provide the name of the tag as “Universal Analytics“. Now click on Tag Configuration.
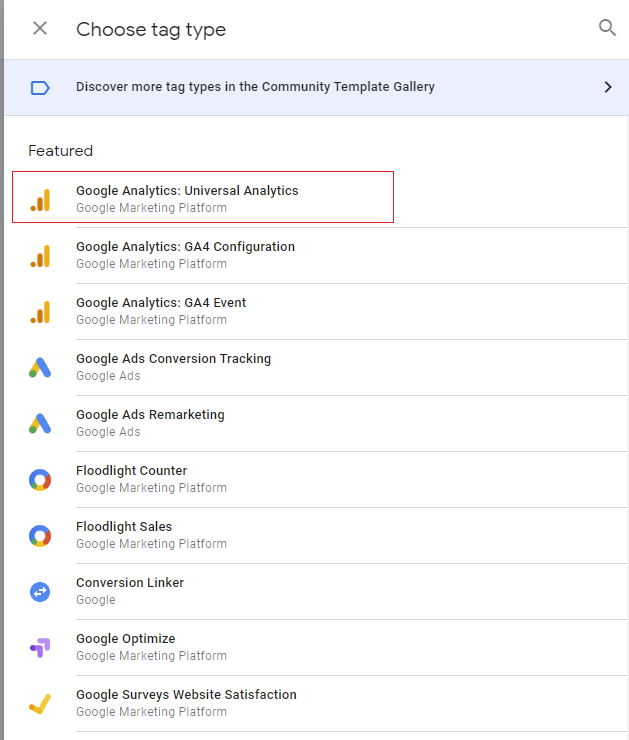
Step 2:- From the popup window choose tag type as Google Analytics: Universal Analytics.
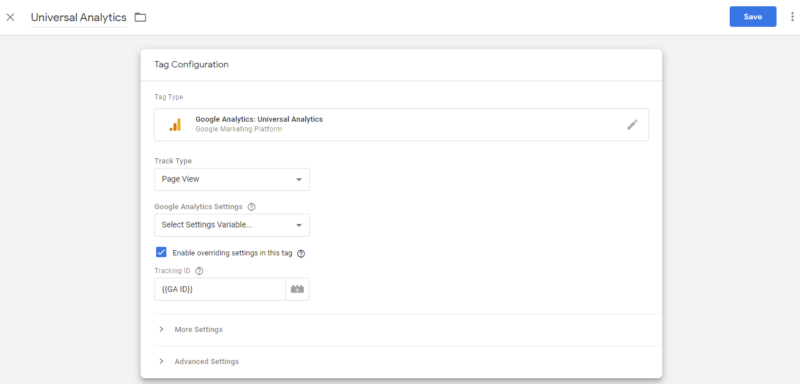
Step 3:- In the Track Type, select Page view and select enable overriding setting in this tag checkbox. More settings will appear below here enter Tracking ID as “{{GA ID}}”.
Step 4:- Click on More Settings. Expand Fields to set and enter the field Name and value pair as shown below:-
Field Name:- campaignMedium Value:- {{UTMMedium}}
Field Name:- campaignSource Value:- {{UTMSource}}
This setting will also send the source and medium to Google Analytics.

Note:- Make sure to create the UTMMedium and UTMSource variables and enter the custom script as shown below:-
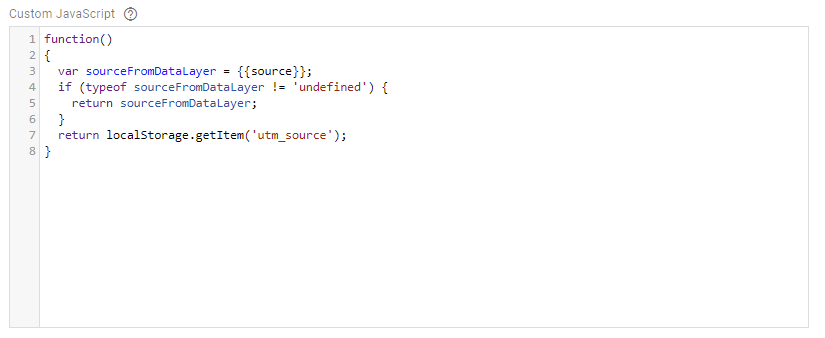
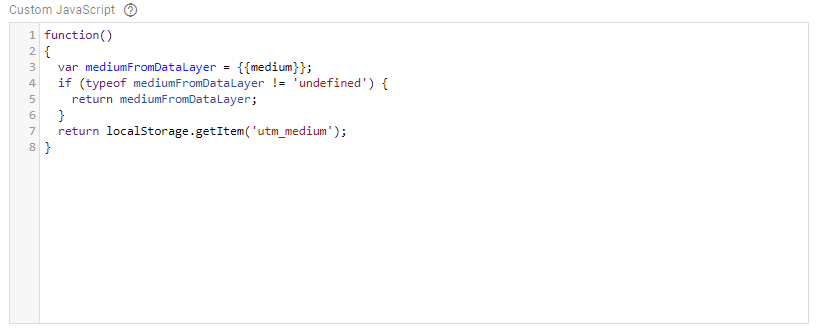
Step 5:- Scroll down below and expand Ecommerce then set Enable Enhanced Ecommerce Features to “True” and tick the Use Data Layer. This setting will automatically pickup pageviews from the data layer. Go to Advertising and set it to “False” then click on Cross Domain Tracking and set Use Hash as Delimiter & Decorate Forms to “False”
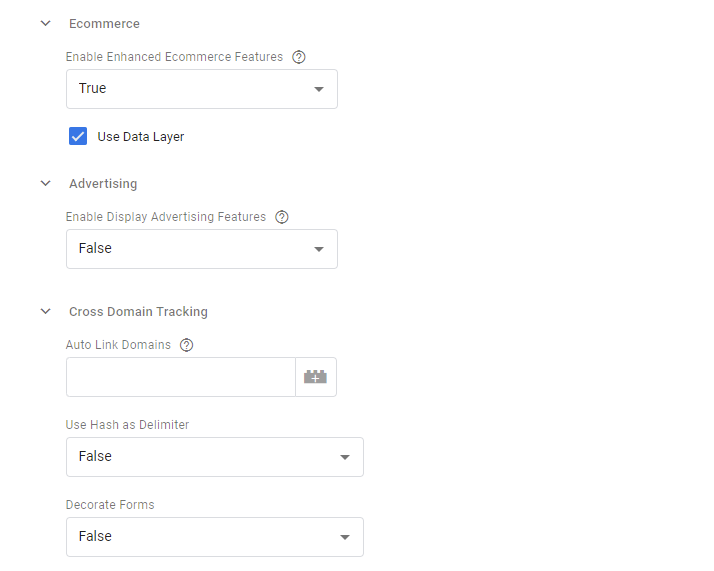
Step 6:- Lastly scroll down and set Use Debug Version “True”, Enable Enhanced Link Attribution “False” and Set Tracker Name “False”. Select the Trigger GTM Ready that we created in the previous step. Finally, click on Save and you are done.
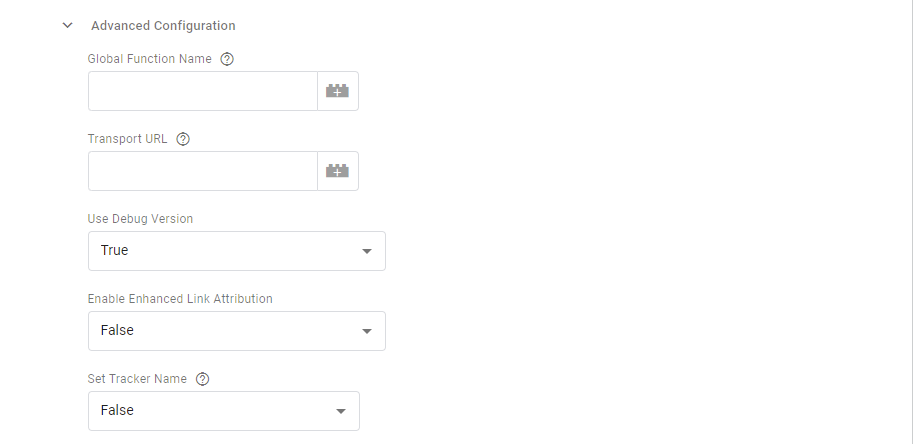
This Configuration Tag Automatically Tracks Few Measurements
Following Measurements are automatically tracked by this configuration tag, simply implement the data layers shown for each measurement on your Magento 2 store.
Product Impressions
Data Layer:- Below is a sample data layer to measure product impressions in Universal Analytics.
ecommerce: { impressions: [ { id: "MSH10", name: "Sol Active Short", price: "32.00", category: "Default Category", brand: "", list: "Category - Men->Bottoms->Shorts", position: 3 }, { id: "MSH09", name: "Troy Yoga Short", price: "24.00", category: "Default Category", brand: "", list: "Category - Men->Bottoms->Shorts", position: 4 }
]
}
After implementing the data layer the configuration tag that we set up in the previous step will automatically track product impressions when triggered by GTM Dom. You can view this tracking firing in GTM under the name ‘DOM Ready’.
Product Details
Data Layer:- Below is a sample data layer to measure product details in Universal Analytics.
ecommerce: { detail: { actionField': {list: "Category - Men->Bottoms->Shorts"} products: [ { id: "MSH09", name: "Troy Yoga Short", price: "24.00", category: "Default Category", brand: "nike", } ] }
After implementing the data layer given above on your store the configuration tag will automatically track it upon pageview you can view this tracking fired on GTM under Dom Ready.
Internal Promotion Impressions
Data Layer:- Below is a sample data layer to measure Internal Promotion in Universal Analytics.
ecommerce: { promoView: { promotions: [ { id: "Test123", name: "Name - Sales on yoga equipments", creative: "Creative - Sales on yoga", position: 1 } ] } }
After implementing the data layer given above on your store the configuration tag will automatically track it upon pageview you can view this tracking fired on GTM under Dom Ready.
Purchases
Data Layer:- Below is a sample data layer to measure Internal Promotion in Universal Analytics.
ecommerce: { currencyCode: "GBP", purchase: { actionField: { id: "WEB-000001037", affiliation: "", revenue: "32.0000", tax: "0.0000", shipping: "0.0000", coupon: "" }, products: [ { name: "Sol Active Short-33-Green", id: "MSH10", price: "32.00", brand: "nike", category: "Default Category", list: "Category - Men->Bottoms->Shorts", quantity: 1 } ] } }
After implementing the data layer given above on your store, the configuration tag will automatically track it due to it being a Pageview type tracking. You can view this tracking firing in GTM under DOM Ready.
Refund
Data Layer:- Below is a sample data layer to measure Refund in Universal Analytics.
ecommerce': { 'refund': { 'actionField': {'id': 'T12345'}, 'products': [ {'id': 'P4567', 'quantity': 1}, {'id': 'P8901','quantity': 2} ] } }
After implementing the data layer given above on your store, the configuration tag will automatically track it due to it being a Pageview type tracking. You can view this tracking firing in GTM under DOM Ready.
Measuring Universal Analytics(Enhanced Ecommerce) Events
For the events below follow the step-by-step guide on setting up all tags, triggers, and variables.
Product Clicks
Data Layer:- Below is a sample data layer to measure product clicks in Universal Analytics.
event: "productClick",
click: { actionField: {list: "Category - Men->Bottoms->Shorts"}, products: [ { name: "Sol Active Short", id: "MSH10", price: "32.00", brand: "nike", category: "Default Category", position: 3 } ] }
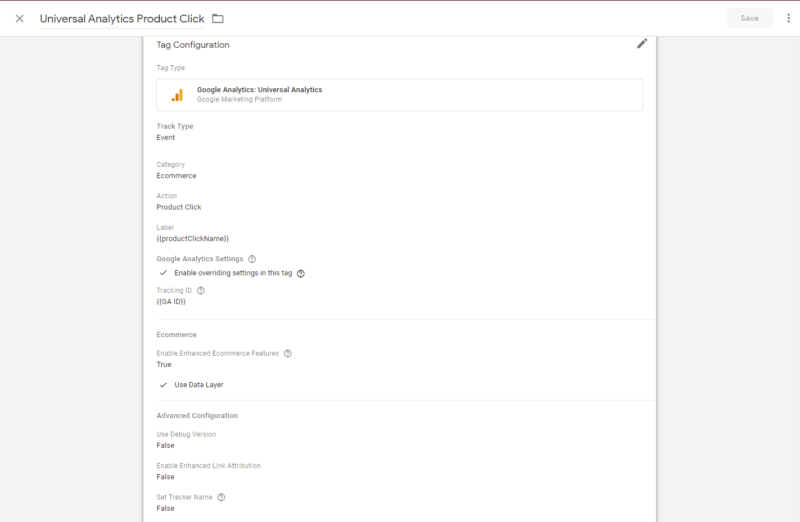
After implementing the data layer given above on your store follow the below steps to set up Universal Analytics(UA) product click tag in GTM.
Step 1:- Setup necessary variables
Variable Name:- productClickName
Variable Type:- Data Layer Variable
Data Layer Variable Name:- ecommerce.click.products.0.name
Data Layer Version:- Version 2
Step 2:- Setup the required Trigger on which this tag will fire
Trigger Name:- Product Click
Trigger Type:- Custom Event
Event Name:- productClick
This Trigger Fires on- Some Custom Events:- Event Equals productClick
Step 3:- Finally configuring the Universal Analytics Product click Tag as per the image given below:-
Add to Cart
Data Layer:- Below is a sample data layer to measure Add to Cart activity in Universal Analytics.
event: "addToCart",
currencyCode: GBP, add: { products: [ { id: "MSH10", name: "Sol Active Short-33-Green", category: "Default Category", brand: "nike", price: 38.4, qty: "1", currency: "GBP", list: "Category - Men->Bottoms->Shorts" } ] }
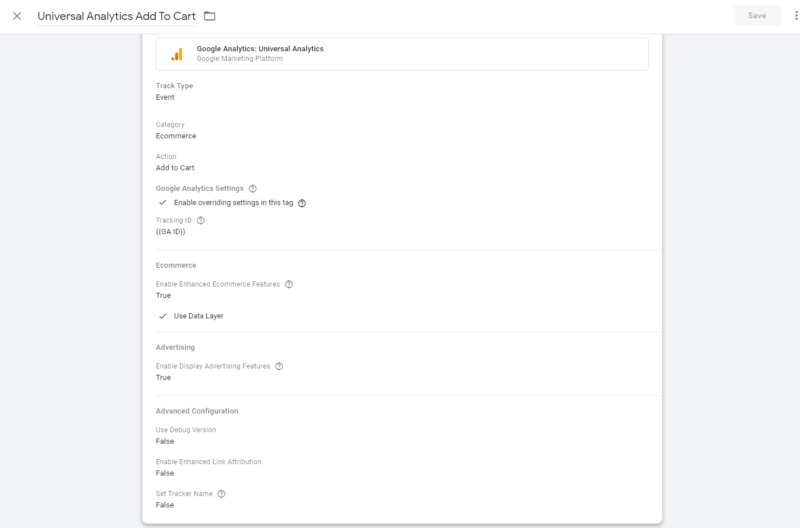
After implementing the data layer given above on your store follow the below steps to set up Universal Analytics(UA) Add to Cart tag in GTM.
Step 1:- Setup the required Trigger on which this tag will fire
Trigger Name:- Add To Cart
Trigger Type:- Custom Event
Event Name:- addToCart
This Trigger Fires on- Some Custom Events:- Event Equals addToCart
Step 2:- Finally configuring the Universal Analytics as per the image given below:-
Remove From Cart
Data Layer:- Below is a sample data layer to measure Remove From Cart activity in Universal Analytics.
event: "removeFromCart",
currencyCode: "GBP", remove: { products: [ { name: "Pierce Gym Short", id: "MSH12", price: "27.00", brand: nike, category: "Default Category", quantity: 0 } ] }
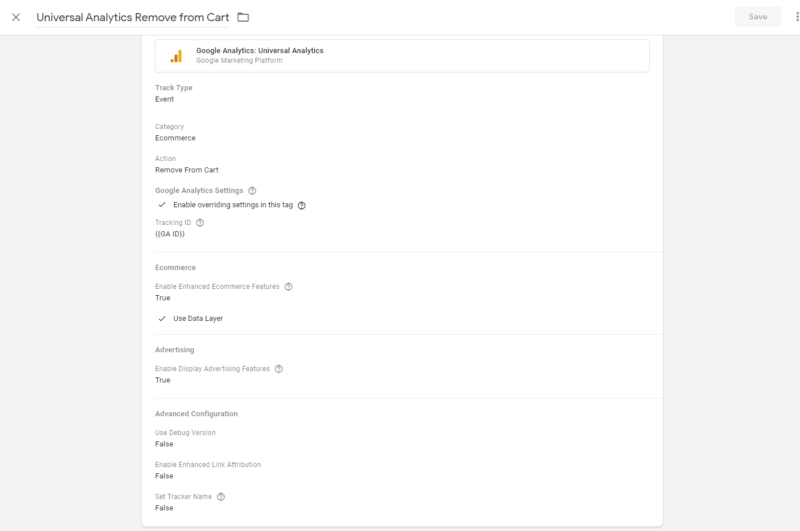
After implementing the data layer given above on your store follow the below steps to set up Universal Analytics(UA) Remove From Cart tag in GTM.
Step 1:- Setup the required Trigger on which this tag will fire
Trigger Name:- Remove From Cart
Trigger Type:- Custom Event
Event Name:- removeFromCart
This Trigger Fires on:- Some Custom Events :- Event Equals removeFromCart
Step 2:- Finally configuring the Universal Analytics as per the image given below:-
Promotion Clicks
Data Layer:- Below is a sample data layer to measure Promotion clicks in Universal Analytics.
event: "promotionClick",
promoClick: { promotions: [ { id: "Test123", name: "Name - Sales on yoga equipments", creative: "Creative - Sales on yoga", position: 1 } ] }
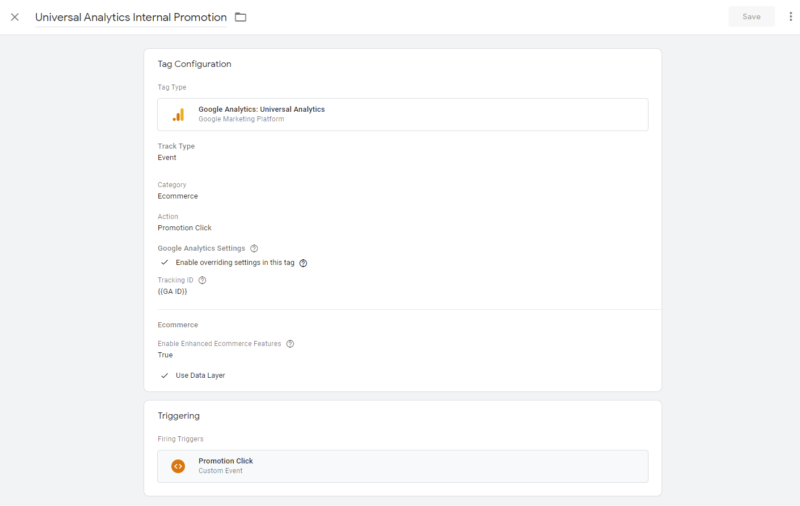
After implementing the data layer given above on your store follow the below steps to set up Universal Analytics(UA) Internal Promotion tag in GTM.
Step 1:- Setup the required Trigger on which this tag will fire
Trigger Name:- Promotion Click
Trigger Type:- Custom Event
Event Name:- promotionClick
This Trigger Fires on- Some Custom Events :- Event Equals promotionClick
Step 2:- Finally configuring the Universal Analytics as per the image given below:-
Checkout
Data Layer:- Below is a sample data layer to measure Checkout in Universal Analytics.
event: "checkout",
ecommerce: { checkout: { actionField: {step: 1, option: "freeshipping"}, products: [ { name: "Sol Active Short-33-Green", id: "MSH10", price: "32.00", brand: "nike", category: "Default Category", quantity: "1", list: "Category - Men->Bottoms->Shorts" } ] } }
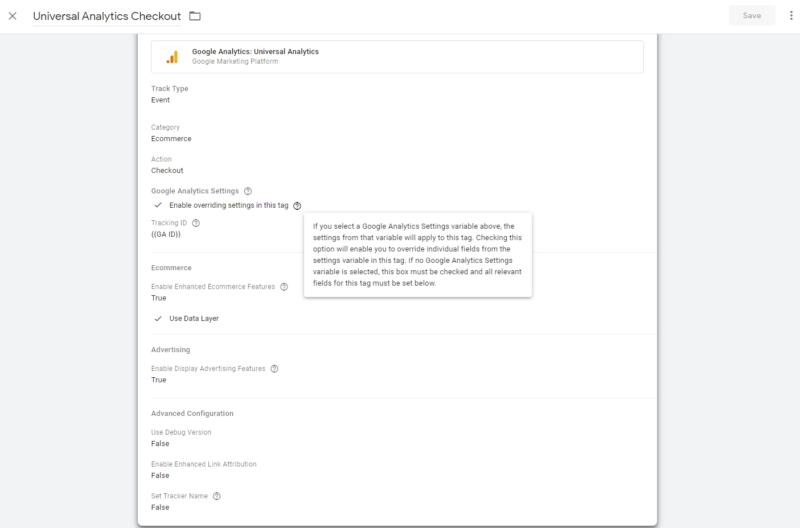
After implementing the data layer given above on your store follow the below steps to set up Universal Analytics(UA) Checkout tag in GTM.
Step 1:- Setup the required Trigger on which this tag will fire
Trigger Name:- Checkout
Trigger Type:- Custom Event
Event Name:- checkout
This Trigger Fires on- Some Custom Events :- Event Equals checkout
Step 2:- Finally configuring the Universal Analytics as per the image given below:-
Checkout Option
Data Layer:- Below is a sample data layer to measure Checkout Option in Universal Analytics.
event: "checkoutOption",
checkout: { actionField: {step: 2, option: "cashondelivery"}, products: [ { name: "Echo Fit Compression Short-29-Blue", id: "WSH07", price: "24.00", brand: "", category: "Default Category", quantity: "1", list: "Category - Collections->New Luma Yoga Collection" } ] }, checkout_option: {actionField {step: 2, option: "cashondelivery"}}
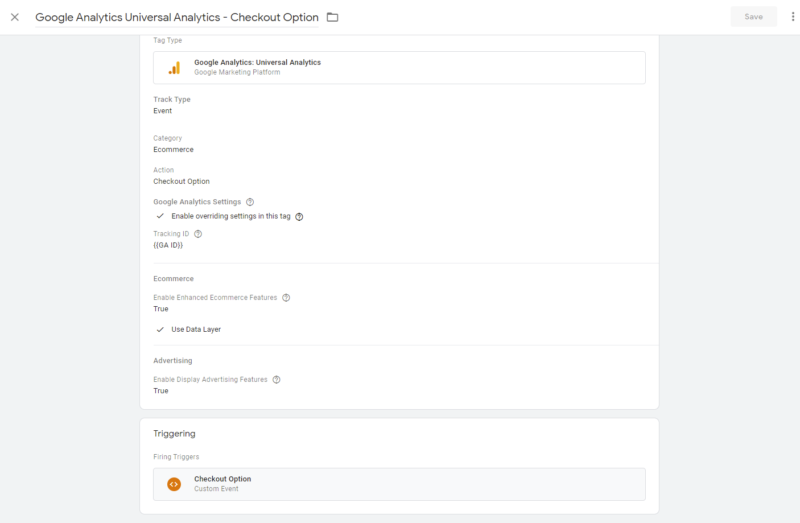
After implementing the data layer given above on your store follow the below steps to set up Universal Analytics(UA) Checkout Option tag in GTM.
Step 1:- Setup the required Trigger on which this tag will fire
Trigger Name:- Checkout option
Trigger Type:- Custom Event
Event Name:- checkoutOption
This Trigger Fires on:- Some Custom Events:- Event Equals checkoutOption
Step 2:- Finally configuring the Universal Analytics as per the image given below:-
Scroll Impressions
Data Layer:- Below is a sample data layer to measure Scroll Impressions in Universal Analytics.
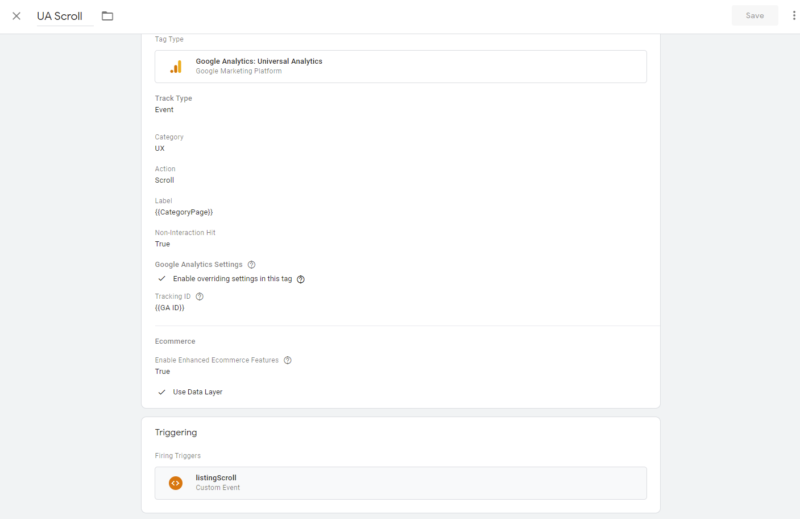
After implementing the data layer given above on your store follow the below steps to setup Universal Analytics(UA) Checkout Option tag in GTM.
Step 1:- Setup necessary variables
Variable Name:- CategoryPage
Variable Type:- Data Layer Variable
Data Layer Variable Name:- ecommerce.impressions.0.category
Data Layer Version:- Version 2
Step 2:- Setup the required Trigger on which this tag will fire
Trigger Name:- listingScroll
Trigger Type:- Custom Event
Event Name:- listingScroll
This Trigger Fires on:- Some Custom Events :- Event Equals listingScroll
Step 2:- Finally configuring the Universal Analytics as per the image given below:-
Conclusion
All the steps above will help you successfully set up Universal Analytics for your Magento 2 store if you still have any errors or you need assistance in the set up feel free to contact us at support@Scommerce-mage.co.uk or check out our pre-built extension to get the setup quickly Magento 2 Google Enhanced Ecommerce Tracking.


