
Are you struggling to track the effectiveness of your Twitter(X) Ads for your Magento store? Do you want to leverage the power of data to optimize your campaigns and boost your ROI? Next, you’ll need to implement Magento Twitter(X) Pixel tracking using GTM. As a result, this comprehensive guide will walk you through the entire process step-by-step, empowering you to fully exploit the potential of your Twitter(X) advertising.
Understanding Twitter(X) Pixel and its Benefits
The Twitter(X) Pixel is a powerful piece of code that allows you to track the actions users take on your Magento website after interacting with your Twitter(X) Ads. It’s like having a magnifying glass on your customer journey, providing valuable insights into their behavior and helping you understand what drives conversions.
Why is this crucial? Because data-driven decisions are the cornerstone of successful e-commerce tracking and Twitter(X) Ads optimisation.
Benefits of using the Twitter(X) Pixel:
- Conversion Tracking: Measure exactly how many sales, leads, or other desired actions result from your Twitter(X) Ads. This is crucial for understanding your Return on Ad Spend (ROAS) and identifying which campaigns are performing best.
- Retargeting: Create highly targeted audiences based on specific website actions. As an example, you can retarget users who abandoned their shopping carts. This leads to higher conversion rates and a more efficient use of your ad budget.
- Website Analytics: Gain deeper insights into user behavior on your Magento store. Understand which pages are most popular, how long users spend on them, and where they drop off. This information can be invaluable for improving your website design and user experience.
- Optimization: Use the data collected by the Pixel to continuously optimize your Twitter(X) Ads campaigns. Determine which strategies are effective and which are not, then modify your targeting, bidding, and creative elements accordingly.
Setting up Your Twitter(X) Pixel
Before you can start tracking conversions, you need to create a Twitter(X) Pixel and install it on your Magento website. Here’s how:
Step 1: Access Twitter(X) Ads Manager
Log in to your Twitter(X) Ads account and navigate to the Events Manager.
Step 2: Create a New Pixel
Click on the “Create Pixel” button. You’ll be prompted to name your Pixel and choose a setup method. Select “Google Tag Manager (GTM)” as your preferred method.
Step 3: Copy Your Pixel ID
Once your Pixel is created, you’ll be provided with a unique Pixel ID. Copy this ID, as you’ll need it later when configuring the tag in GTM.
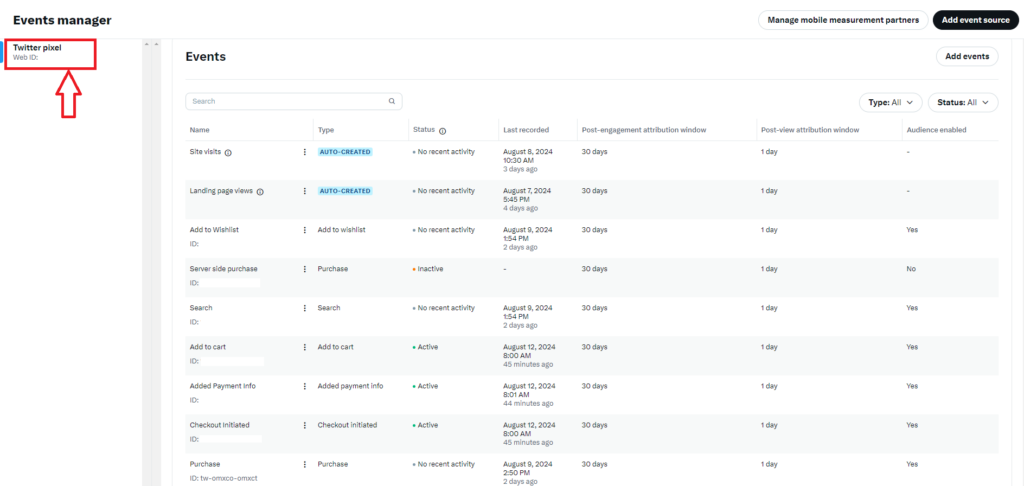
Implementing the Magento Twitter(X) Pixel Tracking using GTM
The implementation takes into account that you already have GA4 data layers implemented on your store if not you can check our module that implements all the necessary data layers and also provides you the GTM JSON import file for all the set up that we are about to do next:-
Let us create the required tags, triggers and variables in our Google Tag Manager Container and set up Twitter(X) Pixel:-
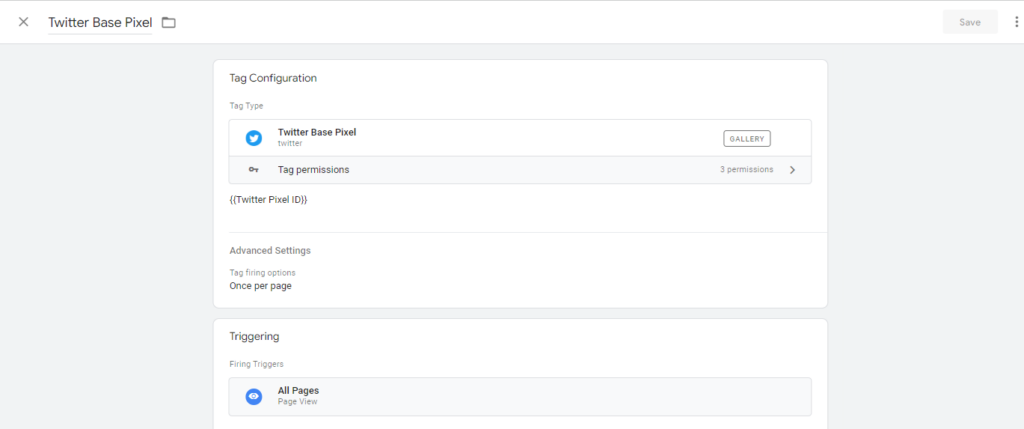
Base Pixel
- Tag Name:- Base Pixel
- Tag Type:- Base Pixel ( This tag type is not present in the default menu, search and import it from the gallery)
- Pixel ID:- {{Twitter Pixel ID}} (Add the constant variable that contains Pixel ID)
- Advanced Settings:-
- Tag firing options:- “Once per page”
- Trigger:- All Pages (trigger this tag on all pages to send a page view event on all pages)
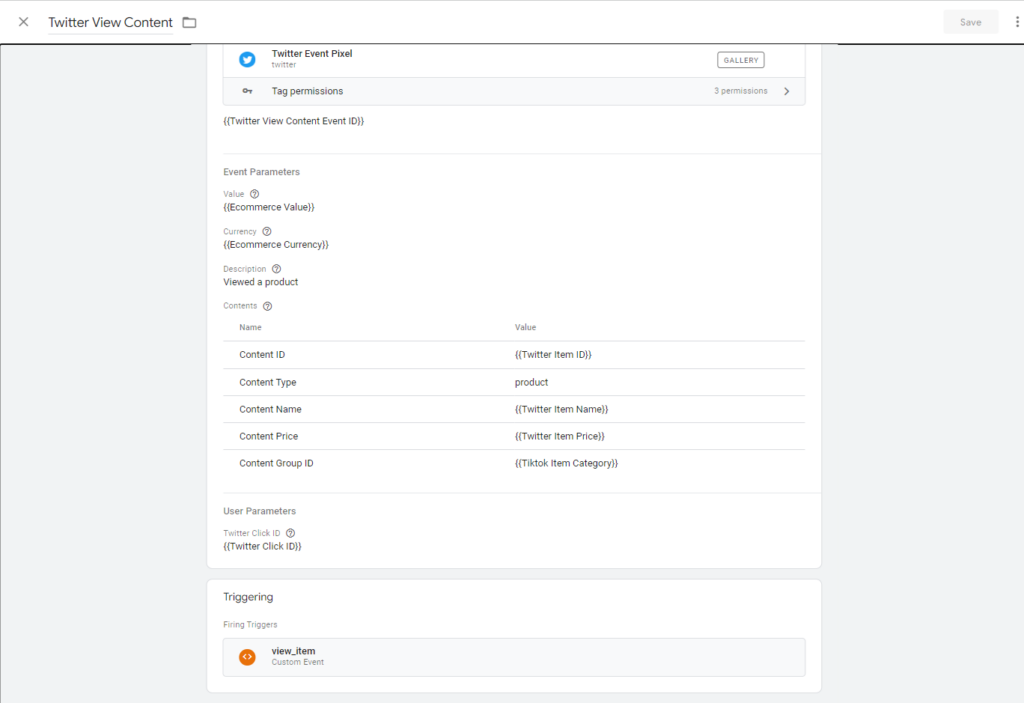
View Content
- Tag Name:- View Content
- Tag Type:- Base Pixel ( This tag type is not present in the default menu, search and import it from the gallery)
- Event ID:- {{View Content Event ID}} (Add the constant variable that contains View content event ID)
- Value:- {{Ecommerce Value}} (Add the variable that pulls value from the data layers when a product is viewed)
- Currency:- {{Ecommerce Currency}} (Add the variable that pulls currency from the data layers when a product is viewed)
- Contents:-
- Content ID:- {{Twitter Item ID}} (Add the variable that pulls product id from the data layers when a product is viewed)
- Content Type:- product
- Content Name:- {{Twitter Item Name}} (Add the variable that pulls product name from the data layers when a product is viewed)
- Content Price:- {{Twitter Item Price}} (Add the variable that pulls product price from the data layers when a product is viewed)
- Content Group ID:- {{Tiktok Item Category}} (Add the variable that pulls product category from the data layers when a product is viewed)
- User Parameters:-
- Twitter Click ID:- {{Twitter Click ID}}
- Trigger:- view_item (fire this tag when the view_item event from GA4 occurs.)
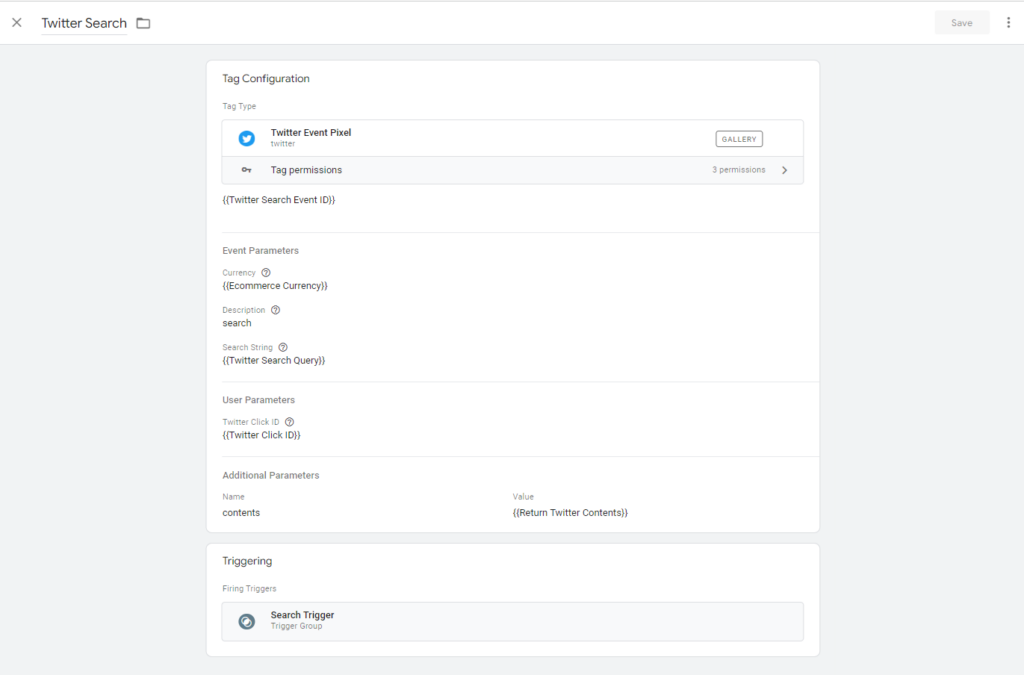
Search
- Tag Name:- Search
- Tag Type:- Base Pixel ( This tag type is not present in the default menu, search and import it from the gallery)
- Event ID:- {{Search Event ID}} (Add the constant variable that contains Search event ID)
- Currency:- {{Ecommerce Currency}}
- Description:- search
- Search String:- {{Search Query}} (Add the variable the pulls the search query from the URL)
- User Parameters:-
- Twitter Click ID:- {{Twitter Click ID}}
- Additional Parameters
- contents:- {{Return Twitter Contents}} ( Add the variable that maps the GA4 items array to create twitter contents array)
//Example of items array mapping for products from GA4
function() {
    return function(products) {
        if (!Array.isArray(products)) {
            return products;
        }
        var prodsForTwitter = products.map(function(prod) {
            var prodObj = new Object();
            if (prod.item_category) {prodObj.content_type = prod.item_category};
            if (prod.item_name) {prodObj.content_name = prod.item_name.toString()};
            if (prod.item_id) {prodObj.content_id = prod.item_id.toString()};
            if (prod.price) {prodObj.content_price = parseFloat(prod.price)};
	        if (prod.quantity) {prodObj.num_items = parseInt(prod.quantity)};
            return prodObj;
        })
        return prodsForTwitter;
    }
}- Trigger:- Trigger group (Fire this tag when the view_item_list event from GA4 occurs and the page URL contains ‘result’)
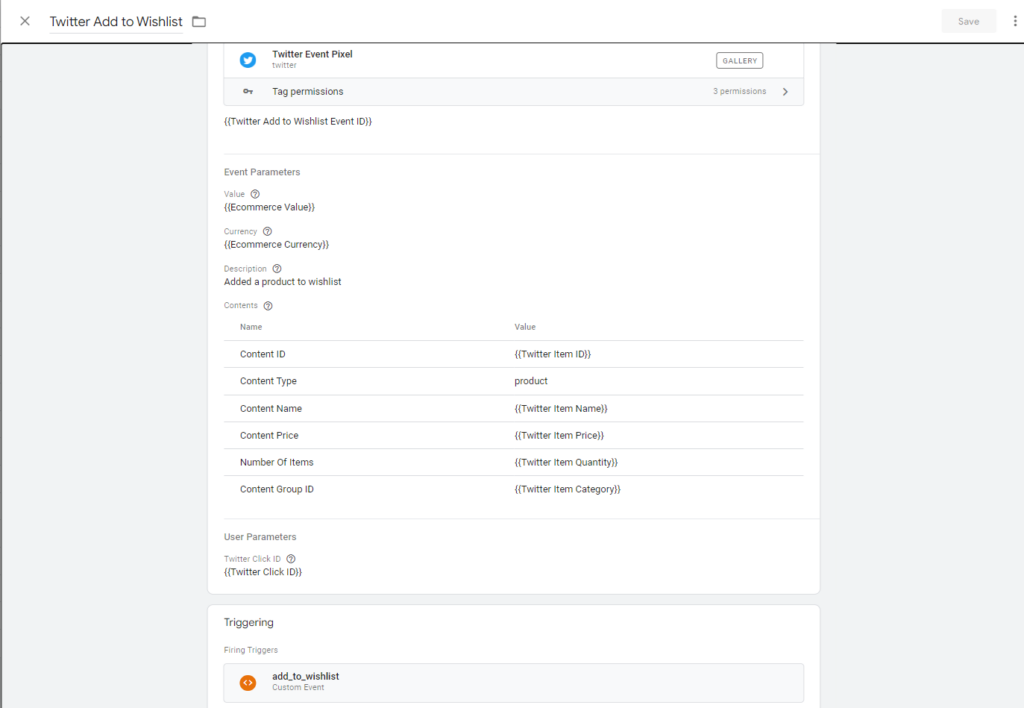
Add to Wishlist
- Tag Name:- Add to Wishlist
- Tag Type:- Base Pixel ( This tag type is not present in the default menu, search and import it from the gallery)
- Event ID:- {{Add to Wishlist Event ID}} (Add the constant variable that contains add to wishlist event ID)
- Value:- {{Ecommerce Value}}
- Currency:- {{Ecommerce Currency}}
- Description:- Added a product to wishlist
- Contents:-
- Content ID:- {{Twitter Item ID}}
- Content Type:- product
- Content Name:- {{Twitter Item Name}}
- Content Price:- {{Twitter Item Price}}
- Number Of Items:- {{Twitter Item Quantity}}
- Content Group ID:- {{Twitter Item Category}}
- User Parameters:-
- Twitter Click ID:- {{Twitter Click ID}}
- Trigger:- add_to_wishlist (fire this tag when the add_to_wishlist event from GA4 occurs)
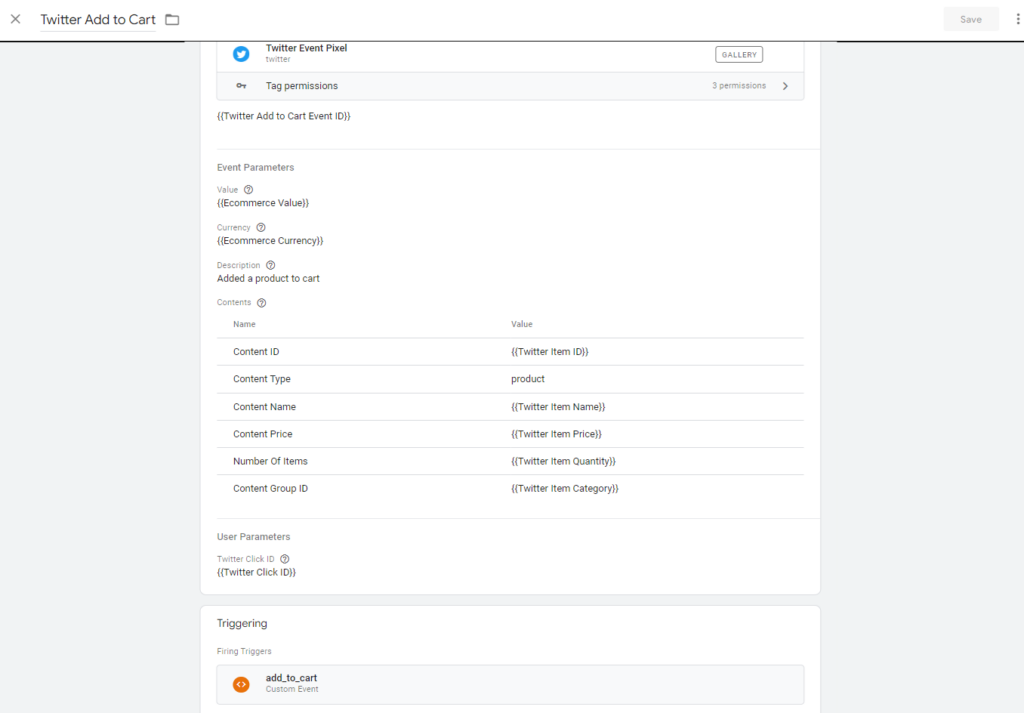
Add to Cart
- Tag Name:- Add to Cart
- Tag Type:- Base Pixel ( This tag type is not present in the default menu, search and import it from the gallery)
- Event ID:- {{Add to Cart Event ID}} (Add the constant variable that contains add to cart event ID)
- Value:- {{Ecommerce Value}}
- Currency:- {{Ecommerce Currency}}
- Description:- Added a product to cart
- Contents:-
- Content ID:- {{Twitter Item ID}}
- Content Type:- product
- Content Name:- {{Twitter Item Name}}
- Content Price:- {{Twitter Item Price}}
- Number Of Items:- {{Twitter Item Quantity}}
- Content Group ID:- {{Twitter Item Category}}
- User Parameters:-
- Twitter Click ID:- {{Twitter Click ID}}
- Trigger:- add_to_cart (fire this tag when the add_to_cart event from GA4 occurs)
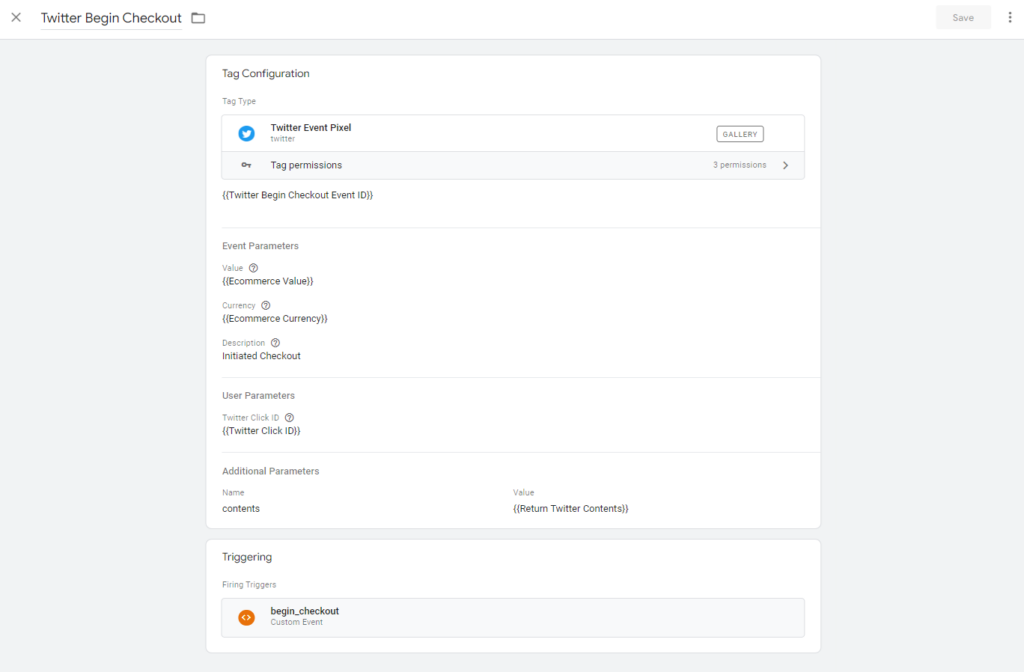
Begin Checkout
- Tag Name:- Begin Checkout
- Tag Type:- Base Pixel ( This tag type is not present in the default menu, search and import it from the gallery)
- Event ID:- {{Begin Checkout Event ID}} (Add the constant variable that contains Begin Checkout event ID)
- Value:- {{Ecommerce Value}}
- Currency:- {{Ecommerce Currency}}
- Description:- Initiated Checkout
- User Parameters:-
- Twitter Click ID:- {{Twitter Click ID}}
- Additional Parameters
- contents:- {{Return Twitter Contents}} ( Add the variable that maps the GA4 items array to create twitter contents array)
- Trigger:- begin_checkout (fire this tag when the begin_checkout event from GA4 occurs)
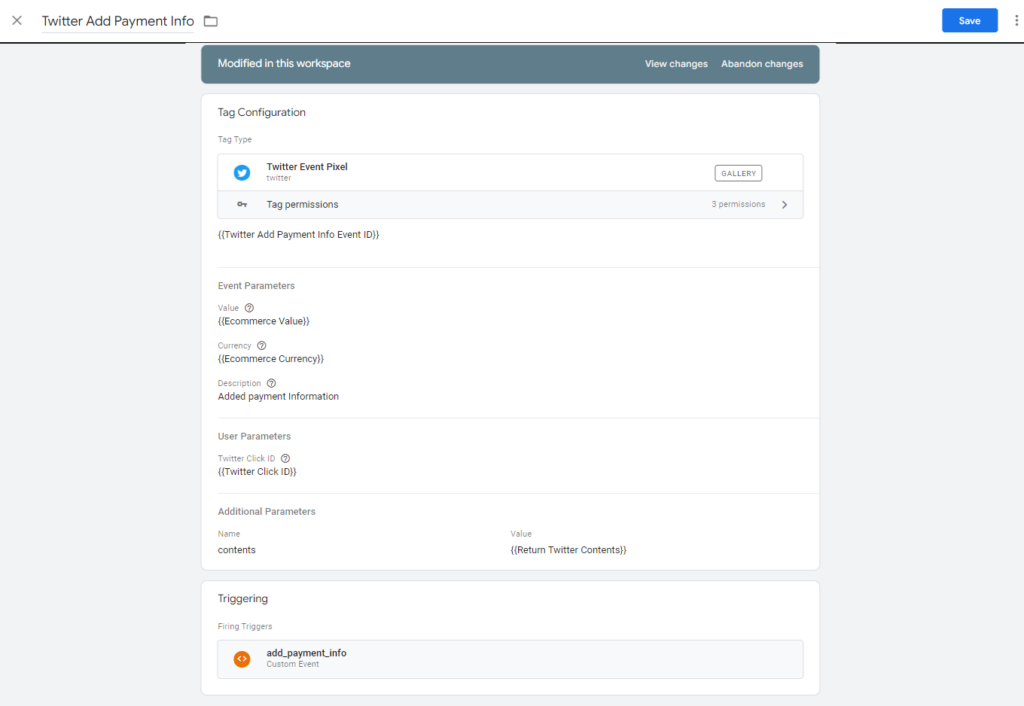
Add Payment Info
- Tag Name:- Add Payment Info
- Tag Type:- Base Pixel ( This tag type is not present in the default menu, search and import it from the gallery)
- Event ID:- {{Add Payment Info Event ID}} (Add the constant variable that contains Add Payment Info event ID)
- Value:- {{Ecommerce Value}}
- Currency:- {{Ecommerce Currency}}
- Description:- Added payment Information
- User Parameters:-
- Twitter Click ID:- {{Twitter Click ID}}
- Additional Parameters
- contents:- {{Return Twitter Contents}}
- Trigger:- add_payment_info (fire this tag when the add_payment_info event from GA4 occurs)
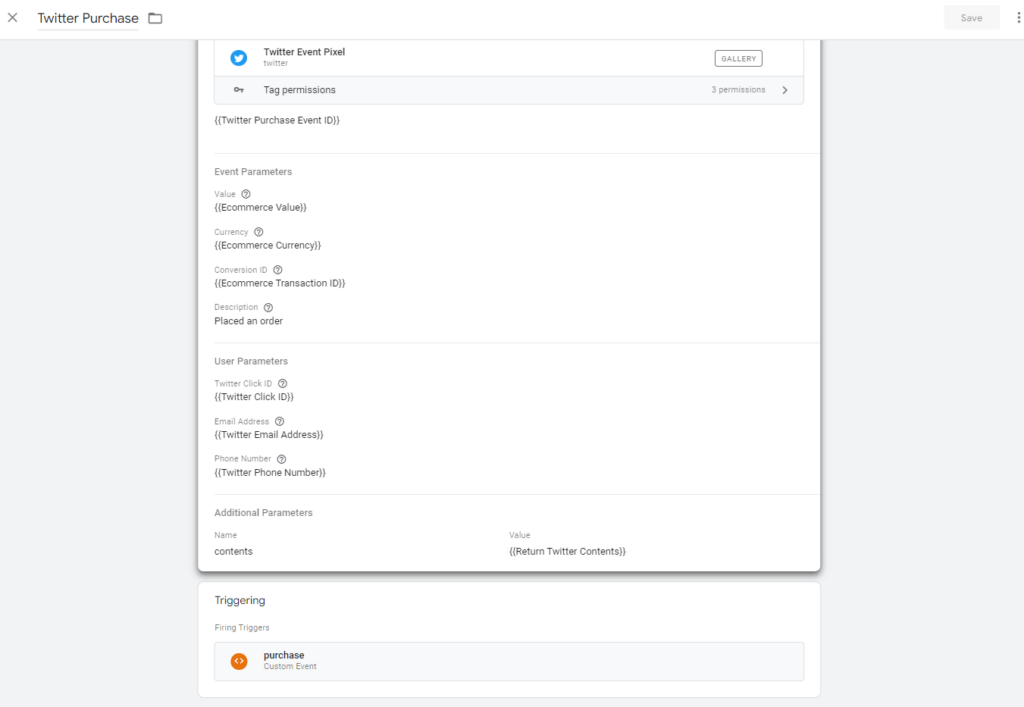
Purchase
- Tag Name:- Purchase
- Tag Type:- Base Pixel ( This tag type is not present in the default menu, search and import it from the gallery)
- Event ID:- {{ Purchase Event ID}} (Add the constant variable that contains purchase event ID)
- Value:- {{Ecommerce Value}}
- Currency:- {{Ecommerce Currency}}
- Conversion ID:- {{Ecommerce Transaction ID}}
- Description:- Placed an order
- User Parameters:-
- Twitter Click ID:- {{Twitter Click ID}}
- Email Address:- {{Twitter Email Address}} ( Pass non hashed email )
- Phone Number:- {{Twitter Phone Number}} ( Pass non hashed phone number )
- Additional Parameters
- contents:- {{Return Twitter Contents}}
- Trigger:- Purchase (fire this tag when the purchase event from GA4 occurs)
Verifying Your Setup and Troubleshooting
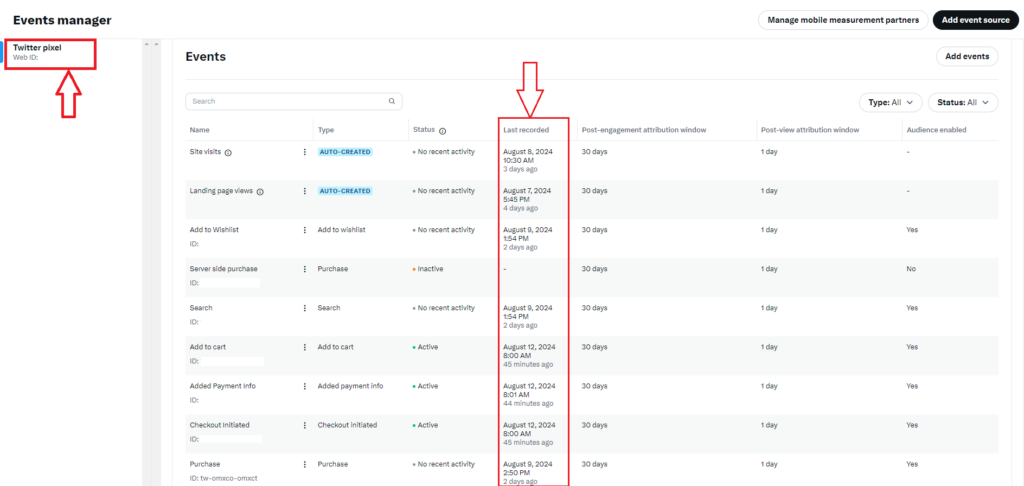
Checking for Pixel Activity in Your Twitter(X) Ads Manager
- After implementing the Twitter(X) Pixel, monitor its activity through the Events Manager in your Twitter(X) Ads account.
- Ensure that the Pixel is receiving data and that the events you set up are being triggered as expected.
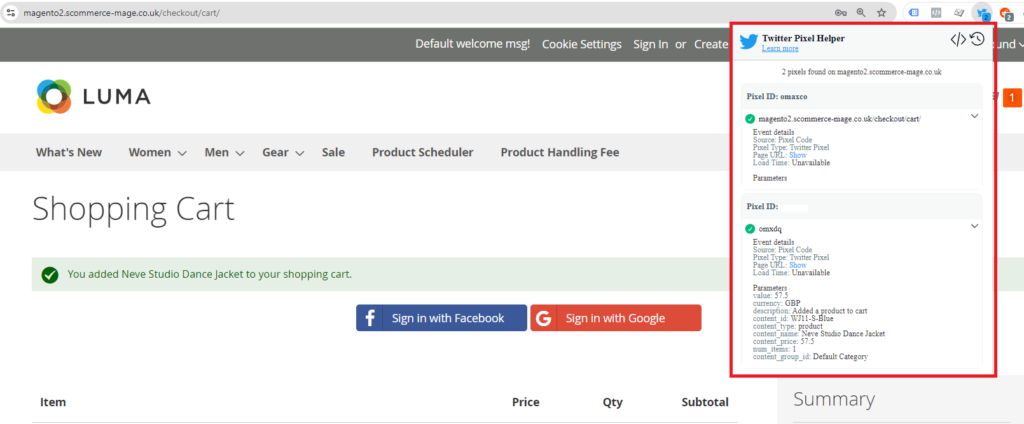
Using the Twitter(X) Pixel Helper Chrome Extension for Debugging
- Install the Twitter(X) Pixel Helper Chrome extension to verify that your Twitter(X) Pixel is firing correctly.
- Navigate to your Magento store and check if the Pixel Helper identifies the tags correctly.
Common Troubleshooting Tips and Solutions
- No Data Received: If no data is showing in your Twitter(X) Ads account:
- Verify that the Pixel ID is correctly added to your GTM tags.
- Check if the triggers are correctly configured to fire on the intended pages.
- Tag Not Firing: If the tag doesn’t fire:
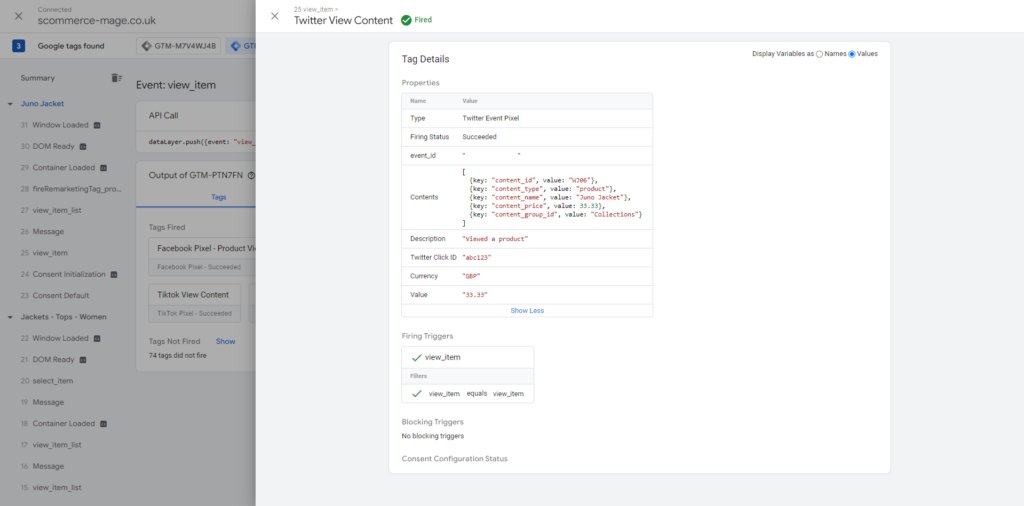
- Ensure that Preview Mode in GTM shows the tag firing on the correct events.
- Double-check trigger conditions and make sure they are set up correctly.
- Debugging with GTM: Use the GTM Debug console to see detailed information about fired tags and potential errors.
Conclusion
Tracking conversions through Twitter(X) Pixel is essential for Magento store owners looking to enhance their advertising efficiency. By implementing the steps outlined in this guide, you can effectively measure the performance of your Twitter(X) ads and make data-driven decisions to optimize your campaigns. Hence, take the time to set up your Magento Twitter(X) Pixel tracking today. The insights gained will be invaluable for refining your marketing strategies and maximizing your advertising budget.
Furthermore, if you’re looking for guidance on setting up your Twitter(X) Ads or GTM, our team of experts is here to help you navigate the complexities of ecommerce tracking and ensure you’re getting the most out of your digital marketing efforts.
Magento 1 / Open Mage:- https://www.scommerce-mage.com/magento-ga4-google-tag-manager.html
Magento 2:- https://www.scommerce-mage.com/magento-2-ga4-google-tag-manager.html


