

In the following article, we explore Shopify orders. You will find out what the Shopify orders page is and what opportunities it offers. We explain how to fulfill orders on Shopify by describing all the core processes associated with Shopify draft orders and orders placed by your customers. You will learn what the difference between these two kinds of the same entity is. Also, we touch upon the topic of Shopify recurring orders, briefly explain how to set up pre-orders on Shopify, shed light on how to cancel orders, and elucidate a bunch of other processes from editing customer information to attaching files and internal notes to orders. If you want to import orders into Shopify but have no idea how to do that, this guide will be helpful too. We also talk about exporting Shopify orders below. Before going any further, let’s define what e-commerce order management is and then proceed to the essentials of its implementation in the Shopify admin.

Table of contents
What is e-commerce order management?
E-commerce order management is, in a nutshell, the process of following and managing an order from the moment it is placed through the fulfillment process until the moment the client receives their products. E-commerce platforms, including Shopify, collect data at each level so that you, as a store administrator, can follow the client order’s lifespan.
Every order-filling system, including the one available in Shopify, incorporates order management. It makes a substantial contribution to the customer experience by determining how quickly and easily a client can place a new order and receive their purchased goods.
A successful order management system should include each and every function needed to track, manage, and oversee the process. Does Shopify comply with these requirements? Yes! It even enables some extended order fulfillment opportunities:
- Customer communication and assistance;
- Support for numerous sales channels;
- Monitoring of stock levels and supply chains;
- Integration with third-party systems for shipping.
When managing orders across many channels and distribution sites, the process can easily become complex and overwhelming without effective order management. However, Shopify provides the ability to reduce such headaches, and we will show you how. But before going any further, let’s focus on several more order management essentials.
How to manage e-commerce orders?
Optimizing the order routing and fulfillment process while lowering the number of errors that happen along the way is the key goal of e-commerce order management in Shopify or any similar system. Although the workflow may differ for each purchase, the following steps comprise a typical order fulfillment process:
- A customer places an online order using a website (e.g., your Shopify storefront) or an external e-commerce system or integrated marketplace.
- The company records the purchase order and accepts it. Either manually or with the use of order management software, they carry this out.
- The consumer receives an email confirming receipt of their order and collection of money. It’s also possible to offer a delivery estimate or a link to check on the progress of your order.
- An inventory allocation process distributes products from a company’s stock to a sales order. It can be automated by OMS or carried out manually.
- The company’s warehouse receives the order information. Products are confirmed to be available while stock levels are checked. The warehouse staff then selects, packages, and ships the products.
- Customers are notified when their order has been shipped. A business may also provide details so customers can follow their orders through delivery. After assessing inventory levels at this point, a business can get in touch with its suppliers to order more products.
- After the consumer receives their order, checks are conducted to ensure they are satisfied.
- The client expresses concern by getting in touch with the company, whether by phone, email, social media, etc.
- Any problems that have been brought up are fixed. This could be done by offering an alternative product, a refund, or other solutions. Here, a business must consider any inventory or financial effects of finding a solution.
- Now, the business can ask a customer for feedback.
It’s how a conventional order management process looks. Shopify simplifies it dramatically by automating numerous processes. Some of them are covered below, while we focus on the others in separate articles since they are not a part of the Shopify Orders admin section.
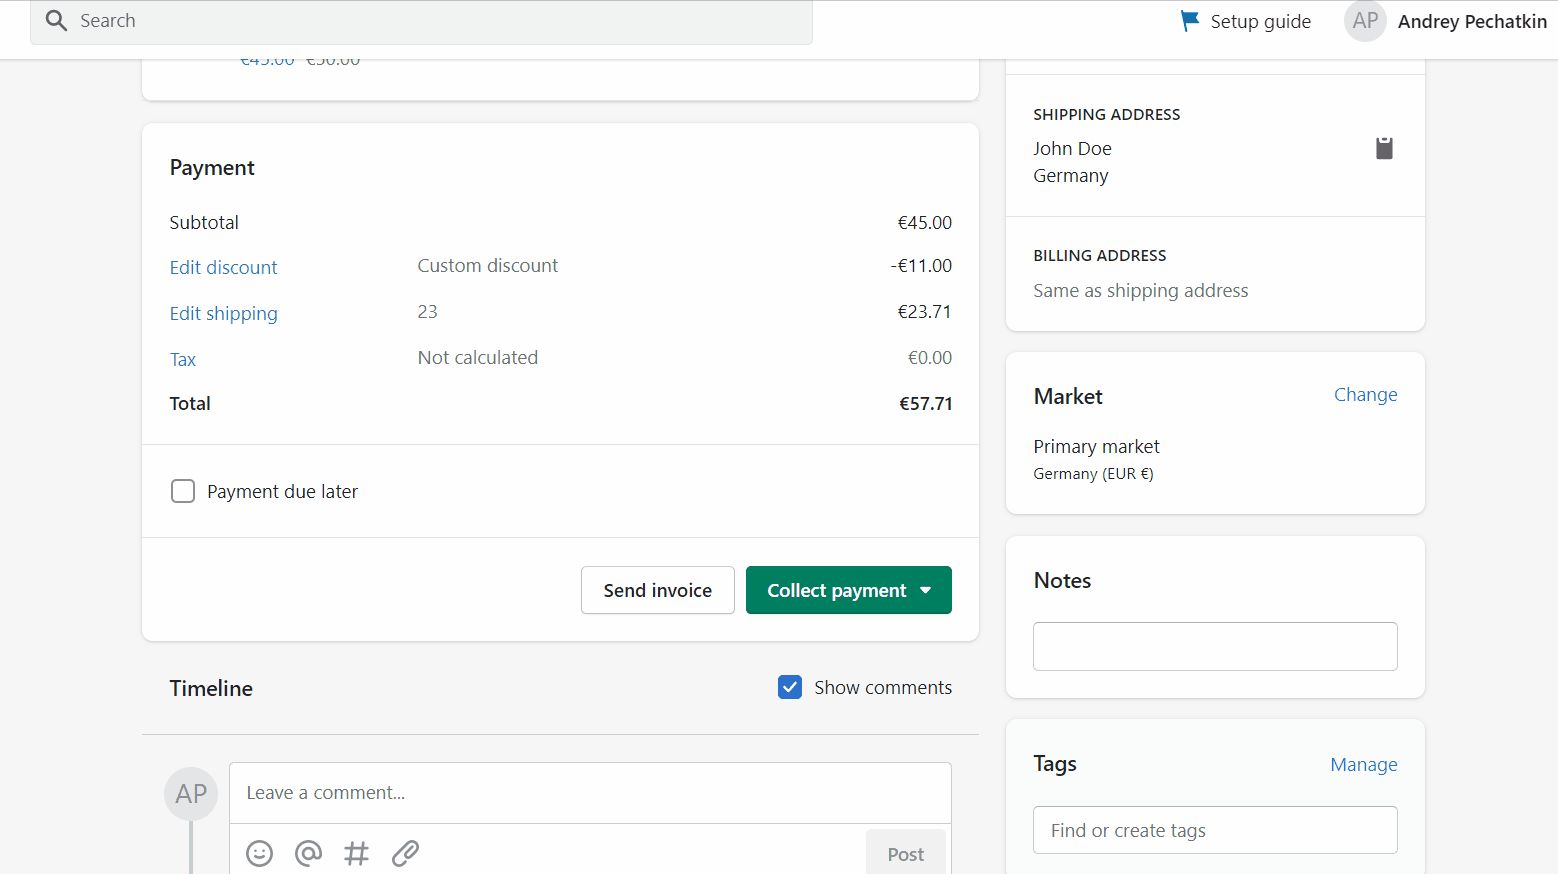
Shopify Orders page
Let’s explore opportunities associated with Shopify order management. In addition to fulfilling orders and taking payments, this e-commerce system also lets you tag open orders, add notes, review the order’s Timeline, as well as follow up with a customer who placed the order. We describe all these and other nuances of Shopify order fulfillment below.
All order management chores begin in your Shopify admin on the Orders screen.

On the Shopify orders page, you can see a grid that contains all orders associated with your Shopify website. It unveils such information as an order number, date when the order was placed, associated customer, order total, payment & fulfillment statuses, item count (click on it to unveil the particular products), delivery method, and tags.

At the same time, there is a bunch of filtering options that let you narrow down the selection of Shopify orders. First of all, you can display unfulfilled, unpaid, open, or closed orders separately.

At the same time, it is possible to filter out orders according to warehouse location on the Shopify orders page. You can either display all orders or specify a particular point to show records for.

You can also use a search field to dig particular orders. Note that previously applied filters remain active, but you can cancel them by clicking the grey X button.

If you need more filters, click the corresponding button available above the grid on the Shopify orders page.

You will unveil the selection of filters. Pick one and specify values to reduce the number of records in the Shopify orders grid. Note that you can add as many filters as necessary.

Another opportunity is associated with the order of columns. Check/uncheck column names in the corresponding dropdown to show/hide them in your grid. Also, you can drag and drop them to change the default order.

Note that Shopify lets you sort orders from oldest to newest or vice versa based on one of the following options:
- Order number;
- Date;
- Customer name;
- Payment status;
- Fulfillment status;
- Label status;
- Total.

When changes are applied, save them for further use. Either click the Save button or activate other options: Rename view, Save as, Create view, or Delete view.

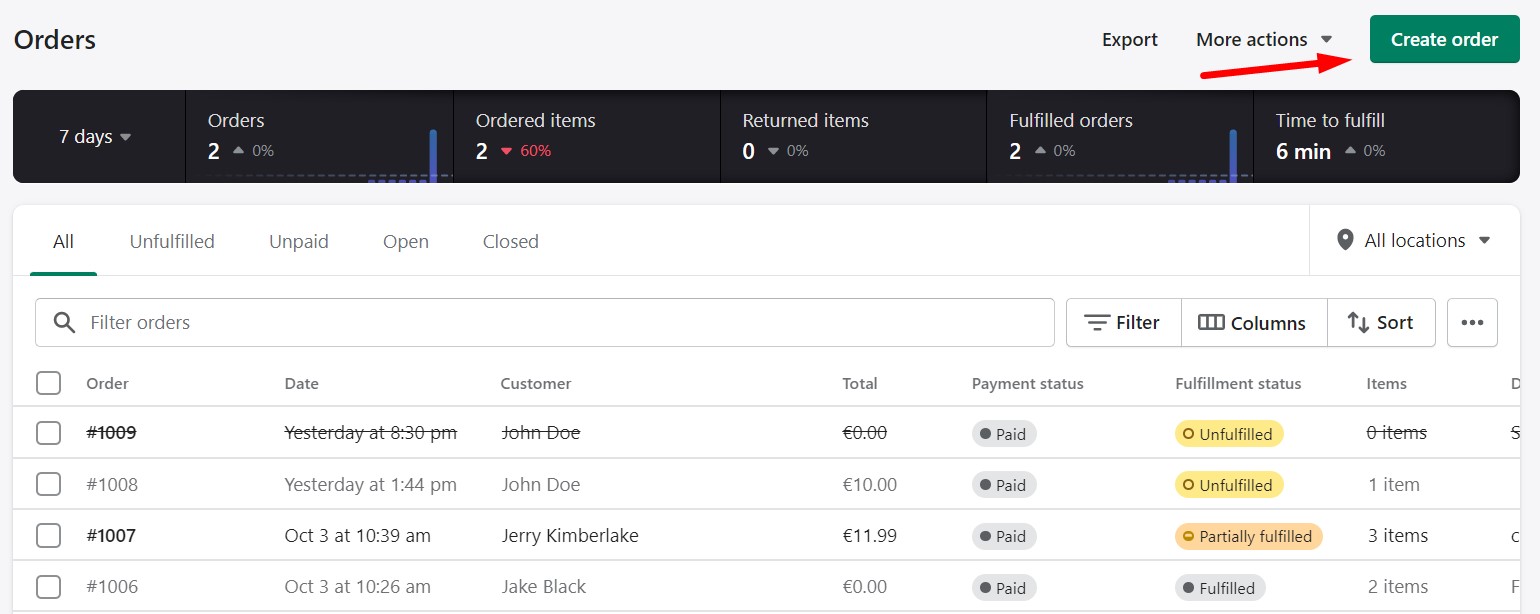
Above the Shopify orders grid, you can see related statistics. Select a period (today, last 7 days, or last 30 days) to see how many orders, ordered items, returned items, and fulfilled items you have. Time to fulfill is also shown here.

In addition to that, you can also initiate Shopify order export from this page. Hit the Export button to export Shopify orders. You can find more information about that in our guide: How to export orders in Shopify. Also, we describe this functionality in a separate chapter below.

Note that by default, order import is impossible on the Shopify orders page. However, you may rely on third-party tools to initiate it.
How to view orders in Shopify
Viewing orders in Shopify is fairly intuitive. Go to your Shopify admin and open the Orders page.
Here, you can see a grid that we’ve just described above. Use filters to narrow the selection of records in the Shopify Orders grid. Click the order number to see more details. The picture that displays in front of you may be different depending on the order status, payment status, and other details.
On the top of the order view page, you can see an order number and its payment and fulfillment statuses. Order creation date and time, along with the order source (created from a draft order, placed by a customer, or imported), are also shown here.

Below the order number, you can see a list of unfulfilled items. You can either delete or fulfill them. In the second case, you need to click the Fulfill items button.

The following window displays:

The fulfillment screen lets you provide tracking information as well as send shipment details to your client. Also, you can edit the shipping address on this screen. Hit the Fulfill items button to finish the fulfillment procedure.
Next, there is the Fulfilled bloc. It displays your warehouse location, order status, delivery date, as well as fulfilled items.

There is also a section that illustrates the payment status of the order: paid, refunded, partially refunded, etc.

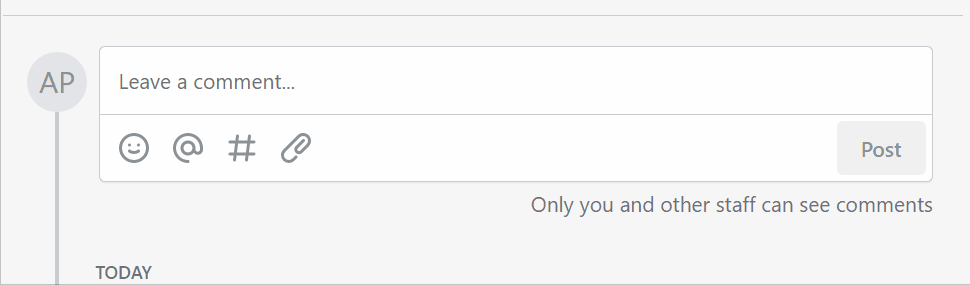
The Timeline section illustrates the order history mixed with a comment section. You can view all events that lead to status changes here. At the same time, store admins can post their comments for internal purposes here.

Besides, there are a few more blocks on the right:
- Notes – you can post order-related notes here. Customers also can add notes to the order that appears here.
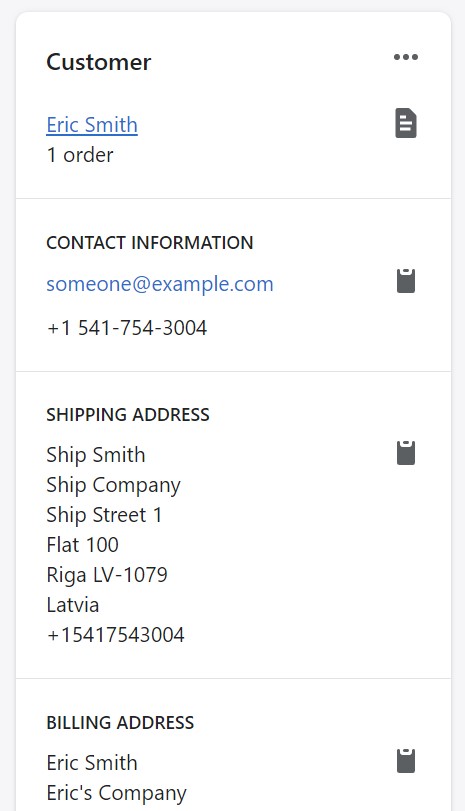
- Customer – you can view and edit contact information along with shipping and billing addresses here. Also, it is possible to replace a customer associated with the order in this block.
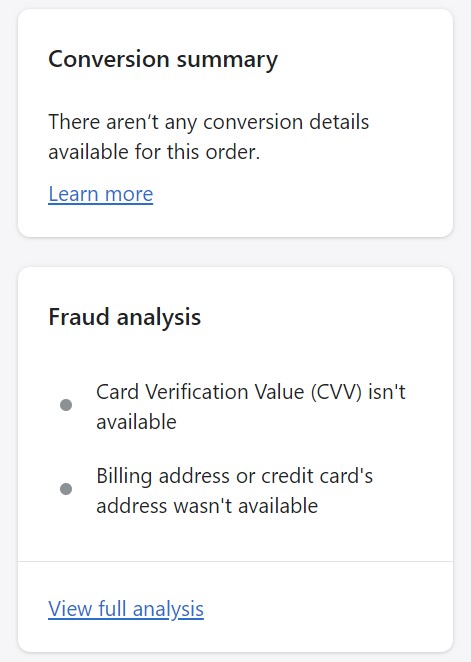
- Conversion summary – conversion-related information is displayed here.
- Fraud analysis – a brief fraud analysis is displayed here. This block informs you about how to deal with high-risk orders on Shopify.
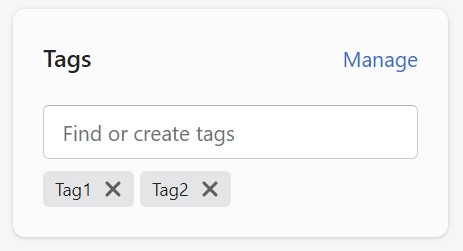
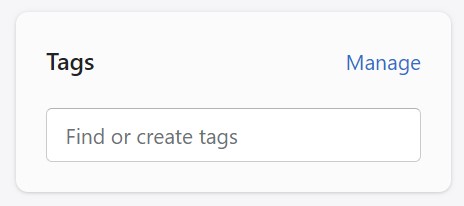
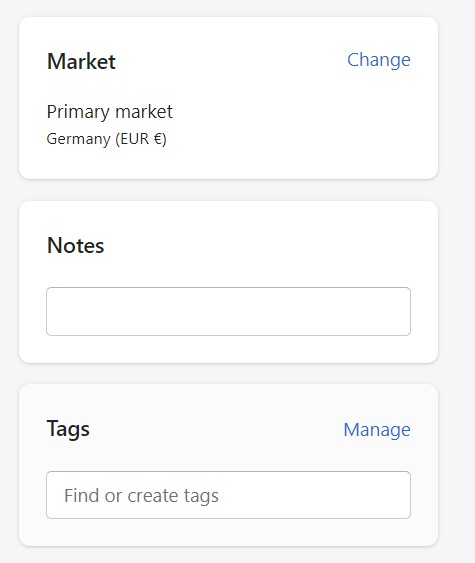
- Tags – add, delete, and manage order tags in this block.


Now, let’s focus on more specific processes associated with order fulfillment in Shopify.
How to view Timeline for Shopify orders
As we’ve just mentioned, it is possible to view the detailed history of each order in the order’s Timeline. You can also place internal comments (they are available only within the Shopify admin) there as well as:
- Communicate with store administrators;
- Attach files;
- Add links to other products, orders, and customers.
It dramatically simplifies order management in Shopify and lets your employees communicate with one another. As a store owner, you can always view the order fulfillment progress there.
You can view Timeline for Shopify orders as follows:
- Go to your Shopify admin -> Orders.
- Open the order whose Timeline you want to view by clicking its number.
- Scroll down to the Timeline section on the order details page.

That’s it! Let’s look at payment events now. If you need to debug a failed payment capture or refund, they may be of assistance.
When a prospect makes a payment for their order in Shopify, the financial information is recorded as a payment event and displayed in the Timeline. For further information, expand Payment Events:
- Scroll down to the Timeline section on the order details page.
- Hit a payment occasion record to expand it.
- Click Information from the gateway for more payment gateway information.

To observe payment events if your consumer abandoned the checkout process, navigate to the abandoned checkout history.
How to edit customer information in Shopify orders
If something is wrong with customer information, you can edit it straight from the order detail page. Keep in mind that order line items, order total, and billing address cannot be changed. You can either partially fulfill an order or partially refund it if a consumer decides they no longer need some of its items.
So, follow these steps to edit customer information on a Shopify order page:
- Go to your admin -> Orders.
- Click the order number of the record that you want to edit.
- Click three dots next to the customer information on the right.
- Select what you want to edit: contact details, shipping address, or billing address.

- Apply changes.
- Click Save when done.


How to attach an internal note, file, or link to a Shopify order
It is possible to add notes, comments, links, and even files to orders in the Timeline section. Follow these steps to attach internal notes to a Shopify order:
- Go to your admin -> Orders.
- Click the order number of the record that you want to edit.
- Scroll down to the Timeline section.
- Add notes, attach files, and post links to products and customers here.
How to attach an order tag to a Shopify order
By adding tags, you can categorize your orders in ways other than just whether they were paid, received, or completed. Orders can be conveniently accessed in the future by applying a tag filter to them, which, in its turn, can be saved as an order view. To attach an order tag to a Shopify order, follow these steps:
- Go to your admin -> Orders.
- Click the order number of the record that you want to edit.
- Scroll down to the Tags block on the right.
- Enter tag names separated by commas.
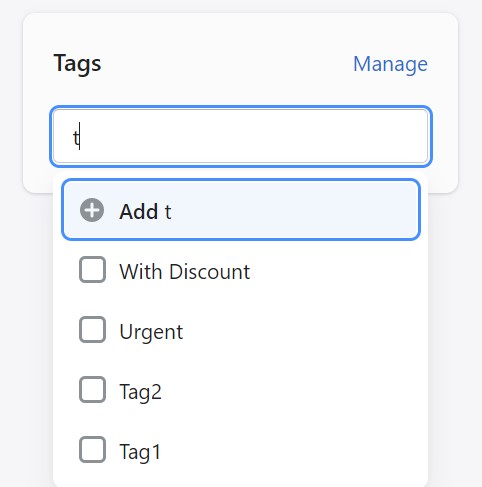
- To select from previously used tags, start typing a tag or click Manage and check the available tags.
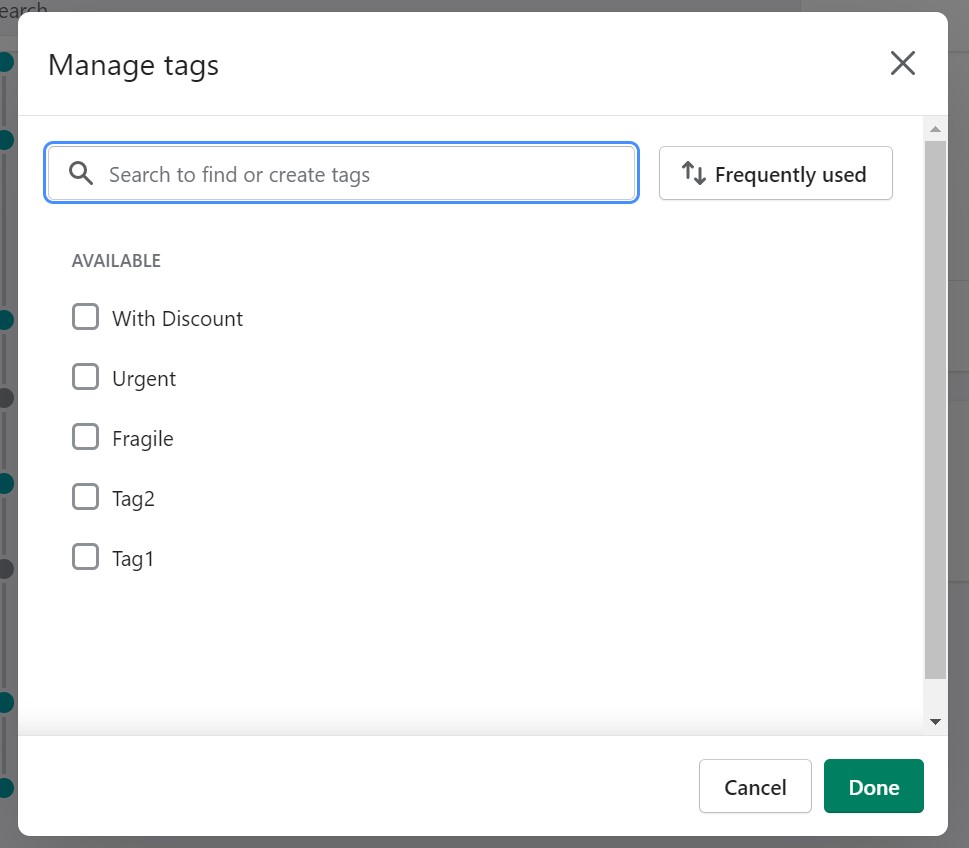
- Click Done when finished.


Note that order tags are limited to 40 characters per tag. You can use both letters and numbers.
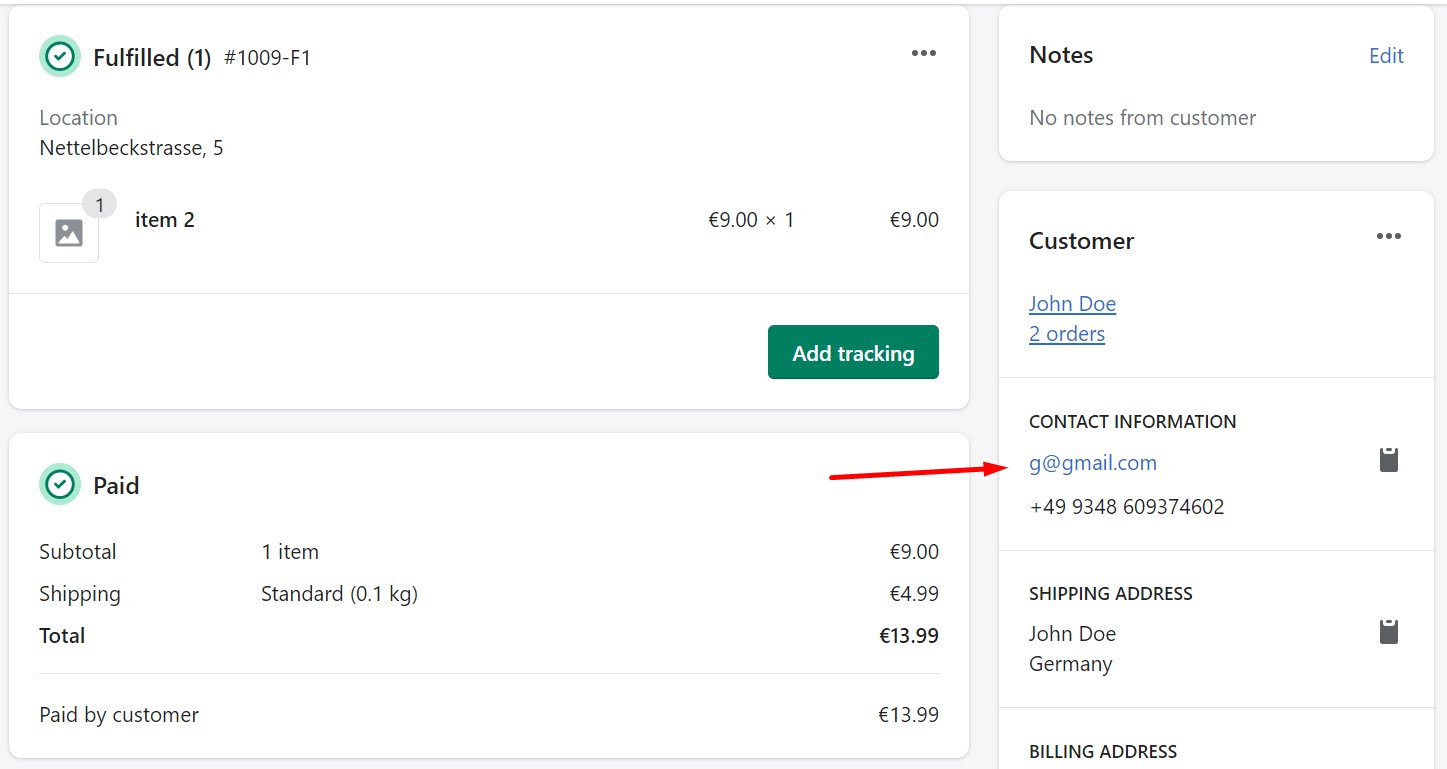
How to contact a customer in a Shopify order
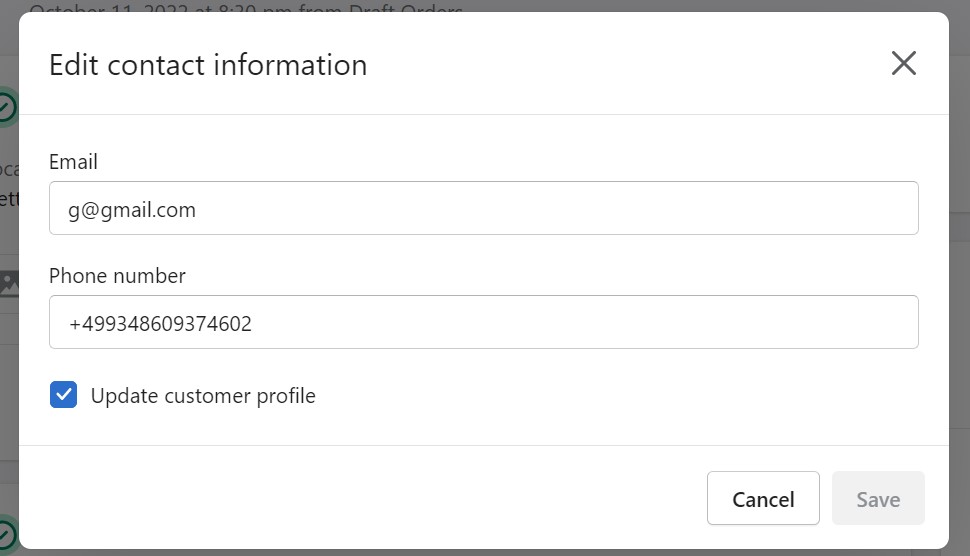
All of your customer’s contact information is stored within your e-commerce website. By selecting editing options in the Contact section of the Shopify order page and providing the necessary information, you can add further contact information. If you allow consumers to input a phone number or email address during the checkout process (and they did so), it is possible to access that information in the Contact area. Call the number entered by the consumer if you want to get in touch with them. Alternatively, you can drop a message to the provided email address. You can contact a customer in a Shopify order as follows:
- Go to your admin -> Orders.
- Click the order number of the order placed by a person you want to contact.
- Click the customer’s email address in the Contact section on the right.
- The Contact customer window displays:
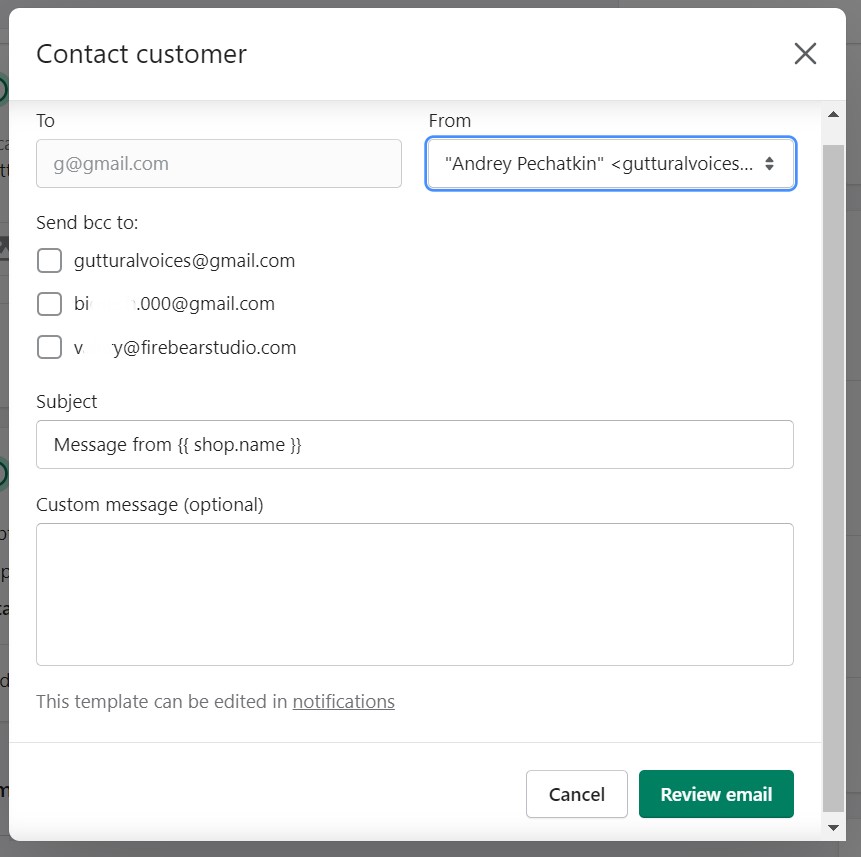
- Enter the message you want to send.
- Add subject.
- Check email addresses to send copies of your message.
- Click Review email.
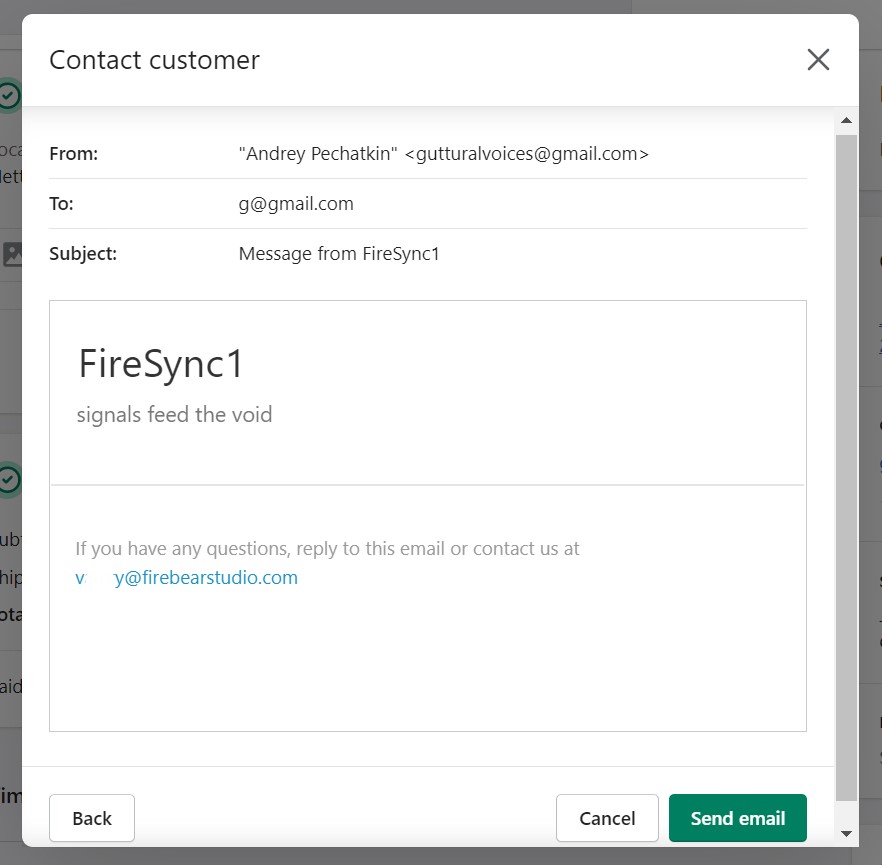
- Review your email and click Send notification. You can return and apply more changes by clicking Back.


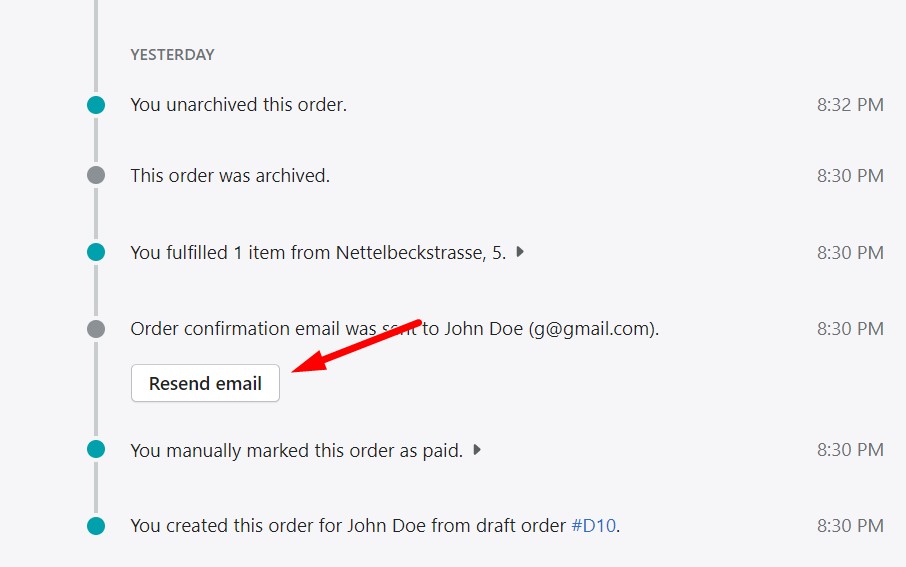
How to resend an email or SMS about a Shopify order to a customer
Shopify provides the ability to resend your emails and SMS messages to customers. You can do that as follows:
- Go to your admin -> Orders.
- Click the order number of the order placed by a person you want to contact.
- Scroll down to the Timeline section.
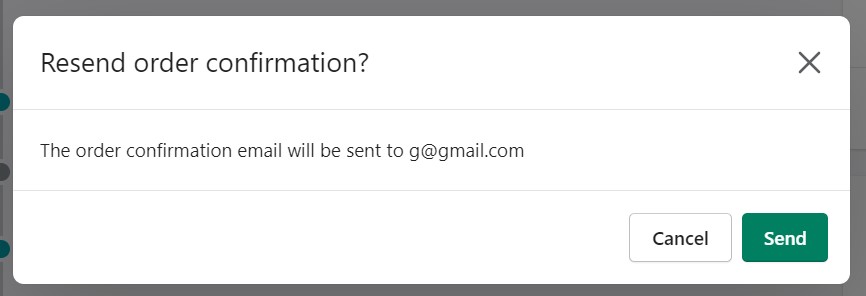
- Click Resend email under the email you want to send again.
- Click Resend SMS under the message you want to send again
- Click Send in the confirmation window.


How to subscribe to the orders feed in Shopify
Shopify provides an opportunity to track your store’s orders via the RSS feed, which is available under:
https://yourshopname.myshopify.com/admin/feed/orders.xml
Also, you can find your Shopify orders arranged in a feed on the /admin/feed page. However, since it is protected data, the feed requires authentication before you can access it.
How to enable push notifications for new Shopify orders
When an order is placed on your e-commerce website, you can receive a notification on your phone. Turn on push notifications in the Shopify app and make sure they are enabled in your device’s default settings.
You can enable push notifications for new Shopify orders as follows:
- Go to your Shopify app and tap Store -> Settings -> Notifications.
- Click the Push notifications toggle under Orders to enable push notifications.
Also, you can enable the Badge app icon here. Thus, you will be able to see how many open orders are available straight on the home screen of your smartphone.
The amount of open orders displayed in the Shopify app badge is associated with a single store. The badge displays the number of open orders for the last account that had the option enabled if you are using the Shopify app for multiple accounts.
How to view the order status page on Shopify
Your customers receive a URL to the order status page, which is the last page of the checkout process when they finish a transaction.
They may check the status of their order on this page, and if they have any questions, they can get in touch with you here as well.
You can view the order status page from the Shopify admin as follows:
- Go to your admin -> Orders.
- Click the order number of the record you want to view.
- Hit the More actions menu and choose the View order status page.

- Shopify redirects you to the same order status page displayed to your customer.


How to delete Shopify orders
Follow these steps to delete Shopify orders:
- Go to your admin -> Orders.
- Click the order number of the record you want to delete.
- Scroll down to the end of Timeline. You will see the Delete order button. Click it.
- Confirmation window displays. Click the Delete order button.
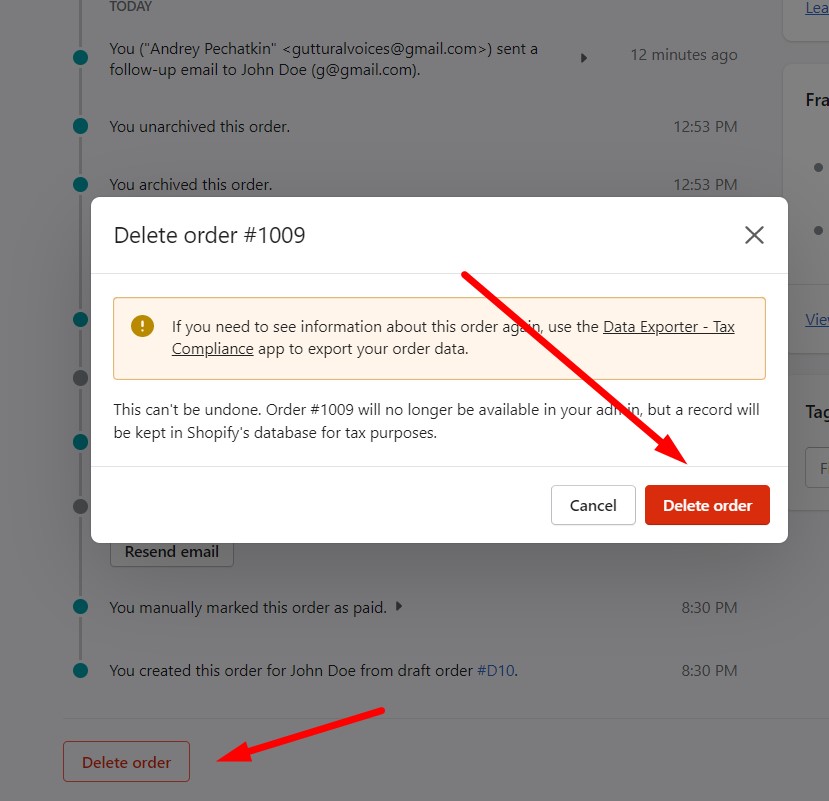

Not all orders can be deleted. You can remove, for instance, canceled or archived orders. Your order will no longer be available in the admin, but a record will be kept in Shopify’s database for tax purposes.
How to cancel Shopify orders
Let’s see how to cancel orders on Shopify:
You can unarchive orders in Shopify as follows:
- Go to your admin -> Orders.
- Click the order number that you want to cancel.
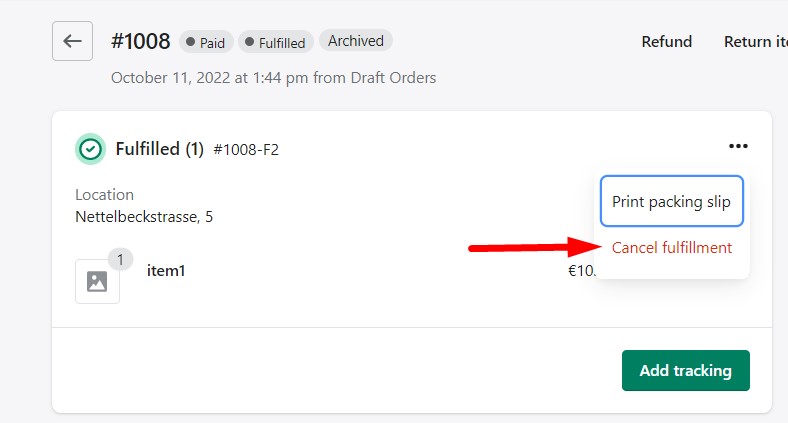
- Cancel fulfillment if you’ve already fulfilled this order.
- Hit the More actions menu and choose Cancel order.
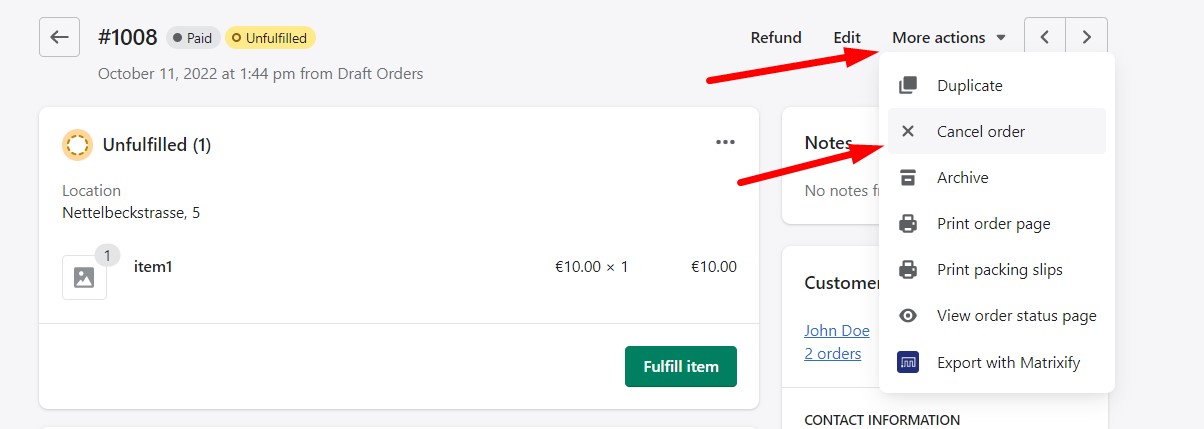
- Choose how to refund payment, select the reason for cancellation, and notify the customer.

- Hit Cancel order, and Shopify will cancel the selected order.


Note that canceled orders can no longer be edited.
How to achieve Shopify orders
You can archive orders in Shopify as follows:
- Go to your admin -> Orders.
- Click the order number that you want to archive.
- Hit the More actions menu and choose Archive.
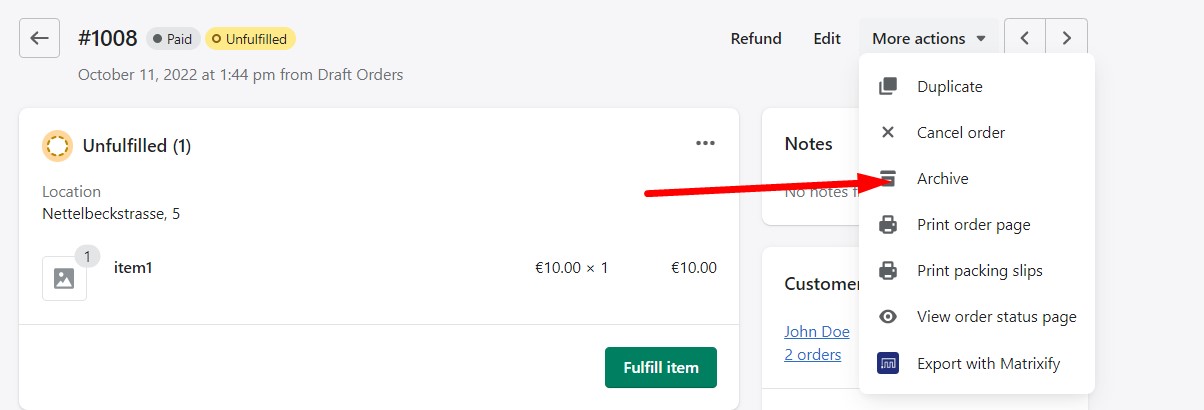
- Shopify will archive your order.

How to unarchive Shopify orders
You can unarchive orders in Shopify as follows:
- Go to your admin -> Orders.
- Click the order number that you want to unarchive.
- Hit the More actions menu and choose Unarchive.
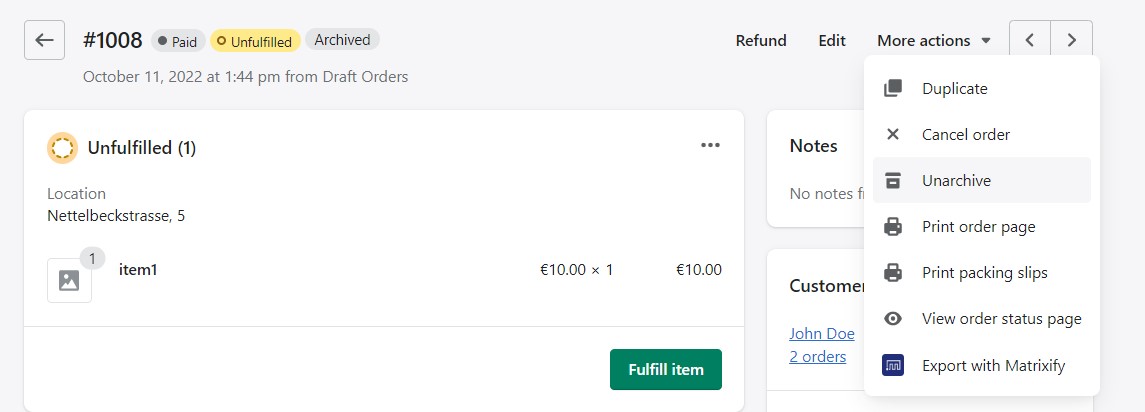
- Shopify will anurchive your order.

How to duplicate existing orders in Shopify
Duplicating an existing order or an existing draft order can help you save time while creating a draft order. Examples of situations when it could be advantageous to duplicate an existing order include the following:
- For recurring clients, you frequently create orders manually. It’s the easiest way to tame Shopify recurring orders (subscription orders).
- An existing order has to be modified or edited, but you want to save its original copy
When you create a new draft order from an existing order or a draft order, the following details stay the same:
- products;
- custom items;
- customer information;
- email, billing, and shipping addresses;
- notes, note attributes, and tags;
- market.
At the same time, you should keep in mind that discounts and shipping rates are not duplicated.
To duplicate existing orders in Shopify, follow these steps:
- Go to your Shopify admin -> Orders or Draft orders.
- Open the order (or the draft order) you want to duplicate.
- Click Duplicate. A draft order is created with the same line items and customer information. This option may be also available in the More actions menu, as you can see in the image above.
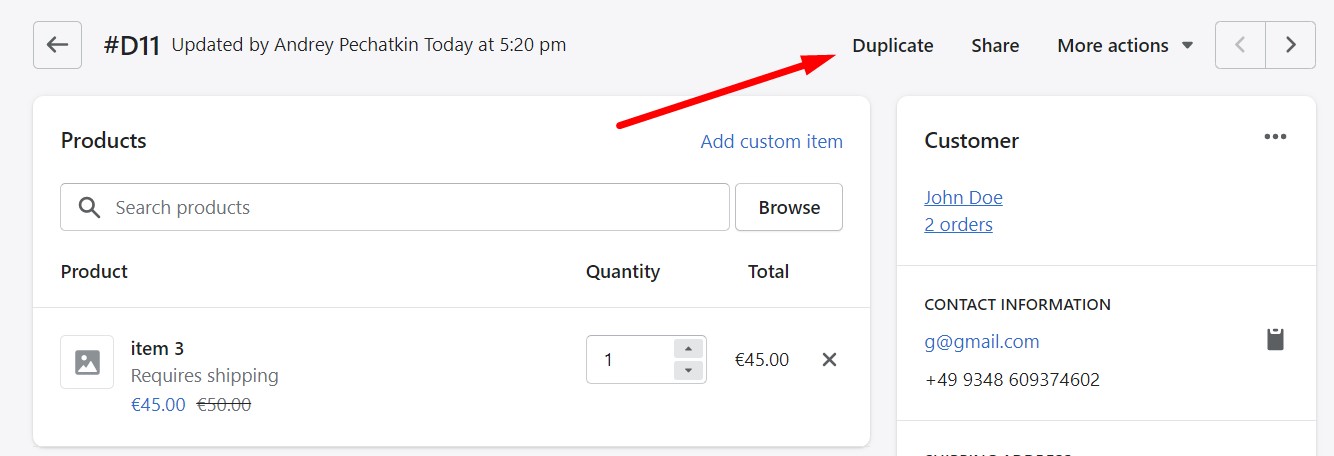
- Now, you can send an invoice, accept payment, or save your newly duplicated order as a draft

You can edit an order that has been saved as a draft at a later time from the Drafts screen in your Shopify admin. Your draft order becomes an order on the Orders page if you accept payment for it.
How to create draft orders in Shopify
Now, let’s focus on Shopify draft orders. What are draft orders in Shopify, you will ask?
You can generate a draft order in your Shopify admin when you need to create an order on a customer’s behalf. Input the customer’s information and the items and then issue an invoice, gather payment, or establish payment conditions.
In Shopify, the draft order becomes an order and appears on your Orders page once it has been paid for or after you have established payment conditions. You can use Shopify draft orders to sell to other companies or customers, as well as complete the following tasks:
- Take money for purchases placed over the phone, in person, or via email;
- Let customers pay for invoices by clicking on a secure checkout link;
- Indicate extra expenses or products that aren’t visible in your inventory (via custom items);
- Make orders for any of your active sales channels;
- Sell goods at a discount or wholesale rates;
- Accept preorders;
- Orders can be saved as a draft so that work can be continued later.
If you utilize Shopify Markets, the market that is linked to the order determines the local currency, pricing, tariffs, and taxes. The market for the order, in its turn, is determined by the customer’s shipping address when more than one market is enabled. As a store administrator, you can change the market on a draft order.
For the convenience of your client, draft an order, and then send them an invoice. A link to the checkout where your customer can pay for their order is automatically included in the invoice.
In Shopify, draft orders may include the following information:
- At least one product;
- Discounts: either on individual items or the entire order;
- Shipping details and rates
- Applicable taxes;
- Customer information;
- Tags;
- Market.
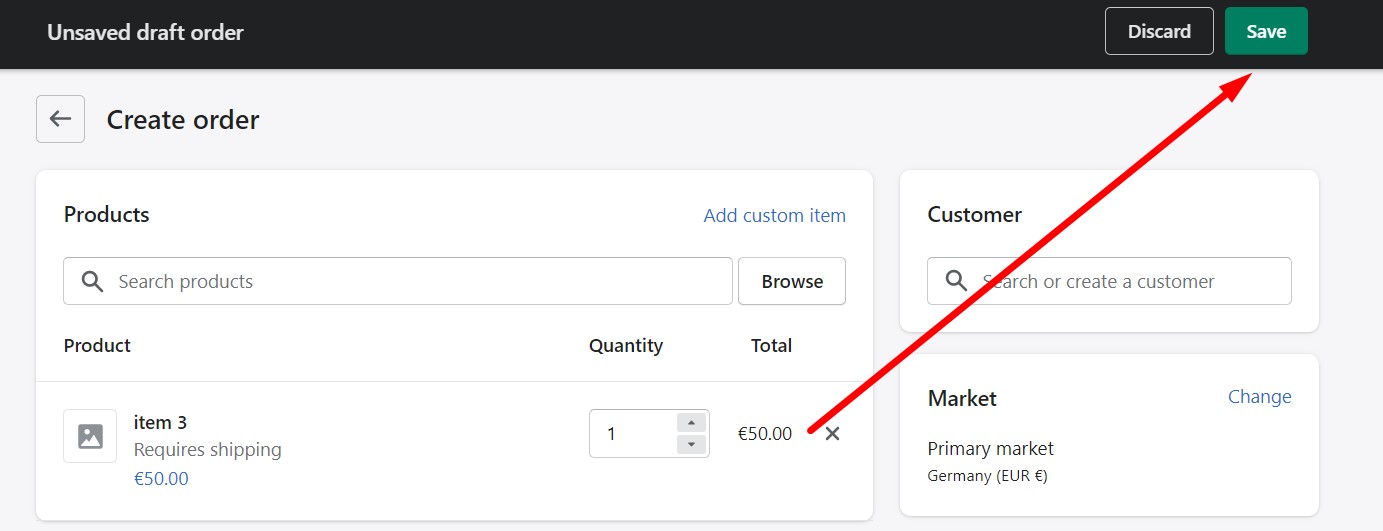
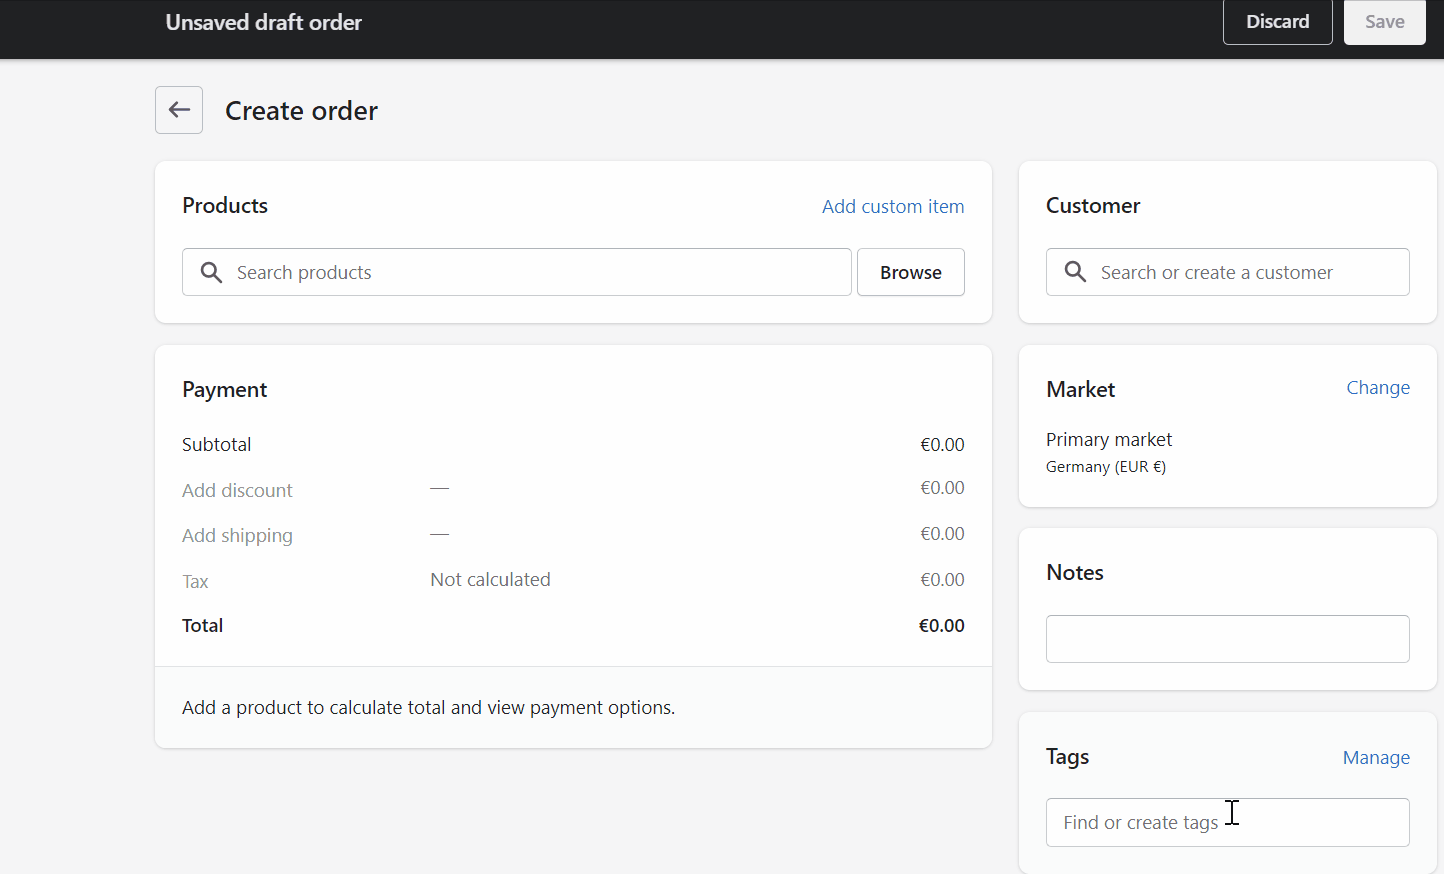
In general, you can create Shopify orders as follows:
- Go to your Shopify admin -> Orders.
- Here, click the Create order button.
- Now, browse your catalog to add products to the order.
- Apply other changes to the order:
- Add a customer (start typing their name or create a new one);
- Apply discounts;
- Enable/disable taxes;
- Create notes;
- Add tags;
- Change the market, etc
- Add a customer (start typing their name or create a new one);
- Next, take one of the following measures:
- Send an invoice to the customer to provide them with a link to a checkout page so that your customer can pay for the order.
- Accept payment from your client.
- Set particular payment terms.

- Save your order as a draft. You will be able to update it later.
- Send an invoice to the customer to provide them with a link to a checkout page so that your customer can pay for the order.


Note that Shopify provides the ability to simplify the order creation process by introducing the ability to leverage pre-filled customer information automatically copied from existing customer profiles.
Now, let’s focus on the core aspects of adding a draft order in Shopify.
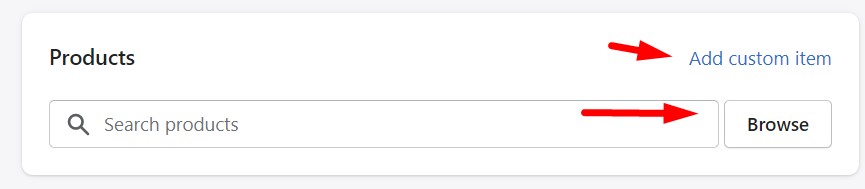
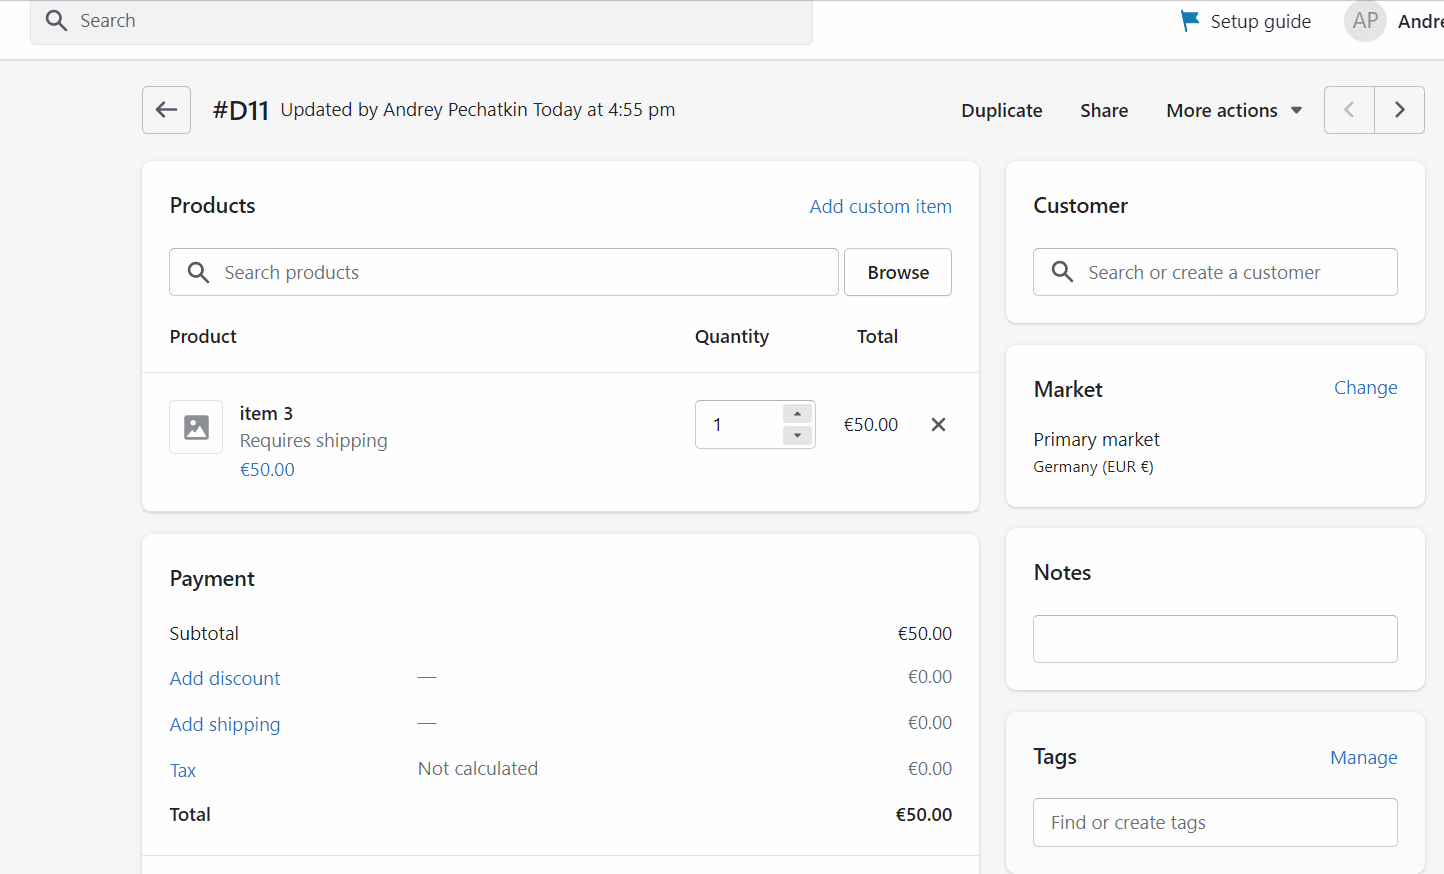
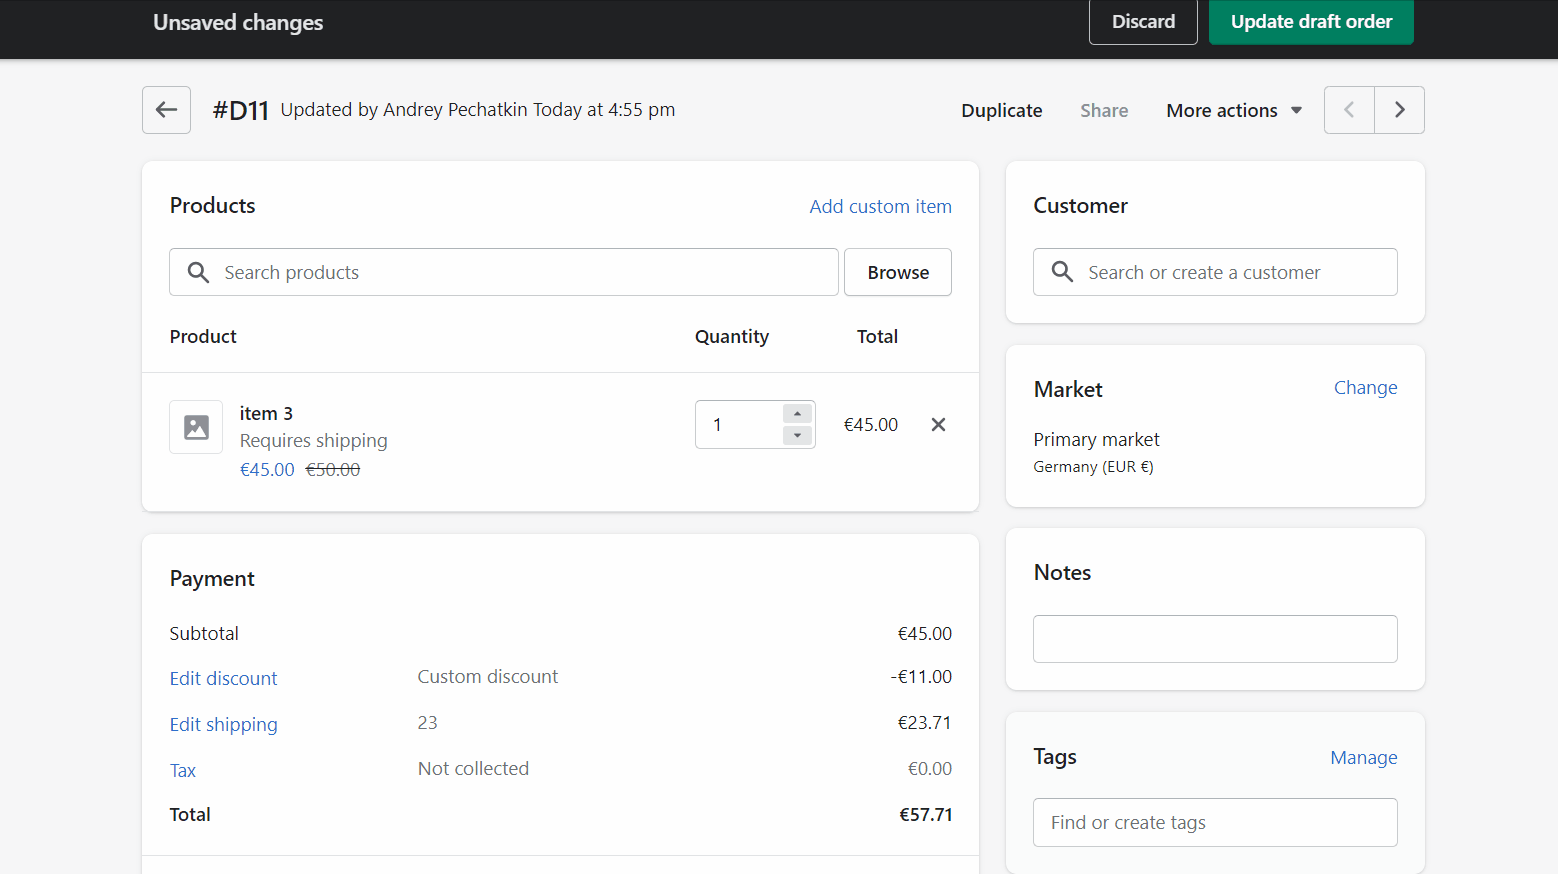
Adding products to Shopify draft orders
You can add products to draft orders in Shopify as follows:
- From the Drafts page in your Shopify admin, access the draft order.
- Choose one of the following actions in the Order details section:
- Type in the name of the item you want to include in your order.
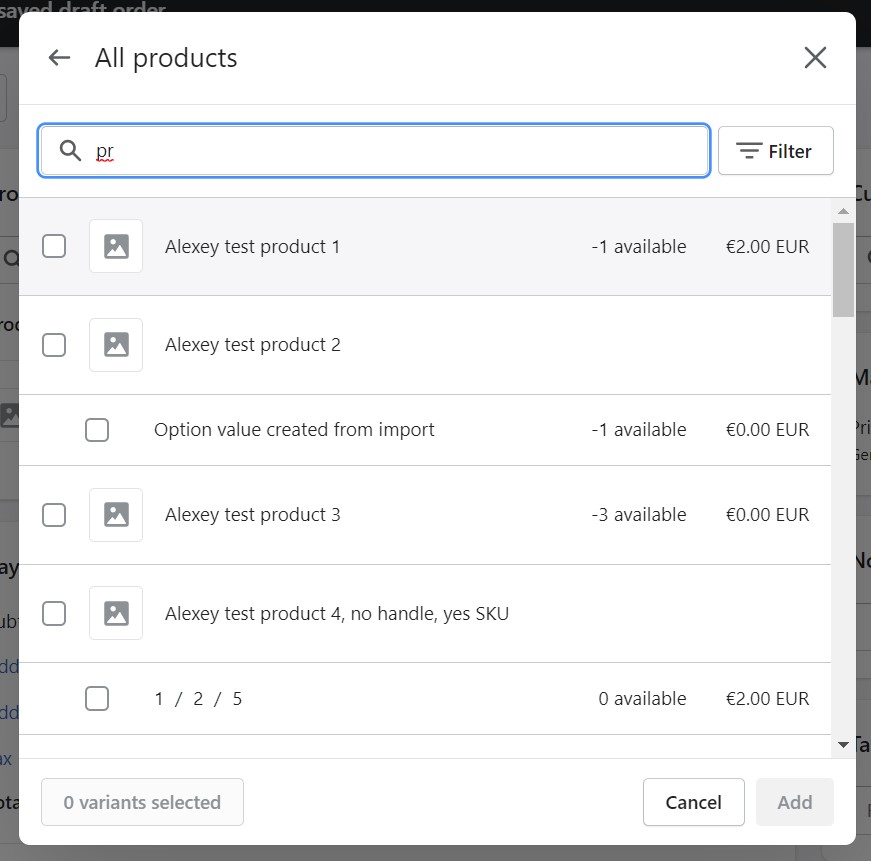
- To browse a list of the goods and collections in your store, click Browse products.
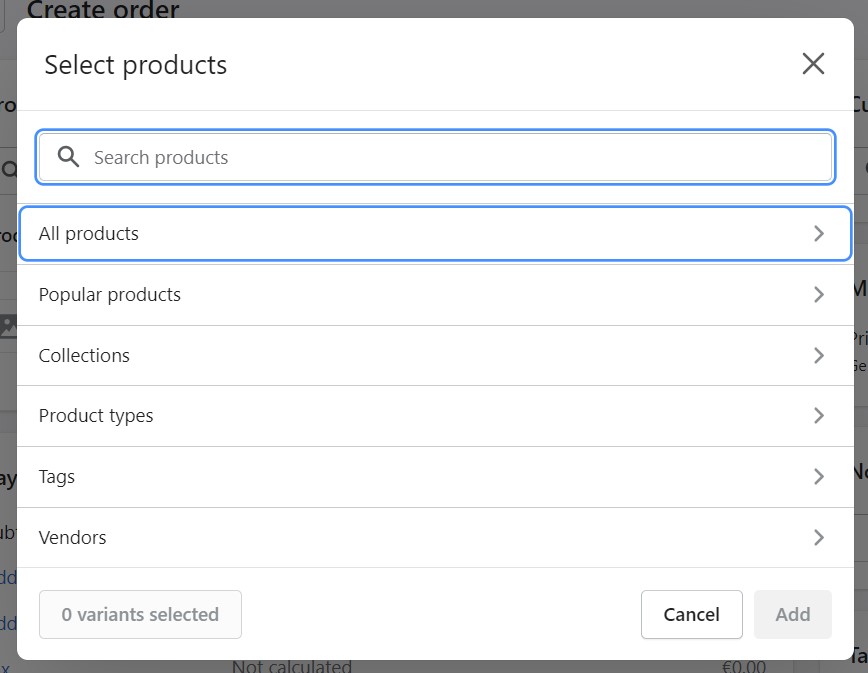
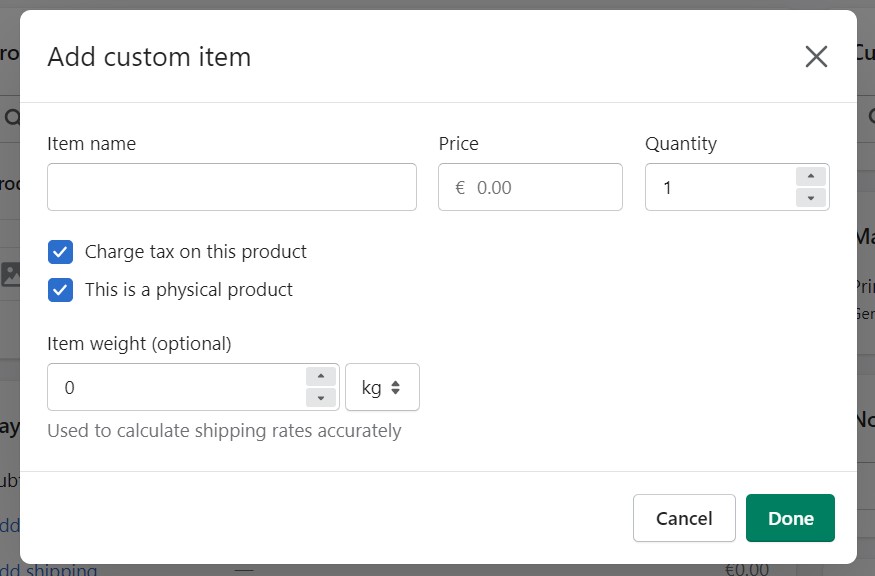
- By selecting Add custom item, a custom item can be created for the order.
- Type in the name of the item you want to include in your order.
- Verify each of the specific items or variants you want to add to the order.
- Hit the Add to order button. Click the X button next to a product in the Order Details section to delete it from the order.
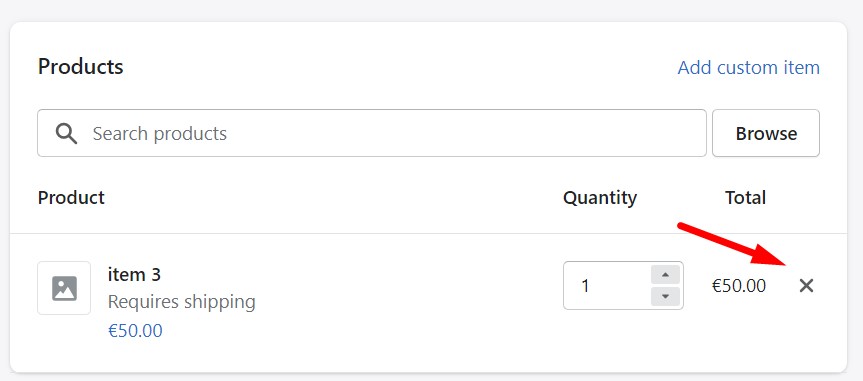
- Verify how many things you added to the order. When you try to check out, you will see a notification alerting you to a stock problem if you add a product with an inventory of zero and the product does not permit overselling.
- This step is optional: Click Reserve items and then choose how long you’d like the items on an invoice or a draft order to be reserved. This does not change the goods’ real inventory levels in your Shopify admin, but it reserves any items for which inventory tracking is enabled.


Setting discounts in Shopify draft orders
You can select to discount the entire Shopify draft order or only specific goods. The overall cost of the order is reduced by the item and order discounts. Note that orders created as draft order invoices are not eligible for discount codes to be used at checkout.
It is also recommended to enter the discount as a percentage rather than a particular number if the order is in a currency other than your shop currency. By using the percentage discount, you can avoid charging your customer a foreign exchange cost that might happen since discounts are not subject to the same rounding restrictions as product prices.
How to apply a discount to an item
You can apply a discount to an item in a Shopify draft order as follows:
- Go to the Drafts page in your Shopify admin and open the order you want to apply a discount to.
- Locate an item you want to modify and click the price near its name in the order details section.
- Now, you have two options: to set the discount as a particular amount or a percentage of the listed price.
- If necessary, you can give a reason for the discount in the Reason text box.
- Hit the Apply button to add a discount to an item of your Shopify draft order.
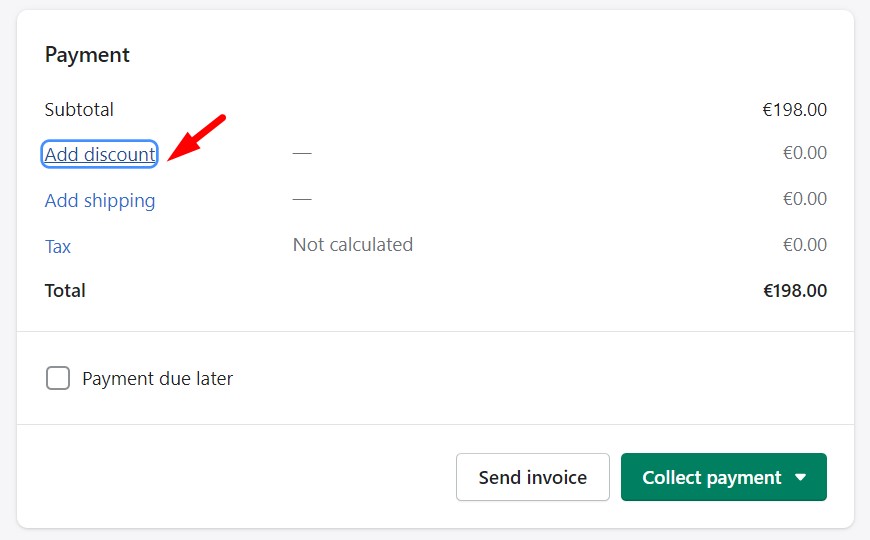
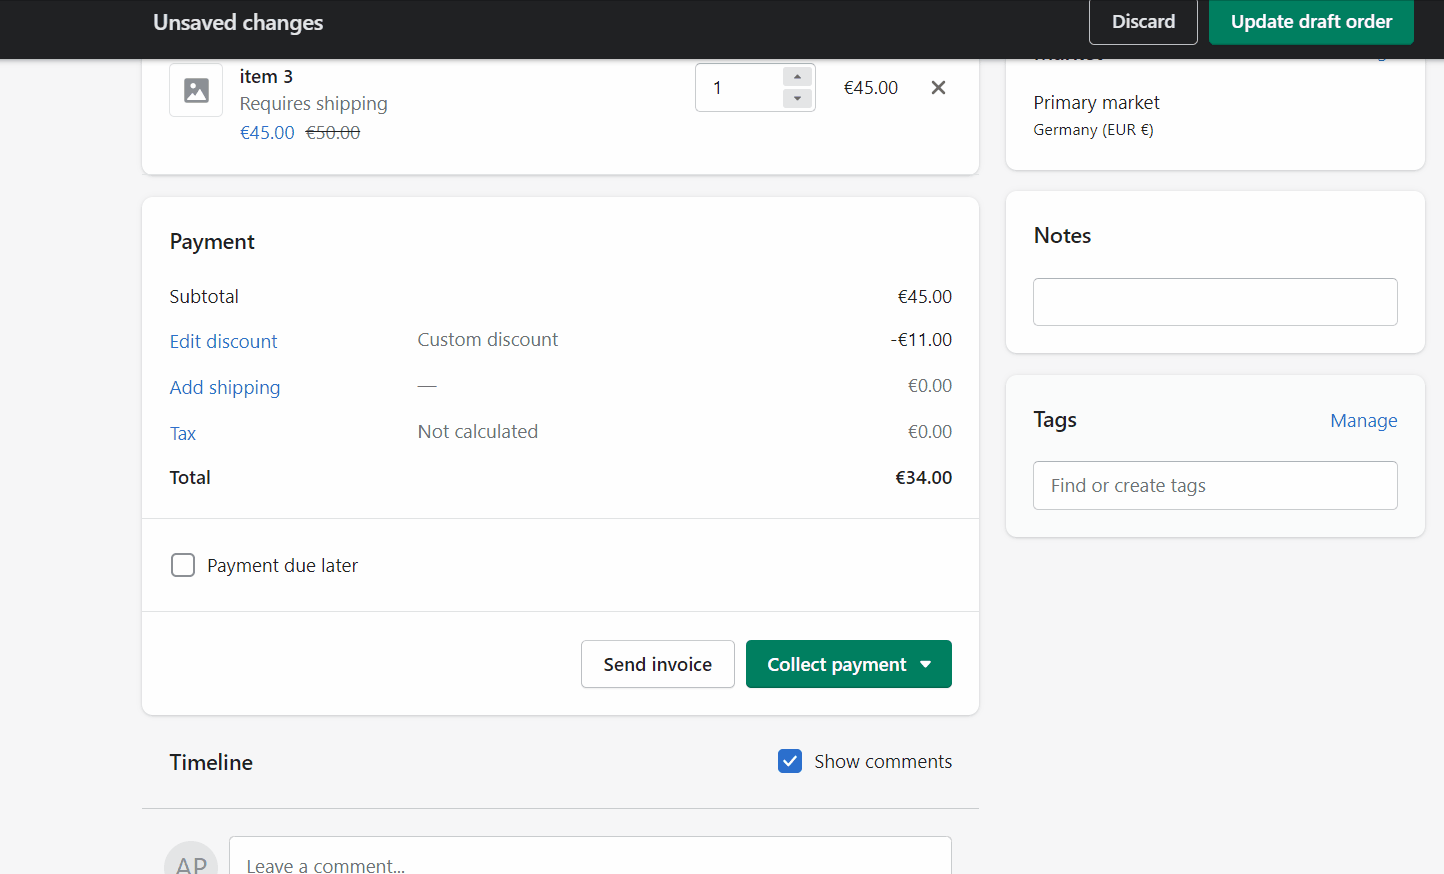
How to apply a discount to the entire Shopify draft order
You can apply a discount to the entire Shopify draft order as follows:
- Go to the Drafts page in your Shopify admin and open the order you want to apply a discount to.
- Click Add discount in the Payment section.
- Now, you have two options: to set the discount as a particular amount or a percentage of the total order price. Note that you apply a discount on top of item-specific discounts.
- If necessary, you can give a reason for the discount in the Reason text box.
- Hit the Apply button to add a discount to your Shopify draft order.
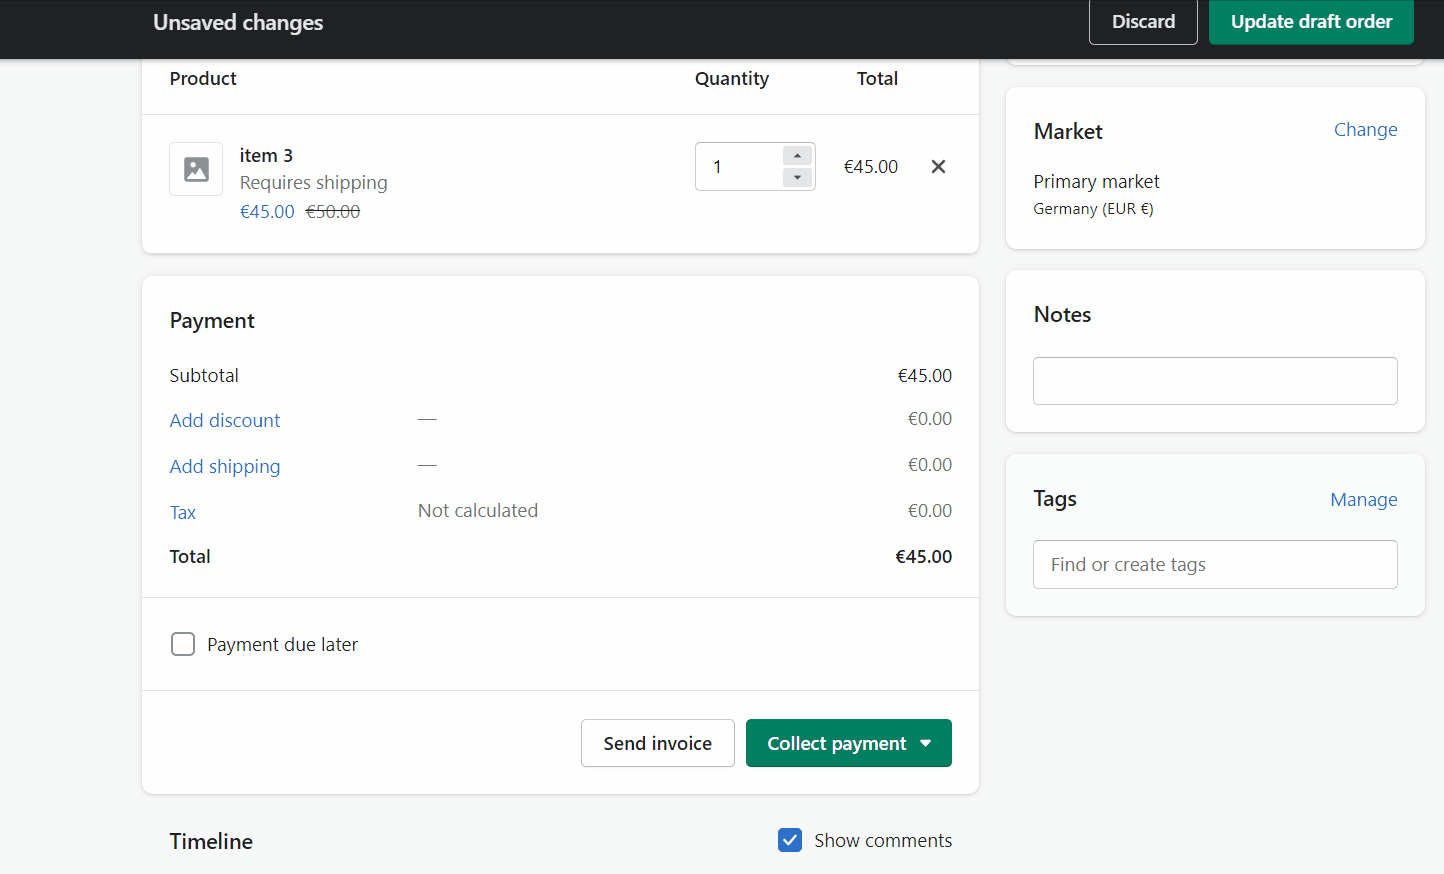
Adding shipping to Shopify draft orders
You can select a preconfigured shipping fee or make a bespoke rate if the current order requires shipment. Add a shipping rate to your Shopify draft order as follows:
- From your Shopify admin’s Orders page, access the order.
- To configure shipping details, click Add shipping in the Payment block.
- Select a standard shipping rate or enter a shipping cost after choosing Custom. In the second case, type the name of the custom rate and its cost.
- Note that you must first add a customer and a shipping address to your order to be able to use a location-based delivery rate. You can select from the shipping costs in your store’s shipping options after adding a customer.
- Tap Apply when finished.
Adding tags is similar for both normal orders and draft orders. They are designed to help you categorize orders in ways other than just whether they were paid for, received, and completed. As a result, even Shopify draft orders can be filtered by tags. You can add tags to Shopify draft orders as follows:
- From your Shopify admin’s Orders page, access the order.
- Put the tag names in comma-separated.
- Click Manage to choose from your previously used tags. To add new tags to the order, click on each one, then click Done.
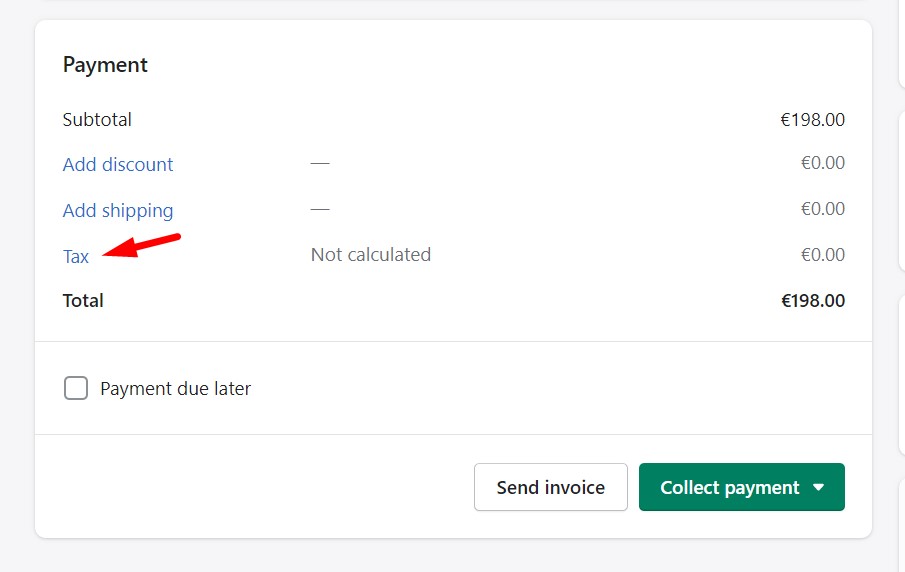
Adding or removing taxes in Shopify draft orders
Draft orders, by default, include taxes based on the shipping address of the customer and the tax preferences of your store. Taxes are calculated depending on the customer’s billing address if you don’t already have their shipping address. You can enable/disable tax calculation for your Shopify draft order as follows:
- From your Shopify admin’s Drafts tab, open the order.
- Click Taxes in the Order Details section’s Payment box.
- Check or uncheck Charge taxes.
- To save your changes, click Apply. To cancel, click Close.

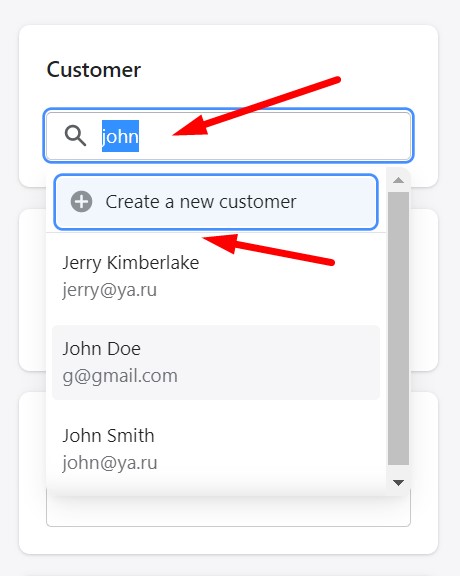
Adding a customer to a Shopify draft order
If you want to use a location-based shipping rate for the current order, you must add a customer.
Following are several ways to include a client in a Shopify draft order:
- From your Shopify admin’s Orders page, access the order.
- Start typing the name of an existing customer or enter the name of a new one in the “Search or create a customer” area.
- To add the customer to the order, click the customer.
- Click Create a new customer if you are adding a new customer.
- Create a new customer and fill out the necessary data, such as a customer name and email.
- To save a customer, click Save customer. This client has now been stored in your database.
Additionally, it is possible to update a customer’s contact details:
- From your Shopify admin’s Orders page, access the order.
- Open the context menu (three dots in the Customer section) and click edit contact information, shipping address, or billing address.
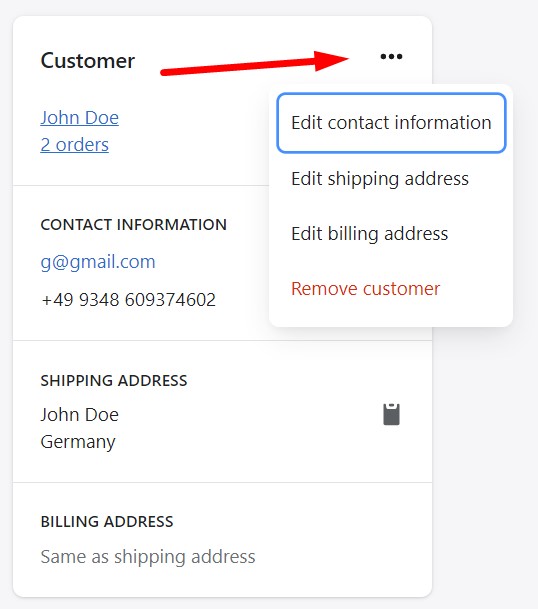
- Make any necessary adjustments. Note that you can change this information in a draft order only or use it to update the corresponding customer profile
- Press Done.

The procedure for removing a client from a draft order is fairly simple. Open the context menu (three dots in the Customer section) and click Remove customer. Note that the corresponding record won’t be eliminated from your Shopify admin’s list by doing this.
Setting payment terms for payments due later for Shopify draft orders
You can specify the deadline for payment on an order using the payment terms. On draft orders and orders that have the status “Payment Pending,” you can specify the terms for making payments.
When deciding on the payment terms, you can select from the following choices:
- Due on receipt: Use this option to make a payment due on the day your customer receives their invoice.
- Net term: Use this option to set the number of days from the issue date that payment is due. E.g., Within 7 days means that 7 days from the date of issue is when payments are expected to be made. After choosing a net term option, the issue date, which by default is set to the current date, can be changed.
- Fixed term: Select this option to designate a specified date by which the payment is due.
Order status changes to Overdue if payment isn’t received by the due date for an order.
You can either issue an invoice or accept money for the order after establishing the terms of payment.
When payment terms are established, you cannot, in one circumstance, send an invoice: You can only collect payment by credit card or by marking the order as paid if the draft order is in a local currency other than your shop currency. From the order page, there is no option to send the buyer an invoice in this case.
You can set payment terms for payments due later for Shopify draft orders as follows:
- Go to the Drafts page of your Shopify admin and open an order there.
- Check the Payment due later option In the Payment section.
- Select one of the following Payment terms:
- Due on receipt;
- Within … days;
- Fixed date (specify the due date).
- After that, click Create order.

Sharing checkout links with customers
The client can add billing information, choose a delivery option, and make a payment if you generate a draft order for them and send a link to the checkout page. The draft order transforms into an order on the Orders page after the customer uses the link to finish the checkout process, and it is immediately marked as Paid.
There are two ways to give your clients checkout links:
- Send your client an invoice that includes a link to the checkout page.
- Give your buyer a link to your checkout page.
Make sure not to mark the draft order as Paid. In this case, the customer won’t be able to finish the checkout through the link in the invoice.
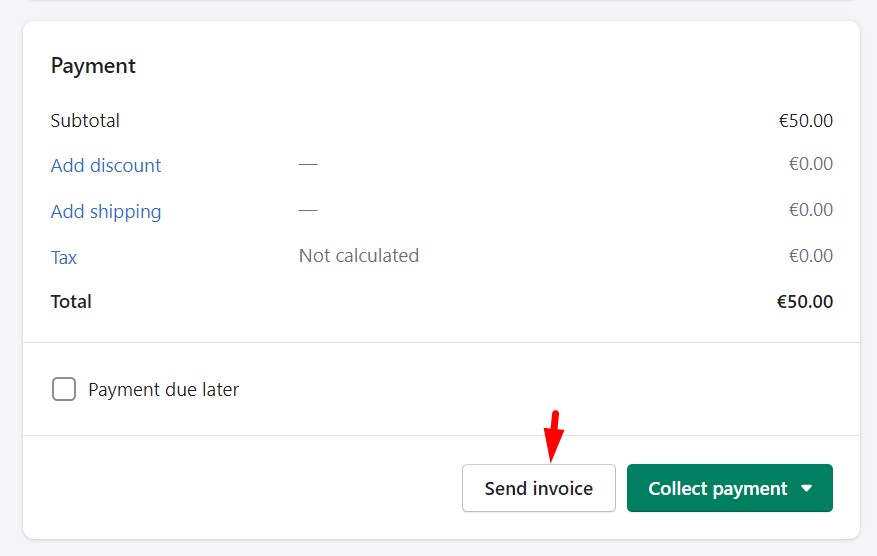
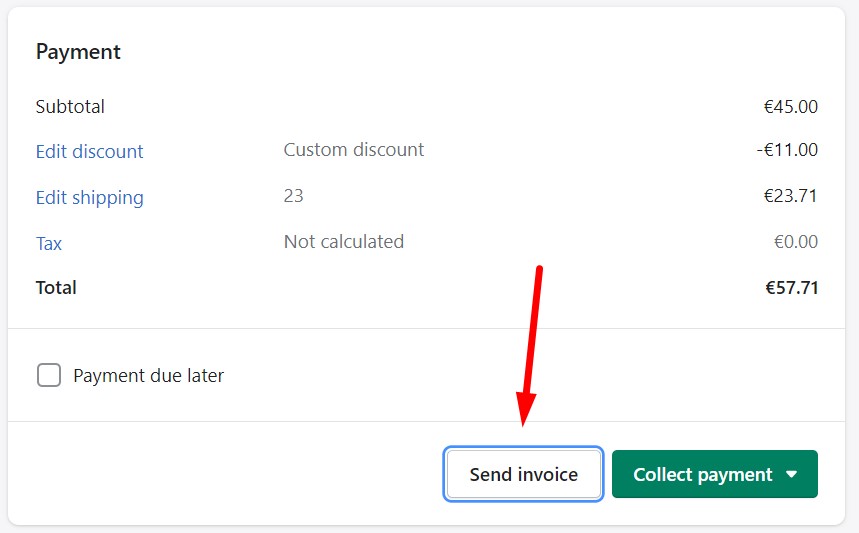
Send invoice
You can include a link to the checkout page in an invoice you send to your client. The email contains a link your customer may use to enter billing information, choose a shipping option, and make a payment.
The market linked to the customer’s delivery location determines the currency on the invoice if you utilize Shopify Markets to sell overseas. Therefore, by altering the market, you can alter the currency.
Additionally, invoices for orders with a Payment Pending status can be sent. When payment terms are established, you cannot send an invoice: You can only collect payment by credit card or by marking the order as paid if the draft order is in a local currency other than your shop currency.
You can send an invoice to a customer in Shopify as follows:
- From your Shopify admin’s Drafts orders page, open the order to send an invoice.
- Then click Send Invoice in the payment section.
- Enter the message you want to appear on the invoice in the Send invoice dialog.
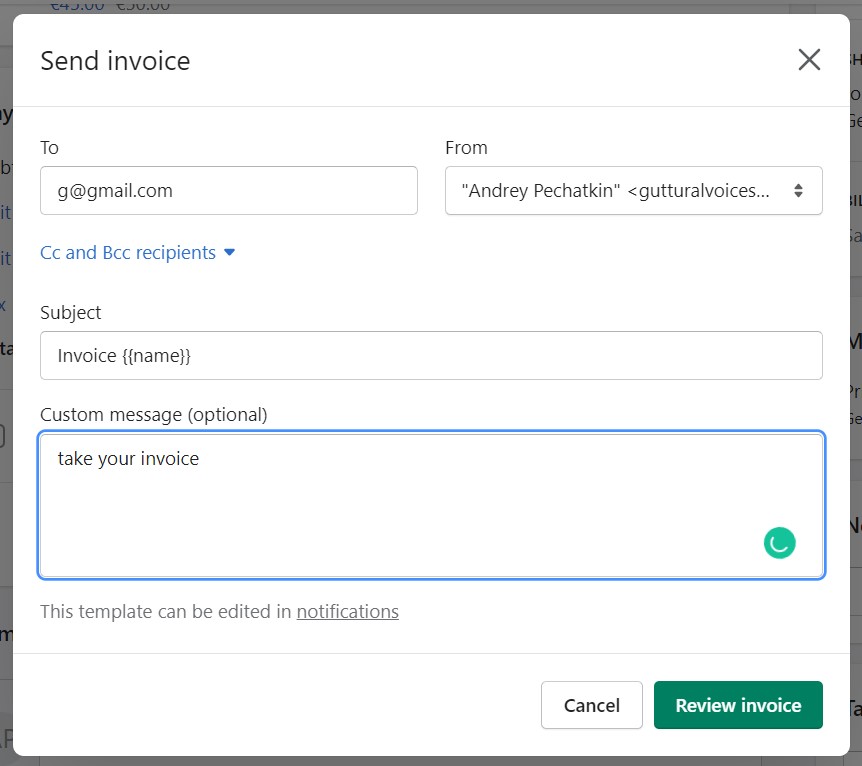
- Click on “Review Invoice.”

- Review your invoice in the dialog box before clicking Send invoice.


Note that any shipping rates that were computed for that order won’t automatically update to reflect the cost of shipping the new goods if you add them after sending an invoice.
You can create a draft order for customer requests and then share a link to the checkout page with your customer as follows:
- From the Shopify admin, tap Orders, then tap Draft orders.
- Tap the order that you want to send an invoice for.
- Tap More Options, and then tap View order status page.
- Copy and paste the page link to share it with your customer.
Alternatively, you can use the Shopify app since it offers more intuitive sharing options.
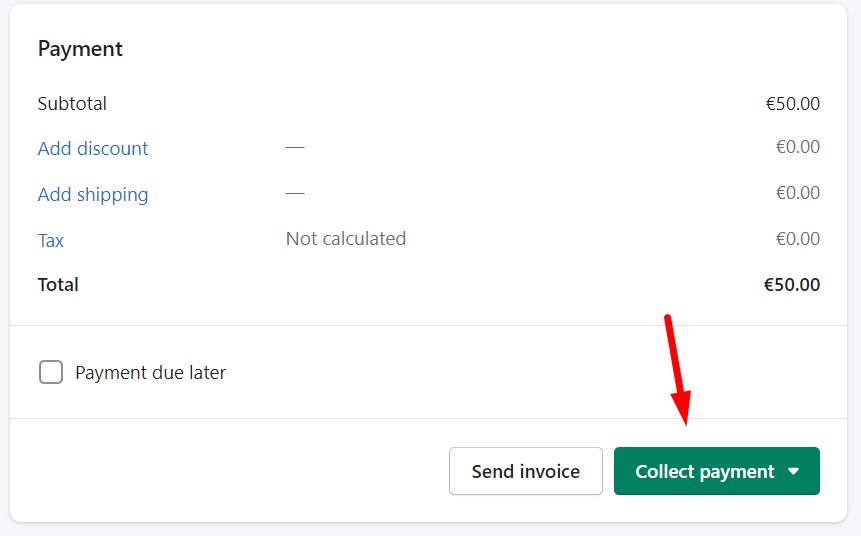
Accepting payments for draft orders in Shopify
If you have already received payment, it is possible to take payment for draft orders by marking them as paid, or, if you have your customer’s billing information, you can accept payment by credit card. A draft order turns into an order on the Orders page when you receive payment for it.
Although there are no third-party transaction fees for orders completed by Shopify Payments, you pay them while manually processing credit card purchases in your Shopify admin. The third-party transaction fees for processing credit card transactions are the same as those for processing online orders if you choose to use a supported direct credit card payment provider. However, when you issue a refund, the credit card transaction fees are not given back to you.
But pay heed to the fact that third-party transaction costs are not applied to an order if you designate it as paid and choose a manual payment option, such as cash on delivery or bank deposit.
Check with your provider to see if handling customer information in this way affects PCI compliance requirements if you accept payments through direct payment providers other than Shopify Payments.
Mark order as paid
After receiving a payment for the current order, you can mark it as paid. In this case, your payment provider does not capture the received amount, and Shopify sends an order confirmation email to the customer.
If you use Shopify Markets, the amount received is expressed as the local currency value of the customer converted to your store’s currency. The conversion is based on the fluctuating current exchange rate. If the amount you got differs from the amount shown for reporting purposes, correct it.
To mark the payment as paid in Shopify, follow these steps:
- Go to the Drafts page in your Shopify admin and open the order to apply changes to
- Click Collect payment and Mark as paid.
- If the Amount received value differs from the actually received amount, update the value.
- Hit Create order.
Note that this payment won’t be captured by Shopify, and you won’t be able to refund it using Shopify.
Accept payment by credit card
You can take payment for the order by credit card if you have your customer’s billing information or if they are available to submit it themselves. Only Shopify Payments support this form of payment. On the admin side, you should take the following steps:
- From your Shopify admin’s Drafts screen, open the order you want to edit.
- Then select Collect payment.
- Click Enter Credit Card. A direct credit card gateway should be enabled for the store where the order is created.
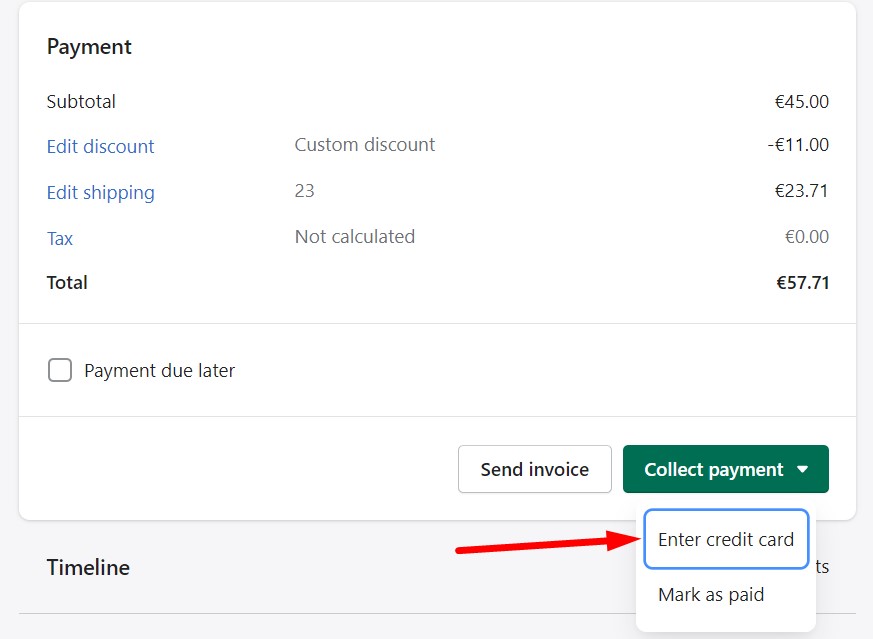
- Enter the billing and credit card details for the customer.
- To finish setting up your payment method and start creating an order from your draft order, click Charge.

Using local currency on draft orders
If you use Shopify Markets to sell overseas, the market that is linked to the order determines the local currency, price, taxes, and duties.
The customer’s shipping address determines the market that is related to the order. When a customer is added to an order, the market is updated, and your customer’s local currency is shown.
The foreign exchange rate is calculated when you make the draft order for orders that display a local currency other than the store currency. It makes no difference whether the exchange rate changes or not; this rate is set and applied to the invoice. If you save the order as a draft and then edit it, the pricing for the entire order will be adjusted with the currency rate in effect at the time of revision.
Change the market if you wish to use another price and currency for a draft order, but first, consider the following effects of doing so on an order:
- Prices for items either include taxes or do not. Those with a United States market, for instance, do not include taxes in prices, whereas orders with a Great Britain market do.
- Markets have various tax rates. The market on the order, with its tax included or excluded setting, remains unaltered if a customer changes the delivery address during checkout to an address outside the market. The right tax rate for the customer’s shipping address is subsequently charged.
- Only if the consumer completes their purchase and chooses a delivery option are duties fees assessed for draft orders. Based on the market for the order, the duties are computed. Duty amounts are still determined by the market you choose, not by the customer’s shipping address if you switched to a different market.
- Pricing for an order is determined by the exchange rate used by the third-party service you employ to calculate the foreign exchange rate for a market. However, the market that Shopify has chosen will have an impact on the rate that Shopify Payments uses to determine your payout. As a result, the amount charged on the order and the amount you receive as payment may differ.
- Manufacturer Suggested Retail Price (MSRP). If you are required to sell a product at the MSRP in a customer’s market, switching markets and using a different market price may be in violation of the contract.
Changing the market for a draft order in Shopify
If you use Shopify Markets, adjust the market to alter the order’s price and currency.
Review the effects of changing the market on an order before you do so, and make sure the following conditions are met:
- A market other than your primary market must be enabled in order to see the Market card on an order.
- To switch to a certain market’s local currency, both the market and its local currency must be activated.
You can change the market for a draft order in Shopify as follows:
- Go to your Shopify Admin -> Orders -> Drafts.
- Open a draft order to edit it.
- Scroll to the Market card and click Change.
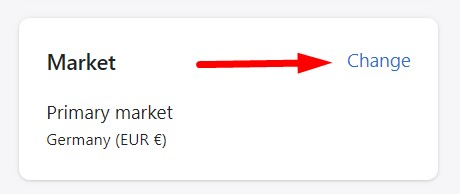
- Now, you can choose a country and select Change market.
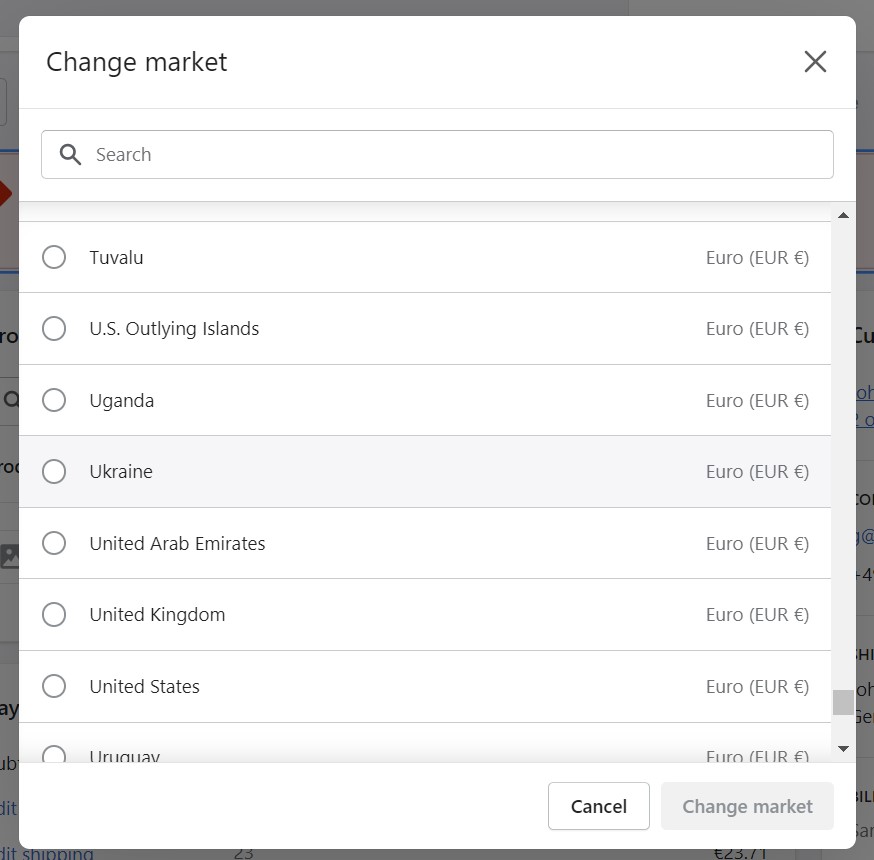
- Choose Update draft order.


Except when you are making the following special alterations to the order, order pricing is displayed in the customer’s native currency:
- When you apply a custom discount, the value of the discount is shown in store money.
- If you enter a custom shipping cost, store currency will be shown for the Price.
- When a custom item is added, the Price is shown in a store currency.
These customized adjustments are shown on the order in the client’s native currency when you make them.
Shopify recurring orders
You can offer things on a recurring basis by including subscriptions as a purchase option. Your consumers can choose to pay an agreed fee for your goods regularly depending on the subscription alternatives you provide. You might provide memberships on a monthly, weekly, or daily basis, for instance. From your Shopify admin, you can manage prepaid subscription orders and pay-per-delivery orders.
Orders for pay-per-delivery services only contain one subscription item. Your subscription app generates fresh pay-per-delivery orders regularly, which show up in your Orders list. The management and fulfillment of pay-per-delivery orders are the same as those of non-subscription orders.
Prepaid subscription orders have planned fulfillments over time but are paid for in advance. Orders for prepaid subscriptions are in a Scheduled status up until the fulfillment date. The order status changes to Unfulfilled when the fulfillment date is reached, at which point you can complete the transaction. Once the subsequent fulfillment date has been reached, and the cycle has started once more, the order’s status returns to Scheduled. When an order is in the Scheduled status, you can track it on your Orders page without taking any more action.
Review all of the prepaid subscription order items on the order, which are divided into Fulfilled, Unfulfilled, and Scheduled fulfillment cards. The Scheduled fulfillment card contains information about the order’s subsequent scheduled fulfillment.
Your consumers can arrange recurrent purchases once you’ve set up subscriptions. However, you need to install a subscription app from the Shopify App Store to enable recurring orders in Shopify and view information about your subscriptions. The following components of your Shopify admin become accessible with subscription information if a such app is installed:
- Customers.
- Customer profiles;
- Product pages;
- Discounts;
- Orders.
Shopify pre-orders
Can you do pre-orders on Shopify? It is impossible by default. You need to install a pre-order app from the Shopify App Store. After that, you will be able to set up pre-orders and enable your customers can pre-order and pay for products before they are ready to ship.
If you have a pre-order app installed, then corresponding information becomes available in the following areas:
- Product pages;
- Orders.
Since Shopify pre-orders are unavailable in the default e-commerce store, we don’t review them here.
Shopify order statuses
Orders can be in a variety of statuses based on different conditions, such as payment or fulfillment. These statuses are used to build displays that let you monitor the status of your orders and identify those that require attention. As a result, various combinations of order statuses can be used to filter your orders.
Order statuses
There are three order statuses in Shopify:
| Status | Description |
| Open | The order was placed or submitted. There is work to be done on the order, such as handling the payment and fulfilling or managing returns. |
| Archived | Either manually or automatically, the order was archived. |
| Canceled | The order was revoked. If an order was canceled but not entirely refunded, there might still be some work. |
Payment statuses
The payment status of an order is a crucial piece of information that helps decide the tasks you must complete for it. One or more of the following payment statuses apply to orders in Shopify:
| Status | Description |
| Pending | For one of the following reasons, orders have the status “Payment Pending”:
|
| Authorized | Your customer’s payment information was verified by the payment processor. Only when you manually capture payments is the Authorized status visible, serving as a reminder to do so before the authorization period expires. Customers can finish their checkout after the order is created and inventory is reserved. |
| Overdue | This status assumes that the payment wasn’t captured before the due date. The latter was set in the payment terms on an order that had the Payment pending status. |
| Expiring | This badge isn’t a payment status, but it appears two days before the deadline for capturing payment on orders with the Authorized payment status. |
| Expired | The payment wasn’t captured before the set date. Since some payment providers use the Expired status to indicate that they were unable to process the payment, contact them to see if you can still capture the payment. |
| Paid | There are two cases when this status is used:
|
| Refunded | The full amount paid for an order was returned to the customer. |
| Partially refunded | The amount returned is less than the full amount that the customer paid. |
| Partially paid | This status is used if you manually captured payment for the order and specified less than the full order value. |
| Voided | An unpaid order was canceled manually. |
| Unpaid | This payment status combines Authorized, Pending, Expired, and Partially paid orders. |
Fulfillment status
Shopify lets you use the following fulfillment statuses for orders
| Status | Description |
| Fulfilled; | When you’ve shipped all the items in an order, it is Fulfilled. |
| Unfulfilled; | An order is placed, and it has an Unfulfilled status unless you have selected to capture the payment and fulfill all of the order’s line items automatically. |
| Partially fulfilled; | If you have shipped only a few items from the order, then the order has a Partially fulfilled status. |
| Scheduled; | Orders for prepaid subscriptions are in a Scheduled status up until the fulfillment date. The order status changes to Unfulfilled when the fulfillment date is reached, at which point you can complete the transaction. |
| On hold. | This status is associated with upsell offers presented to customers at checkout. In this case, the order fulfillment status is set to On hold temporarily. When fulfillment is On hold, you can reserve inventory for the order, but you can’t fulfill the order until the fulfillment hold is released and the order fulfillment status changes to Unfulfilled. |
As you’ve probably heard already, importing orders into Shopify is impossible by default. The default data transfer solution doesn’t support this functionality. However, you can import orders into Shopify with the help of third-party apps, such as Matrixify. This tool fo Shopify import works with orders. Here at Firebear, we’ve also prepared something special for importing orders into Shopify. Contact us for more information. You can find more information about import processes here: Shopify Import Guide.
When it comes to export processes, Shopify supports orders. You can even transfer orders’ transaction histories together with them or separately. Within a transaction history file, you can find the payment data that was actually captured. However, no authorization information is displayed. You can export Shopify orders as follows:
- Go to your orders and select the records that you want to export.
- Click Export on the top of the Orders page.
- The Export Orders window displays. Select options for the orders you wish to export. To export your orders by date, for instance, select Export orders by date and specify the period for the orders you wish to export.
- Decide on a file format under “Export as.” It can be a plain CSV or a sheet for Excel and other editors.
- Click Export orders if you want to download all of the information related to your orders. Click Export transaction history if you only want to download your transaction data.

You can find more information about export processes here: Shopify Export Guide.
Conclusion
With all these features and instruments at your disposal, you should know how to fulfill orders on Shopify in the most friendly and efficient way. The platform delivers an intuitive interface where you can easily handle all tasks associated with order management, no matter whether you work with Shopify draft orders or orders placed by your customers. Now, you know how to cancel orders on Shopify within a few clicks or delete them. Importing orders into Shopify won’t be an issue as well if you install a proper enhancement to your admin. The same approach is required for pre-orders on Shopify and recurring (subscription) orders. However, if you don’t need these features, you can just keep your admin interface less loaded with instruments.
Shopify Order Fulfillment FAQ
What does it mean to fulfill an order?
You must prepare and deliver the products in an order after your consumer places one. Order fulfillment is the term used to describe this process. Typically, the fulfillment process entails the following: selecting and placing things in a box or envelope, preparing the order’s label for shipping, etc. In Shopify, order fulfillment may involve several more steps.
Does Shopify fulfill orders?
From Shopify’s checkout settings page, you can configure automatic or manual fulfillment for orders and order archiving. Although you initiate the process of sending an order to the customer when you complete it, machine learning helps a lot in Shopify order fulfillment. It is used to keep your inventory close to clients to reduce shipping time and costs. Additionally, based on sales, days on hand, and seasonal trends, smart replenishment advises you which SKUs to resupply at which fulfillment location.
What happens when I click fulfill an order on Shopify?
The fulfillment status of the order is updated on the order screen. Tap Orders on the Shopify app. Select an order whose fulfillment status is Unfulfilled by tapping it. Items are shown in a single unfulfilled section if the order can be filled using the stock at a single location.
When should you mark an order as fulfilled on Shopify?
No matter the fulfillment setting, if you ship an order to a customer address, it will always be reported as unfulfilled. When you’re prepared to send an order to a customer, you must manually designate the order as fulfilled in the Shopify admin.
Can you fulfill Shopify orders on your phone?
Shopify’s application for mobile devices empowers you to manage orders as they come in, verify inventory accuracy whenever you want, and fulfill orders more quickly from the location where you select, pack, and get them ready for delivery.


