The shopping cart functionality of Magento 2 has been updated multiple times. Every new version introduced vital improvements for both customers and store administrators. In the following post, we shed light on new Magento 2 shopping cart features, discuss the updated functionality, and provide a tool designed to import and export Magento 2 shopping carts and all the related data within just a few clicks.
As a store administrator, you get the ability to manage shopping carts of customers who are now online – a new feature that is explained below. Besides, it is possible to access the persistent carts – a new term used to call abandoned carts – of shoppers who are not currently logged in to their accounts.
In both cases, you are able to add and remove products, transfer items from customer activities, and create orders. As for the respective import and export processes, they are available via third-party software. In this article, we use the Improved Import & Export Magento 2 extension to show how to transfer Magento 2 shopping carts.

Table of contents
Magento 2 Shopping Cart: Now Online
With the appearance of the Now Online option on the Customers menu lists, you can view customers and visitors who are attending your e-commerce website in real time. Use this functionality to help customers complete a purchase over the telephone.
As a Magento administrator, you can open the customer’s account as well as examine the contents of the shopping cart. Feel free to add items to the cart, apply coupons, and submit the order – we will describe each procedure in more detail below.
It is even possible to set the length of the online session, which determines how long the customer’s activity is visible from the admin section. The default length is fifteen minutes.
To see all online customers, go to the admin sidebar, tap Customers, and choose Online Now.
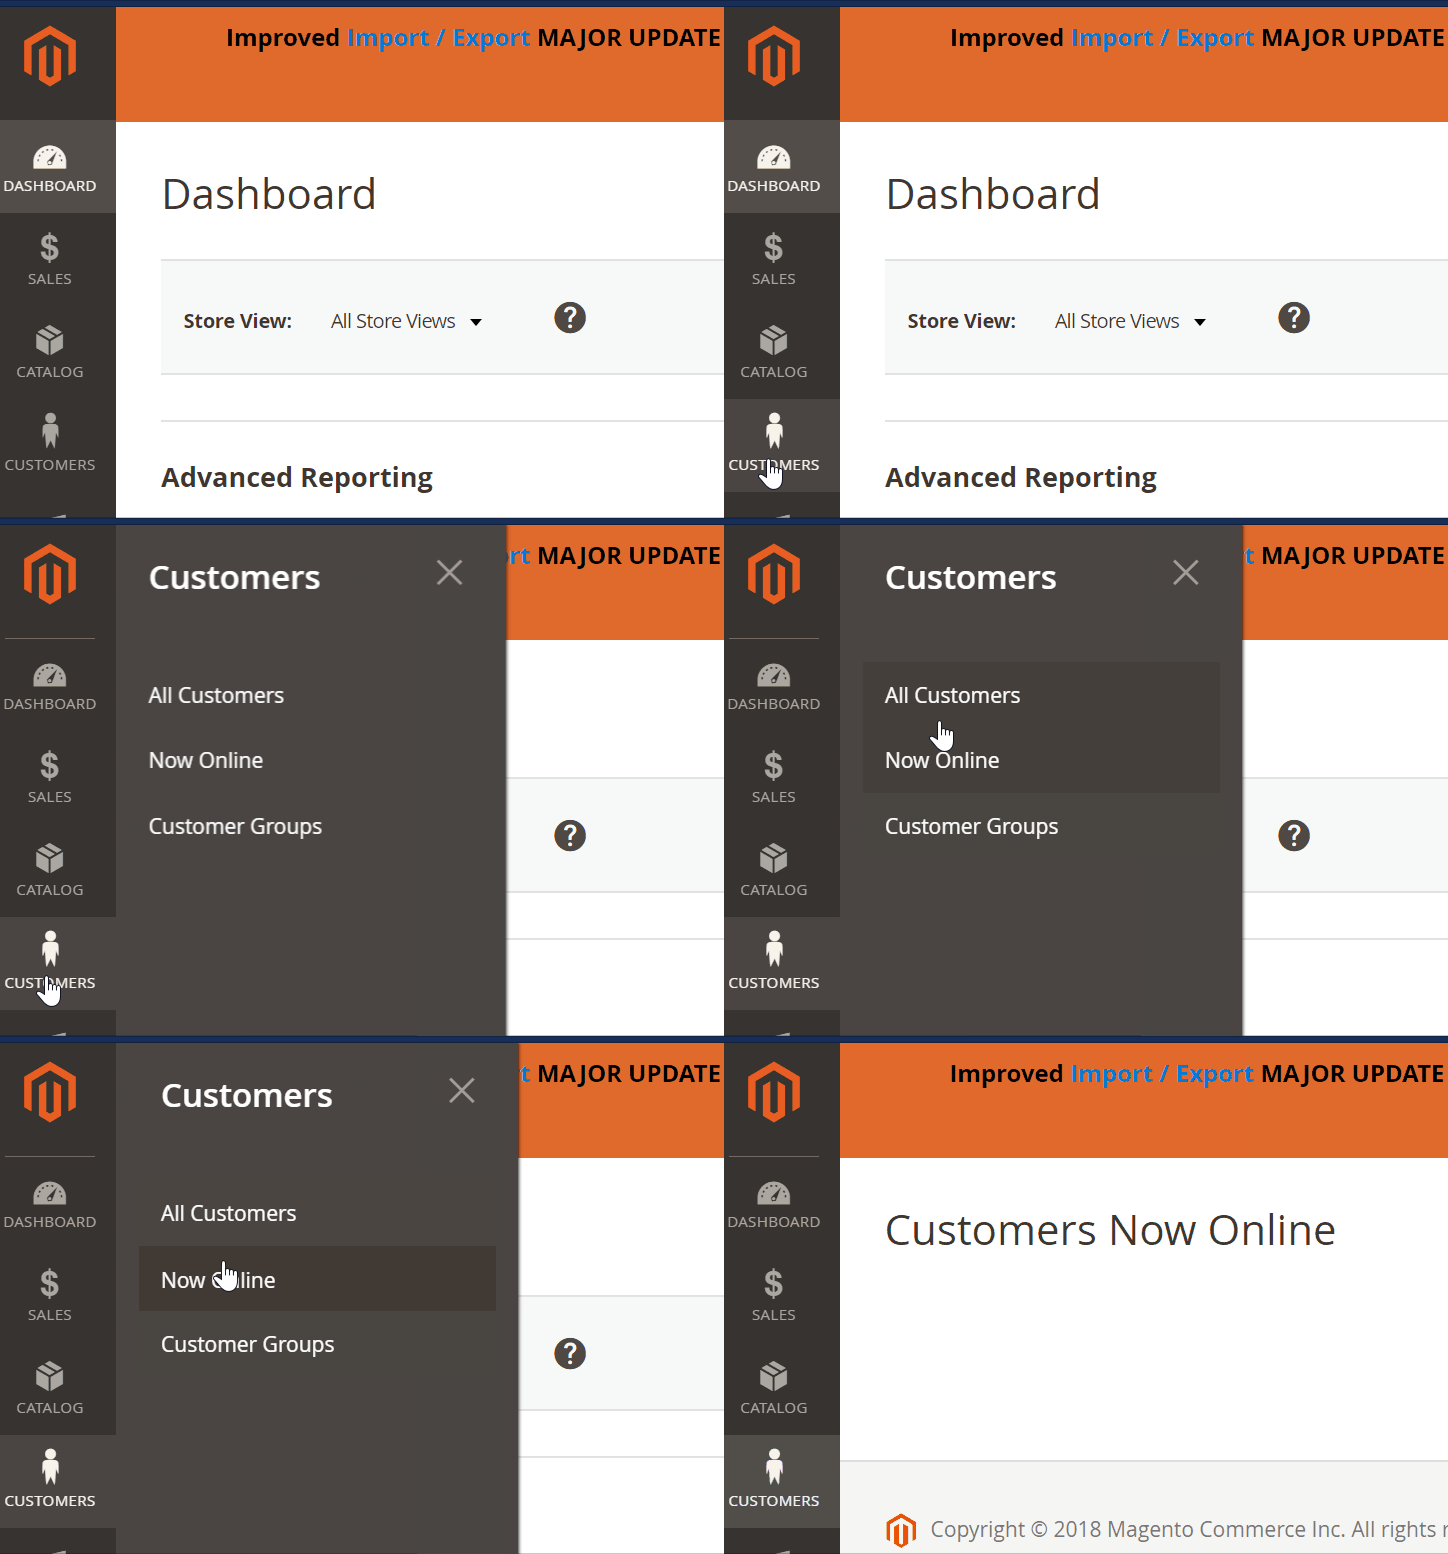
If you want to configure the online session length, proceed to Stores on the admin sidebar, and choose Online Now under settings. Next, select Customer Configuration in the panel on the left under Customers. Now, you have to expand the Online Customers Options section to enter the number of minutes before an online expires in the Online Minutes Interval field. If you want to use the default value – fifteen minutes – leave the field empty. Don’t forget to save the new configuration to enable the changes.
For more information, follow this link: Online Customers (Now Online).
Magento 2 Shopping Cart: Persistent Cart
If your store visitors leave items in the cart without purchasing them, a persistent shopping cart keeps track of them. Furthermore, the information is saved for the customer’s next visit. Thus, “remembered” customers can quickly restore the contents of their shopping carts the next time they are on your website.
As a result, you decrease the cart abandonment rate and increase sales. For achieving better results, we recommend you to install a corresponding third-party extension. The best solutions are gathered here: Magento 2 Cart Abandonment. But let’s return to our mutton.
Note that persistent shopping carts do not expose sensitive account information. When such cart is utilized, both registered customers and guests are required to log or create a new account. It is necessary for proceeding to the checkout and completing shopping.
As for guest shoppers, the situation is similar but at the same time a little bit more complicated. A persistent shopping cart is the only way to retrieve information from their previous session. Don’t forget that a condition necessary to enable the persistent shopping cart functionality is cookies: the customer’s browser must be set to allow them.
Magento 2 persistent shopping carts use two types of cookies:
- Session Cookie. A short-term session cookie is necessary to store data used for the duration of a single visit. Usually, it expires when the customer leaves, unless a specific period is specified.
- Persistent Cookie. This cookie type is used to store data after the end of the session. It helps to save data regarding the customers’ shopping cart content for future visits. Thus, the persistent cart functionality is enabled for both guests and registered shoppers.
For further information about Magento 2 persistent shopping carts, read this article: Persistent Cart.
Magento 2 Shopping Carts Management
Below, we discuss various nuances of shopping carts management in Magento 2. If you don’t know how to open a cart, add/remove products, apply coupons, and do other useful things from the Magento 2 admin, check the following tutorials.
Open Shopping Cart
To open a shopping cart of a customer, go to the Admin sidebar and choose Customers.
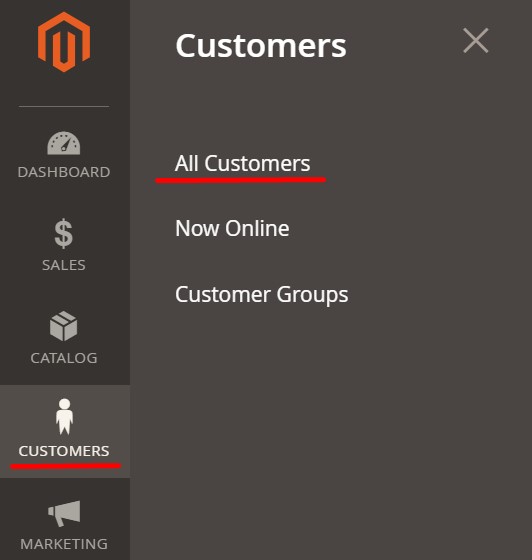
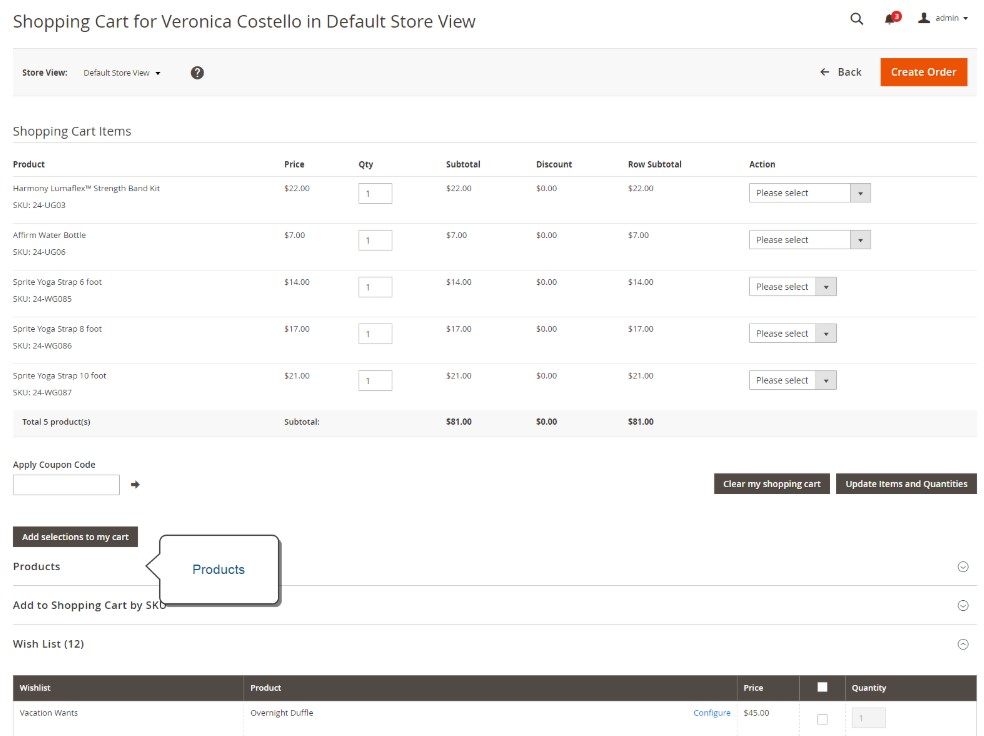
Next, select All Customers and find a specific account in the grid. Click Edit. To display the contents of the customer’s cart, you have to use the Manage Shopping Cart option. You will see the following result:
Add Products to Shopping Cart
Magento 2 offers several options when it comes to the necessity to add a product to the shopping cart from the admin section. First of all, you can add products from the catalog. Expand the Products section. Use filters and search to find the necessary products.
When all items are displayed, mark them with the help of the checkbox. In the case of a configurable product, you also have to choose the product options.
Next, it is necessary to enter the number of items for each product that’s going to be purchased. When all products are selected, and their quantity is specified, tap “Add selections to my cart.” Close the Product section.

Alternatively, it is possible to add products by SKU. Firstly, you should expand the “Add to Shopping Cart by SKU” section to view the available option. For each product, enter the SKU number and quantity. Tap “Add another” to add more products.
At the same time, you can import a list of SKUs. You need a CSV file with two columns: SKU and Qty. Specify SKUs and quantity of products that should be added to the cart. Next, select the “Choose File” option and find the file to upload. After the process is complete, apply the “Add selections to my cart” option.

The third possible way of adding products to the shopping cart from the Magento 2 admin lets you leverage current activities. Start with expanding the section with items to add. If necessary, use filters to find the required products. When all items are displayed, mark them with the help of the checkbox. In the case of a configurable product, you also have to choose the product options.
Next, it is necessary to enter the number of items for each product that’s going to be purchased. When all products are selected, and their quantity is specified, tap “Add selections to my cart.”
Apply Coupon Code From Admin
And you can freely apply coupon codes to the whole content of the shopping cart from the Magento 2 admin. Simply enter a coupon code in the “Apply Coupon Code” field and tap the arrow to apply the discount.

Remove Item From Shopping Cart
This procedure is extremely straightforward. You only have to choose the “Remove” command in the Action column of the item. Next, tap “Update Items and Quantities” to apply changes.
To remove all items, click “Clear my shopping cart” and tap “OK” when prompted to confirm.
Move Item to Wish List
The principle behind this command is already familiar: you should select a specific option in the
Action column. Under Move to Wish List, you have to choose the name of a wish list you want to move an item to. Don’t forget to tap “Update Items and Quantities.”
Create Order
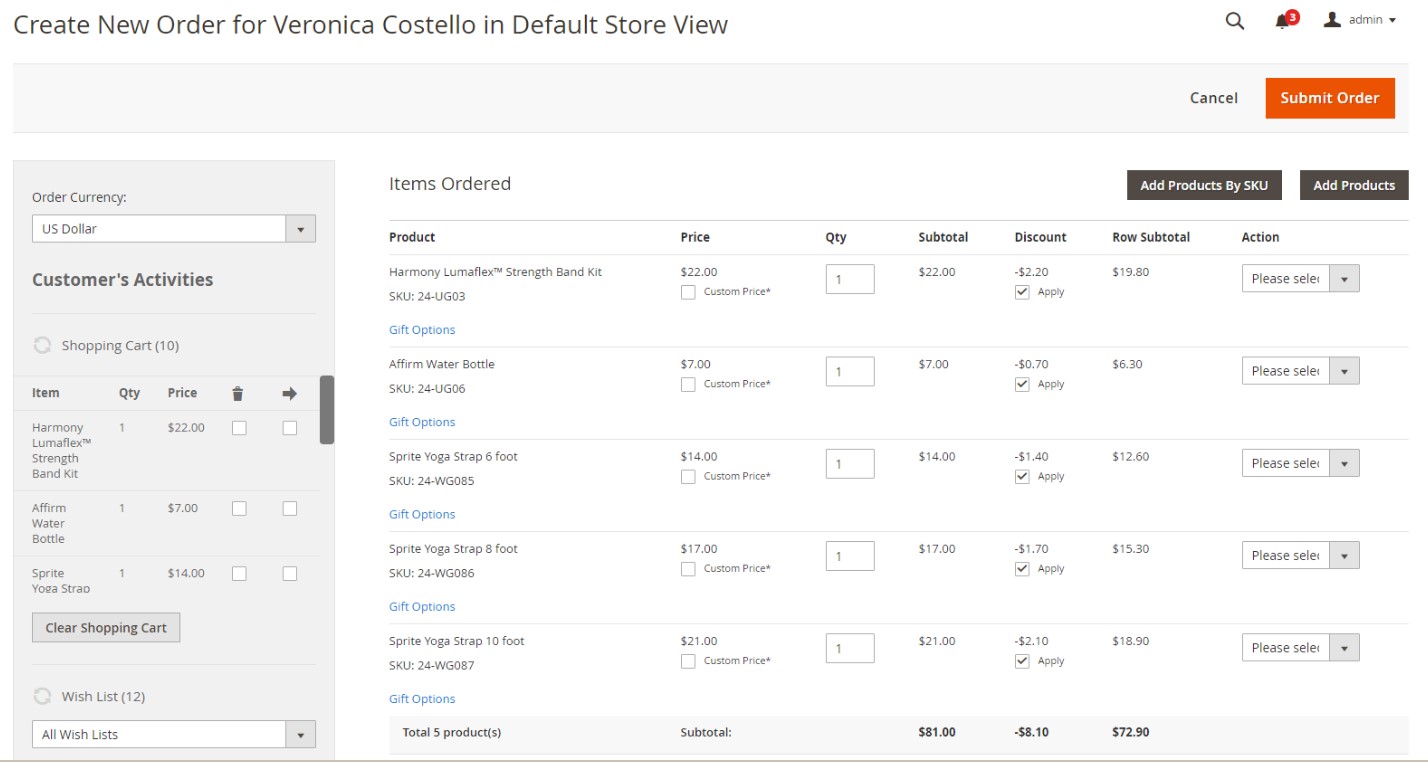
After reviewing each item in the shopping cart and making any changes, you can apply the “Create Order” option situated in the upper-right corner. Next, follow the standard process of order creation.
For further information, follow this link: Managing a Shopping Cart.
How to Import And Export Magento 2 Shopping Carts

Unfortunately, Magento 2 doesn’t let you import or export shopping carts with all the related data. But you can easily solve the problem by installing a third-party module. So what tool do we recommend?
Since it has always been difficult to find a reliable import/export extension in the whole Magento ecosystem – multiple tools are limited to import or export processes correspondingly, some of them transfer only several entities, others lack such features as automation or mapping – we’ve decided to develop our own solution.
Meet the Improved Import & Export Magento 2 extension – your number one time saver when it comes to data transfers between your store and external systems. With our module, you can easily transfer most Magento 2 entities including shopping carts.
To import Magento 2 shopping carts, follow these steps:
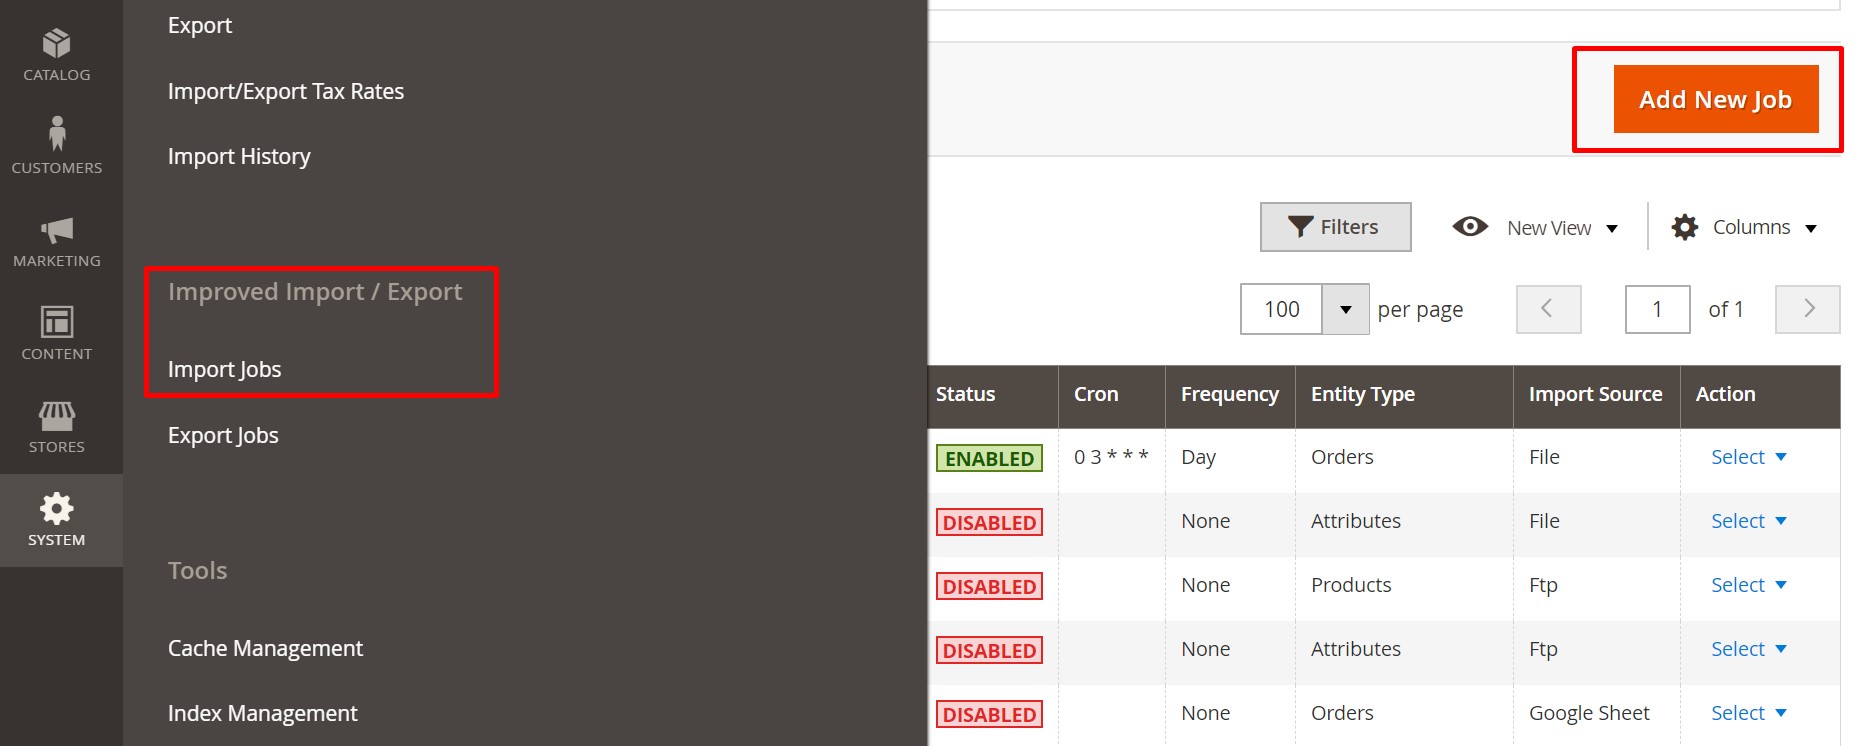
- Go to System -> Improved Import / Export -> Import Jobs and hit the Add New Job button.
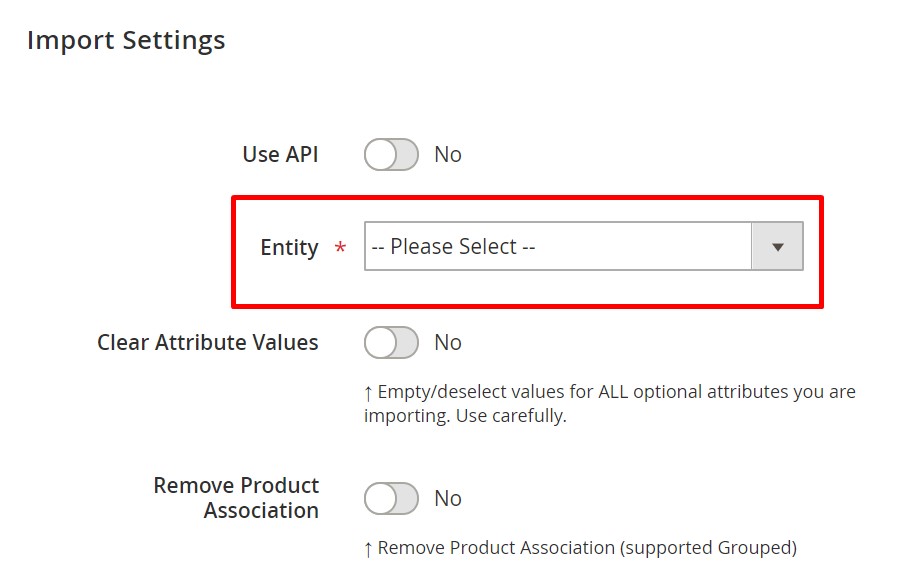
- Configure General Settings and proceed to the Import Settings section. Here, you can select shopping carts in the Entity drop-down.
- When the job is configured, save it and run the update.
As for the Magento 2 shopping carts export, the process is entirely the same. You can configure it under System -> Improved Import / Export -> Export Jobs.
Get Improved Import & Export Magento 2 Extension
Improved Import & Export Magento 2 Extension Features
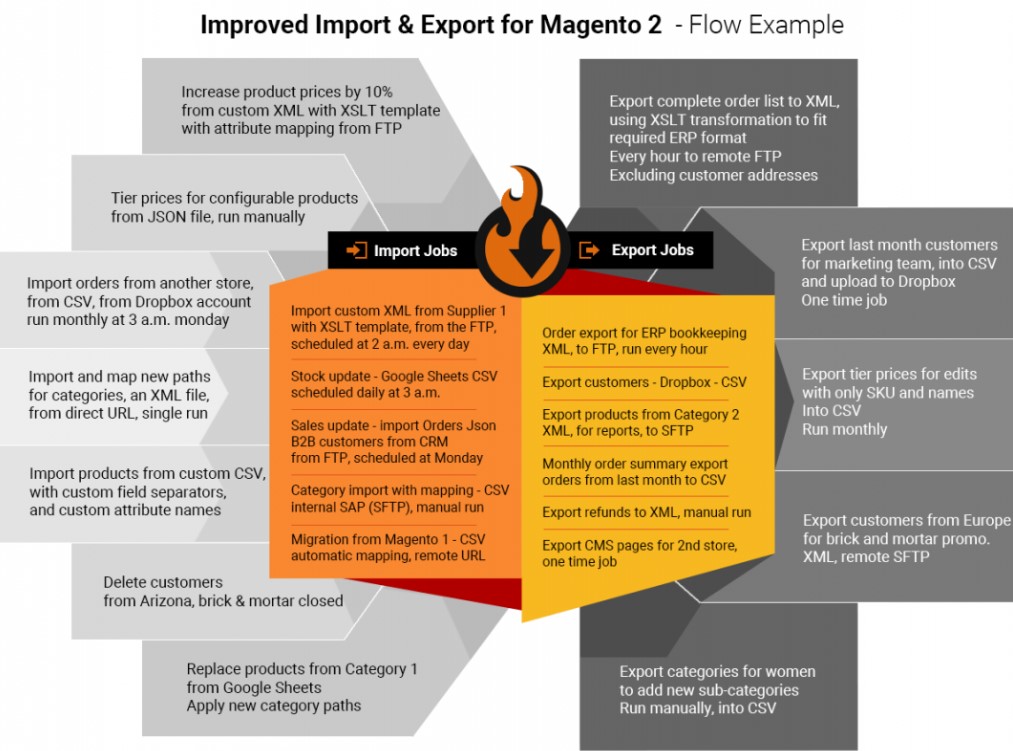
So, what are other features that enhance your daily import/export routine? Since we’ve been working within the Magento ecosystem for years implementing different projects and developing our own tools, we’ve provided the Improved Import & Export Magento 2 module with lots of benefits and advantages that enhance the default functionality of the platform.
Our extension has already become a number one time saver for hundreds of merchants all over the world, so if you face integrations, data transfers, and synchronizations with external systems, give it a try – you will definitely enjoy the revamped experience.
Below, we shed light on the core features of Improved Import & Export that dramatically improve your daily duties. Let’s start with the automation of data transfers.
Automated Import & Export Processes
With the Improved Import & Export extension, you get two ways of the data transfers automation. Firstly, it is possible to create update schedules. Secondly, you can specify event-based triggers to launch the import and export processes automatically.
Schedules
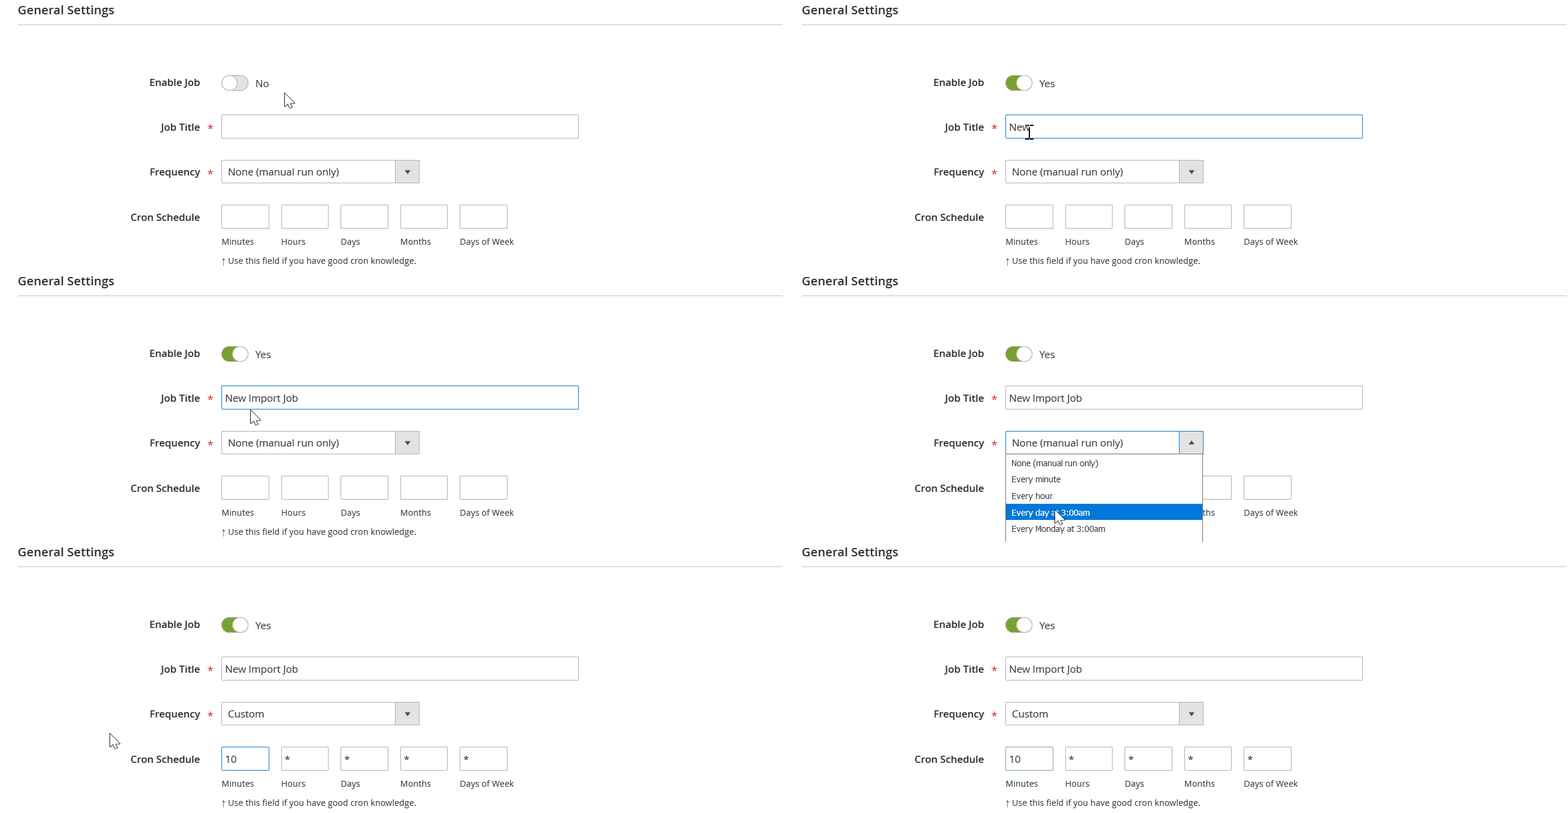
The Improved Import & Export Magento 2 extension incorporates cron to enable the magic of scheduled updates. You can easily create own custom update schedules applying the default cron syntax. At the same time, the module provides a list of predefined intervals. Select one that suits your needs. Note that every range can be customized if necessary.
Profiles that have no schedules are another vital aspect of scheduling. Chances are, certain integrations are quite random or asynchronous. Thus, you should run related data transfers manually. With the Improved Import & Export Magento 2 extension, it is not a problem at all. You can even launch every scheduled profile asynchronously whenever you want.
You can configure a schedule in the following way:
Events
Besides, our extension offers events – an alternative method of running import and export processes in a fully automated manner. Thus, the Improved Import & Export extension offers improvements necessary to enable real-time updates and data transfers. You only need to specify a proper trigger. For instance, an event when a customer places an order can be assigned to this role enabling an instant import or export procedure.
Note that the Improved Import & Export extension supports not only system events but also custom ones. After a trigger is defined, create conditions to make its work more efficient. To find more information about this feature, read this article: How to Run Magento 2 Import or Export After Specific System Event or Process.
Advanced Mapping Features
It’s not a secret that data is stored differently in every system preventing direct transfers. Even Magento 2.x and 1.x are separated by a gulf of different attribute standards. Consequently, a seamless connection between them is hard to achieve unless you use the Improved Import & Export Magento 2 extension. Below, we shed light on how our module solves the problem.
Mapping Presets
Our extension lets you solve the problem of different attribute standards within a few clicks. Since it offers multiple mapping presets, you can match external designations to the corresponding internal ones in a matter of seconds.
Select and apply a preset related to your integration and the module will do all the dirty work. It will analyze the input data matching all third-party attributes to the corresponding ones used within your Magento 2 store.
As for the default attribute editing, you have to transfer data via files and edit their content manually on every update. The more attributes they include – the more work should be done. With the Improved Import & Export Magento 2 module, you select a preset only once, and it is applied for all further update automatically. Check the following image to see how fast the process is:
Matching Interface
In case a preset for your particular integration is absent, you can map attributes manually using a user-friendly interface. Select a third-party designation and specify the corresponding internal one in front of it. Repeat this action for every external attribute. The procedure is straightforward:
As you might have already noticed, the grid above includes the third column called “Default Value.” It represents an opportunity to set hardcoded values for all items bound to the attribute. For instance, you may import products from different store views but direct all of them to a single one instead.
Attribute Values Mapping
Feel free to map attribute values in the same way as attributes. The Improved Import & Export Magento 2 extension allows you to reduce headaches related to external values. Although they usually don’t prevent import processes, there are always several exceptions. And attribute values require lots of time and effort for editing after the update is made.
The solution provided by the Improved Import & Export Magento 2 module is not as fast as selecting and applying a preset, but much quicker than doing everything in other ways. You only need to choose a third-party designation and specify the internal one in front of it. For further information, follow this link: Attribute Values Mapping.
Attribute Values Editing
In addition to matching, you can edit attribute values in bulk. The Improved Import & Export Magento 2 extension offers the following rules:
- Add a prefix to attribute values in bulk;
- Add a suffix to attribute values in bulk;
- Split multiple attribute values;
- Merge multiple attribute values.
Our extension lets you combine these rules and create conditions to increase their efficiency. For further information, follow this link: How to Modify Attribute Values During Import and Export in Magento 2.
Category Mapping
And if you move products from external systems frequently, the following feature will be helpful. To prevent all inconveniences caused external catalogs – the update may contain categories unrelated to yours, which are added to your frontend after the import is complete – the Improved Import & Export Magento 2 extension lets you match them to the ones used internally. The following gif image displays the process:
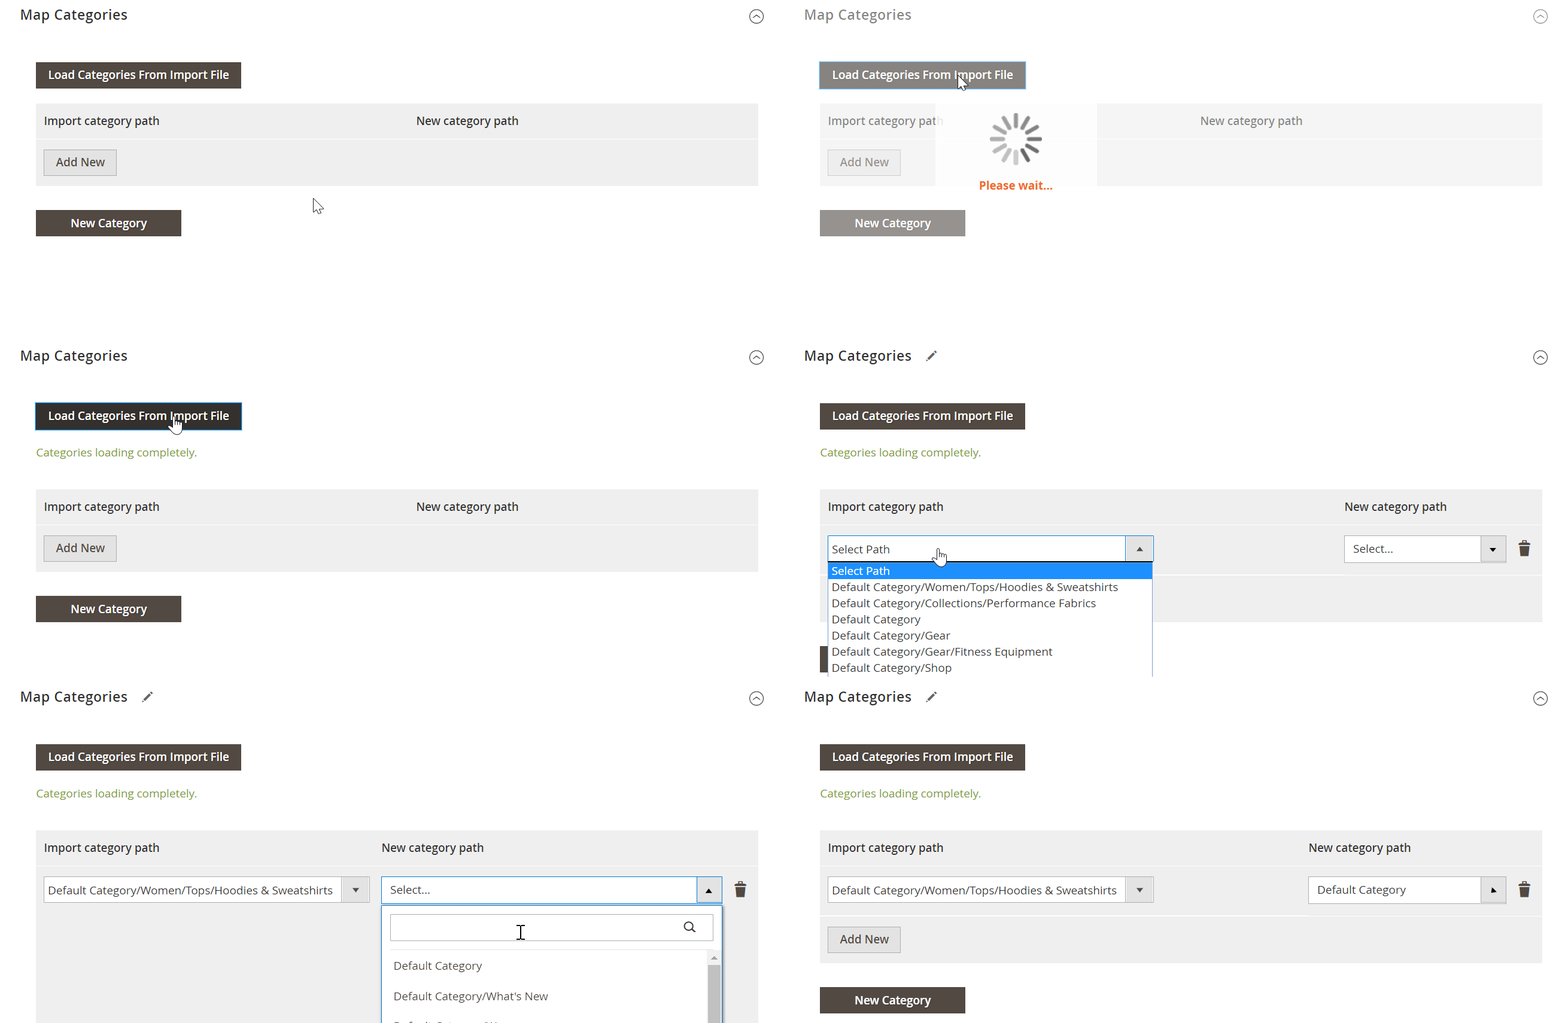
If necessary, you can even create new categories on the fly: select a parent category and specifying the name of a new one. That’s it! Both features are described here: Category Mapping.
Attributes On The Fly
In case an import file lacks attributes, you can create them on the fly. The Improved Import & Export Magento 2 extension enables you to specify all the necessary parameters necessary for the attribute generation via the following general form:
Attribute|attribute_property_name:attribute_property_value|…
The full process is described in more detail here: Product attributes import.
Extended Connectivity Options
While the standard data synchronization between Magento 2 and other platforms is based on data files, the Improved Import & Export extension offers several more ways of creating a bridge between the two systems. Furthermore, it multiplies opportunities related to data file transfers in comparison not only to the default Magento 2 tools but other third-party import and export solutions. Let’s describe the standard procedure first and highlight how our module improves it.
Multiple File Standards
While Magento is bound to CSV files only, the Improved Import & Export Magento 2 extension essentially increases the number of supported formats. With our tool, you can freely transfer XML, JSON, ODS, and Excel files. Import and export them applying all the extension’s features.
Multiple File Sources
To increase the flexibility of file transfers, the Improved Import & Export Magento 2 extension offers several connection options:
- FTP/SFTP. Use a local or remote server as a place of transfers.
- Dropbox. The same functionality is possible with a Dropbox account.
- URL. In the case of import procedures, a direct file URL is enough.
It is also worth mentioning that the Improved Import & Export Magento 2 extension extracts compressed data automatically. Thus, you no longer need to do that manually before every update.

Alternative Ways of Import & Export
If you don’t want to use files to transfer data between your store and external systems, the Improved Import & Export module offers several replacements. First of all, our extension lets you establish a direct API connection between your website and other external systems. Use one of the following standards to synchronize your e-commerce store with any third-party platforms: REST, SOAP, and GraphQL.
Besides, it is possible to utilize different online sheets for the same purpose. Use Google Sheets, Office 365 Excel, or Zoho Sheet to exchange data between the two platforms. The integration on the basis of Google Sheets looks as follows:
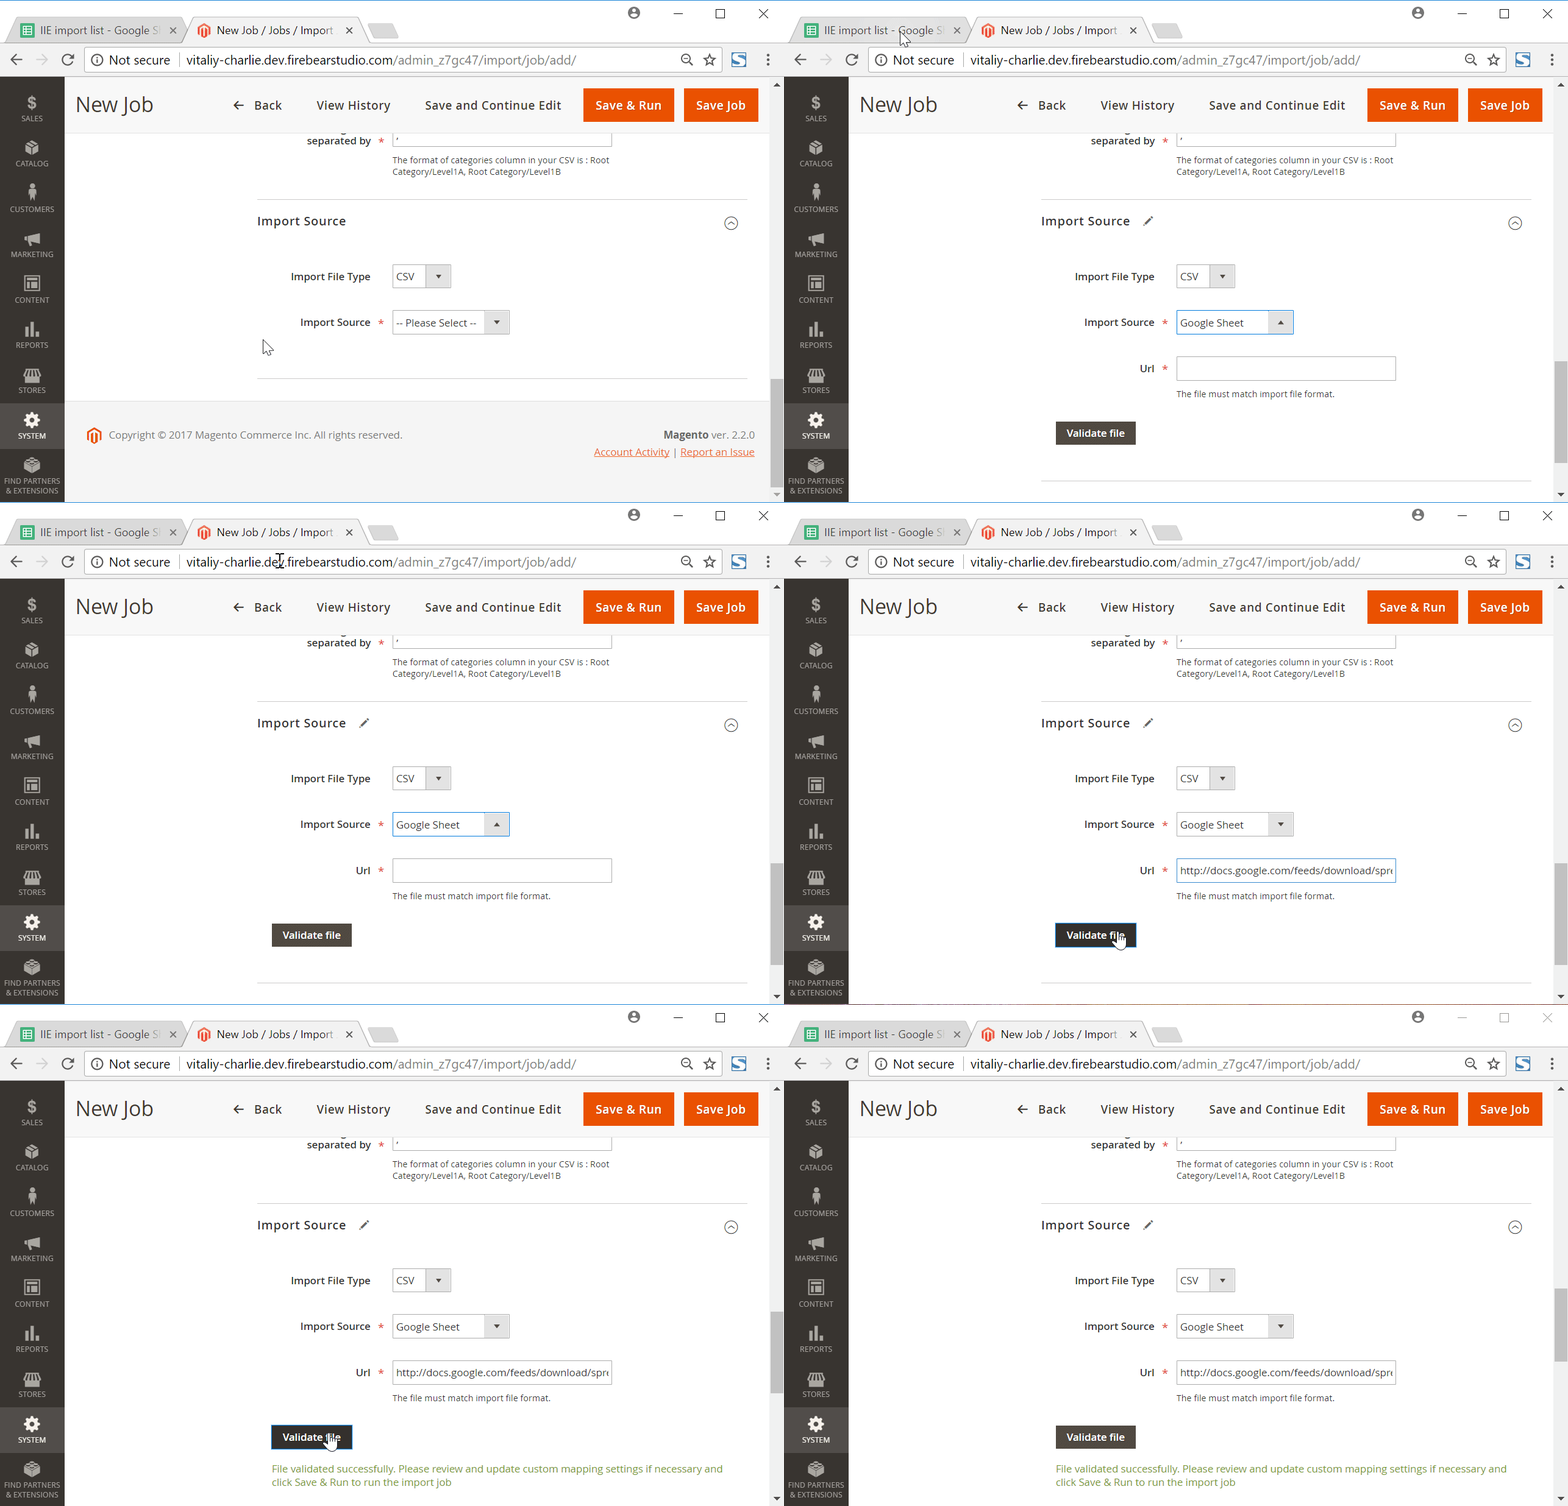
Watch the following video to see the extension in action:
[embedded content]
Final Words
As you can see, Magento 2 provides admins with much more extended opportunities when it comes to shopping cart management. You can fully control this store element from the backend. Unfortunately, it is impossible to import/export the corresponding data. But the problem is easily solved with the Improved Import & Export Magento 2 extension. For further information about the module, its shopping cart-oriented features, and other opportunities, follow the link below and contact our support:
Get Improved Import & Export Magento 2 Extension
Magento 2 Shopping Cart Import & Export FAQ
Let’s take a look at other nuances of importing and exporting shopping carts in Magento 2 with the help of the Improved Import & Export Magento 2 extension.
How to import and export shopping carts to Magento 2 automatically?
If you need to move shopping carts between Magento 2 and third-parties or other Magento 2 websites on a regular basis, you can use the Improved Import & Export extension. The module incorporates a cron scheduler to automate all data transfers including those associated with shopping carts. As a store administrator, you get the ability to import and export shopping carts between Magento 2 and external destinations automatically. Just specify a schedule of updates and the module will do everything for you.
How to import shopping carts with third-party attributes to Magento 2?
Magento 2 blocks the import of third-party data that doesn’t follow its requirements and shopping carts are not an exception. However, you can still transfer third-party data with the help of the Improved Import & Export extension. Create a mapping scheme where you match third-party attributes and values to ones used within the system. As a result, your shopping cart data can be easily adapted to the native standards of your e-commerce website. Note that you can also apply mapping to export processes to generate the output your partners require.
How to import and export shopping carts to Magento 2 via API?
The Improved Import & Export Magento 2 extension provides the ability to create API connections for transferring shopping carts along with other entities between your Magento 2 website and any external system, including ERP or CRM. There is a dedicated section in the module’s import/export jobs where you specify the parameters necessary to sync the two objects.
How to import and export shopping carts to Magento 2 via ODS files?
Improved Import & Export lets you import and export shopping carts via ODS files. You no longer need to convert such files to CSV to fit the Magento 2 requirements.
How to import and export shopping carts to Magento 2 via XLSX files?
In addition to ODS, Improved Import & Export lets you import and export shopping carts via XLSX files. You no longer need to convert them to CSV to fit the Magento 2 requirements.
How to import and export shopping carts to Magento 2 via JSON files?
Also, Improved Import & Export lets you import and export shopping carts via XLSX files. You no longer need to convert them to CSV to fit the Magento 2 requirements.
How to import data to Magento 2 via compressed files?
If your files with shopping carts are compressed, you can transfer them to Magento 2 with the help of the Improved Import & Export extension. Remember that your file archive should be in a ZIP or TAR format that contains CSV, XML, ODS, JSON, or XLSX files.
How to import data to Magento 2 from Google Sheets?
If your shopping cart data is stored in Google Sheets, it is no longer a problem. The Improved Import & Export extension lets you move the corresponding information straight from Google Sheets to your e-commerce website. Specify the address of the corresponding data table and let the extension do everything for you. Besides, you can export shopping carts from Magento 2 to Google Sheets.
How to import and export shopping carts between Magento 2 and Dropbox?
The Improved Import & Export module lets you transfer shopping carts between Magento 2 and Dropbox using CSV, JSON, XML, ODS, or XLSX files. They can be compressed as ZIP or TAR archives.
How to import and export shopping carts between Magento 2 and Google Drive?
In addition to Google Sheets and Dropbox, the Improved Import & Export extension provides the ability to import and export shopping carts between Magento 2 and Google Drive. Use CSV, JSON, XML, ODS, or XLSX files. ZIP and TAR archives are supported.


