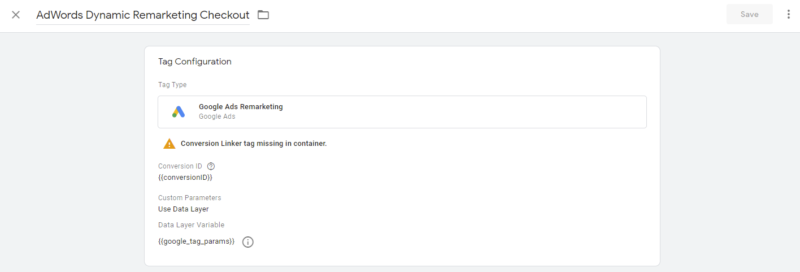
Implementing Magento 2 Adwords Dynamic Remarketing will help you display custom-tailored ads to your customers of the products that they have viewed previously. In order for this to work, it will need some data that we will send through GTM so wherever a customer visits a specific page the relevant information will be collected. We will also set up Magento 2 Google Dynamic Remarketing via GTM. It will help you capture the customers’ interactions with your ads and help you improve them which will ultimately bring in more conversions.
If you do not prefer to complete the setup manually you can check our Magento 2 GTM Pro (contains Google Dynamic Remarketing via GTM and several other trackings). It supports both standard business types (for eg:- hotels, rentals, flights, jobs, education, real estate, and more) and custom feed templates. It gives you better control over feed contents. You can simply choose it from the configuration. In this tutorial, we will cover standard business-type data layers. Look at the example below:-
{ event: "fireRemarketingTag_home", gtm: {uniqueEventId: 89}, google_tag_params: { ecomm_pagetype: "home", ecomm_prodid: "", ecomm_totalvalue: 0 }
}
Whereas you custom feed templates data layer looks something like this:-
{ event: "fireRemarketingTag_home", gtm: {uniqueEventId: 89}, google_tag_params: { ecomm_pagetype: "home", ecomm_prodid: "";, ecomm_totalvalue: 0 }
}
List of Measurements in Magento 2 Google Dynamic Remarketing
We will configure and track the following measurements under Magento 2 Google Dynamic Remarketing via GTM:-
- Dynamic Remarketing Home
- Dynamic Remarketing Category
- Dynamic Remarketing Product
- Dynamic Remarketing Cart
- Dynamic Remarketing Checkout
- Dynamic Remarketing Purchase
Configuring Magento 2 Google Dynamic Remarketing Via GTM
In the section below we will create tags, triggers, and variables for each of the pages and also provide you the data layer samples to be implemented on each of the pages. Make sure to implement the data layer on your store before continuing with the GTM step up. For all of the tags that we will use some variables. Let us create these variables first:-
1.conversionID:- Please follow the steps given below to create this variable:-
Step 1:- Go to your GTM container and from the left navigation choose Variables. Click on New to create a new variable.
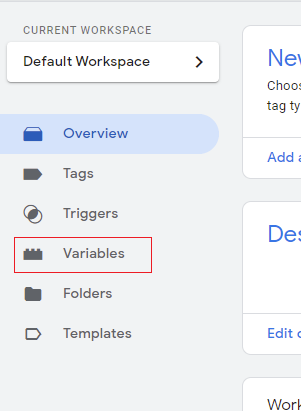
Step 2:- Enter the Variable Name as “conversionID” and click on Variable Configuration.
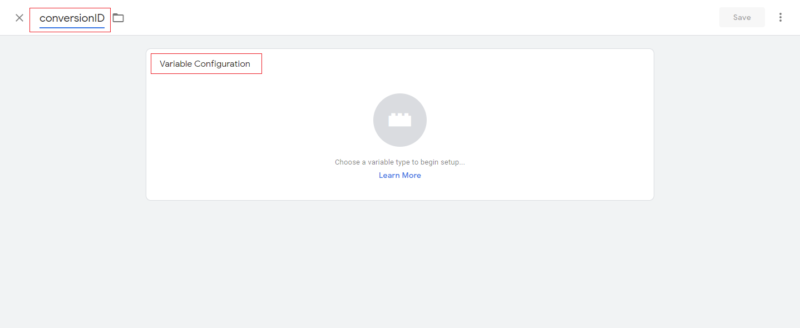
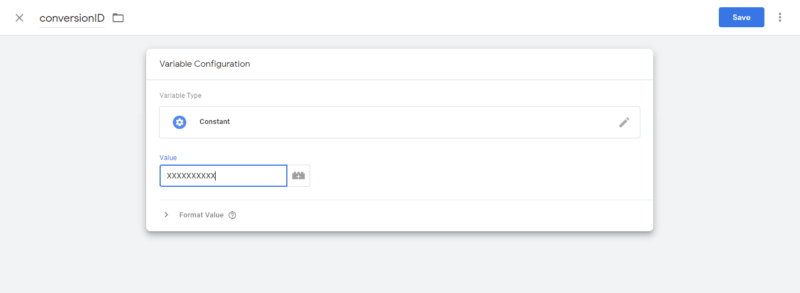
Step 3:- From the Variable Type popup menu select “Constant”. Enter your Conversion ID in Value and click save to save the variable.
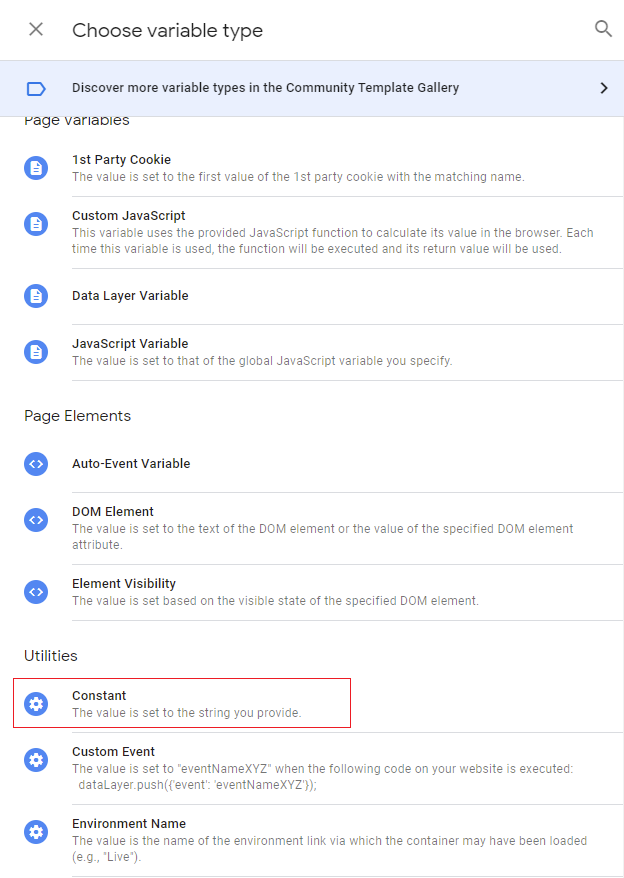
After successfully creating the variable it will look something like this:-
2.Google_tag_params:- This is a data layer variable please follow the steps below to create this variable:-
Step 1:- Create a New Variable as we did previously. Enter the variable name as “google_tag_params” then click on Variable Configuration.
Step 2:- From the Variable Type popup menu select “Data Layer”.
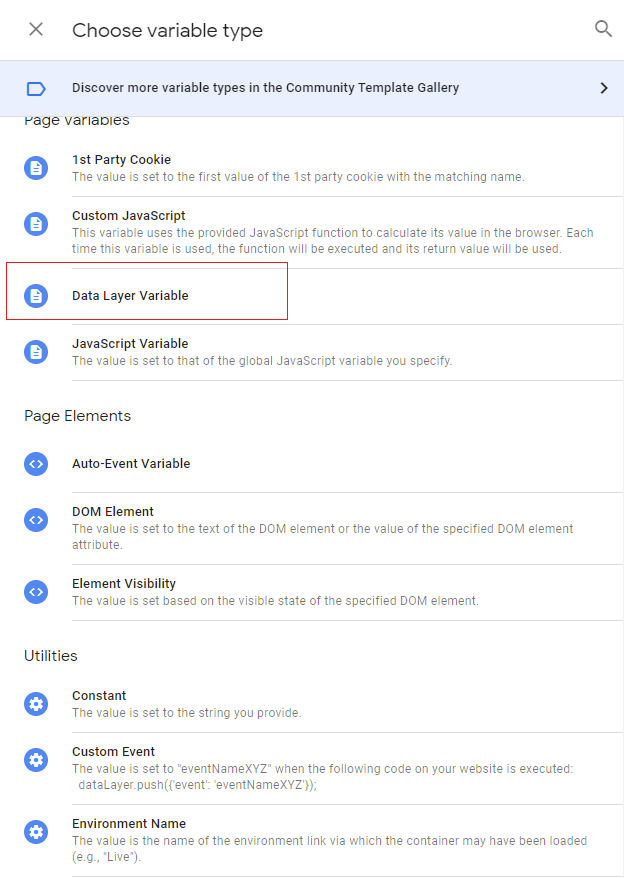
Step 3:- In the Data Layer Variable Name enter “google_tag_params”. Click on Save to save this variable.

Adwords Dynamic Remarketing on Home Page
We will list the entire setup step by step for you. For the upcoming tags follow the same instructions below with the data provided in each section.
Data Layer:- Implement the data layer given below on your website’s home page.
{ event: "fireRemarketingTag_home", gtm: {uniqueEventId: 89}, google_tag_params: { ecomm_pagetype: "home", ecomm_prodid: "", ecomm_totalvalue: 0 }
}
Setting up the Trigger
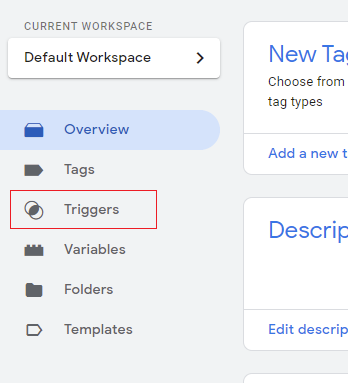
Step 1:- Go to your GTM container and from the left navigation menu select Triggers.
Step 2:- Click on New on the top right corner to create a new trigger.
Step 3:- Enter the Tag Name as “Remarketing Tag Home” then click on Tag Configuration.

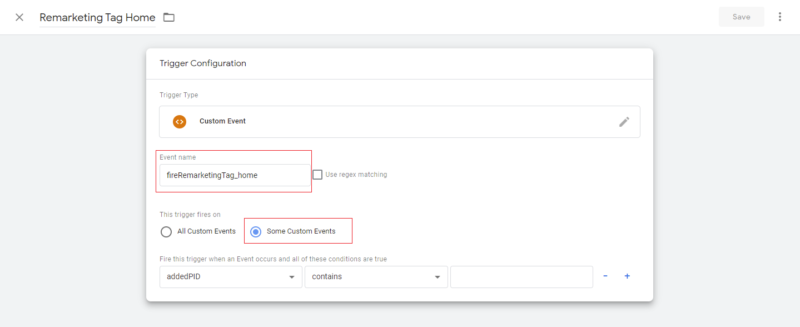
Step 4:- From the popup menu select Custom Event then enter the Event Name as “fireRemarketingTag_home”. Select Some Custom Events in “This trigger fires on”.
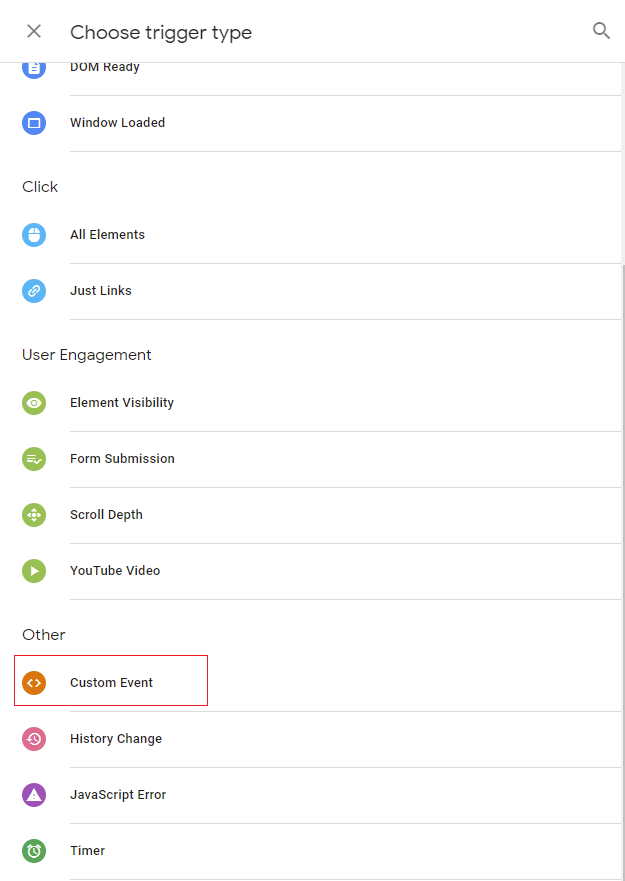
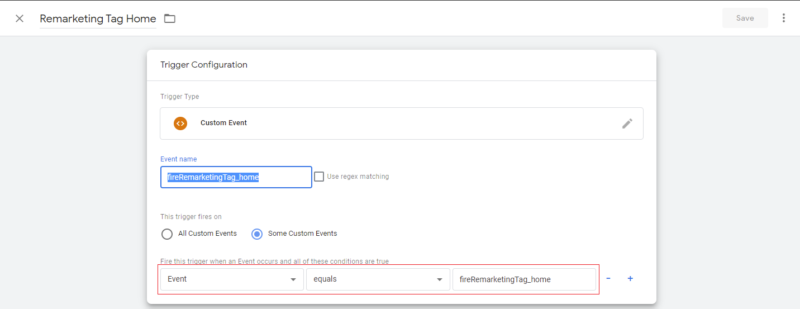
Step 5:- Now enter Event Equals fireRemarketingTag_home as shown in the image below:-
Step 6:- Lastly click Save to save the newly created trigger.
Setting up the Tag:-
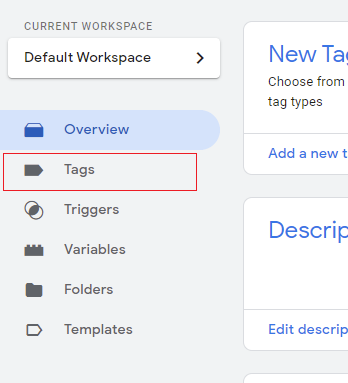
Step 1:- Go to your GTM container and from the left navigation choose Tags. Click New to create a new tag.
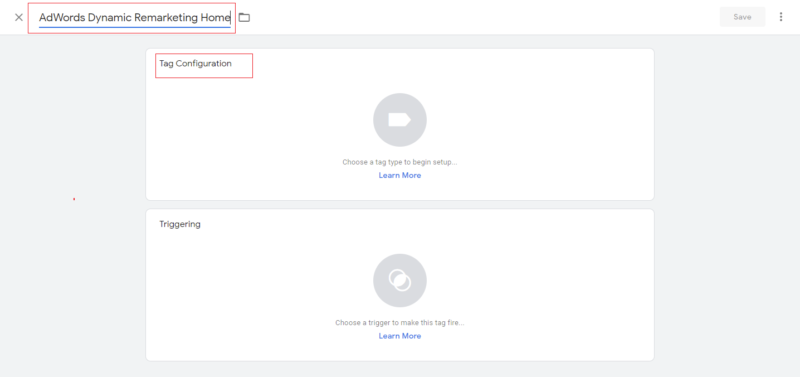
Step 2:- Enter the Tag name as “AdWords Dynamic Remarketing Home”. Click on Tag configuration.
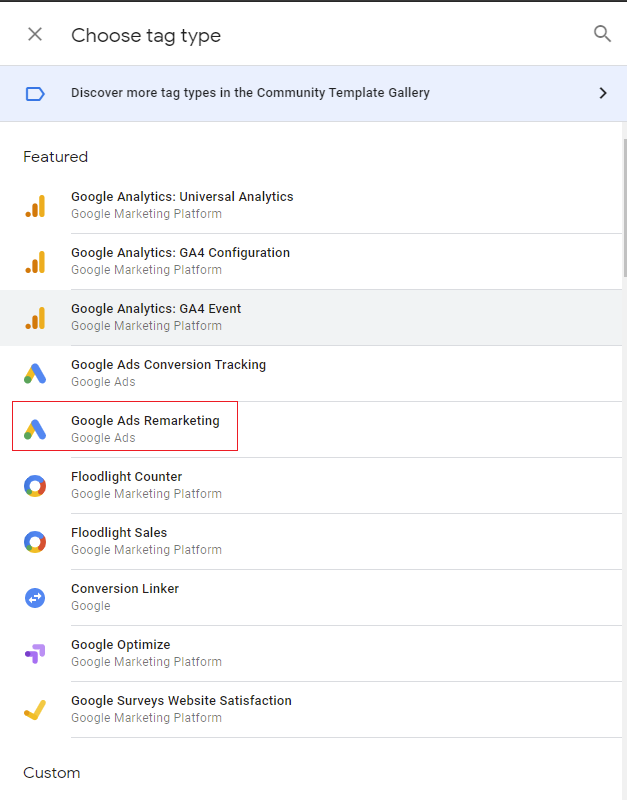
Step 3:- From the popup menu choose “Google Ads Remarketing”.
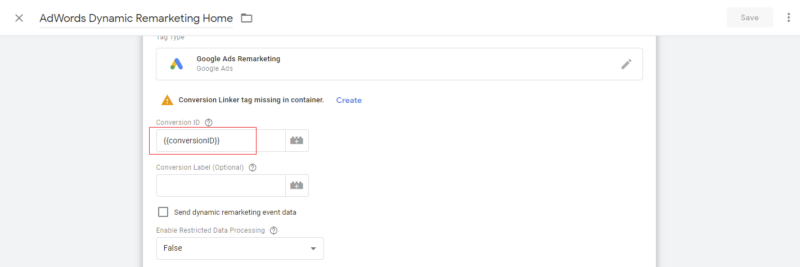
Step 4:- In the Conversion ID enter the variable containing the ID i.e {{ConversionID}} that we created in the previous steps.
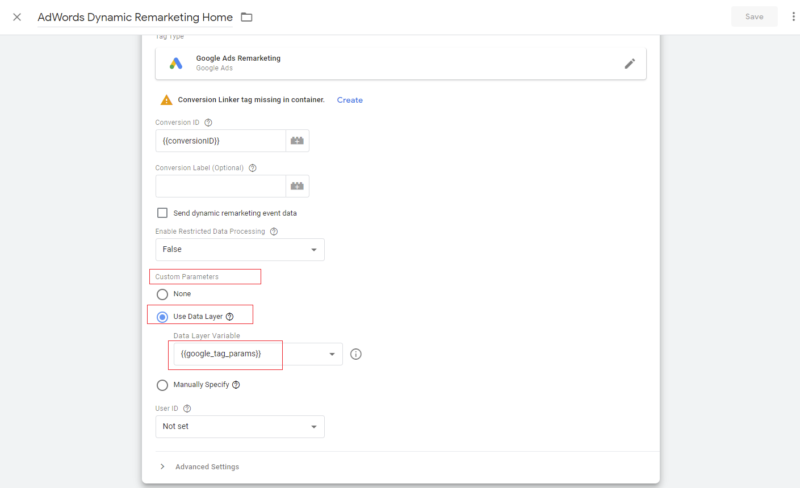
Step 5:- Select “Use Data Layer” in Custom Parameters and select {{google_tag_params}} in the Data Layer Variable dropdown.
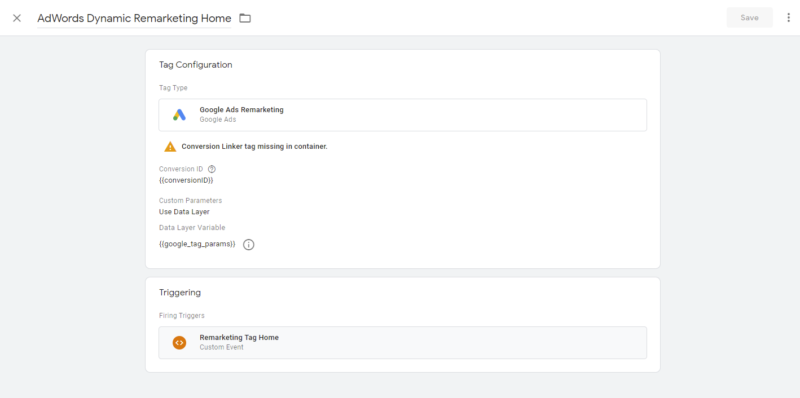
Step 6:- Click on Trigger and select “Remarketing Tag Home” that we created in the previous step.
Step 7:- Lastly click Save and your tag should look similar to the image below:-
Adwords Dynamic Remarketing on Category Page
Data Layer:- Implement the data layer given below on your store’s category pages.
{ event: "fireRemarketingTag_category", gtm: {uniqueEventId: 89}, google_tag_params: { ecomm_pagetype: "category", ecomm_prodid: [ "MSH12", "MSH11", "MSH10", "MSH09", "MSH08", "MSH07", "MSH06", "MSH05", "MSH04" ], ecomm_totalvalue: 319.800009 }
}
Setting up the Trigger
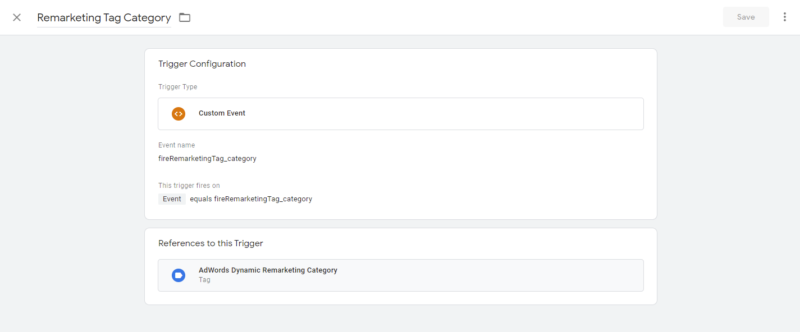
Please follow the steps above and create a new trigger with the information given below:-
Trigger Name:- Remarketing Tag Category
Trigger Type:- Custom Event
Event Name:- fireRemarketingTag_category
This trigger fires on:- Select Some Custom events then enter Event Equals fireRemarketingTag_category
Once the trigger is created successfully it should look similar to the image below:-
Setting up the Tag
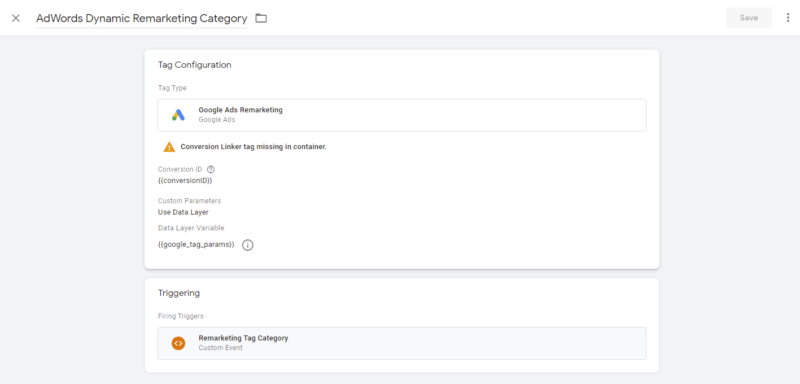
Please follow the steps above and create a new tag with the information given below as we did in previous steps:-
Tag Name:- AdWords Dynamic Remarketing Category
Tag Type:- Google Ads Remarketing
Conversion ID:- {{conversionID}}
Custom Parameter:- select Use Data Layer then from the Data Layer Variable Name dropdown select google_tag_params.
After successfully creating the tag it will look similar to the image below:-
Adwords Dynamic Remarketing on Product Page
Data Layer:- Implement the data layer given below on your store’s product pages.
{ event: "fireRemarketingTag_product", gtm: {uniqueEventId: 89}, google_tag_params: { ecomm_pagetype: "product", ecomm_prodid: "MSH09", ecomm_totalvalue: 28.800001, ecomm_pvalue: 28.800001, ecomm_category: "Shorts" }
}
Setting up the Trigger
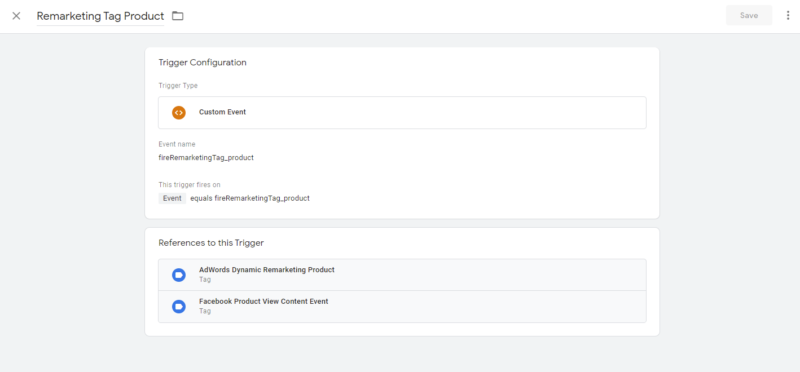
Please follow the steps above and create a new trigger with the information given below:-
Trigger Name:- Remarketing Tag Product
Trigger Type:- Custom Event
Event Name:- fireRemarketingTag_product
This trigger fires on:- Select Some Custom events then enter Event Equals fireRemarketingTag_product
Once the trigger is created successfully it should look similar to the image below:-

Setting up the Tag
Please follow the steps above and create a new tag with the information given below as we did in previous steps:-
Tag Name:- AdWords Dynamic Remarketing Product
Tag Type:- Google Ads Remarketing
Conversion ID:- {{conversionID}}
Custom Parameter:- select Use Data Layer then from the Data Layer Variable Name dropdown select google_tag_params.
After successfully creating the tag it will look similar to the image below:-
Adwords Dynamic Remarketing on Cart Page
Data Layer:- Implement the data layer given below on your store’s cart page.
{ event: "fireRemarketingTag_cart", gtm: {uniqueEventId: 89}, google_tag_params: { ecomm_pagetype: "cart", ecomm_prodid: ["MSH12", "MSH11"], ecomm_totalvalue: 56.4, ecomm_quantity: ["1", "1"] }
}
Setting up the Trigger:-
Please follow the steps above and create a new trigger with the information given below:-
Trigger Name:- Remarketing Tag Cart
Trigger Type:- Custom Event
Event Name:- fireRemarketingTag_cart
This trigger fires on:- Select Some Custom events then enter Event Equals fireRemarketingTag_cart
Once the trigger is created successfully it should look similar to the image below:-

Setting up the Tag
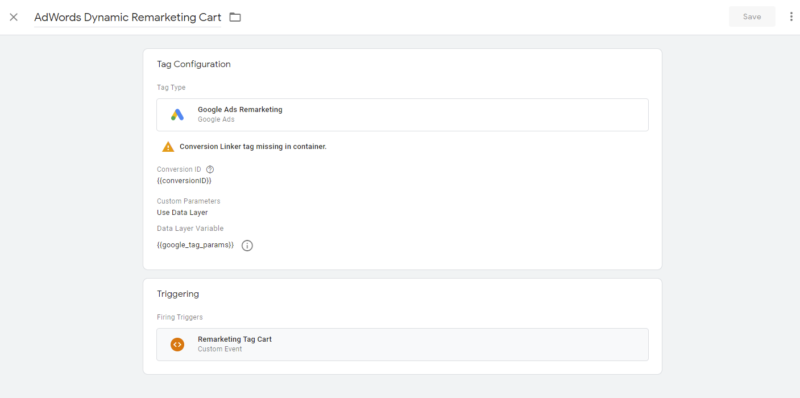
Please follow the steps above and create a new tag with the information given below as we did in previous steps:-
Tag Name:- AdWords Dynamic Remarketing Product
Tag Type:- Google Ads Remarketing
Conversion ID:- {{conversionID}}
Custom Parameter:- select Use Data Layer then from the Data Layer Variable Name dropdown select google_tag_params.
After successfully creating the tag it will look similar to the image below:-
Adwords Dynamic Remarketing on Purchase
Data Layer:- Implement the data layer given below on your store’s Purchase page.
{ event: "fireRemarketingTag_purchase", gtm: {uniqueEventId: 89}, google_tag_params: { ecomm_pagetype: "purchase", ecomm_prodid: ["MSH12", "MSH11"], ecomm_totalvalue: 47, ecomm_quantity: ["1", "1"], ecomm_pvalue: ["27.00", "20.00"], hasaccount: "Y" }
}
Setting up the Trigger:-
Please follow the steps above and create a new trigger with the information given below:-
Trigger Name:- Remarketing Tag Purchase
Trigger Type:- Custom Event
Event Name:- fireRemarketingTag_purchase
This trigger fires on:- Select Some Custom events then enter Event Equals fireRemarketingTag_purchase
Once the trigger is created successfully it should look similar to the image below:-

Setting up the Tag
Please follow the steps above and create a new tag with the information given below as we did in previous steps:-
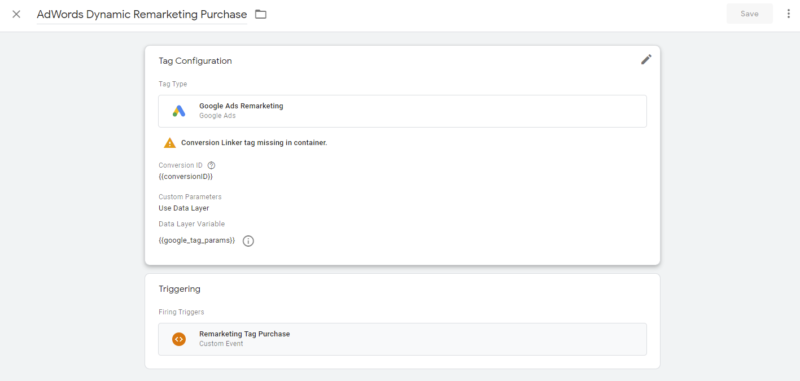
Tag Name:- AdWords Dynamic Remarketing Purchase
Tag Type:- Google Ads Remarketing
Conversion ID:- {{conversionID}}
Custom Parameter:- select Use Data Layer then from the Data Layer Variable Name dropdown select google_tag_params.
After successfully creating the tag it will look similar to the image below:-
Adwords Dynamic Remarketing on Checkout Pages
Data Layer:- Implement the data layer given below on checkout page of your store.
{ event: "fireRemarketingTag_checkout", gtm: {uniqueEventId: 89}, google_tag_params: { ecomm_pagetype: "checkout", ecomm_prodid: ["MSH12", "MSH11"], ecomm_totalvalue: 47, ecomm_quantity: ["1", "1"] }
}
Setting up the Trigger:-
Please follow the steps above and create a new trigger with the information given below:-
Trigger Name:- Remarketing Tag Cart
Trigger Type:- Custom Event
Event Name:- fireRemarketingTag_cart
This trigger fires on:- Select Some Custom events then enter Event Equals fireRemarketingTag_cart
Once the trigger is created successfully it should look similar to the image below:-

Setting up the Tag
Please follow the steps above and create a new tag with the information given below as we did in previous steps:-
Tag Name:- AdWords Dynamic Remarketing Cart
Tag Type:- Google Ads Remarketing
Conversion ID:- {{conversionID}}
Custom Parameter:- select Use Data Layer then from the Data Layer Variable Name dropdown select google_tag_params.
After successfully creating the tag it will look similar to the image below:-
