

If you don’t know how to import customers to Magento 2, you’ve come to the right place. Below, we shed the light on Magento 2 customers import. There are three separate entities designed to simplify import from external sources by default: System > Data Transfer > Import > Entity > Customers Main File // Customer Addresses // Customers And Addresses. Below, we describe each one. Your journey into the world of the Magento 2 customer data import starts with a Magento 2 sample import table. We explain how to get a file with customers and addresses and describe the structure of the corresponding import table. Next, you will find out what Magento 2 customer import attributes are used for transferring data to your website. The article focuses on Customers Main File attributes, Customer Addresses attributes, and Customers and Addresses attributes used in Magento 2. Besides, we explain attributes mapping for transferring customers from external platforms. After that, we provide a detailed guide on how to import customers and customer addresses to Magento 2.

Table of contents
How to import Customers and Customer Addresses to Magento 2 post continues the line of guides for Magento 2 import/export guide list. The other articles in the line are:
Without further ado let’s dive into the customer import process starting with getting the import table we will be using.
There are several ways of getting the sample import table for customers import. Let’s cover all of them.
- In your Magento 2 backend – In ‘Entity Type’, select ‘Customers And Addresses (single file)’. The link with Magento customer import sample CSV will be displayed. Download it for further exploration.
- At GitHub – navigate to the FIreBear Studio GitHub and download the file with required entity type.
- At Google Sheet Master Table – FireBear team composed a Google Sheet where we have gathered all import entity types with description and sample values.
Now that you have got the sample file, you can use it to compose your own import table. To get a complete understanding of the CSV table formatting and which Magento 2 customer attribute does what – read the following chapter.
Read more about Google Sheet Master table
The import table can be either a CSV file, if you are using native Magento 2 import, or CSV, XML or Google Sheets if you are using Improved Import and Export extension.
If you have decided to create the table manually make sure to edit the field separators, text delimited and character set.
| Character set | Unicode (UTF-8) |
| Field separator | Comma, Tab |
| Text delimiter | ” |
In case you want to stick to your own table formatting, or your supplier provides you with the custom formatted import table, you can always take advantage of the field mapping right inside the import screen.
There are three types of entities you can import to your Magento 2 store:
- Customers Main File – where you import customer credentials and personal account information;
- Customer Addresses – where you import customers billing and shipping addresses with all associated information;
- Customers and Addresses – think of it as a conjunction of the first two, with the exception to some customer attribute names, that are a little different.
Now that we have listed all three Magento 2 customer import entities let’s get through the attributes listed in the tables:
Magento 2 Customers Main File attributes
You can get a full Magento 2 Customers Main File table with the attribute description and sample value reference at the Master Google Table. There you can click every customer attribute and get a quick reference of the attribute and which value is expected from you in the column.
Back to the ‘Customers Main File’, it contains the following columns:
| Attribute name | Reference | Values | Value example |
| Email of the customer | Make sure to properly paste the email address with the domain | john.doe@test.com | |
| _website | Associate to Website. Defines to which website the customer belongs | To find the value for the column navigate to Stores > All Stores > Click the required Website in Website column and find its Code | base |
| _store | The Store View customer belongs to | To find the value for the column navigate to Stores > All Stores > Click the required Store in Stores column and find its Code | default |
| confirmation | Confirmed email. Defines whether customer has confirm their email address associated with their account | 1 – the email address has been confirmed
0 – customer needs to confirm the email address |
1 |
| created_at | Account Created. Defines the date and time the account has been created | The data format is:
yyyy/mm/dd hh:mm:ss The time format uses 24 hour clock |
2018-01-16 9:48:37 |
| created_in | Account Created in. Defines the Website the account has been created in | You need to specify the name of the store view. You can find it at Stores > All Stores > Click the required store view in Store View column and find its Name | Default Store View |
| disable_auto_group_change | Disable Automatic Group Change Based on VAT ID | 1 – the automatic group change disabled
0 – the automatic group change enabled |
0 |
| dob | Date of Birth of the customer | The date should be in the following format yyyy-mm-dd | 1973-12-15 |
| failures_num | The numbers of incorrect login attempts. Works with Maximum Login Failures to Lockout Account setting | Any numeral value | 0 |
| first_failure | First Failure Date. The date of the first failed login attempt | The date should be in the following format yyyy-mm-dd hh:mm:ss | 2018-03-30 8:33:01 |
| firstname | First Name of the customer | Any characters allowed | John |
| gender | Gender of the customer | Male
Female leave blank if not specified |
Male |
| group_id | If of the Customer Group the customer belongs to | ID of the Customer Group can be found under Customers > Customer Groups. In ID column | 2 |
| lastname | Last Name of the customer | Any characters allowed | Doe |
| lock_expires | Defines the date when the account lock expires. | The date should be in the following format yyyy-mm-dd hh:mm:ss | 2018-03-30 8:33:01 |
| middlename | Middle Name/Initial of the customer | Any character value allowed | D |
| password_hash | Hash value of the customer account password | Proper hash value | testhashvalue123 |
| prefix | Name Prefix of the customer | Any character value | Mr. |
| rp_token | Reset password token of the customer account | Proper token value | testtoken123 |
| rp_token_created_at | The date the password had been reset | The date should be in the following format yyyy-mm-dd hh:mm:ss | 2018-01-16 9:48:37 |
| store_id | ID of the store the customer belongs to | Numeric store ID | 1 |
| suffix | Name Suffix of the customer | Any character value | Jr. |
| taxvat | Tax/VAT Number of the customer | Proper VAT value | EU555555555 |
| updated_at | Date when the customer’s account was last updated | The date should be in the following format yyyy-mm-dd hh:mm:ss | 2018-02-21 13:01:41 |
| website_id | ID of the website the customer belongs to | Numeric website ID | 1 |
| password | If you want to change the password to the customer’s account this is the column you type it in. | Any values supported by password field | testpassword123 |
Magento 2 Customer Addresses attributes
As with the Customers Main File you can get a complete import table with all the attributes described from the Master Google Table.
The attributes available are:
| Attribute name | Reference | Values | Value example |
| _website | Defines to which website the customer belongs | To find the value for the column navigate to Stores > All Stores > Click the required Website in Website column and find its Code | base |
| _email | Email of the customer | Make sure to properly paste the email address with the domain | john.doe@test.com |
| _entity_id | Internal ID of the customer address used for identification purposes inside of Magento 2 | Numeral value | 1 |
| city | City of the customer | Can be any character value | Calder |
| country_id | Country of the customer. | For full list of country IDs refer to the Country and State Codes sheet | FireBear Studio |
| company | Company the customer country | Can be any value | DE |
| fax | Fax of the customer | Can be any numeral value | 5555555555 |
| firstname | Customer’s first name | Can be any character value | John |
| lastname | Customer’s last name | Can be any character value | Doe |
| middlename | Customer’s middle name | Can be any character value | D |
| postcode | Postcode of the customer | Can be any numeral value | 12345 |
| prefix | Customer’s name prefix | Can be any character value | Mr. |
| region | Region of the country of the customer | Refer to the Country and State Codes sheet for proper region name or state code. Both can be entered in this field | BRG |
| region_id | Region ID of the country of the customer | Refer to the Country and State Codes sheet for proper region ID | 83 |
| street | Name of the street of the customer | Can be any character or numeric value | Test 23 |
| suffix | Customer’s name suffix | Can be any character value | Jr. |
| telephone | Customer’s telephone number | Can be any numeral value | 5555555555 |
| vat_id | Customer’s VAT | Can be any proper VAT value | EU555555555 |
| vat_is_valid | VAT number validity | 1 – the VAT number is valid
0 – the VAT number is not valid |
0 |
| vat_request_date | VAT number validation request date | The data format is:
yyyy/mm/dd |
2018-02-21 |
| vat_request_id | VAT number validation request ID | Proper validation request ID | 20 |
| vat_request_success | VAT number validation request success | 1 – success
0 – failure |
1 |
| _address_default_billing_ | Defines if the imported address of customer is default for Billing | 1 – the address is default
0 – the address is not default |
1 |
| _address_default_shipping_ | Defines if the imported address of customer is default for Shipping | 1 – the address is default
0 – the address is not default |
1 |
Magento 2 Customers and Addresses attributes
Customers and Addresses table combines both Customers Main File and Customer Addresses table attributes. However, you cannot compose this type of table just by combining the attributes from the latter two as there are peculiarities to the attribute naming. That’s why it is much easier to get a sample table from Master Google Sheet.
Or you can use the table below to compose the table or for the reference purposes.
| Attribute name | Reference | Values | Value example |
| increment_id | Unique customer address identifier which you can use to import multiple addresses for a single customer. Use the same value for every unique customer with different addresses. | Only numerals allowed | 12 |
| Email of the customer | Make sure to properly paste the email address with the domain | john.doe@test.com | |
| _website | Associate to Website. Defines to which website the customer belongs | To find the value for the column navigate to Stores > All Stores > Click the required Website in Website column and find its Code | base |
| _store | The Store View customer belongs to | To find the value for the column navigate to Stores > All Stores > Click the required Store in Stores column and find its Code | default |
| confirmation | Confirmed email. Defines whether customer has confirm their email address associated with their account | 1 – the email address has been confirmed
0 – customer needs to confirm the email address |
1 |
| created_at | Account Created. Defines the date and time the account has been created | The data format is:
yyyy/mm/dd hh:mm:ss The time format uses 24 hour clock |
2018-01-16 9:48:37 |
| created_in | Account Created in. Defines the Website the account has been created in | You need to specify the name of the store view. You can find it at Stores > All Stores > Click the required store view in Store View column and find its Name | Default Store View |
| disable_auto_group_change | Disable Automatic Group Change Based on VAT ID | 1 – the automatic group change disabled
0 – the automatic group change enabled |
0 |
| dob | Date of Birth of the customer | The date should be in the following format yyyy-mm-dd | 1973-12-15 |
| firstname | First Name of the customer | Any characters allowed | John |
| gender | Gender of the customer | Male
Female leave blank if not specified |
Male |
| group_id | If of the Customer Group the customer belongs to | ID of the Customer Group can be found under Customers > Customer Groups. In ID column | 2 |
| lastname | Last Name of the customer | Any characters allowed | Doe |
| middlename | Middle Name/Initial of the customer | Any character value allowed | D |
| password_hash | Hash value of the customer account password | Proper hash value | ef55cebdb2034a89 |
| prefix | Name Prefix of the customer | Any character value | Mr. |
| rp_token | Reset password token of the customer account | Proper token value | 09ae7838f74dc08343252255d7c69bf8 |
| rp_token_created_at | The date the password had been reset | The date should be in the following format yyyy-mm-dd hh:mm:ss | 2018-01-16 9:48:37 |
| store_id | ID of the store the customer belongs to | Numeric store ID | 1 |
| suffix | Name Suffix of the customer | Any character value | Jr. |
| taxvat | Tax/VAT Number of the customer | Proper VAT value | EU555555555 |
| website_id | ID of the website the customer belongs to | Numeric website ID | 1 |
| password | If you want to change the password to the customer’s account this is the column you type it in | Any values supported by password field | testpassword123 |
| _address_city | City of the customer | Can be any character value | Potsdam |
| _address_company | Company of the customer | Can be any value | FireBear Studio |
| _address_country_id | ID the customer country | For full list of country IDs refer to the Country and State Codes sheet of this table | DE |
| _address_fax | Fax of the customer | Can be any numeral value | 5555555555 |
| _address_firstname | Customer’s first name for the address | Can be any character value | John |
| _address_lastname | Customer’s last name for the address | Can be any character value | Doe |
| _address_middlename | Customer’s middle name for the address | Can be any character value | D |
| _address_postcode | Postcode of the customer | Can be any numeral value | 12345 |
| _address_prefix | Customer’s name prefix for address | Can be any character value | Mr. |
| _address_region | Region of the country of the customer | Refer to the Country and State Codes sheet of this table for proper region name or state code. Both can be entered in this field | BRG |
| _address_street | Name of the street of the customer | Can be any character or numeric value | 83 |
| _address_suffix | Customer’s name suffix for address | Can be any character value | Jr. |
| _address_telephone | Customer’s telephone number | Can be any numeral value | 5555555555 |
| _address_vat_id | Customer’s VAT for the address | Can be any proper VAT value | EU555555555 |
| _address_default_billing_ | Defines if the imported address of customer is default for Billing | 1 – the address is default
0 – the address is not default |
1 |
| _address_default_shipping_ | Defines if the imported address of customer is default for Shipping | 1 – the address is default
0 – the address is not default |
1 |
Attribute mapping
But you can essentially improve the aforementioned procedure with the help of the Improved Import & Export Magento 2 extension which allows applying mapping, automating import/export procedures, as well as selecting various sources for import/export that are not available in default Magento 2. We will get to this later in this post.
Now, that you have learned all customer attributes it is time to proceed to the actual import.
You are probably familiar with native Magento 2 import procedure, that’s why we’ll describe how to import customers using Improved Import and Export extension by FireBear Studio, and what benefits the store owner gets using the extension.
Improved Import and Export extension enhances Magento 2 import procedure and brings the following list of features:
- Google Sheet Magento 2 import source support
- Import tier prices with products
- Configurable products can be created on the fly
- Automatically upload and synchronize external product listing with M2
- No programming skills required
- CSV, XML, TXT & Google Sheets support
- Flexible cron jobs (admin run, CLI)
- Powerful import & export mapping for any data structure with filters and static values
- Categories, Attributes and values import
- Orders, invoices, shipping export
- Supported sources: FTP, SFTP, URL, Dropbox
- Support all product types, customers, orders
- Magento 1 and Shopify products migration presets
- User friendly & intuitive interface
- Handle millions of products on single file
- Average import speed – 3000 products/min
Back to importing customers, follow the next steps to master the customers import procedure.
Step 1: create an import job
The import job can be created at System > Improved Import / Export. There you will the the import job grid, where you need to click ‘Add New Job’ button.
At the new job screen you will be presented with the general job settings.

Here you can name the job, to identify it in the job list. Set the job schedule, in case you know that you will be importing the job, say, every Monday. And specify the locale of the store you will be importing to.
Step 2: select entity and behavior
After done with general settings you will need to select the entity you are going to import:
- Customers Main File;
- Customer Addresses;
- Customers and Addresses.

We have described the table structure for every entity above, so we consider that you have already composed the table.
Next, configure import behavior. In ‘Import Behavior’ select one of the following options:
- Add/Update – add new customers and update the existing ones;
- Replace – replace customers with new ones;
- Delete – delete old customers.

Then, you can select one of two options: Stop on Error and Skip Error Entries. Specify number of errors to halt import process. Enter field and multi value separator. Enable Magento 2 fields enclosure if it was used in the import CSV file. This is especially handy in case you are trying to import table of the different from supported by Magento 2 formatting.
Step 3: specify source
With Improved Import and Export extension you can specify different import sources:
- File;
- FTP/SFTP;
- Direct URL;
- Google Sheet.
For example if you with your colleagues use a single Google Sheet to approve edits, the only thing you are left to do – is to paste the link and you are good to go. The sheet can be edited every week, and the import job can run automatically every week, speeding up your import management process.

After the file has been uploaded click the ‘Validate file’ button, to let the extension make sure the table is properly formatted.
Step 4: map attributes
If you have got the import table from the different ecommerce platform, or you are importing it from your CRM system, you can always take advantage of the attribute mapping.
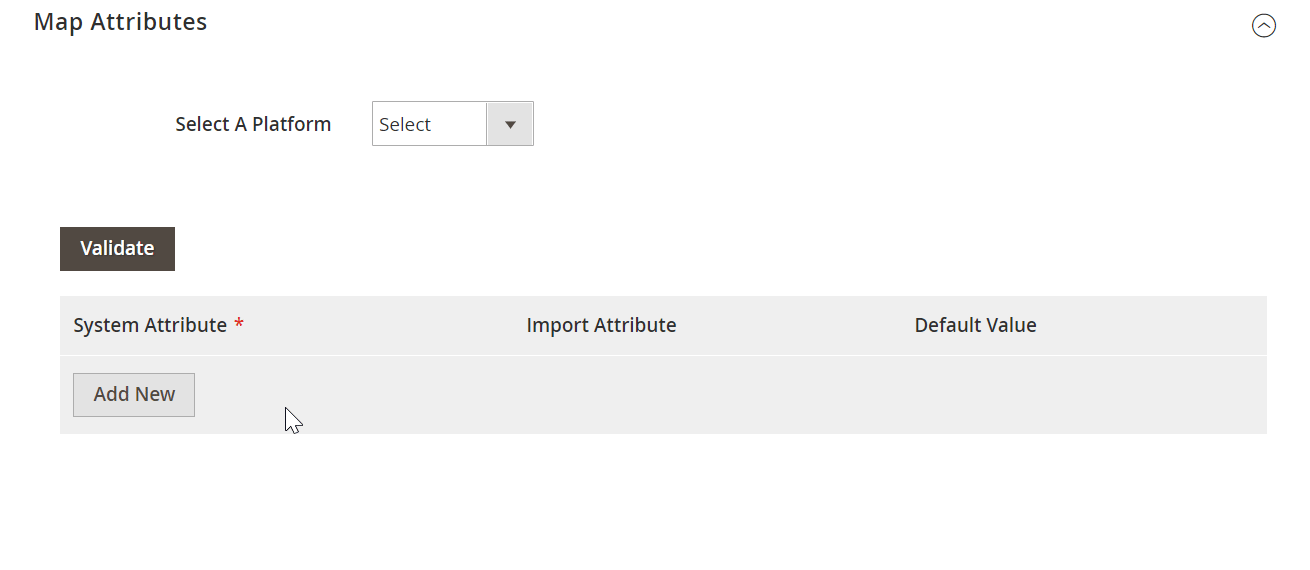
Here, you can either select the platform you are import from and let the extension do the rest of the mapping process. Or, you can map all the attributes manually. The process is really simple.
The only thing you are left to do now is click ‘Save & Run’ button to start the import process. The extension will present you with the import log where you can check how the import process went.

This it it! You have just imported customers to your store using Improved Import and Export extension.
If you are interested in importing other entities to your Magento 2 store – refer to the dedicated blog posts in the beginning of the article.
For further tips, check our Cookbook.
How to import customers into Magento?
As you can see, there are two ways to import customers into Magento 2. Firstly, you can use the platform’s default data transfer solution. Although it is built into the system, the standard customer import mechanism is limited. It doesn’t let you import customers on schedule, transfer them with the help of XLSX, ODS, or JSON files, move from Google Sheets, or deliver them into your e-commerce website via APIs. Alternatively, you can implement the same process using the Improved Import & Export extension. It avoids all the limitations mentioned above. Besides, the module offers a robust mapping functionality, described in this article.
How to import customers from Magento into Shopify?
If you decide to migrate from Magento 2 to Shopify or just need to synchronize data between the two storefronts, Improved Import & Export also comes in handy. The solution lets you import customers from Magento into Shopify with minimum effort. You only need to apply the correct mapping to the Magento data. We also offer the Improved Import & Export tool for Shopify which will help you transfer customers to the storefront. Alternatively, it is possible to establish an API connection between the two systems, synchronizing customer transfers between the two websites in both directions.
How to import WooCommerce customers into Magento?
The situation is similar to the one that happens around the Magento 2 Shopify integration. You need to Improved Import & Export extension to establish the connection between the two systems, moving customers from WooCommerce into Magento.
How to import Magento 2 customers from Google Sheets?
You can use the Improved Import & Export Magento 2 module to import customers from numerous sources, including Google Sheets. The extension provides the ability to choose the desired storage when you configure an import profile. Just select Google Sheets as your data source and specify the URL address of a file with customers to import the corresponding update to your Magento 2 website.
How to import Magento 2 customers from Dropbox?
In addition to Google Sheets, you can also transfer customer data to Magento 2 from Dropbox. Provide the address details of a file stored there and the Improved Import & Export extension will easily move it to your e-commerce storefront. Note that it should be a CSV, XML, ODS, XLSX, or JSON file. You can provide them in a compressed state as ZIP or TAR archives.
How to import Magento 2 customers from a CSV file?
You can use the Improved Import & Export Magento 2 extension to import customers via a CSV file. Follow the instructions mentioned in this article to configure the corresponding import process. Choose a CSV file as your import file type.
How to import Magento 2 customers from an XML file?
You can use the Improved Import & Export Magento 2 extension to import customers via an XML file. Follow the instructions mentioned in this article to configure the corresponding import process. Choose an XML file as your import file type.
How to import Magento 2 customers from an ODS file?
You can use the Improved Import & Export Magento 2 extension to import customers via an ODS file. Follow the instructions mentioned in this article to configure the corresponding import process. Choose an ODS file as your import file type.
How to import Magento 2 customers from an XLSX file?
You can use the Improved Import & Export Magento 2 extension to import customers via an XLSX file. Follow the instructions mentioned in this article to configure the corresponding import process. Choose an XLSX file as your import file type.
How to import Magento 2 customers from a JSON file?
You can use the Improved Import & Export Magento 2 extension to import customers via a JSON file. Follow the instructions mentioned in this article to configure the corresponding import process. Choose a JSON file as your import file type.
How to import Magento 2 customers in a ZIP or TAR archive?
You can use the Improved Import & Export Magento 2 extension to import customers in a ZIP or TAR archive. Note that they should be stored in a CSV, XML, ODS, XLSX, or JSON file.
How to import Magento 2 customers via API?
You can use the Improved Import & Export Magento 2 extension to import customers to Magento 2 via API. The module provides the ability to create a direct connection between the two systems so that you avoid the use of intermediate data exchange points and file transfers.
How to export customers from Magento 2?
It is possible to export customers from Magento 2 with the help of the default data transfer tools. Go to System > Export and select Customers Main File or Customer Addresses depending on your export needs. Configure entity attributes, creating filters. Run the export process. That’s it. However, you cannot apply mapping, create any files except CSV, export customers on schedule, or transfer them via API. If you need all these features, pay heed to the Improved Import & Export Magento 2 extension. The module delivers advanced data transfer capabilities. As a result, you can export customers from Magento 2 in many more ways. Firstly, the plugin’s mapping interface lets you create output that is suitable for the requirements of an external platform. Secondly, the extension lets you create cron-based schedules so that the data output is generated automatically. Thirdly, you can export customers from Magento 2 in numerous file formats to multiple sources, such as FTP, SFTP, Dropbox, etc. Fourthly, the plugin lets you create an API connection between Magento 2 and the external platform you want to move the customer data to. These and many more useful enhancements are available in the Improved Import & Export Magento 2 module.


![Facebook, Instagram, WhatsApp, and Oculus are down. Here’s what we know [Updated]](https://whowillcare.net/wp-content/webp-express/webp-images/uploads/2021/10/facebook-instagram-whatsapp-and-oculus-are-down-heres-what-we-know-updated.jpg.webp)
