It can be stated that promotion bars are indispensable in any marketing campaign. Promo bars are put in ideal positions, helping online stores convey messages about the ongoing or upcoming programs.
Magento 2 Promo Bar extension by Mageplaza supports e-commerce store show notifications and promotion campaigns via small bars to catch customers’ attention. This module also contributes to creating a better shopping experience for your visitors.
Now we’ll dive deeper into the following article to explore more!
Get Magento 2 Promo Bar Extension by Mageplaza
Table of contents
What can the Mageplaza Promo Bar do for Magento 2 stores?
Offer unlimited promo bars on site
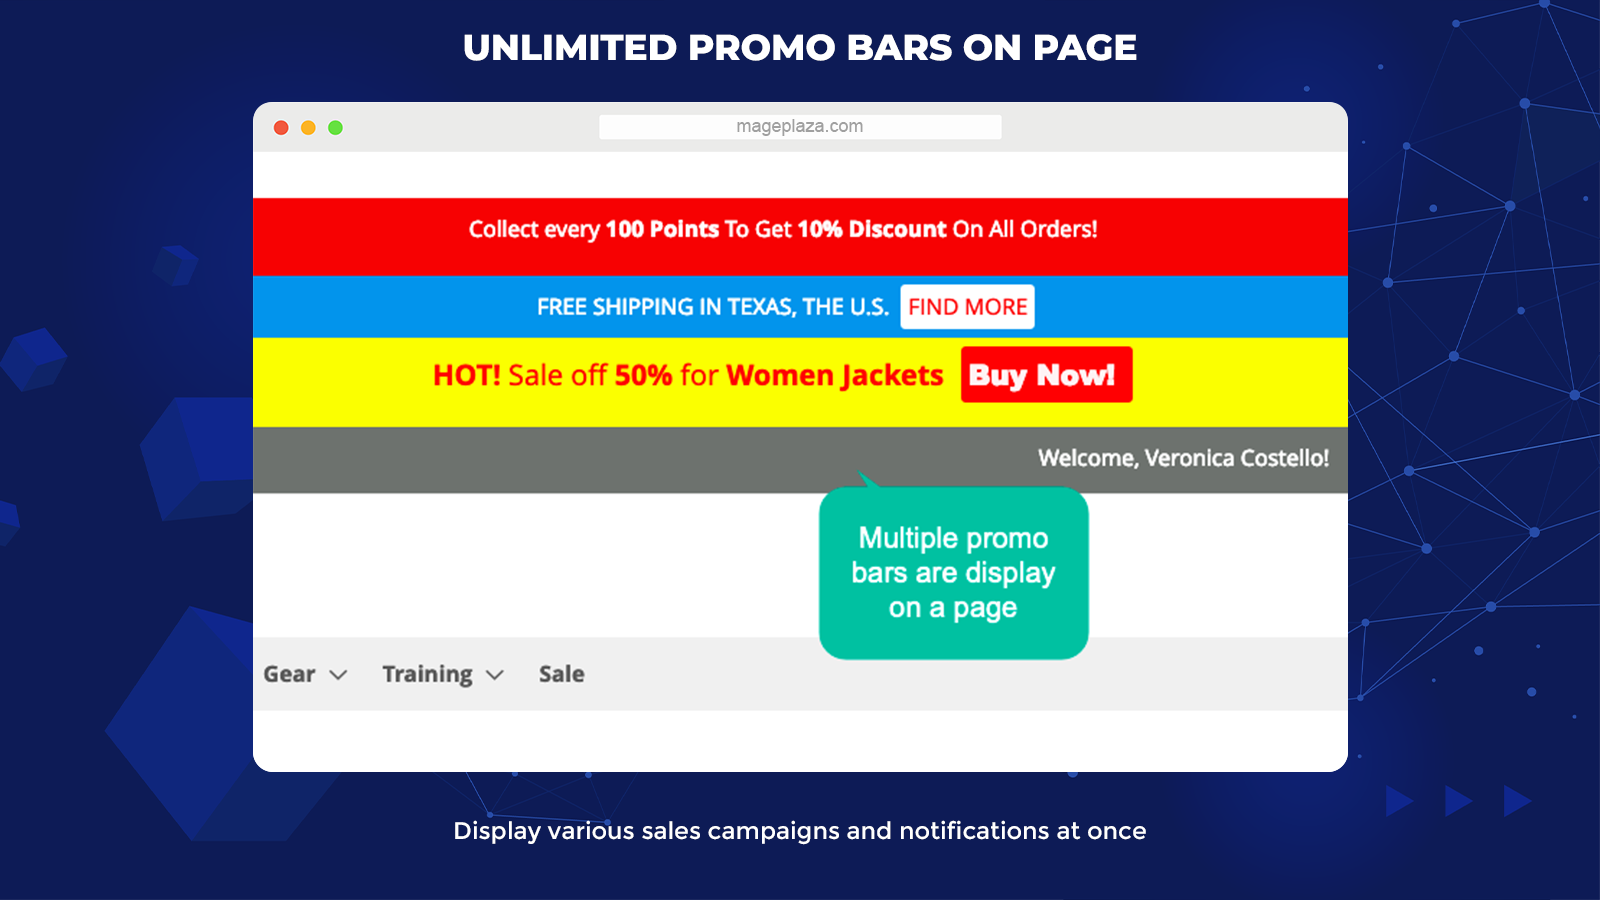
The Promo Bar extension enables stores to promote multiple sales campaigns or any notifications at once by displaying various promotion banners on the store pages.
There can be one or many banners shown simultaneously on the same page. Shoppers can be well informed about sales or discounts when they are browsing the store.
Display promo bars in different ways
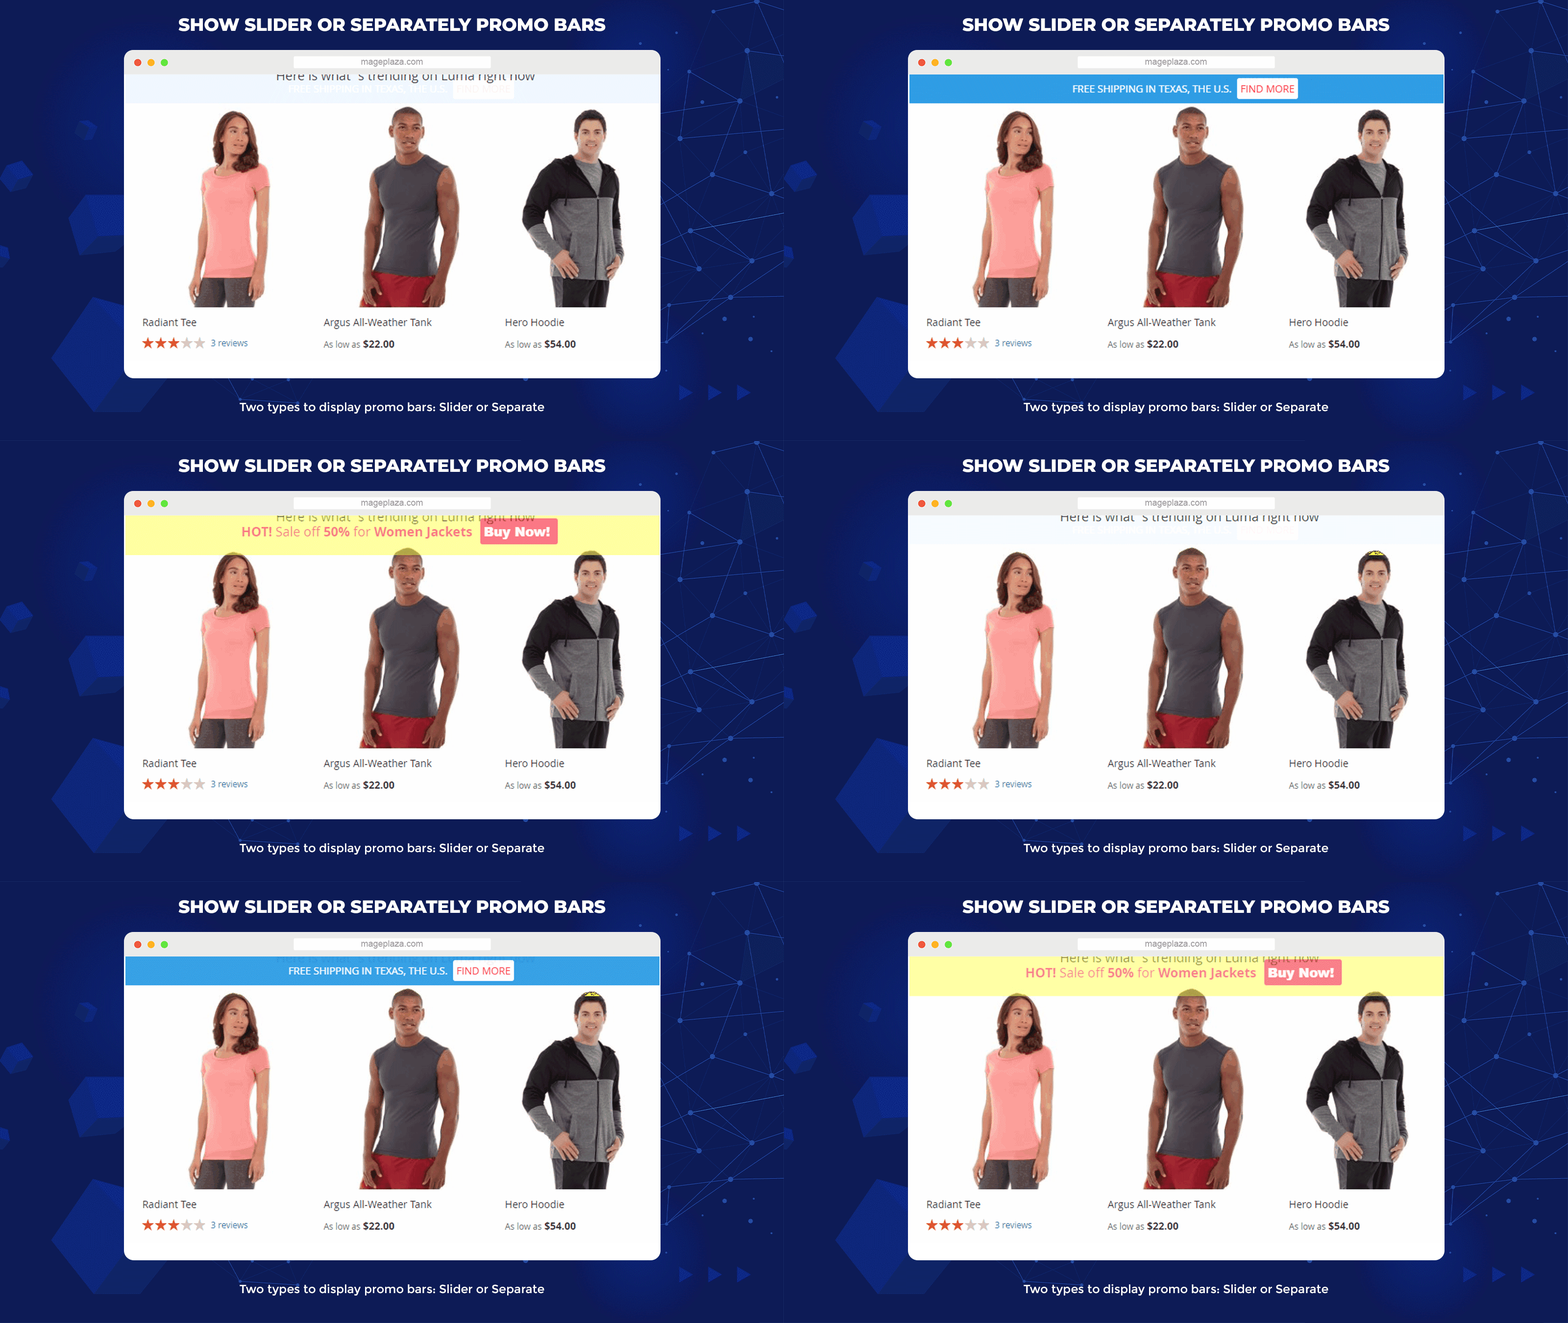
The module supports two types to show promo bars neatly: Slider or Separate. With Slider, promo bars at the same position will be shown in turn. The fade effect is used to change the bars. Meanwhile, with Separate, promo bars at the same position will be displayed vertically by a priority level. Merchants can choose a suitable type to showcase their promo bars properly, based on store themes or the number of bars.
Auto-show promo bars by conditions
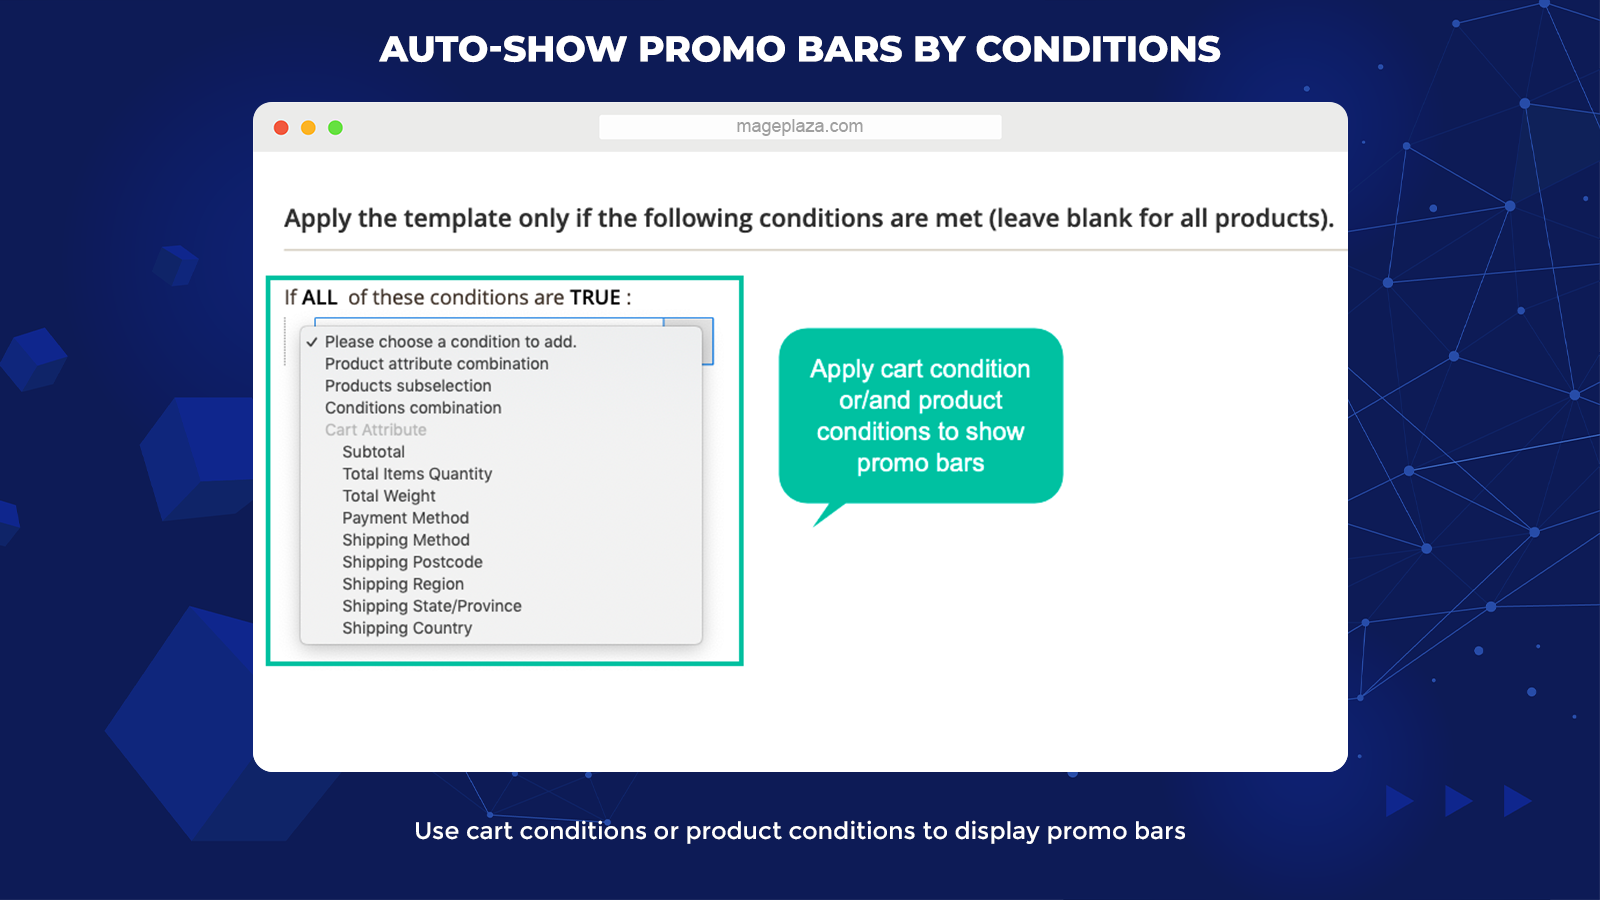
With this module, store admins can decide the conditions to display promo bars in the backend. For instance, when the shopping cart contains products that belong to Men Shirts, the promotion bar ” Sale off 40% for Men T-shirts” will be displayed.
Moreover, merchants can prepare promo bars for each period by conditions. Then when each period occurs, the promo bar will be presented automatically.
Support designing promo bars
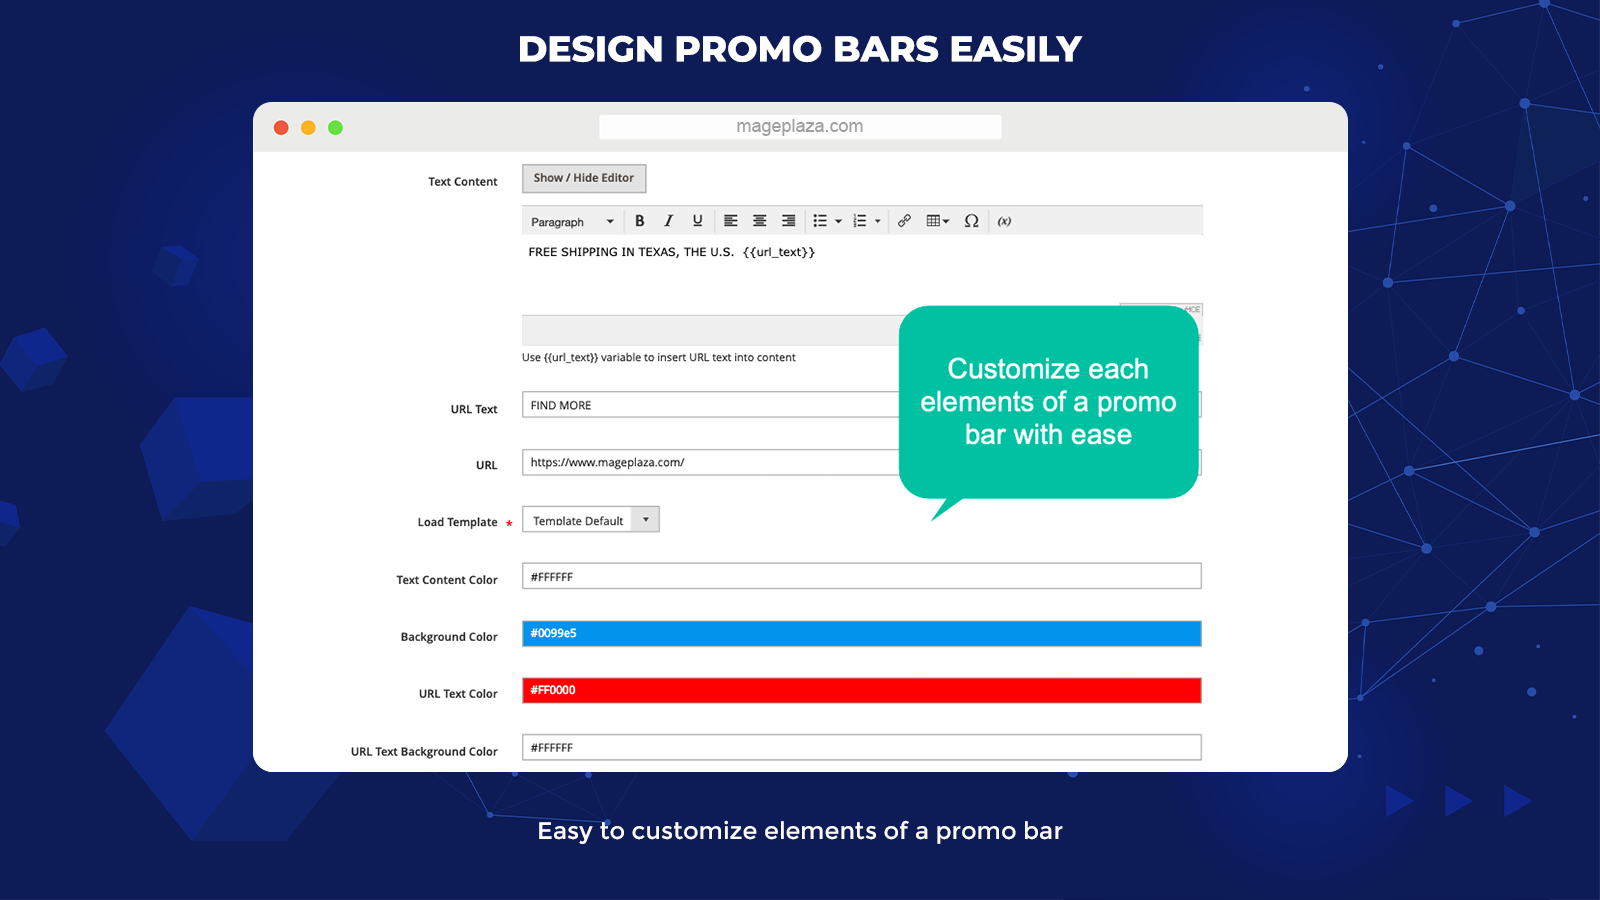
Promotion bars are significant in captivating shoppers and boosting sales. The extension comes with 5 pre-made appealing bar templates. Store owners can make use of these templates immediately or customize some elements below if necessary.
- Text Content
- URL Text
- URL
- Text Content Color
- Background Color
- URL Text Color
- URL Text Background Color
Store admins can flexibly design promotion/ notification bars without any limitations. Plus, variables are provided to facilitate the customization process.
Allow scheduling promo bars
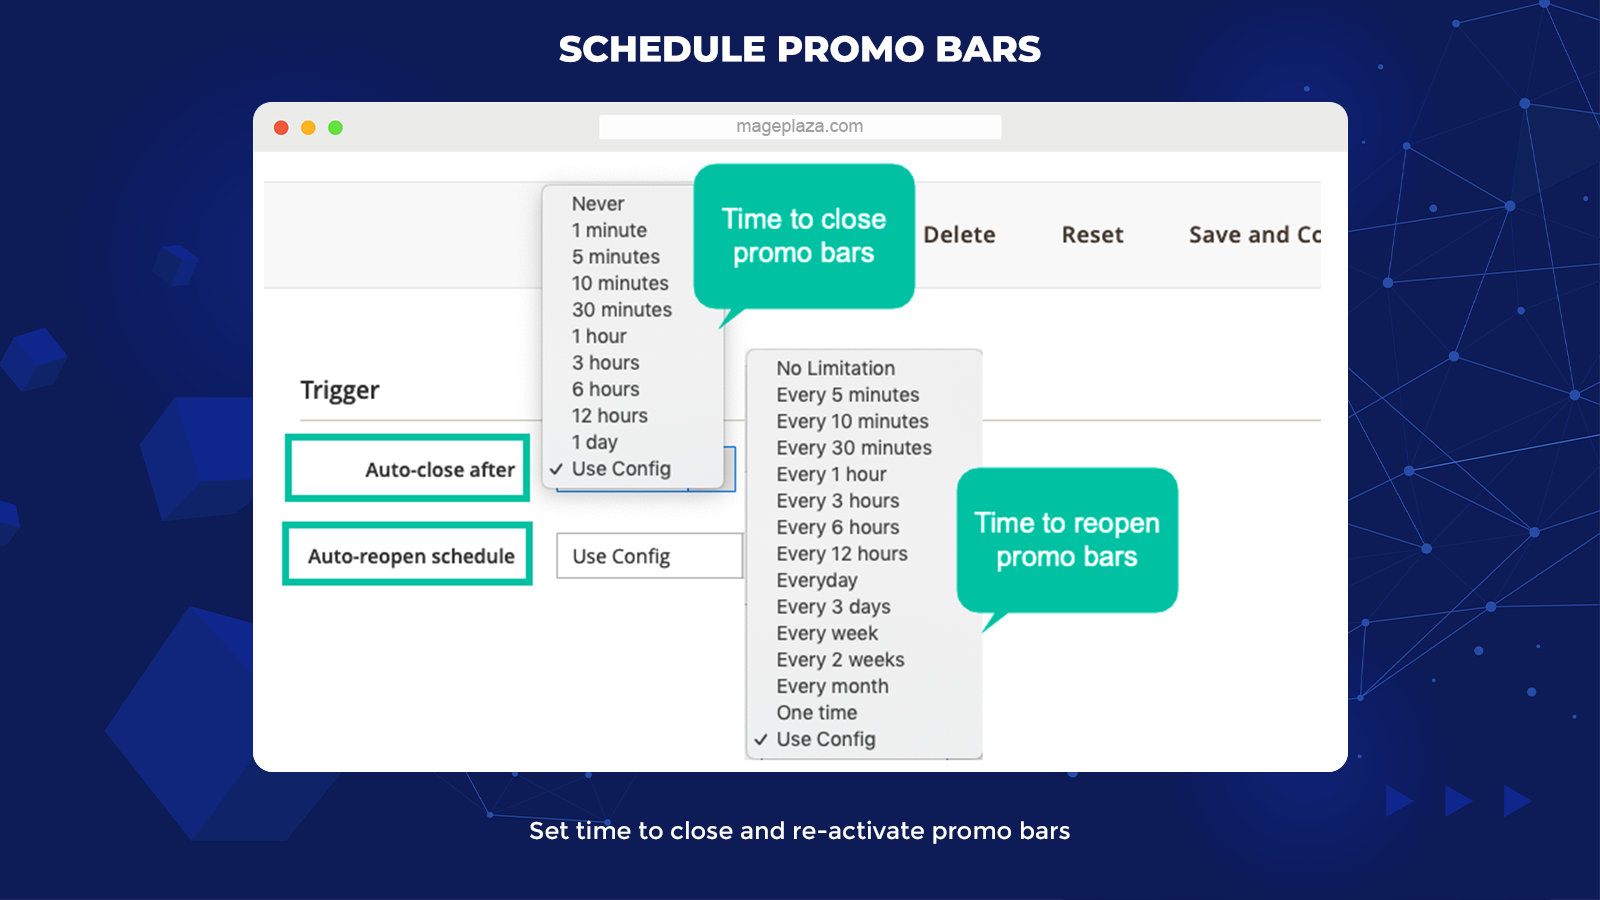
You can set the activation of promotion bars with ease. You can decide the start date and end date to run and close a promo bar. During the valid time, the promo bar can be set auto-close and auto-reopen according to a schedule.
For instance, the promo bar will be closed after 10 minutes and re-opened after 20 minutes. Displaying promotions continuously may make customers feel annoyed. Hence, it is important to define the gap time to make promo bars more user-friendly.
Show promo bars anywhere on page
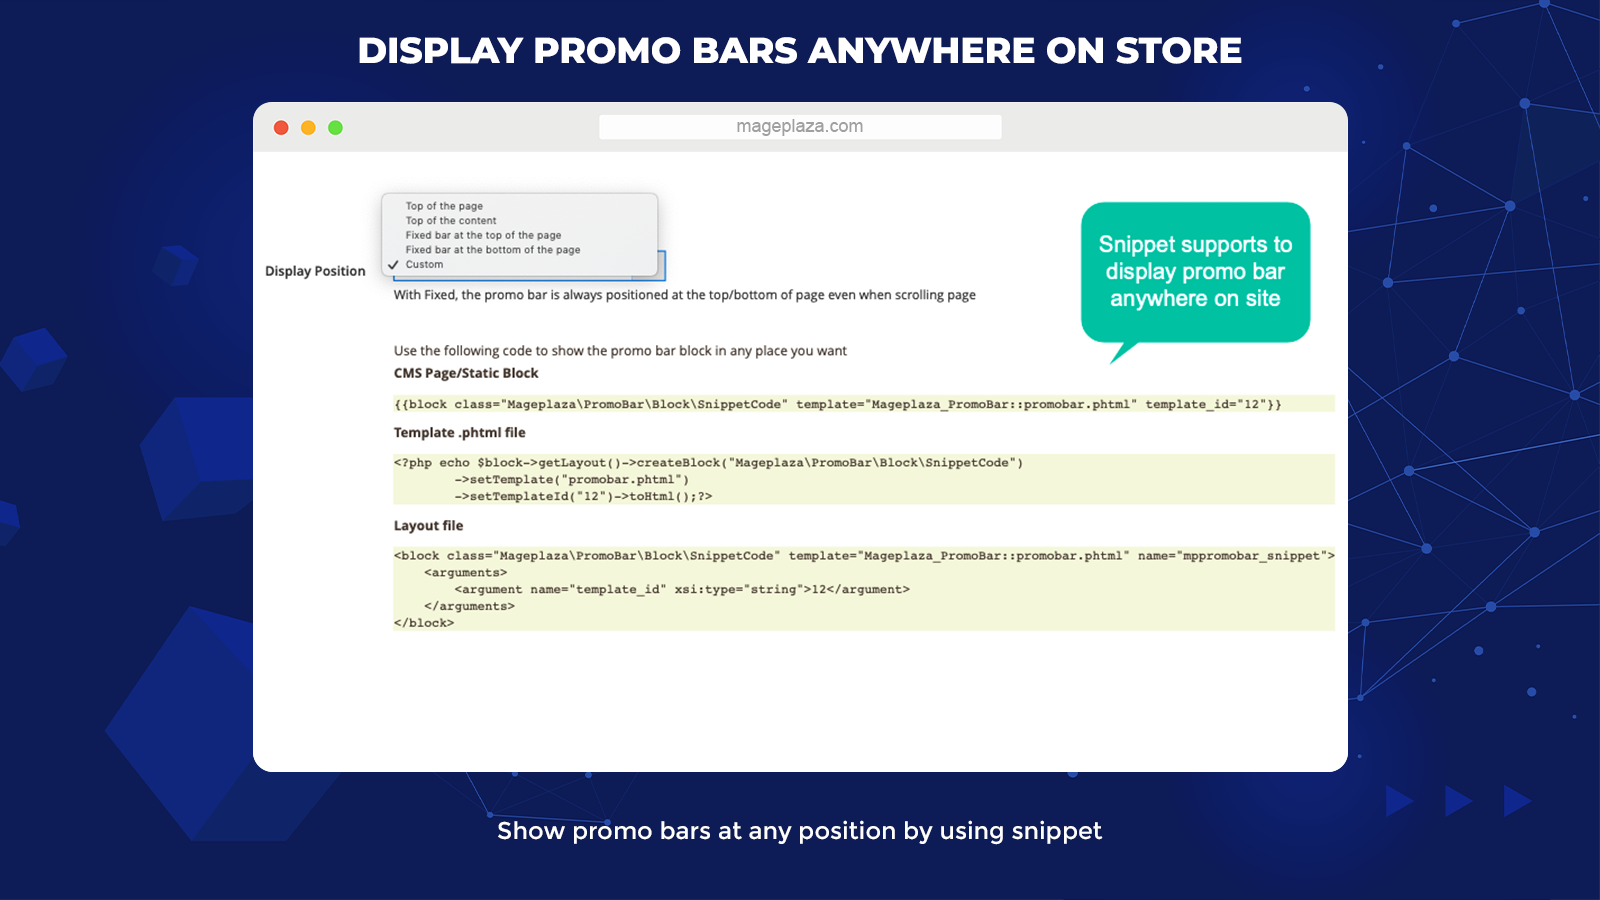
When promo bars are ready with an eye-catching design, store admission can position them anywhere on site. The module provides available options to put bars at the top of the page or content and enables using snippets to customize the bar positions easily.
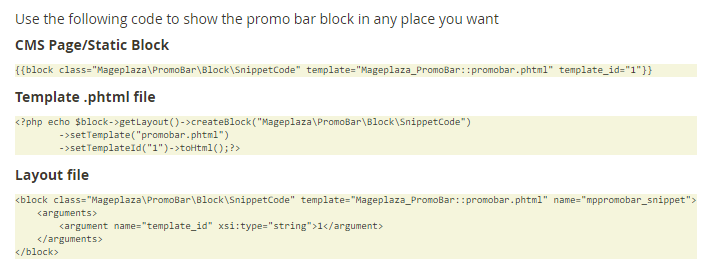
After a bar is saved, the used snippet code can be pasted anywhere on your site to present the bar.
Additional features to make Mageplaza Promo Bar outstanding
Limit visibility
Store owners can decide to display promo bars by store views or customer groups.
Set the priority level
Admins also can define the priority level for each promo bar.
Promo category
The extension supports generating promo categories. Users can group promo bars into one category to manage more effectively.
Grid management
With Magento 2 Promo Bar, merchants can view, filter, and edit any bar via a grid.
Backend review
The module allows previewing the design of promo bars at the admin backend.
Extension compatibility
Promo Bar is perfectly adaptable with Banner Slider and Product Slider extensions by Mageplaza.
Backend
General configuration
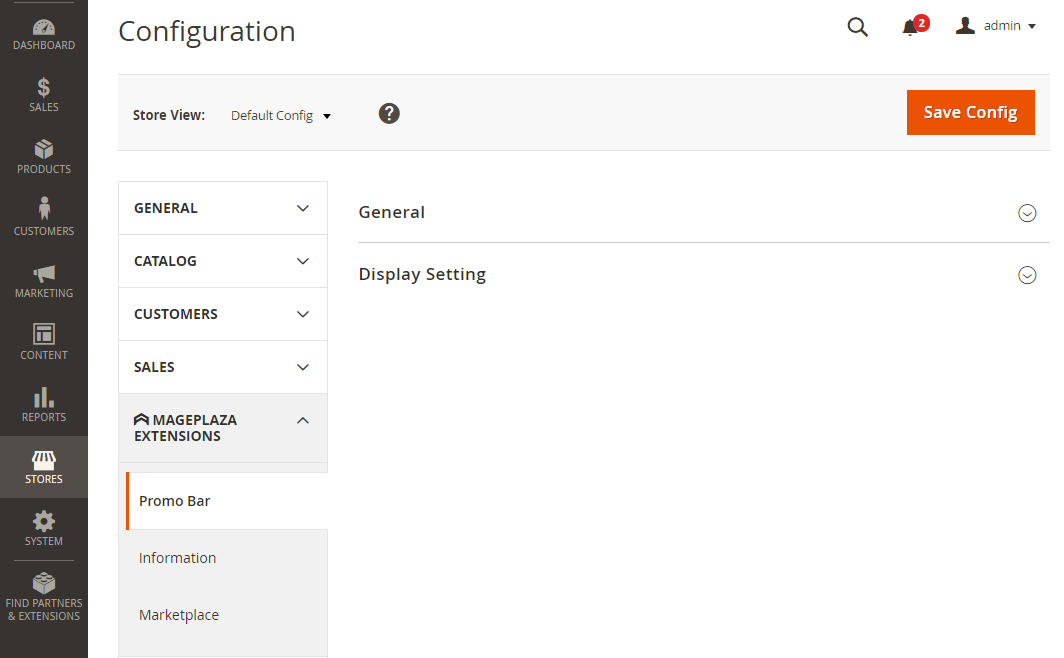
From the Magento Admin, navigate to Stores > Configuration > Mageplaza > Promo Bars > General
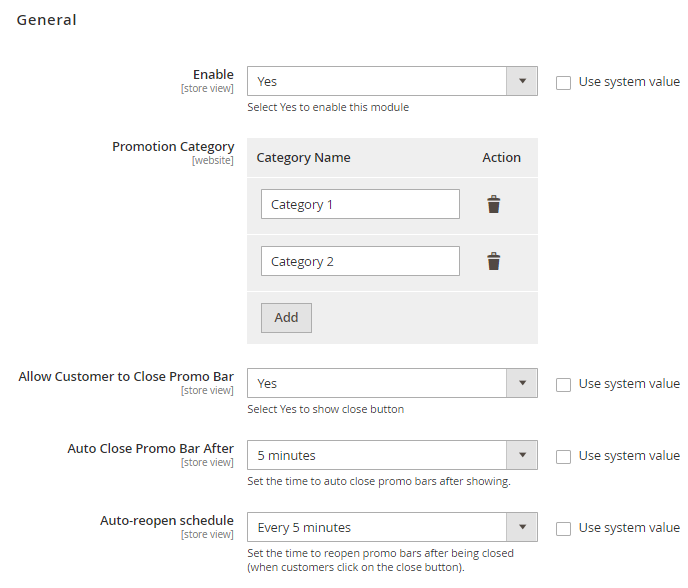
- Enable: Choose Yes to activate the extension
- Promotion Category:
- Category Name: Insert a name for the promotion. The system will show an error message if the field is left empty.
- Action: Choose the trash icon if you would like to remove the promotion category
- Add: Click on the Add button if you want to generate a promotion category
- Allow Customer to Close Promo Bar: Choose No to disallow customers to close the promo bar
- Auto Close Promo Bar After: Set the time period for closing the promo bar automatically
- Auto-reopen Schedule: Set the schedule to reopen the promo bar after being closed.
- Notice: Auto-reopen is supported only when customers click on the Close button.
Display setting

- Enable Multiple Promo Bars: Choose Yes to enable various promo bars to be shown
- Display Type: Choose the display type for the promo bar
- Slider: The promo bars are displayed in a slider.
- Separate: The promo bars are displayed separately.

- Change Bar Time: Fill in the display time for each promo bar
Manage promo bars
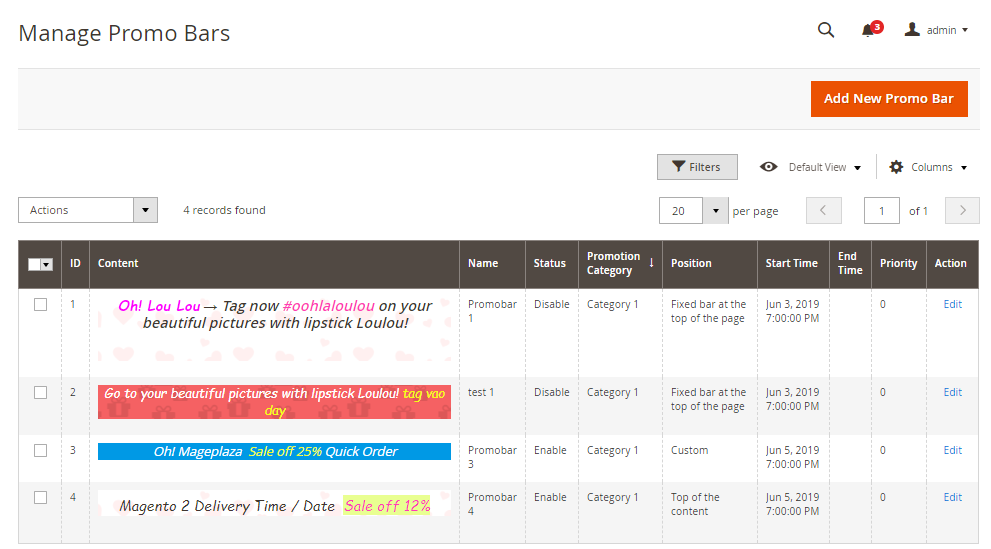
- This is where all the generated promo bars are stored.
- At the grid, admins can see all the fundamental information of the promo bar, including ID, Content, Name, Status, Start Time, End Time, Promotion Category, Position, Priority, and Action.
- Action:
- Edit: Choose Edit to modify the information on the Edit Promo Bar page
- Delete: Remove the promo bar
- Change Status: Edit the promo bar status
- Add New Promo Bar: Generate a new promo bar
Create New/ Edit Promo Bar
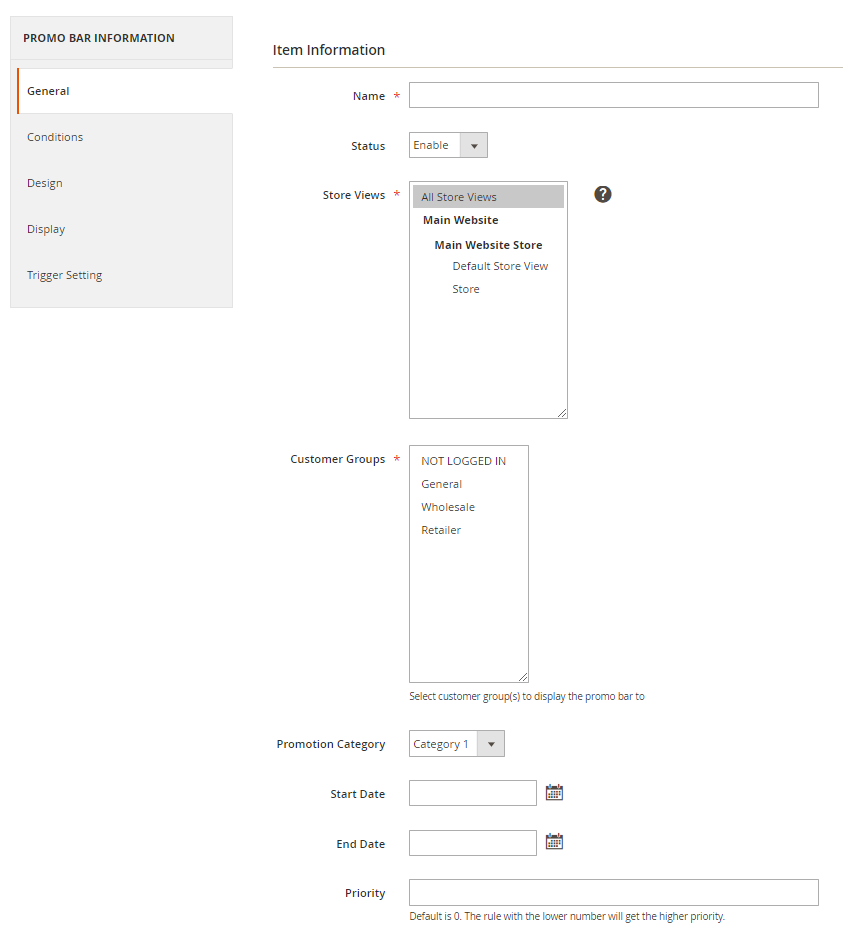
General
- Name: Create a title for the promo bar
- Choose Status = Enable to enable the promo bar to be applied
- Store Views: Choose a store to show the promo bar
- Customer Groups: Choose groups of customers who can view the promo bar
- Promotion Category: Choose the promo category to be applied on the promo bar
- Start Date: Decide the start date of the promo bar
- End Date: Decide the end date of the promo bar
- Priority: Insert the priority for promo bars. The lower the value, the higher the priority.
Conditions
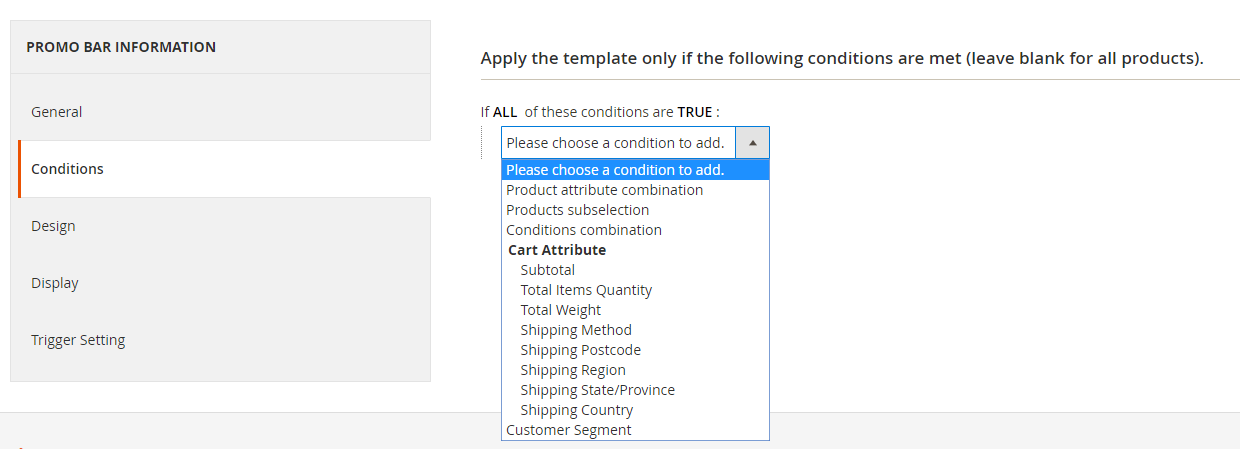
Admin can select conditions to display the promo bar at the checkout page.
Design
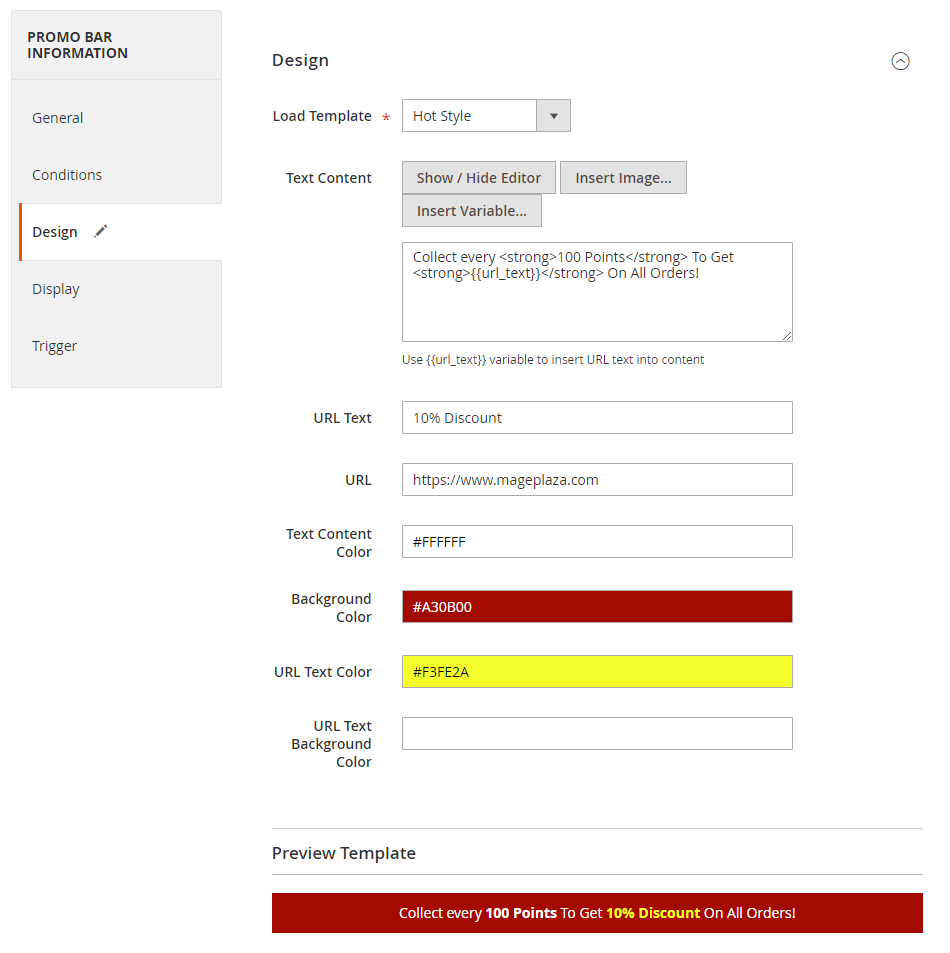
- Load Template: Select the promo bar template. The system will display the preview promo bar when admins select a specific template.
- Text Content: Create content for the promo bar
- URL Text: Fill in the content presented for the value {{url_text}}
- URL: Assign the link to the URL Text. As shoppers click on the text URL, the system will automatically redirect them to the assigned link.
- Load Template: Choose a template for the promo bar
- Text Content Color: Choose a font color for the content
- Background Color: Choose a background color for the promo bar
- URL Text Color: Choose a font color for the URL text
- URL Text Background Color: Choose a background color for the URL text
- Click on Preview Template to view the promo bar template right in the backend.
Display
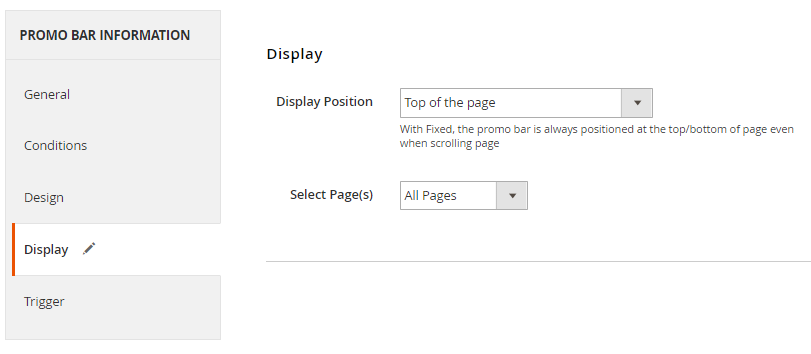
- Top of the content
- Top of the page
- Fixed bar at the bottom of the page
- Fixed bar at the top of the page
- Custom: Admins can select any location on site to show the promo bar by entering commands into the CMS page/ Static Block, template.phtml file and Layout file
- Select Page: Choose the location for showing the promo bar on pages
- All Pages: The promo bar will be shown on all pages
- Specific Pages
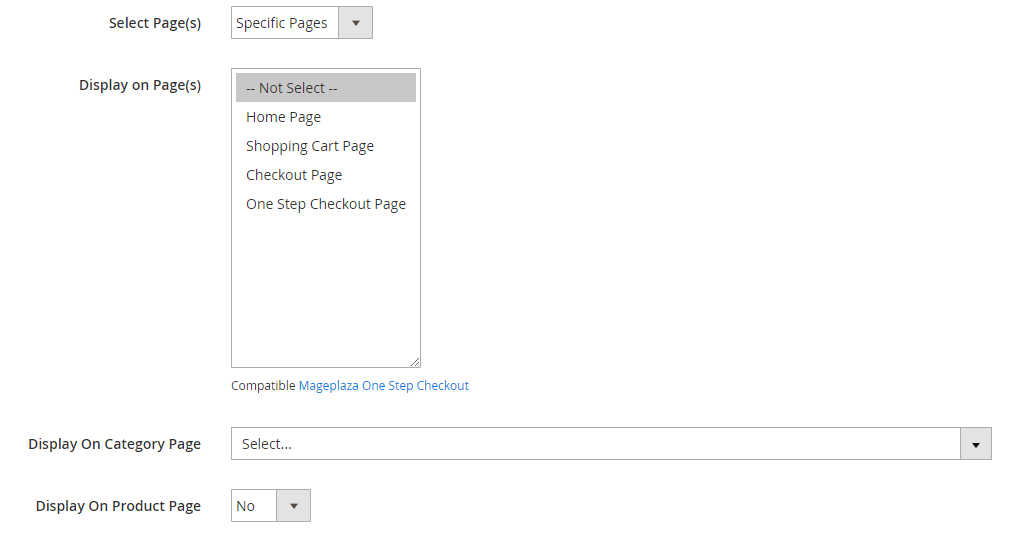
- Display On Page(s): Choose specific pages you want to show the display the promo bar on
- Display On Category Page: Choose the category page to show the promo bar on
- Display On Product Page: Choose Yes to show the promo bar on the product page
Trigger Setting

- Auto-close after: Define the time to deactivate the promo bar. If you choose Use Config, the promo bar will be closed based on the time set in the Configuration section.
- Auto-reopen schedule: Define the time to re-open the promo bar. If you choose Use Config, the promo bar will be re-displayed based on the time set in the Configuration section.
Custom
CMS Page/ Static Block
For instance: If you want to show the promo bar on the About Us page, let’s follow these steps:
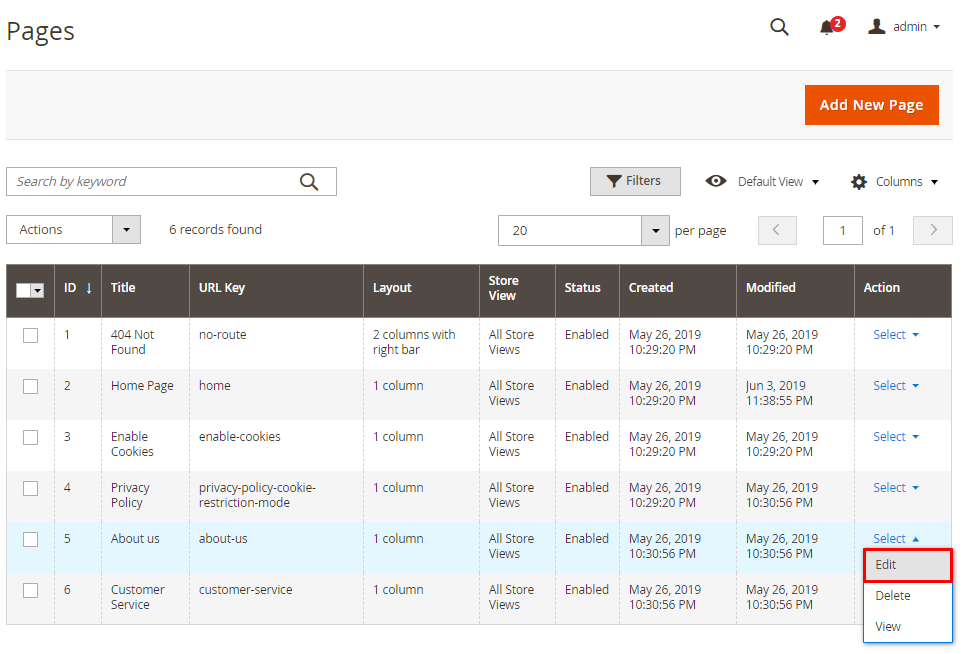
Step 1: Log in to the backend, go to Content > Pages, then choose Edit at About Us
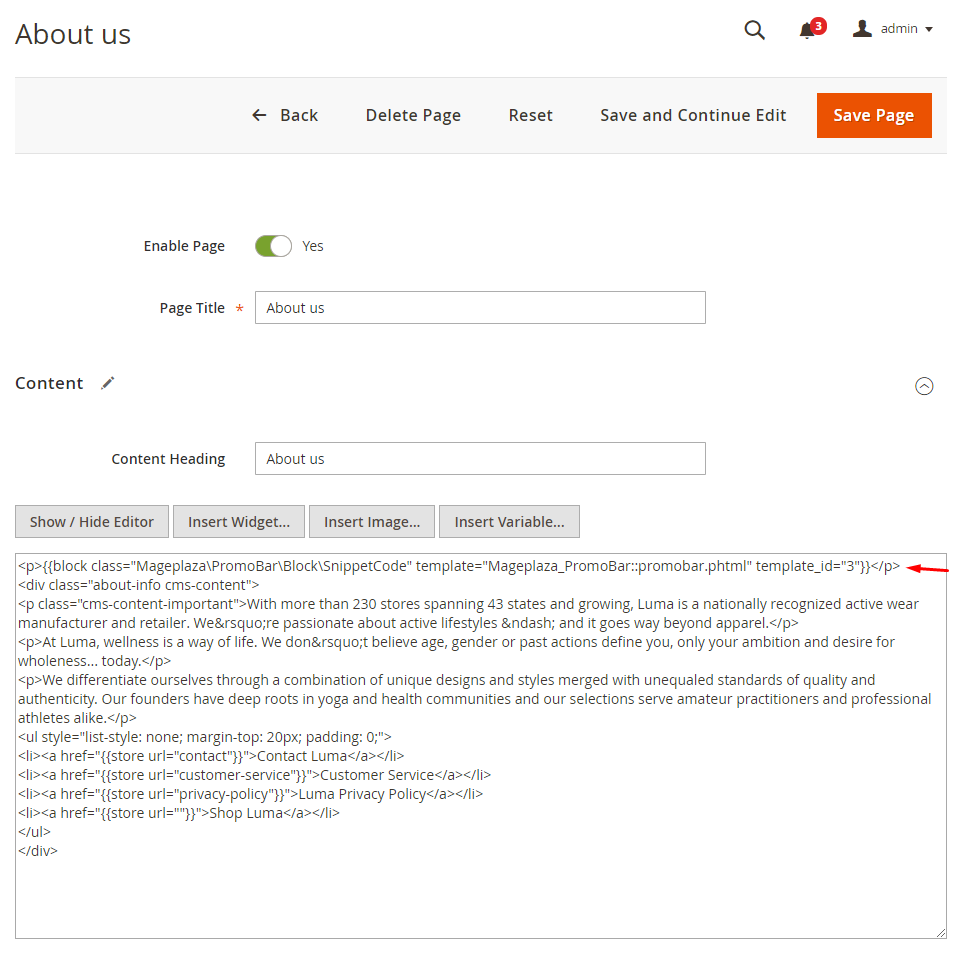
Step 2: Enter the code into the page content
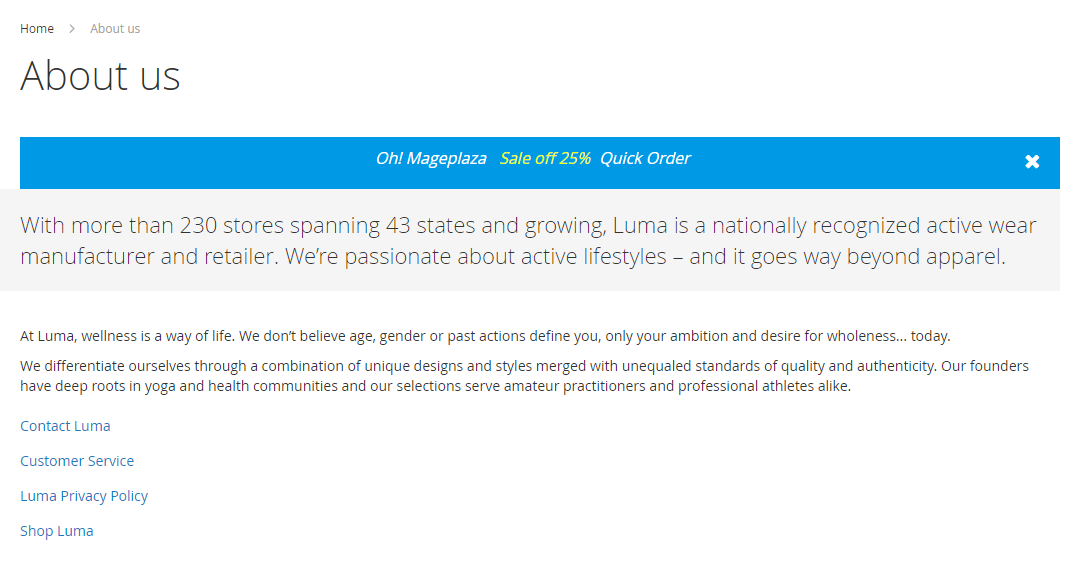
Step 3: Save and check at the frontend
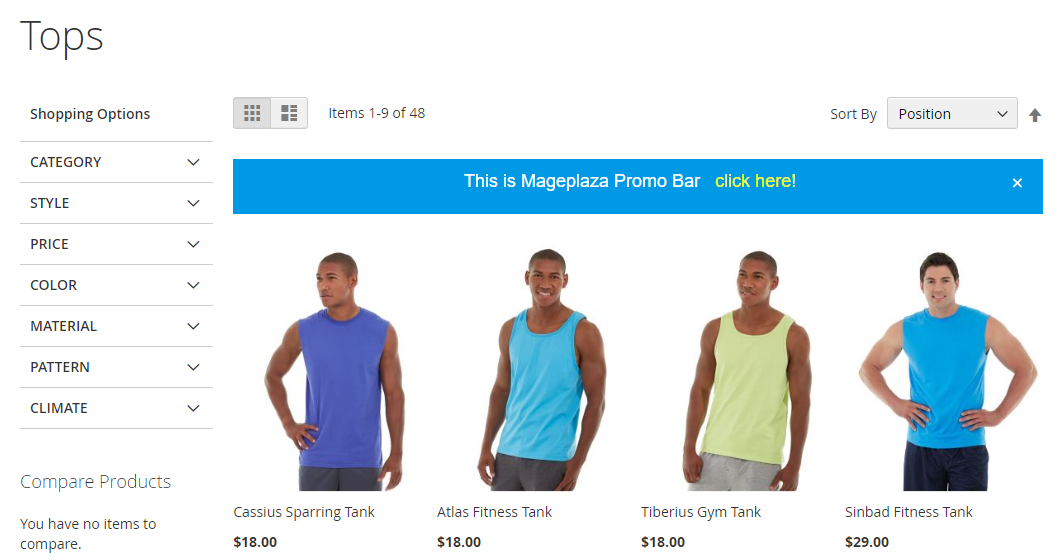
Template .phtml file
If you want to place a promo bar at a specific location in the .phtml file, follow these below steps:
Step 1: Go to the server and look for the directory with the path
vendor/magento/module-catalog/view/frontend/templates
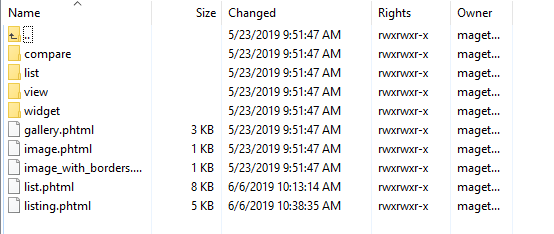
The template file include the following folders:

Step 2: Choose the folder, then choose the file with the format of .phtml
For instance: Suppose you choose the product folder and choose listing.phtml file to perform the action.
Step 3: Go to the selected .phtml file and enter the code

Save and check at the frontend
Layout file
If you want to include a promo bar in a specific location at the Layout file, follow these steps:
Step 1: Log in to the server and look for the directory with the path
vendor/magento/module-catalog/view/frontend/layout
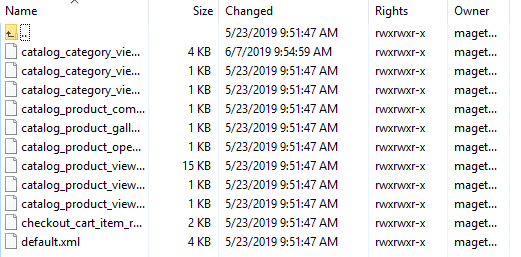
Step 2: Pick any file and enter the code into the file
For instance, suppose you chose the catalog_category_view.xml file.

Save and check at the frontend
Frontend
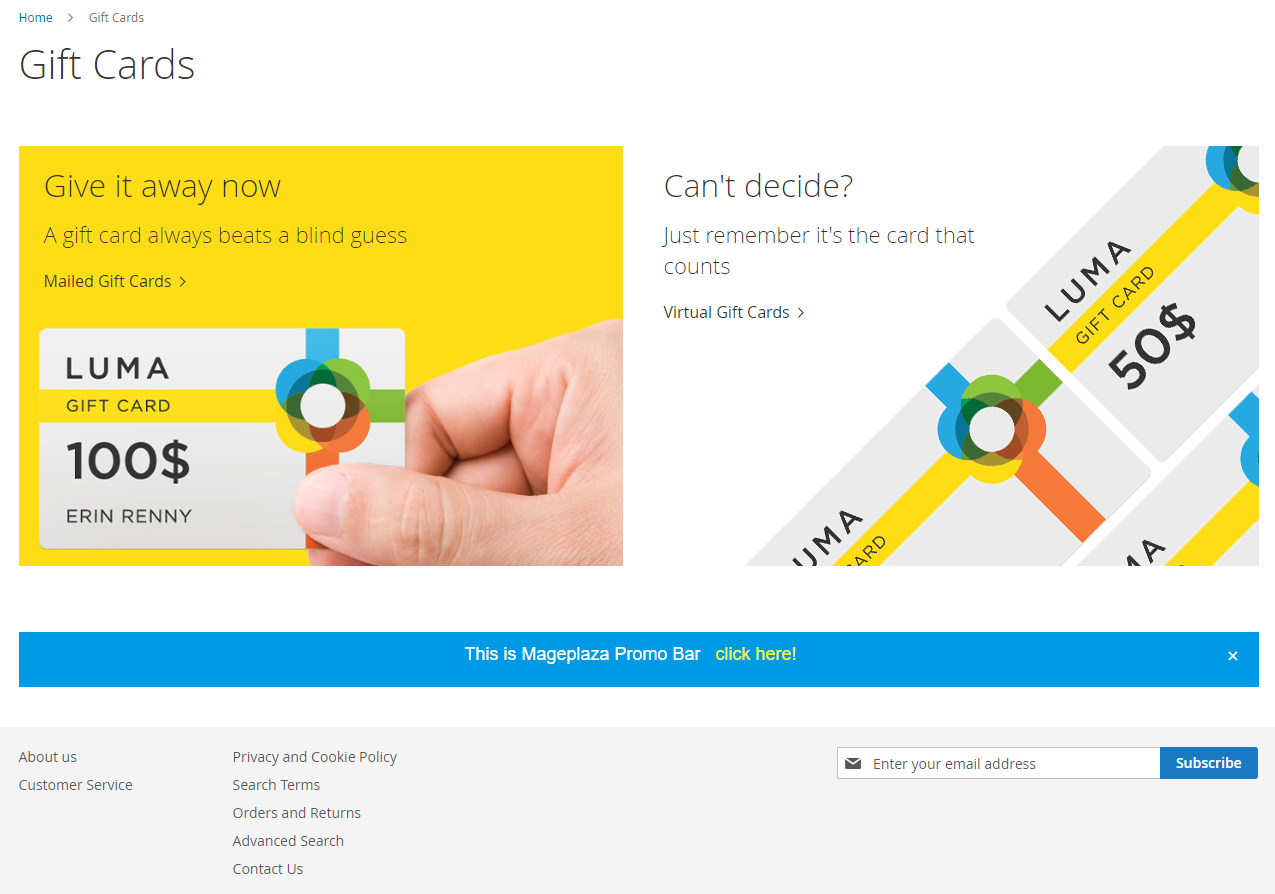
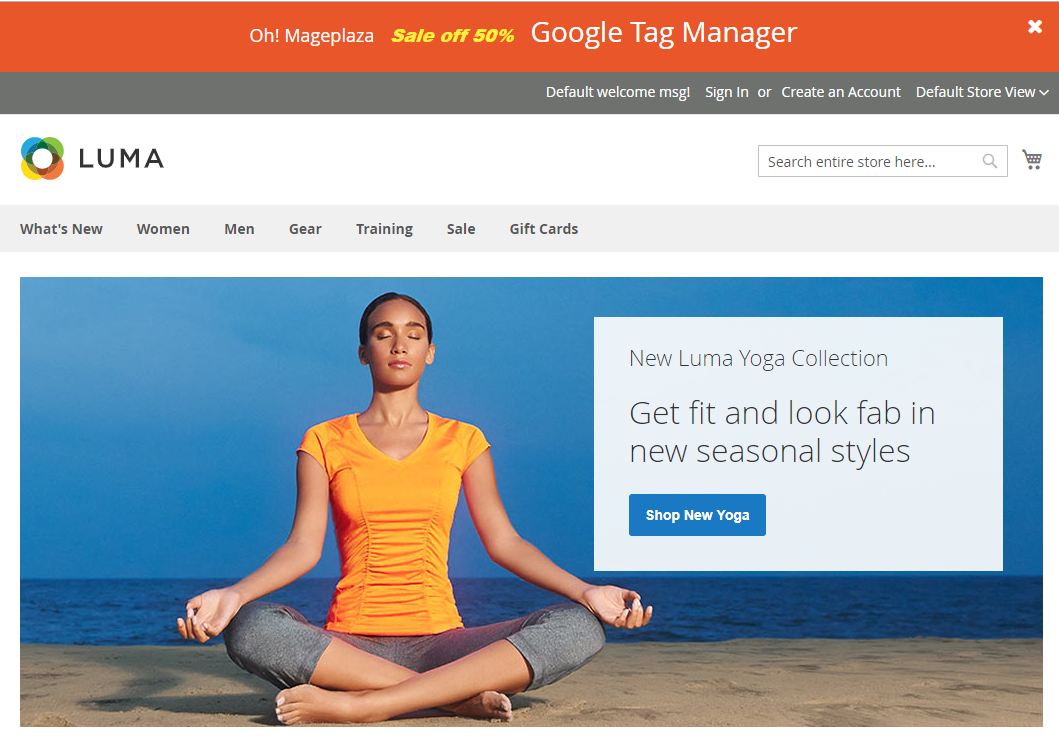
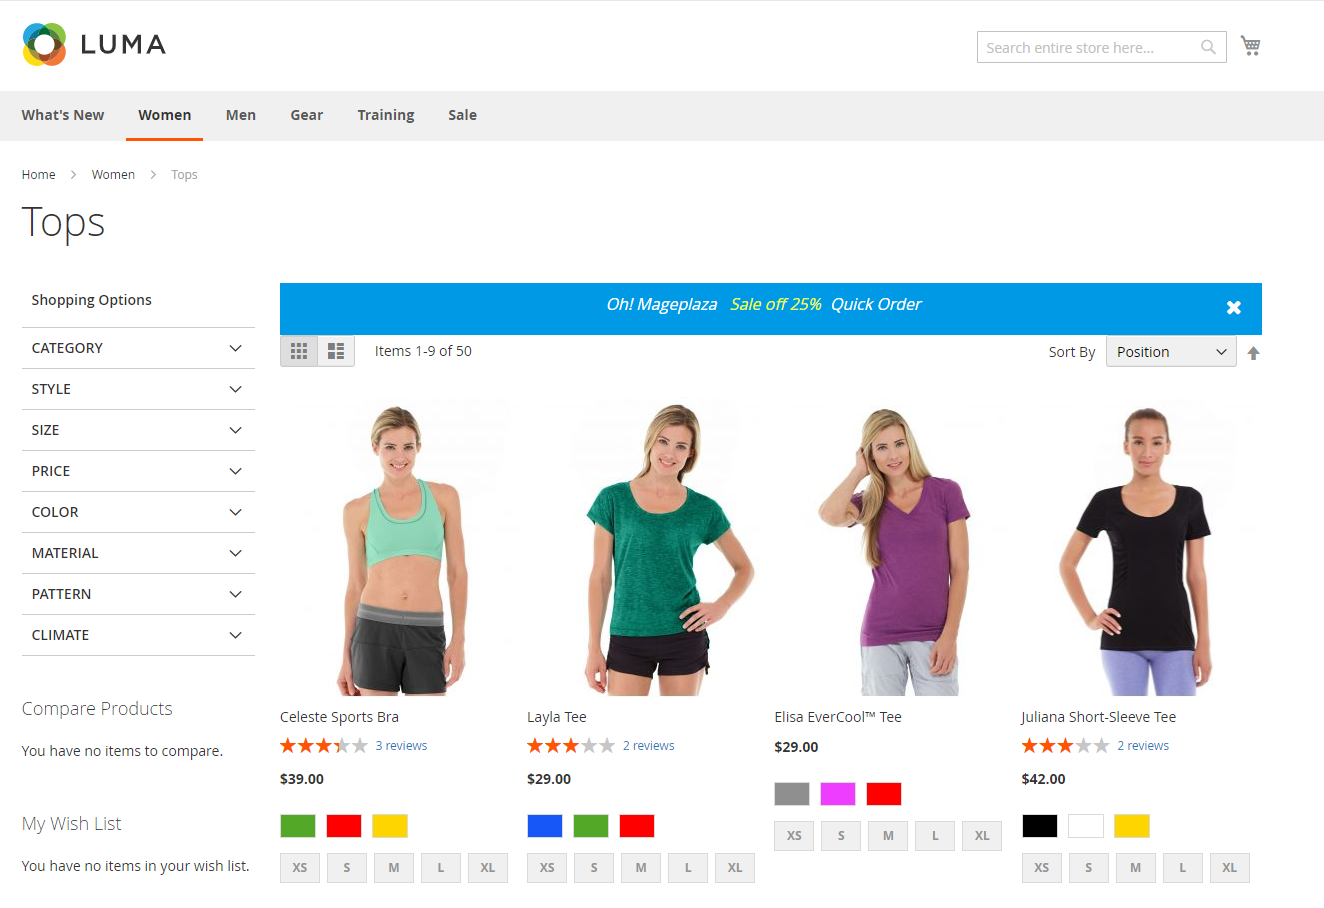
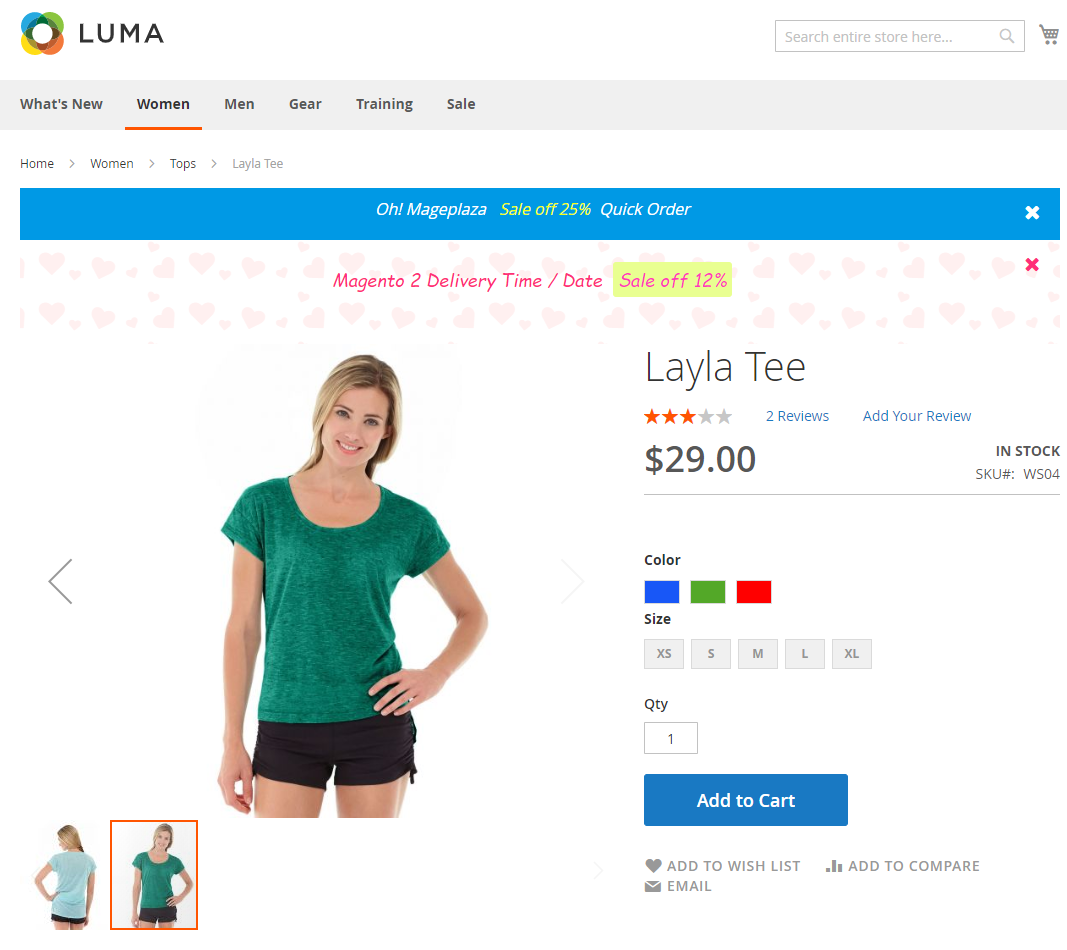
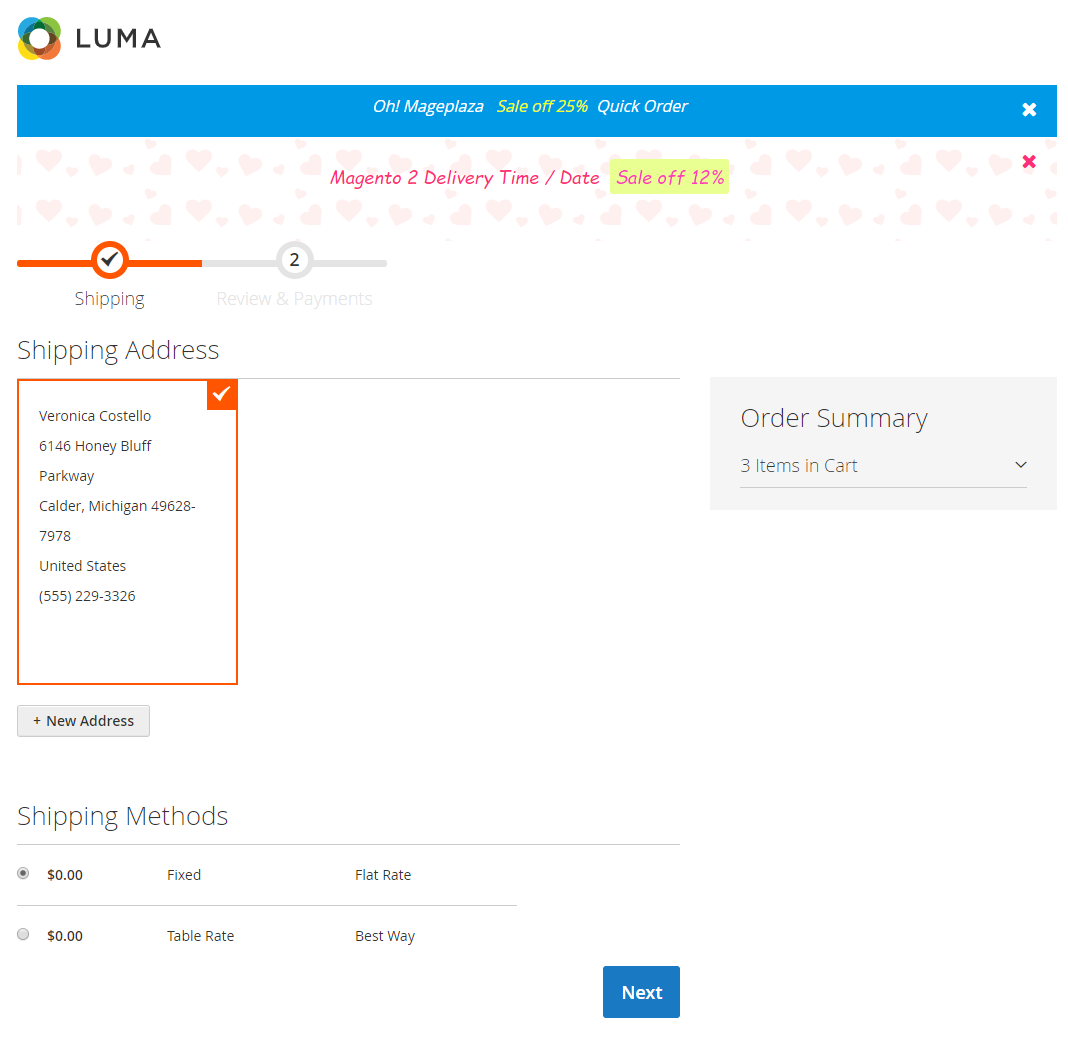
Here’s how the promo bar will appear on the home page, category page, product detail page, and checkout page.
Home page
Category product
Product detail page
Checkout page
Final words
Stunning promotion bars will grab customers’ attention effectively. Besides, bars are displayed repeatedly, working as a reminder. Shoppers will be encouraged no to miss good opportunities to gain good deals.
With Mageplaza Promo Bar for Magento 2, you can make your store more lively and attractive, then attract more customers and generate more sales.
10% DISCOUNT: Use coupon code FIREBEAR to receive a 10% discount when purchasing
Get Magento 2 Promo Bar Extension by Mageplaza


