

We continue exploring Shopware 6 and this time our guide will cover everything about orders within the administration and on the storefront. In the following article, you will find out where to discover orders in the backend and how to manage them. Besides, we shed light on how to create orders from Shopware admin. We start with the overview and proceed to more specific nuances of Shopware 6 order management.

Note that we provide Shopware integration with external platforms. Contact our support for further information or try our Improved Import & Export Extension for Shopware. We can even import your products to Shopware 6.
Table of contents
Shopware 6 Orders: Overview Grid
You can find orders in your Shopware 6 administration as follows:
- Go to the main menu;
- Open orders section;
- Proceed to Overview;
- You will see the following screen:
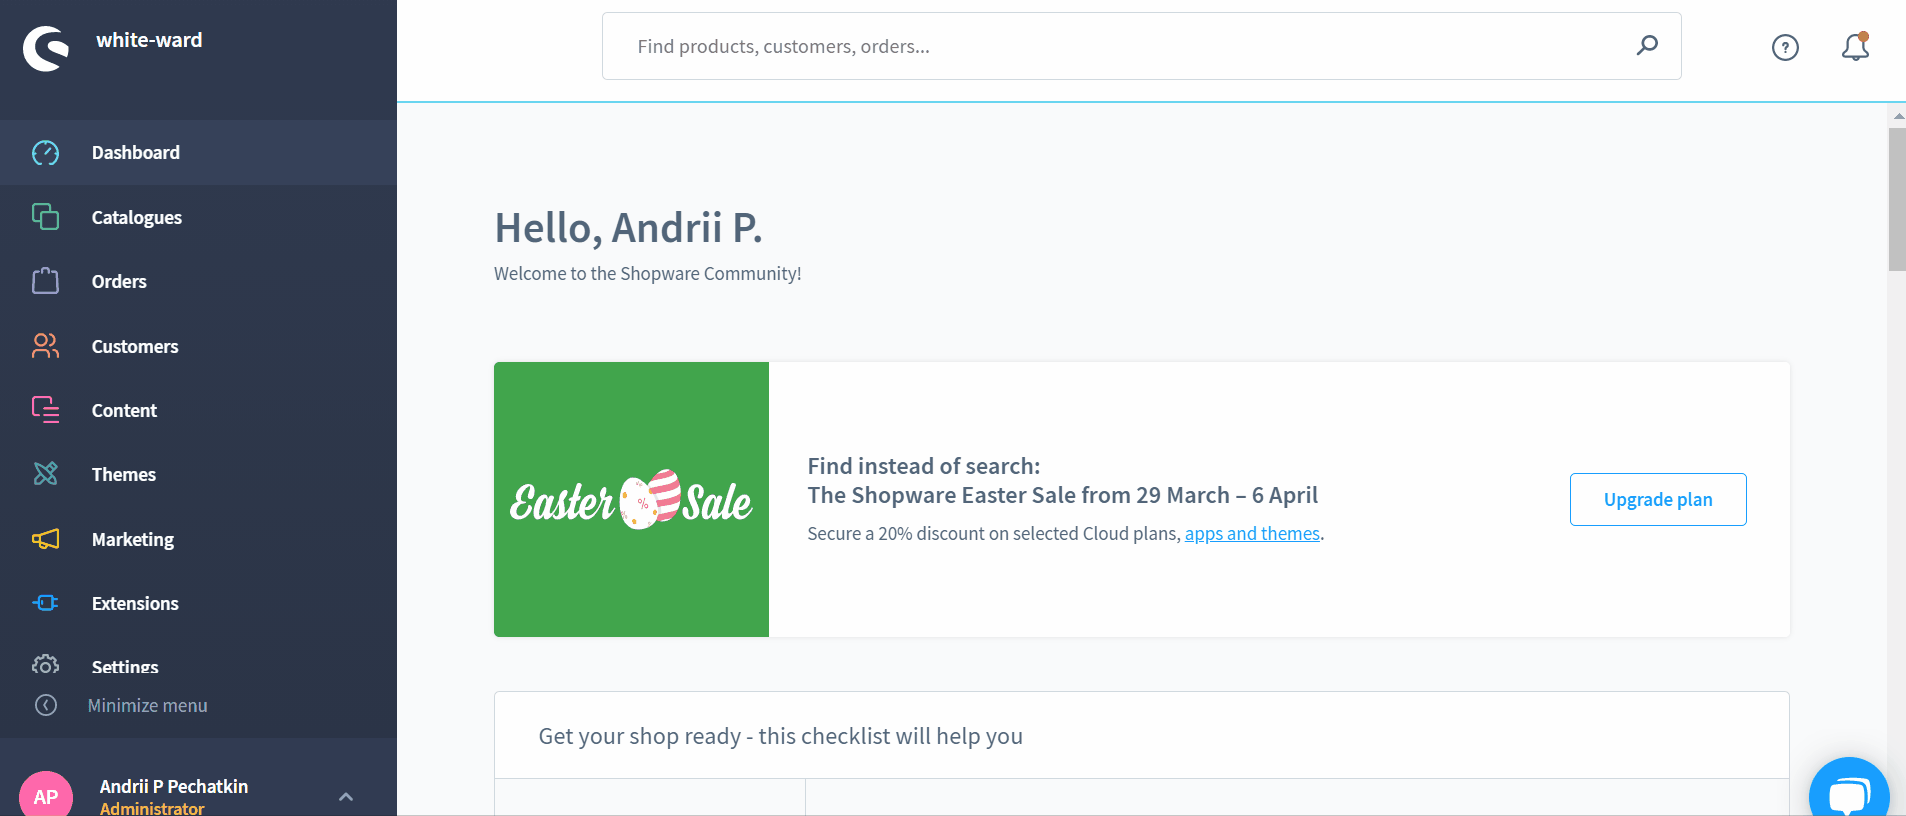
Shopware’s order overview contains a grid that shows all orders placed by your customers or admins on behalf of customers. In the second case, you can create orders with the help of the Add order button. We will describe this process in another chapter of this article.
The Overview grid lets you hide/show columns, each of which has a context menu where you can apply the necessary configuration:

Alternatively, you can manage the Shopware 6 order grid display by clicking the menu icon on the right in the header raw. It lets you enable/disable the compact mode, show/hide columns, and change their position:
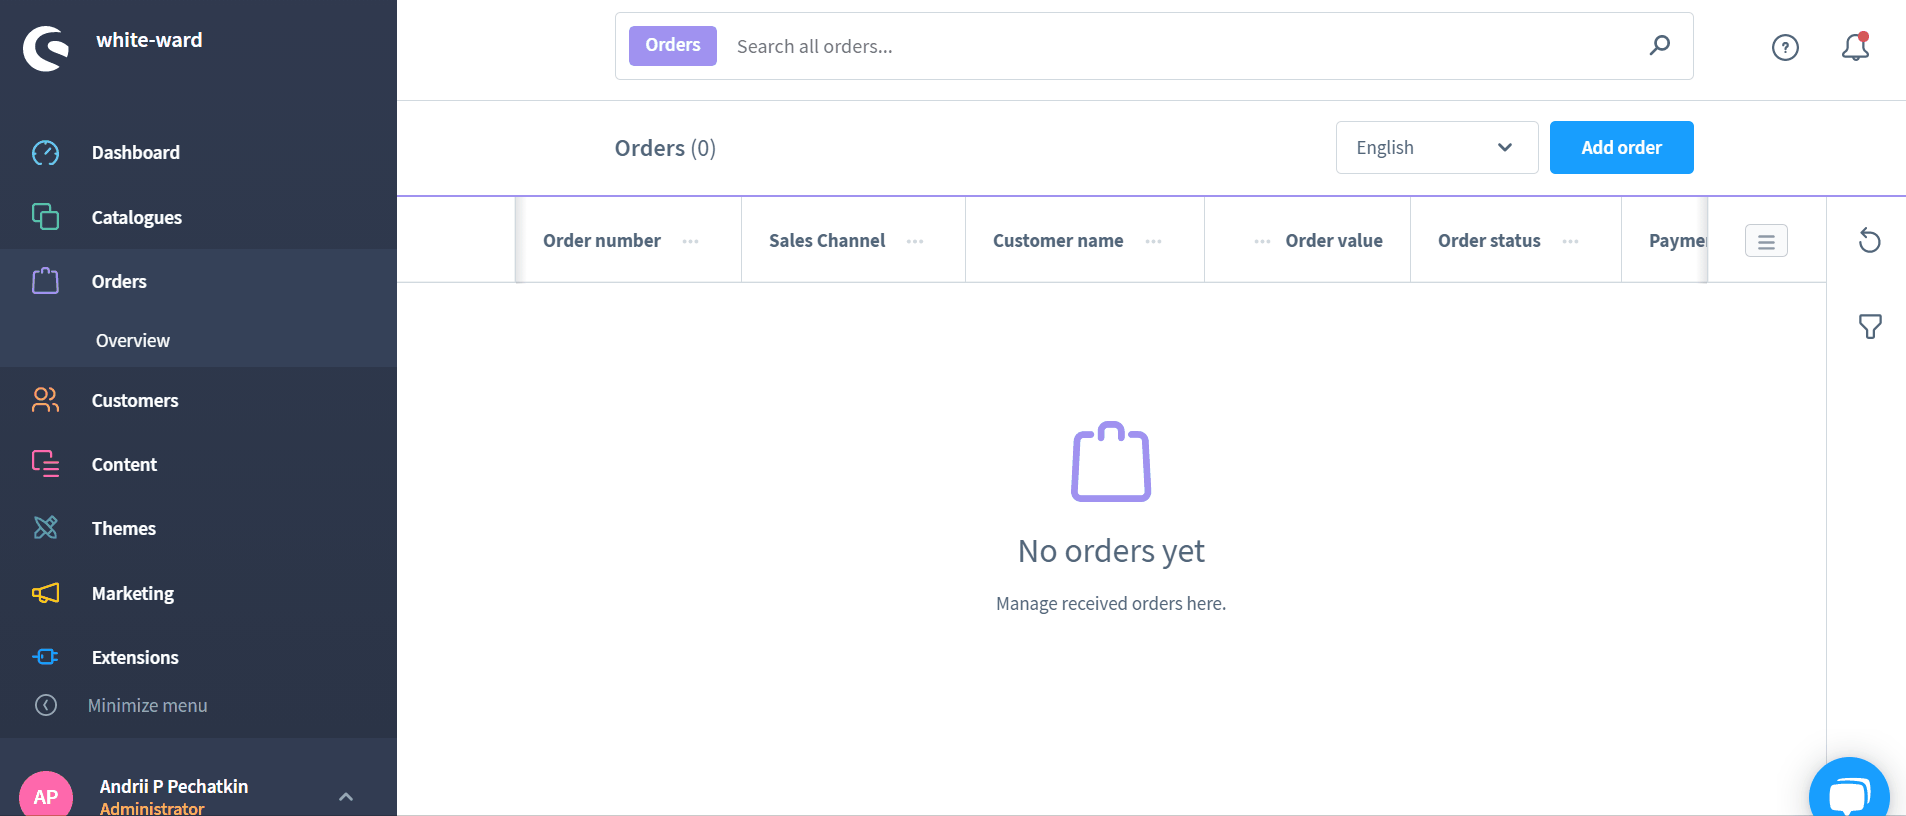
The right section of the overview screen contains tools to update the order display.

Besides, you can filter out the selection.

Shopware 6 Orders: Order Details
You can open any order to see its details. Shopware 6 offers a few ways to do that:
- Firstly, you can get more information about an order in Shopware 6 by clicking on the order number.
- Secondly, the item view within the context menu offers the same functionality.
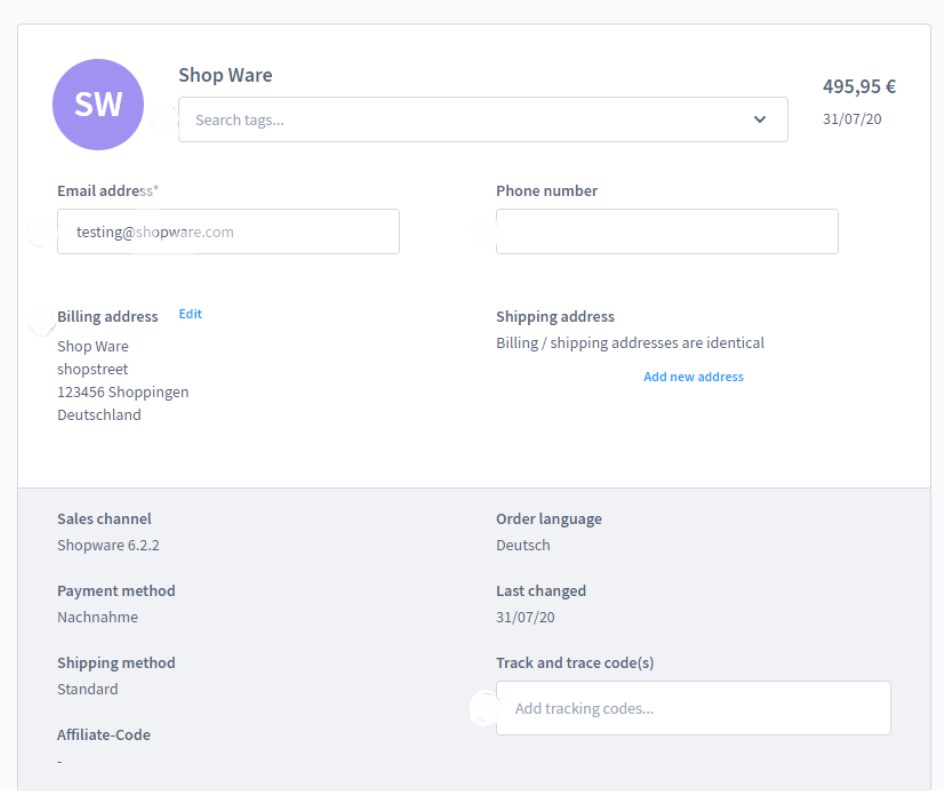
Open the detailed order view to get the additional information that cannot be displayed in the grid, manage the items and the accounting, or get rid of the order. Note that the ability to delete the order is available until a corresponding invoice is created.

An average order view in Shopware 6 is divided into the following sections:
- Details;
- Items;
- States;
- Shipment;
- Documents.
Let’s describe each one.
Details
This section not only provides more information about the order but also lets you cancel it.

The detailed order view displays all the personal data of the customer, who made the order. At the same time, it contains all additional details, as well as the selected shipping and payment methods.
Items
This section contains the individual items related to the order. It also calculates the order totals. As a store administrator, you can add new products or edit/remove the existing ones.

Since the items of the order can be associated with different taxes and price calculations, Shopware 6 enables mixed baskets for the storefront.
States
In this section, you can change the order and payment status of your order. Besides, you can find a history of order status changes.

Note that order statuses usually depend on each other. It means that you can switch between some of them only in a particular order. E.g., you cannot apply Refunded or Chargeback if the order has not been paid – got the Paid or Paid (partially) status.
Only when the order status turns to Completed, the purchased products are deducted from the stock. If you change it using a dropdown menu, Shopware 6 provides the ability to send an email informing the buyer about the new status. It is also possible to attach documents generated for the order.

Shopware 6 lets you send multiple documents in bulk. Select them from the list, activate the Send email to the customer, and hit the Update status button.
After that, the system assigns a template of the appropriate type, creating an email message. If the corresponding sales channel in which the order was placed has no template, Shopware 6 displays a selection window where you can choose how your message should look.

In addition to assigning one of the existing templates, you can create a new one. Next, click the Assign email template button.
Alternatively, it is possible to change the order status without assigning an email template. Simply click the Don’t assign an email template button.
Shipment
This section contains all the details necessary to deliver the order:
- Shipping method;
- Delivery date;
- Shipping costs;
- Delivery address.

Documents
This part of the Shopware 6 detailed order view contains documents associated with your order.

How to Edit Orders in Shopware 6
You can edit an order in the Shopware 6 admin by opening the order details screen described above. The editing mode is available upon clicking the edit button in the upper right corner of the screen.

The system lets you apply changes to Details and Payments
- Details – this section lets you edit contact details:
- Tags – you can add keywords for your products here;
- Email address – changing the email address of this order is possible here;
- Phone number – Here you can edit a customer phone number;
- Addresses – changing billing and shipping addresses is possible at this stage;
- Track and trace codes – add tracking codes of the shipping service provider here.
- Items – this section lets you remove or add items and adjust prices, quantity, and tax rates:
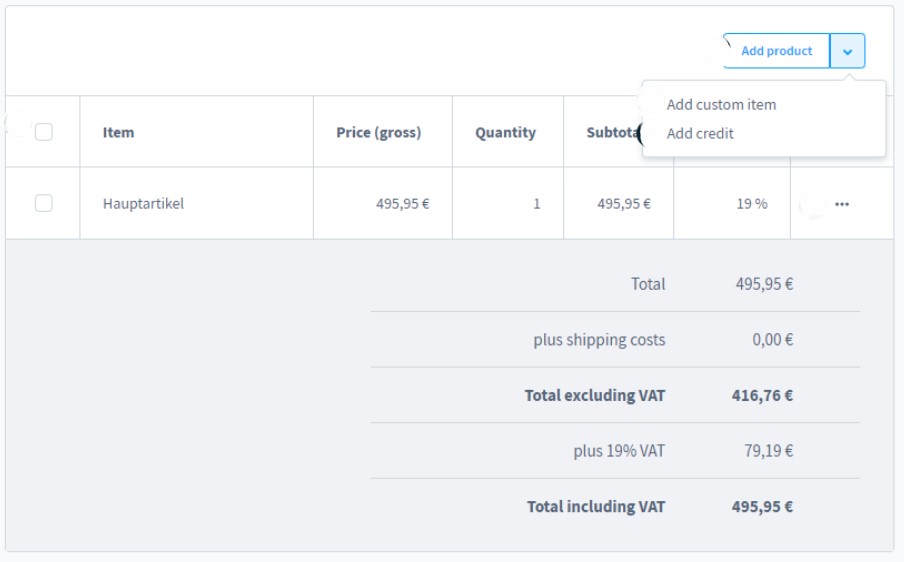
- Delete – select products via the left column and use the Delete button that appears afterward to remove the selected items;
- Add product – use the corresponding button at the top right. Use the dropdown menu to activate additional features;
- Add custom item – this feature lets you enter a name for the item and specify your own price and tax rate;
- Add credit – this feature is also associated with a custom item but this time you assign credit to it;
- Show product – this option transfers you to the configuration page of the respective product.


Shopware 6 Payment Process
Orders are inextricably bound up with money transfers. Therefore, we need to say a few words about Shopware 6 payments.
In spite of the tight connection of orders and payments, Shopware 6 espouses another outlook. The system treats payments and orders separately. An order is triggered as soon as the Send order button is clicked.
However, the payment status doesn’t change to Paid. It happens only when a customer makes a payment. Usually, it happens immediately after the order process. At the same time, it is possible to initiate the payment again in a customer account at a later date. Changing the payment method is possible too.
From the perspective of a buyer, the order screen in a customer account looks as follows:

It is possible to check the delivery and payment statuses as well as apply the following changes:
- Change payment method – this option is associated with a redirect to a checkout page, where a customer gets the ability to update the payment method and re-initiate the payment process;
- Repeat order – this option empowers buyers to reorder the particular selection of items;
- Cancel order – here, it is possible to entirely cancel the order. However, you need to enable this feature under Settings -> Cart settings -> Enable refunds.
How to Create Orders in Shopware 6 Admin
As we’ve already mentioned above, Shopware 6 lets you create orders on behalf of your clients. The process happens in the admin section of your website. Below, we explain how to do that.
Overview
You need to visit the Overview screen situated in the Orders category of your main menu to create a new order manually.

Hit the Add order button to open a new screen where you can create a new order.
Creating a new order
The order creation screen is split into two parts:
- Details;
- Items.
You should fill them in from top to bottom. Also, note that Shopware 6 provides some information automatically after you choose a customer.
Details
The Details section in its turn is split into two sections. The first one requires information about the customer and order, including shipping and billing addresses and other contact details.
Firstly, you specify a customer to create a new order for. Select one from the list of existing customers or create a new one by clicking on the Create new customer button.
After that, Shopware 6 fills in other fields in the Details area.
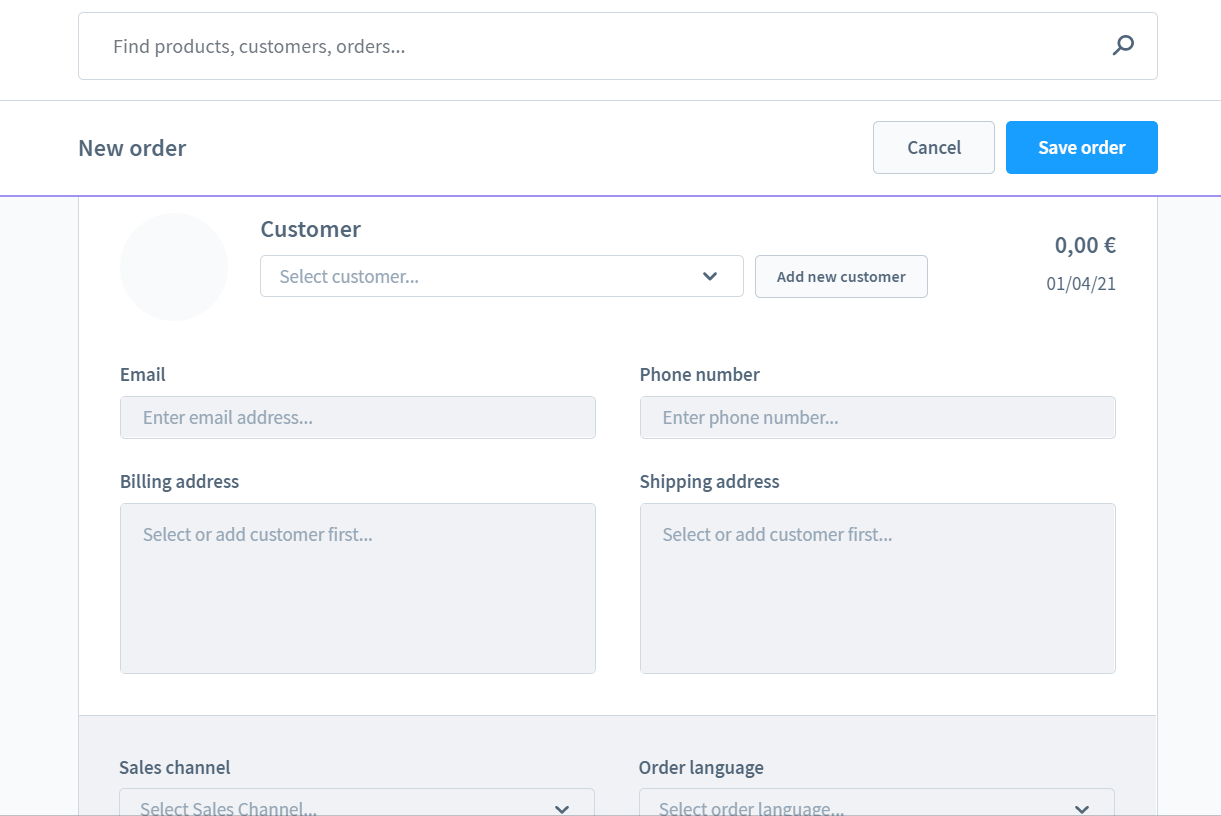
Still, you can change the billing or shipping addresses by clicking on the respective edit buttons.

As for the second part of the Details section, it enables you to adjust the following data:
- Order language – the language in which emails and documents associated with the order should be created;
- Payment method – the payment method associated with the order;
- Currency – the currency associated with the order;
- Shipping method – choose one from the list of shipping methods available for the sales channel associated with the order.
Please note that only the sales channel for which the customer has registered is available as a sales channel. Therefore it is not possible to edit the entry.
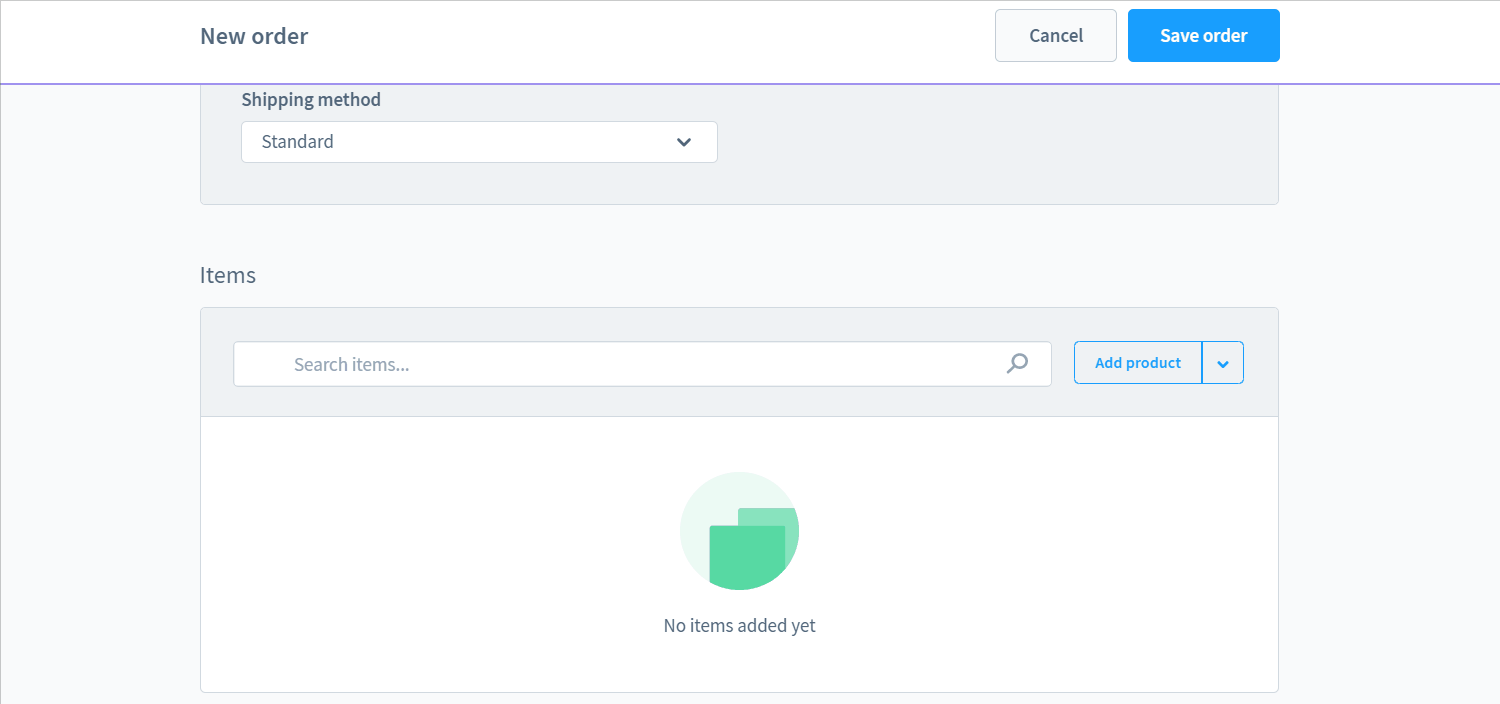
Items
Now, let’s proceed to the Items section of the Shopware order creation screen. It lets you add products to your order as well as create your own discount items.
Pay heed to the fact that the search field in the Items section works within the order. Below, we describe how to add new products to your order.

How to add products to orders in Shopware 6
- Click the Add product button to add a new order item.
- Shopware 6 adds a new row, where you can select a product.
- Double click on the row to apply further changes:
- Select a product;
- Specify its quantity;
- Choose VAT.
- Although the price of the product is determined automatically, you can change it later.
- The total price is calculated automatically following the price and quantity specified.
- The standard tax rate of the product is entered after you create the item (you can change it if necessary).
- Now, click the button with the checkmark to confirm your entries.
How to add empty positions to orders
In addition to an existing item, Shopware 6 lets you add an empty position. You can use the latter to add a product that is not listed on your website. Thus, you get the ability to add items without creating the corresponding product records in your catalog.
Follow these steps to add empty items to your new order in Shopware 6:
- Unfold the drop-down menu next to the Add Product button;
- Choose the Add custom item option.
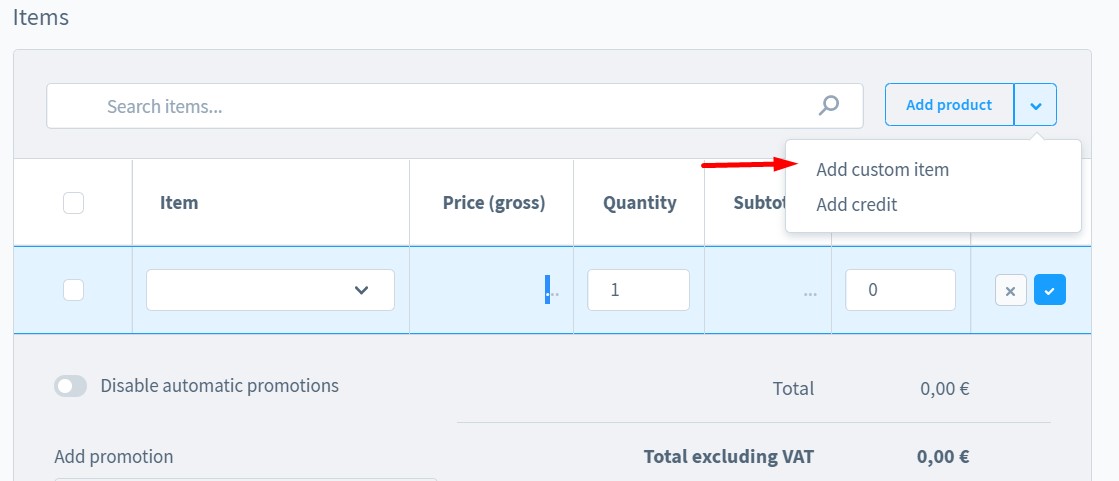
- Edit the added row by double-clicking on it:
- Specify the item name;
- Set the item price;
- Type its quantity;
- Define the tax rate.
- Save your custom item by clicking the button with the checkmark.

Note that Shopware 6 calculates the total price automatically.
How to add a credit note to Shopware orders
Shopware 6 lets you create credit items. You can create a product with this function to store a manual credit note to it.
You can add a credit note as follows:
- Unfold the drop-down menu next to the Add Product button;
- Choose the Add credit option.
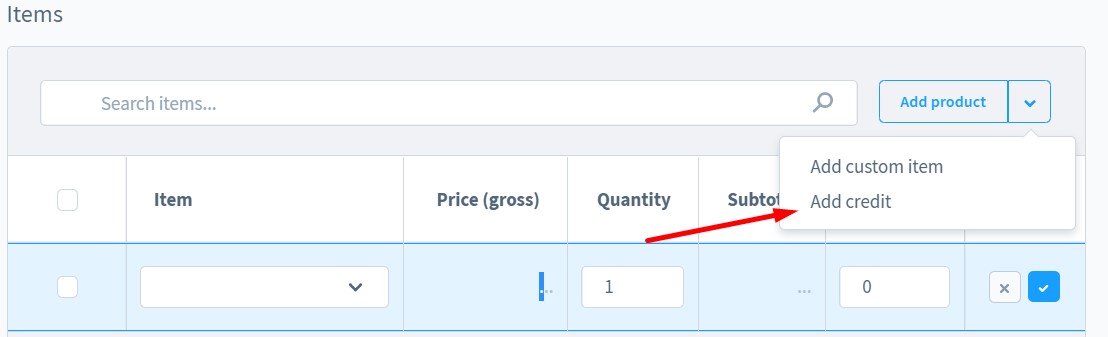
- Edit the added row by double-clicking on it:
- Specify the item name;
- Set the item price;
- Type its quantity;
- Add credit memo data in the Net price column;
- The tax rate is defined automatically.
- Save your credit item by clicking the button with the checkmark.

How to add promotions and automatic campaigns to orders
Shopware 6 offers quite flexible conditions for order creation in admin since you can add promotions and discounts to orders. As a store administrator, you can specify promotions activated without entering a voucher code. Hit the Disable automatic promotions button to turn in the functionality. Place a voucher code in the Enter promotion code field. This functionality is enabled only when at least one item is added to the order.

How to change order shipping costs manually
You can change shipping costs in the Details section. Choose a shipping method that should be used for the order and the system will update the corresponding shipping costs automatically.
If you need to calculate shipping costs that differ from the standard options, double-click on the entry with the shipping costs below the order items.
Provide changes in the newly-appeared window.
When all items are added and special conditions are specified, you can save your new order. Click on the Save order button on the top right section of the screen.

After Order Payment Process
Since Shopware 6 separates payments from orders, we need to describe what happens next after a new order is created.
Settings
The Shopware 6 administration lets you decide what to do with orders that are not paid. You have the possibility to configure the events that occur after the order without payment is saved.
Business events
It is possible to configure Shopware 6 business events under Settings -> Business Events. Here, you can specify actions that occur when certain conditions are met.
- Event – this column contains all business events. You can add new records by clicking the Add business event button;
- Title – here, you specify a name for the event action. Note that the field is not mandatory;
- Sales Channel – in this column, you can find information on a sales channel associated with the event. Don’t specify any sales channels to apply the event to all of them;
- Rules – here, the system lets you choose the existing rules or create and assign new ones to the event, determining conditions to trigger the event;
- Email template – a template used to send an email is displayed here;
- Active – this column displays enabled and disabled events;
- List settings – a context menu for each event is hidden here.
Click on an existing event to proceed to the overview and editing.

You can also hit the Open email template link to proceed to further editing. Shopware 6 lets you attach files there as well as modify the template.
The event itself lets you specify email recipients.

Shopping cart
As a store administrator, you also have an opportunity to enable order cancellation for customers. This feature is available under Settings -> Cart Settings. You need to activate the Enable refunds feature.

Examples
Below, we shed light on several examples of how the after order payment process can be configured in Shopware 6.
Order confirmation for non-PayPal payments
In this case, Shopware 6 requires the order confirmation if a customer chooses a payment method other than PayPal.
You can edit the corresponding event (the order has been received already) by creating a new rule:
- Open the event editing screen in the Rules section and click the Create new rule button.
- Select the Payment method condition.
- Choose Is none of.
- Select the PayPal payment method.
- Save the rule.

After that, Shopware 6 will send order confirmations only when the order was not placed with PayPal.
Resend order confirmation if paid with Paypal
Alternatively, you can send order confirmations in the opposite case – when a customer uses PayPal to complete the order:
- Create a new event:
- Click on the Add event action button;
- Select the Payment reached;
- Choose the Paid option from the dropdown list.
- Select order confirmation for the email.
- Now, create a new rule:
- Click the Create new rule button;
- Select the Payment method condition;
- Choose Is one of;
- Select PayPal;
- Enter the priority over other rules;
- Save the rule.

The Shopware 6 payment process
Now, let’s take a look at the payment process itself.
Backend
From the perspective of an administrator, the payment process in the backend looks as follows:
- A customer creates an order;
- The order appears in the admin as unpaid;
- The payment status is “failed” – there are no technical issues, the payment wasn’t made yet. Also, it happens in two other cases: when the customer cancels the payment or the customer’s PayPal account has a discrepancy;

- The customer makes the payment.
- The order changes its status.

Frontend
Now, let’s see how all these things happen from the perspective of a customer:
- A buyer places an order but doesn’t pay for it;
- Shopware 6 sends a notification that the payment process has failed.
- There is the Change payment link in the notification;
- The customer uses it to proceed to the checkout page with the order made recently.
- It is now possible to use the same payment method again or switch to another.
- It is also possible to cancel the order (activate the feature under Settings -> Cart Settings -> Enable Refunds);

Alternatively, it is possible to re-initiate the payment process from a customer account:
- Open the context menu;
- Choose Complete Payment;
- Alternatively, it is possible to hit the Complete payment button;

As you can see, you can repeat the order from the context menu or by clicking the Complete payment button. Switching to another payment method is possible in both cases as long as the order has not been set to the “paid” status
Canceling the order at this stage is possible too. This feature is available (if activated) even after the status “paid” has been reached.
How to Import Orders to Shopware 6
Our team lets you simplify and automate various routine processes associated with managing your Shopware 6 backend by importing the existing data. Contact our support for more details and try our Improved Import & Export Extension for Shopware. You can use it to import any entities to Shopware 6. Please, consult our specialists before using the module for transferring orders to Shopware 6.


