

We’ve just described how to install Shopware 6 on your server. The next step is associated with the Shopware 6 First Run Wizard. The system launches this tool right after the installer logs you into the admin interface. It always happens after the successful installation. What’s the purpose of the Shopware First Run Wizard? It teaches how to set up your shop, dividing this process into several steps.

Note that we provide Shopware integration with external platforms. Contact our support for further information or try our Improved Import & Export Extension for Shopware.
Table of contents
How to Install Language Packs for Shopware 6
Shopware 6 doesn’t include all the supported languages after the installation. Therefore, you may need to enable additional language packs. The first step associated with the Wizard is dedicated to this process. The tool lets you install additional language packs in Software 6:
- View all language packs available in the system.
- Click on the Install button of the language you want to add to your Shopware 6 store.
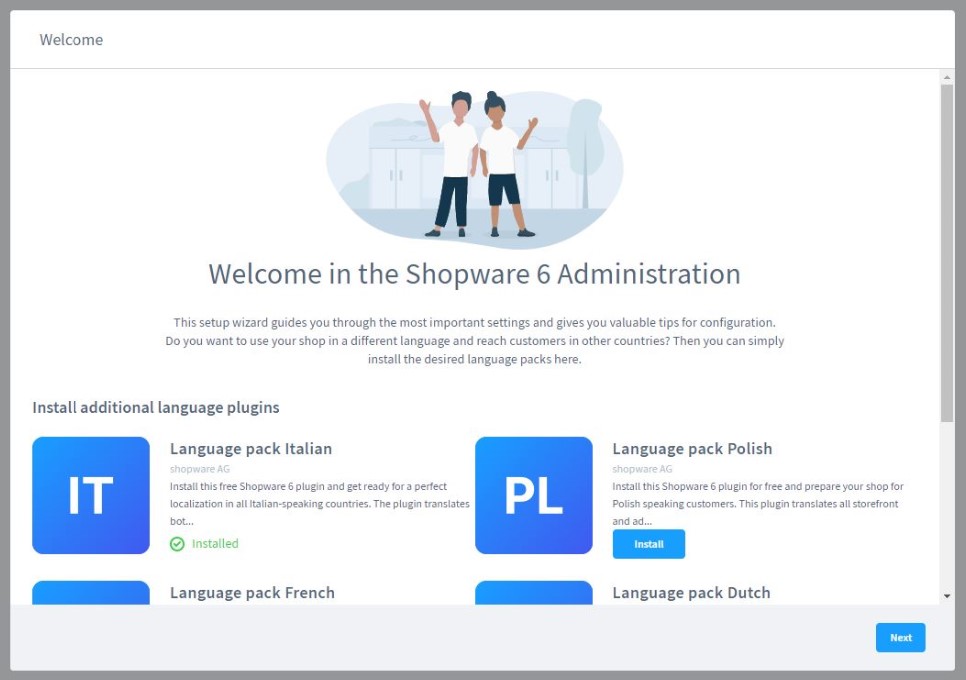
- Complete the installation.
- Now, you can change the language of the administration interface by selecting the added language.


Note that changing the language at this point affects only a particular personal experience of the administrator who applies the setting.
Shopware lets you define the language of your storefront in the configuration section of the respective sales channel.
After installing all the necessary language packs, click the Next button. You will proceed to the next step of the Shopware 6 configuration.
How to add demo data to Shopware 6
Now, we describe how to add demo data to Shopware 6. While the barebone installation doesn’t contain any products, the demo data is associated with products, categories, and manufacturers. You can skip this step or click the Next button to fill in your Shopware 6 website’s front end section.
Note that Shopware 6 provides the demo data for testing purposes only. Therefore, it is prohibited to use it in a production environment.

Alternatively, you can migrate your actual shop data to Shopware at this stage. Note that our team knows how to optimize and automate data migration to Shopware 6. Contact us for further information.
How to configure Shopware 6 mailer settings
At this step, the Shopware 6 First Run Wizard lets you configure the mailer settings. They are necessary for receiving and sending emails through your e-commerce webstore.

As you can see, the system empowers you to use a local email agent. At the same time, it is possible to configure your own SMTP server.
Alternatively, you can skip this step and configure Shopware 6 mailer settings outside of the First Run Wizard. Click on Configure later. We will describe how to configure this instrument in another article.
How to configure PayPal for Shopware 6
The Shopware 6 PayPal configuration is associated with the third step of the Wizard. At the corresponding screen, you can enter your PayPal API access data. The system saves it in the appropriate plugin.

How to install Shopware 6 plugins
Now, the First Run Wizard empowers you to install plugins:
- Select your relevant region;
- Browse through different categories;
- Choose plugins you want to install;
- Click the Next button after installing all the necessary plugins;
- Proceed to the final setup step.

How to set up a Shopware account
Now, you can set up your Shopware account if you didn’t do that previously. Your account provides access to purchased plugins, licenses, and community resources.
- Enter your Shopware ID and password;
- Click the Next button;

- The system will now link your Shopware 6 domain to the shop;
- Choose a preferred domain from the list of verified domains;
- Hit the Next button.

Use the Create button to generate a new shop domain. You can indicate that it is a Test environment with the corresponding checkbox.
Note that Shopware requires the following conditions to be met:
- The domain specified at this stage must be externally accessible;
- The corresponding web server must refer to the public directory within your Shopware 6 installation.
Note that all the domains you’ve created in the First Run Wizard are considered Community Edition domains in your Shopware account.
Congratulations! You’ve performed the basic configuration of your Shopware 6 website. Click the Finish button to finish the First Run Wizard setup.


