Today we are going to cover how to add Google Tag Manager code snippet in your Magento 2 store in simple steps which will help developers, merchant and marketers.
What is Google Tag Manager?
Google Tag Manager is a tag management system that allows you to create and monitor tags on a user interface, without writing new code each time you want to construct a tag. You simply embed the Google Tag Manager code into each page of your website. This eliminates the manual process of creating tags, making your marketing process< more efficient and precise.
Why we need Google Tag Manager?
Tag Manager is a tag management system that allows you to quickly and easily update tags and code snippets on your website.
A tag is a snippet of code that sends information to a third party, such as Google. If you don’t use a tag management solution such as Tag Manager, you need to add these a lot of different code snippets directly on your website. With Tag Manager, you no longer need to maintain each of these code snippets and ask your developer to change now and then.
With the right extension or plugin you should be able to track not only Enhanced E-commerce tracking but many others like Facebook, Google Dynamic Remarking, Marin Software, Google Adwords and many more trackings.
How to create GTM account?
You can follow the following three simple steps to create your GTM account
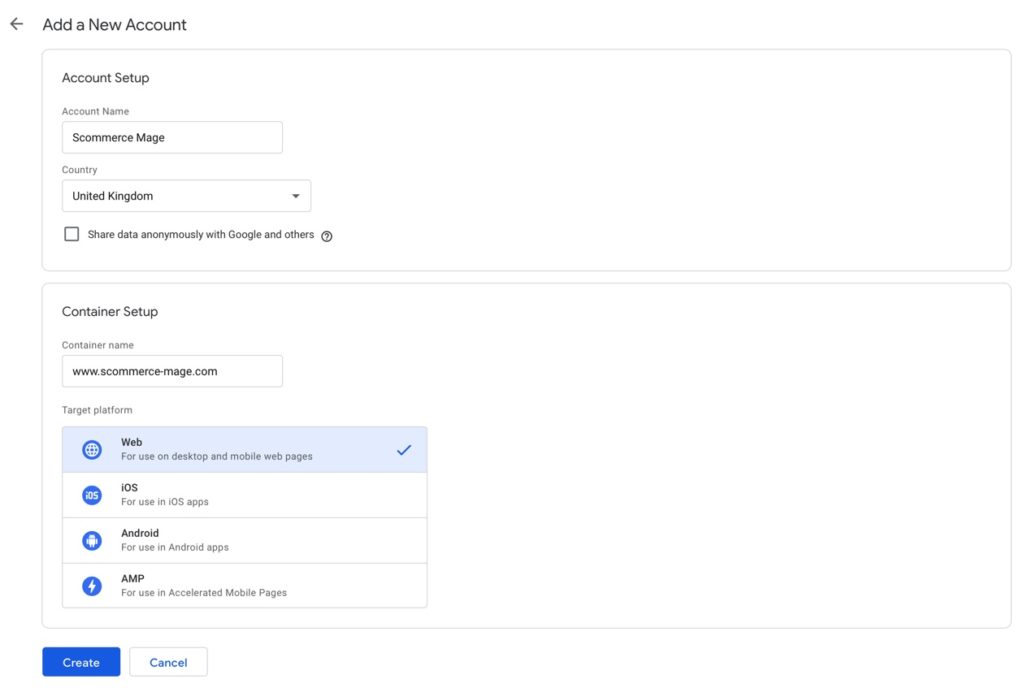
- Go to Google Tag Manager and click create account (as shown in the screenshot below)

- Accept GTM terms and conditions
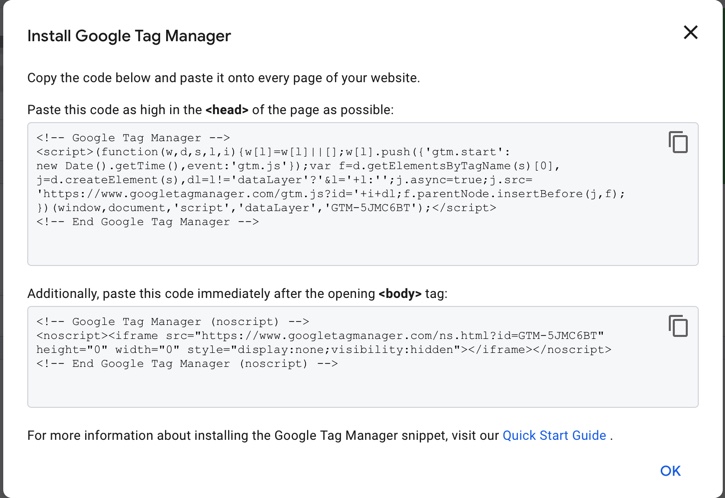
- Copy two snippets as shown below (script and no script code) to use in Magento 2 implementation

How to add GTM code in Magento 2?
You can add the Google Tag Manager code in your custom theme using the following step by step guide
Step 1 – Create two phtml templates to include the GTM code snippet that needs to go to head and body in your custom theme. This is the same code which you copied when creating your GTM account above.
// app/design/frontend/YourTheme/Magento_Theme/templates/html/gtm_head.phtml &amp;amp;amp;amp;amp;amp;amp;amp;amp;amp;lt;!-- Google Tag Manager --&amp;amp;amp;amp;amp;amp;amp;amp;amp;amp;gt;
&amp;amp;amp;amp;amp;amp;amp;amp;amp;amp;lt;script&amp;amp;amp;amp;amp;amp;amp;amp;amp;amp;gt;(function(w,d,s,l,i){w[l]=w[l]||[];w[l].push({'gtm.start':
new Date().getTime(),event:'gtm.js'});var f=d.getElementsByTagName(s)[0],
j=d.createElement(s),dl=l!='dataLayer'?'&amp;amp;amp;amp;amp;amp;amp;amp;amp;amp;amp;l='+l:'';j.async=true;j.src= 'https://www.googletagmanager.com/gtm.js?id='+i+dl;f.parentNode.insertBefore(j,f);
})(window,document,'script','dataLayer','GTM-W29HWSB');&amp;amp;amp;amp;amp;amp;amp;amp;amp;amp;lt;/script&amp;amp;amp;amp;amp;amp;amp;amp;amp;amp;gt;
&amp;amp;amp;amp;amp;amp;amp;amp;amp;amp;lt;!-- End Google Tag Manager --&amp;amp;amp;amp;amp;amp;amp;amp;amp;amp;gt; // app/design/frontend/YourTheme/Magento_Theme/templates/html/gtm_body.phtml
&amp;amp;amp;amp;amp;amp;amp;amp;amp;amp;lt;!-- Google Tag Manager (noscript) --&amp;amp;amp;amp;amp;amp;amp;amp;amp;amp;gt;
&amp;amp;amp;amp;amp;amp;amp;amp;amp;amp;lt;noscript&amp;amp;amp;amp;amp;amp;amp;amp;amp;amp;gt;&amp;amp;amp;amp;amp;amp;amp;amp;amp;amp;lt;iframe src="https://www.googletagmanager.com/ns.html?id=GTM-W29HWSB" height="0" width="0" style="display:none;visibility:hidden"&amp;amp;amp;amp;amp;amp;amp;amp;amp;amp;gt;&amp;amp;amp;amp;amp;amp;amp;amp;amp;amp;lt;/iframe&amp;amp;amp;amp;amp;amp;amp;amp;amp;amp;gt;&amp;amp;amp;amp;amp;amp;amp;amp;amp;amp;lt;/noscript&amp;amp;amp;amp;amp;amp;amp;amp;amp;amp;gt;
&amp;amp;amp;amp;amp;amp;amp;amp;amp;amp;lt;!-- End Google Tag Manager (noscript) --&amp;amp;amp;amp;amp;amp;amp;amp;amp;amp;gt;
Step 2 – Create default.xml file to load the above files in the layout folder of your custom theme
&amp;amp;amp;amp;amp;amp;amp;amp;amp;amp;lt;!-- app/design/frontend/YourTheme/Magento_Theme/layout/default.xml --&amp;amp;amp;amp;amp;amp;amp;amp;amp;amp;gt; &amp;amp;amp;amp;amp;amp;amp;amp;amp;amp;lt;referenceBlock name="head.additional"&amp;amp;amp;amp;amp;amp;amp;amp;amp;amp;gt; &amp;amp;amp;amp;amp;amp;amp;amp;amp;amp;lt;block class="MagentoFrameworkViewElementTemplate" name="gtm.head" before="-" template="Magento_Theme::html/gtm_head.phtml" /&amp;amp;amp;amp;amp;amp;amp;amp;amp;amp;gt; &amp;amp;amp;amp;amp;amp;amp;amp;amp;amp;lt;/referenceBlock&amp;amp;amp;amp;amp;amp;amp;amp;amp;amp;gt; &amp;amp;amp;amp;amp;amp;amp;amp;amp;amp;lt;referenceContainer name="after.body.start"&amp;amp;amp;amp;amp;amp;amp;amp;amp;amp;gt; &amp;amp;amp;amp;amp;amp;amp;amp;amp;amp;lt;block class="MagentoFrameworkViewElementTemplate" name="gtm.body" before="-" template="Magento_Theme::html/gtm_body.phtml" /&amp;amp;amp;amp;amp;amp;amp;amp;amp;amp;gt; &amp;amp;amp;amp;amp;amp;amp;amp;amp;amp;lt;/referenceContainer&amp;amp;amp;amp;amp;amp;amp;amp;amp;amp;gt;
Step 3 – Clear caches and you should have GTM code implemented successfully!

Now you can go in Google Tag Manager and start creating tags for example Google Analytics, Facebook, Google Adwords, Google Remarking etc.

The above will add basic script of GTM code on your Magento 2 store but GTM is all about data and data layers without them there is very little can be done using the basic script of GTM.

For example – for Google Enhanced Ecommerce, you need to create data layers for all the below actions / pages
If you are a developer you can add the above data layers in your code using the following layout handlers -:
- default.xml
- catalog_category_view.xml
- catalog_product_view.xml
- catalogsearch_advanced_result.xml
- catalogsearch_result_index.xml
- checkout_cart_index.xml
- checkout_index_index.xml
- checkout_onepage_success.xml
The following extension / plugin will help you achieve all the above and many more

Magento 1 Google Tag Manager with Enhanced Ecommerce

Magento 2 Google Tag Manager with Enhanced Ecommerce


