Unfortunately, the Magento 2 platform doesn’t contain a reliable blog by default. Luckily, due to such extensions as Amasty Blog Pro, Magento 2 blogs become available and can be easily added to any ecommerce storefront. Below, we shed light on how the Amasty Magento 2 blog module works.

Download / Buy Amasty Blog Pro Magento 2 Extension
Download / Buy Amasty Blog Pro Magento Extension
Blogging was always a big part of online marketing. By posting qualitative articles, descriptions, and product reviews, merchants attract new customers and increase the loyalty of existing clients.
So, what are the core features a reliable Magento blog extension should provide? These are responsive design (yes, there is a plethora of mobile readers nowadays), a customizable layout and user-friendly interface (not to let your visitors get lost in the blog), and metadata. Besides, today, every blog should be SEO-friendly. Otherwise, nobody will find it in a huge list of search results.
What about the Amasty Blog Pro Magento 2 module? Does it satisfy the requirements mentioned above? Before we proceed, check the following reviews:

Table of contents
Features
- The extension was developed with the latest design trends in mind, so it is absolutely mobile-friendly;
- The extension automatically generates AMP (Accelerated Mobile Page), making pages faster;
- You can install a PWA add-on for enhanced mobile UX;
- The blog has a very convenient structure, so readers will easily find what they are looking for;
- Search engine optimization is also among the provided features;
- Besides, you can fully customize blog posts display;
- Particular articles can be pinned at the top of the page;
- Comments management is available with Amasty Blog Pro as well;
- Social sharing simplifies user experience and allows promoting your ecommerce business on various social networks for free.
As you can see, Magento 2 blog integration won’t be painful if you choose Amasty Blog Pro. This Magento 2 blog module is designed to inform current and potential clients about the product, sales, promotions, and discounts in the most efficient way. This way, you can easily increase customer engagement and boost your revenue by targeting the right audience. The Amasty Blog Magento 2 extension offers convenient management tools to backend users, allowing them to fine-tune the look and feel of a website’s blog in line with a specific marketing strategy. Let’s describe each extension’s feature in more detail to find out all the privileges the tool provides.
First of all, it is necessary to mention the responsive design of the Magento blog extension. The share of mobile commerce in ecommerce is continuously growing, and for some markets, it is already more than 50%. Therefore, lots of your current and potential customers are trying to reach your Magento 2 website from smartphones. If you don’t provide an optimized layout, you might lose to your competitors who offer a mobile-friendly interface. Luckily, the Amasty Blog Pro Magento 2 module is fully responsive, so you don’t need to worry about visitors who prefer to shop from small screens. All desktop and mobile devices are treated equally well by the Amasty Magento 2 blog extension.
Moreover, the Magento 2 advanced blog module enables you to convert any blog page into an accelerated mobile page. It makes your blog pages’ content loading faster on mobile devices and provides website visitors with a smooth experience on their smartphones.
Another tool for improving mobile shopping offered by Amasty is the PWA add-on designed specifically for Blog Pro. The add-on is a ready-to-use solution for the PWA-based storefront that can be seamlessly implemented on a website without extra development work. The Amasty progressive web app for blogs is created following the best PWA practices and is fully compatible with the Magento Venia theme. This way, compatibility issues with a website’s environment are minimized, and PWA setup takes less time.
The Amasty PWA blog add-on supports the essential features of the extension so that online store owners can provide customers with a responsive design and convenient navigation on mobile devices. By creating mobile-optimized articles, e-commerce merchants can strengthen their marketing efforts and improve user acquisition strategy. Thus, you get extended possibilities for engaging mobile shoppers who visit the blog on our website and leading them to the purchase.
The PWA technology ensures faster page loading and stable performance on mobile, so your store visitors will enjoy smooth browsing across your website on any device. Besides, Amasty PWA add-ons provide a flawless cross-browser experience due to the support of the most popular browsers, including Chrome, Firefox, and Safari. Another advantage of installing the add-on on a Magento 2 PWA storefront is advanced search engine optimization. In addition to SEO features available with the Amasty blog extension, websites can get a higher position in the Google search results due to the increased speed of mobile pages.
Download Amasty PWA for Blog Pro Magento 2 Add-On
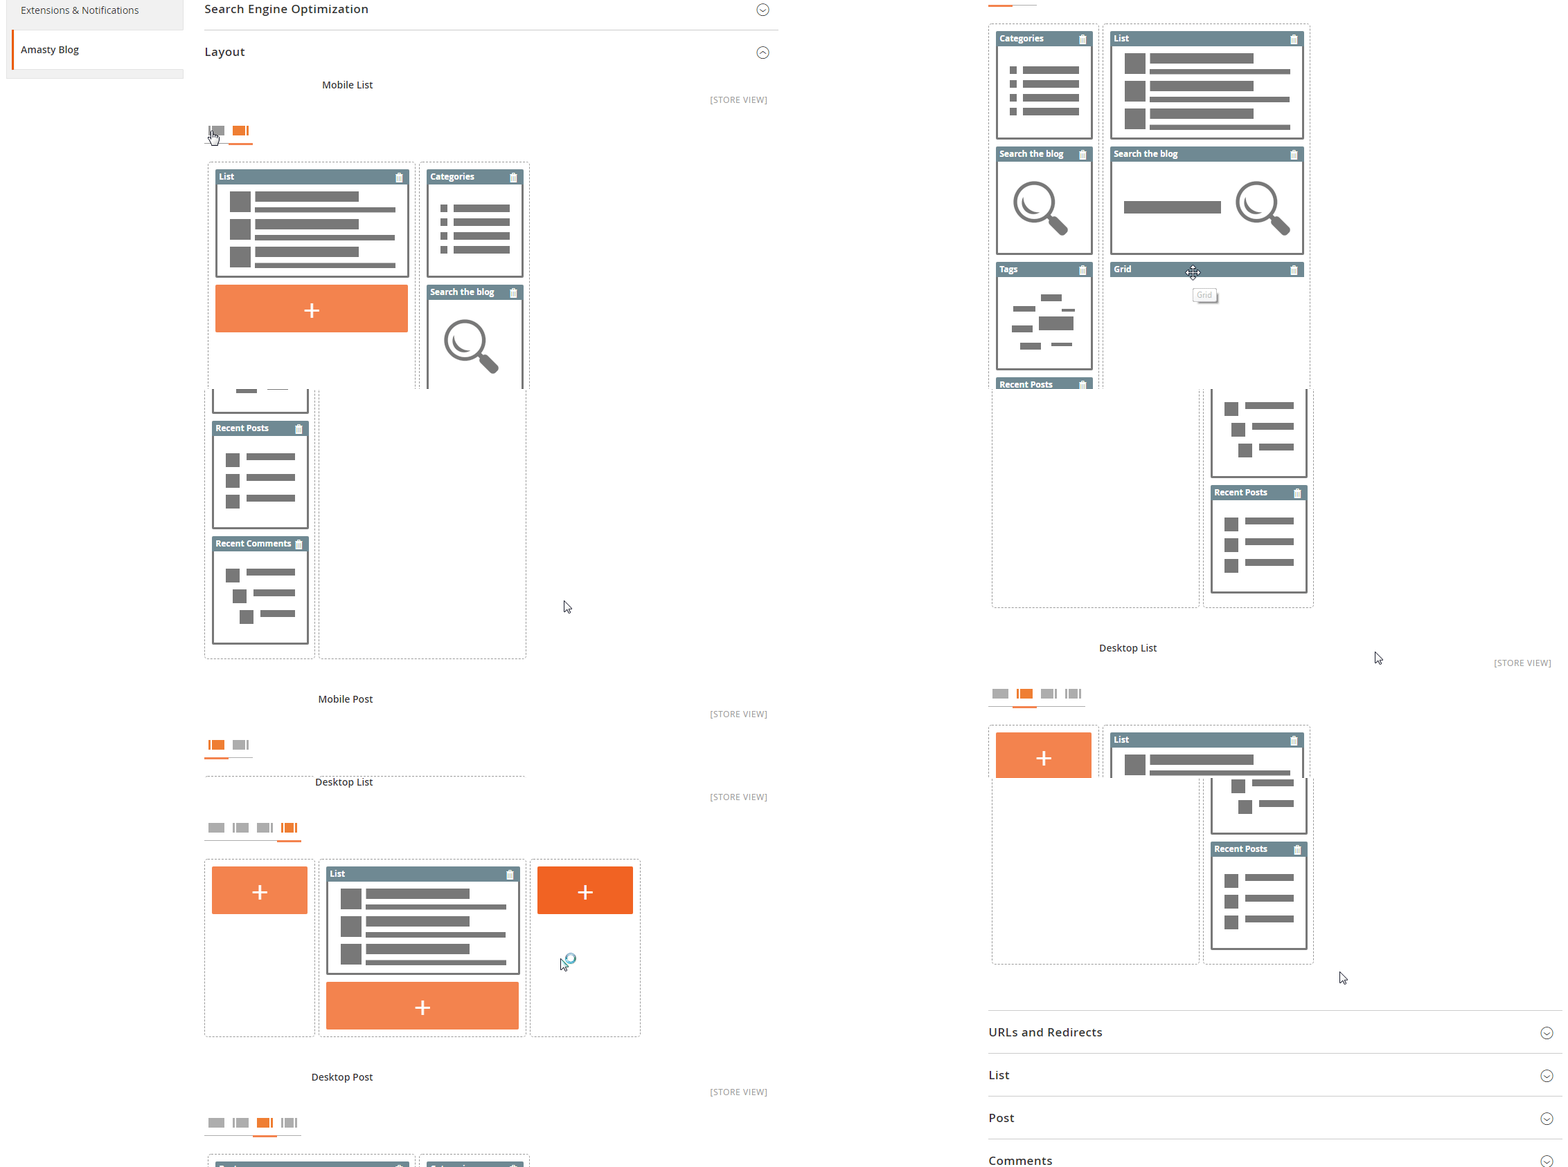
In addition to the mentioned above mobile support, the Magento blog module also offers a highly customizable layout. It means that you can easily configure the appearance of your blog according to even the most strict requirements. The Amasty Blog Pro Magento 2 extension offers an intuitive constructor that allows arranging various blocks of each blog page.
Besides, various general display options allow you to decide how many posts to display on a single page, choose the qty of recent posts in a blog, as well as fully configure your sitemap integration. It is also possible to apply some design improvements, such as custom icon colors. Moreover, you can mark selected posts as featured to pin them at the top of the blog page.
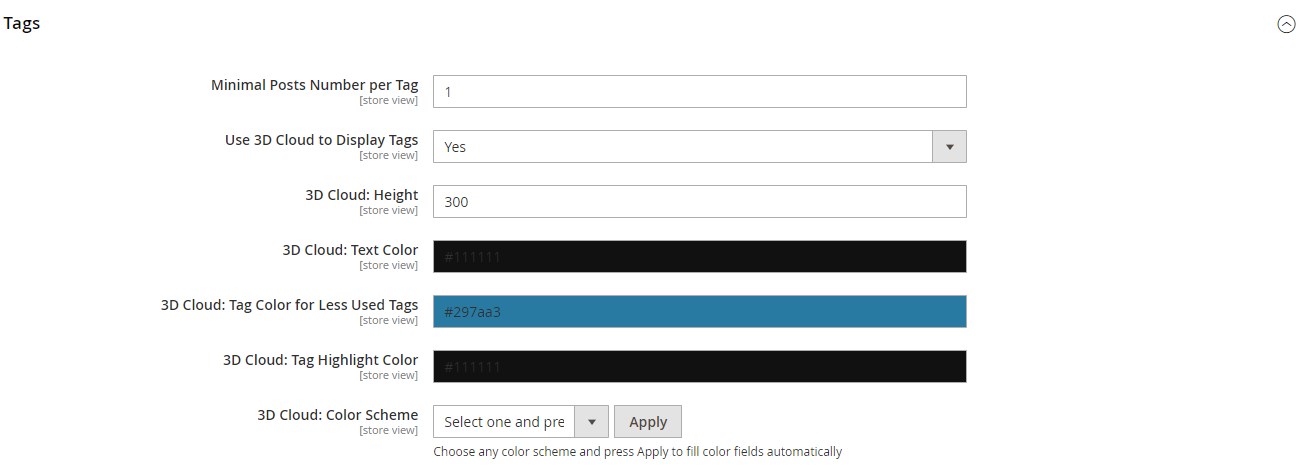
With the Amasty extension, you can also provide your website visitors with improved blog navigation by creating a multi-level category tree and organizing blog posts in relevant subcategories. A powerful 3D cloud of tags is among the extension’s features as well. As a Magento 2 administrator, you can change such parameters as size, text color, and the overall color scheme. Thus, making tags visually appealing to store visitors is no longer a problem.
As for the already mentioned social media integration, Amasty’s Magento 2 blog extension allows visitors not only to read interesting content but also share it on their social accounts in a matter of a few clicks. As a result, you promote your store on social media services and improve SEO (social sharing is a positive ranking factor). Note that sharing buttons can be added to all pages of the blog.
Some other features are:
- WYSIWYG editor – the easiest way to create and edit blog posts;
- Widgets – you can place eye-catching widgets with blog categories, recent posts, or recent comments on any page of your store.
- Default blog author – a feature that allows to specify the author of blog posts and display related information and contacts.
- Schedule – the Amasty Blog Pro Magento 2 module enables you to schedule blog posts.
- Advanced comments – you can enable/disable guest comments, automated comments approval, and email notifications. Besides, it is possible to moderate comments manually.
- Voting with “likes” – website visitors can vote for blog posts with likes and dislikes. This way, you can understand which articles are more popular with customers.
- Import from WordPress – the Amasty blog extension can automatically import all existing content from a WordPress website to your Magento 2 store.
- Compatibility with GraphQL – various blog data can be exposed for building the PWA/JS-based frontend.
- Compatibility with the Automatic Related Products extension – after installing Automatic Related Products by Amasty, you will be able to add widgets with relevant products, cross-sells, and up-sells to your blog post pages.
Now, let’s dive deep into the backend section to see how the mentioned above features work on a practical level.
Backend
Below, we explore various backend sections of the Amasty Blog Pro Magento 2 module.
Configuration
The configuration section is available under Stores -> Settings -> Configuration -> Amasty Extensions -> Blog Pro. It is divided into 15 sub-sections: Display Settings, Search Engine Optimization, Layout, URLs and Redirects, List, Post, Categories, Comments, Notification of Added Comment, Recent Posts Block, Posts & Products Relation, Tags, Social Buttons, Look and Feel, and Accelerated Mobile Pages.
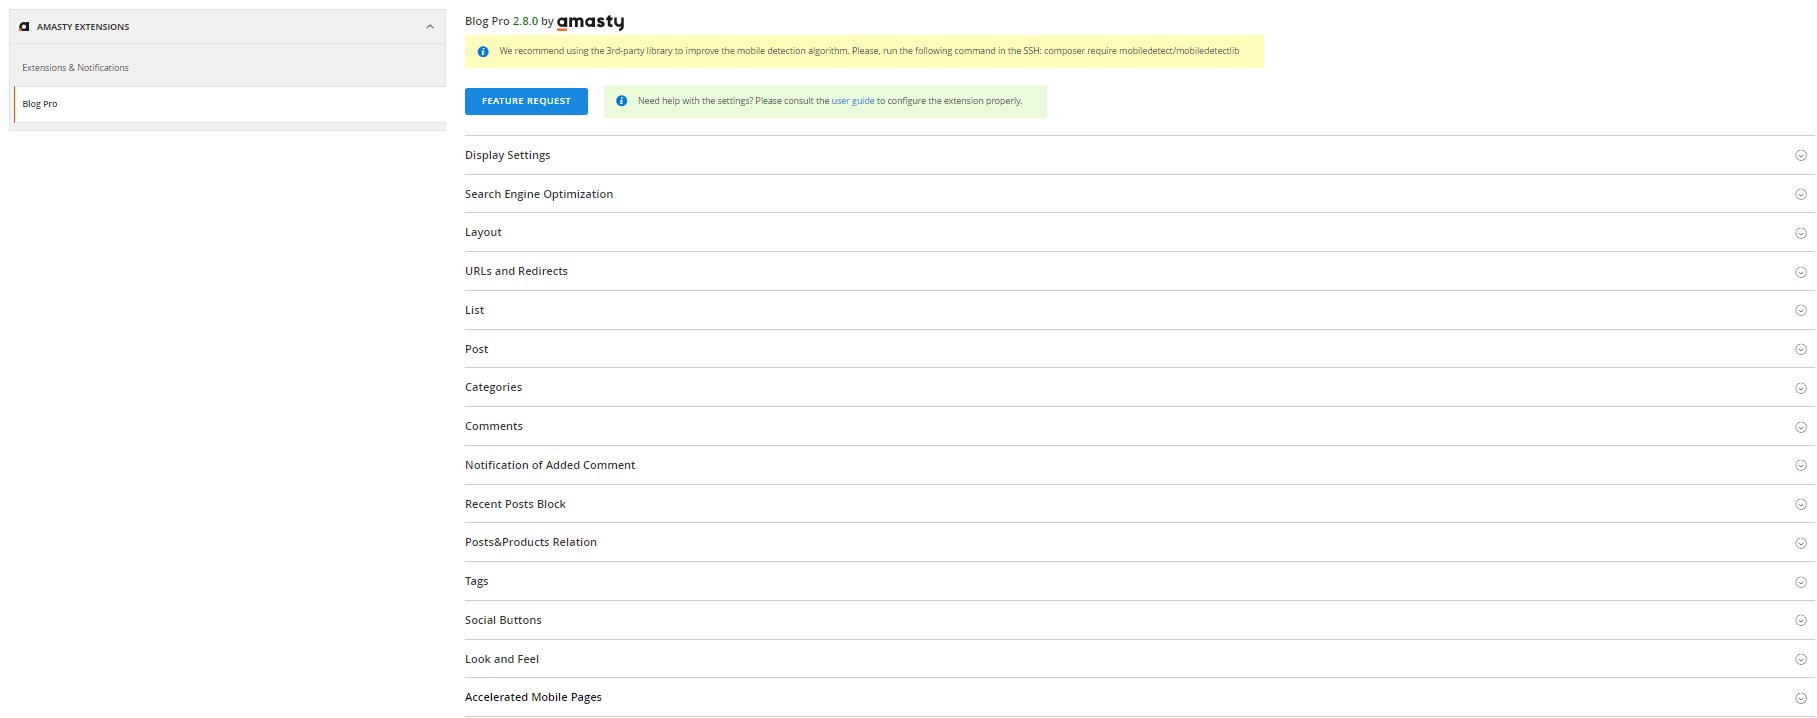
In Display Settings, you can create a title for the blog’s link and enable/disable a link leading to the blog in the footer, header, and categories menu.

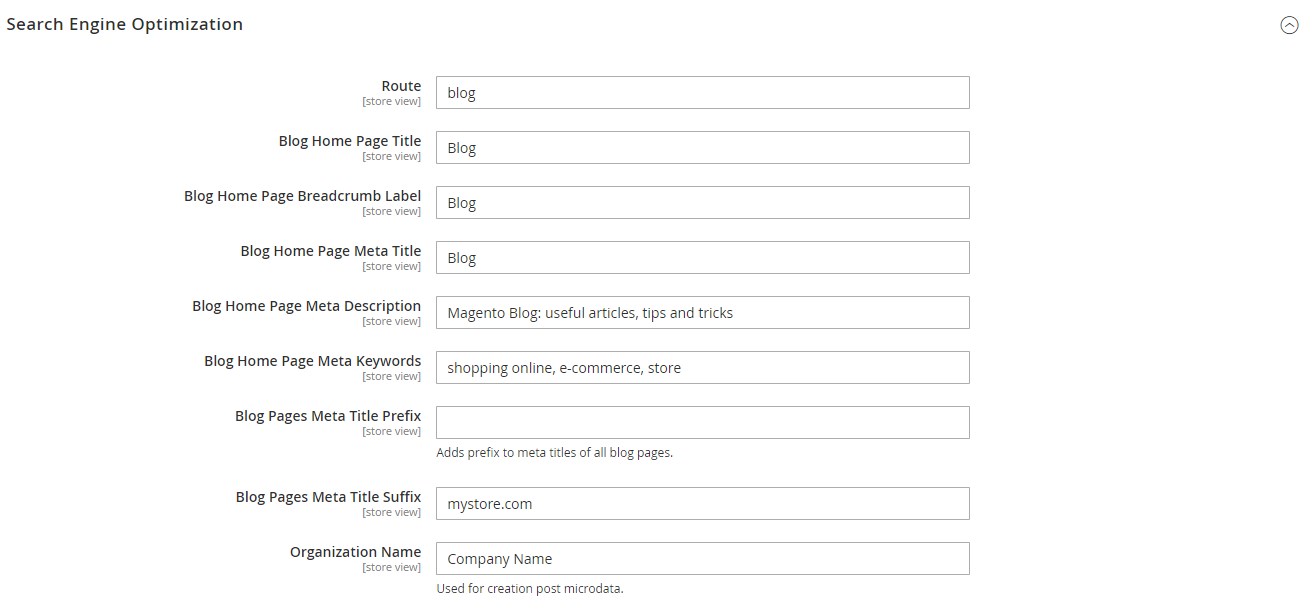
The SEO sub-section allows specifying such parameters as route; blog home page title; breadcrumb label; meta title, description, and keywords; meta title prefix and suffix. You can also type in the organization name here.
Layout is a sub-section where you can arrange blocks with different blog information for mobile and desktop view separately.
In URLs and Redirects, the Amasty Blog Pro Magento 2 extension provides the ability to select a URL postfix option (html or no postfix) and redirect visitors and search bots to an SEO friendly page using 301 redirects.

The List sub-section enables admin users to set the number of posts displayed per page.

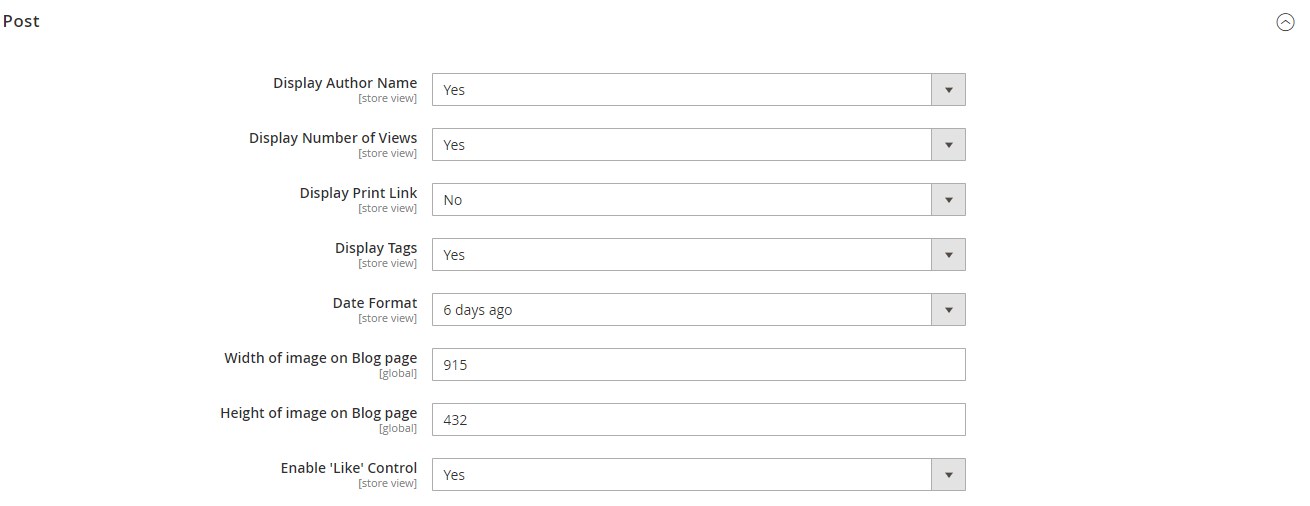
In Post, the Magento 2 blog module lets you show/hide such parameters as author name, number of post views, print link, and tags. Besides, it is possible to select a date format (X days ago or dd/mm/yyyy) and specify the width and height of images in a blog post. Here, you can also allow website visitors to use likes and dislikes to vote for the blog posts.
Next, you decide whether to show the categories block. You can set a limit for the number of categories displayed in the block and categories tree.

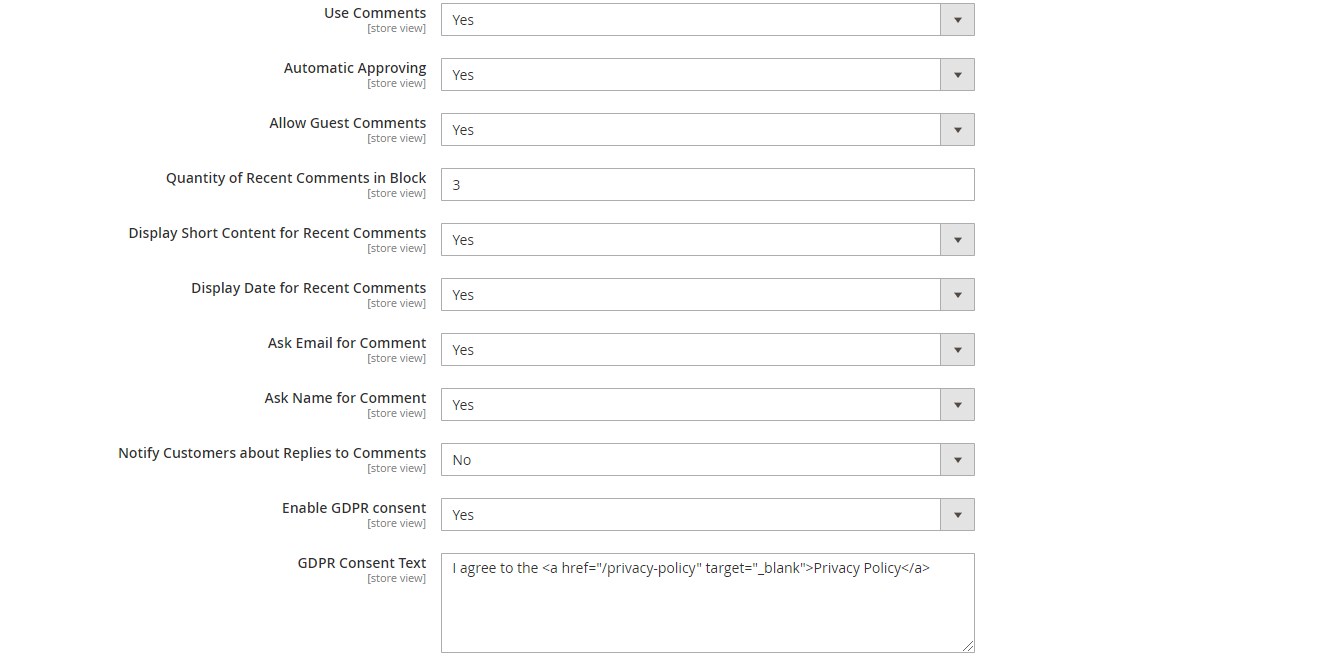
The Comments sub-section allows admins to enable/disable the usage of comments in a blog, automatic approving, and guest comments. You can also set the number of recent comments to be displayed, as well as activate such features as short content and the date display for recent comments. Besides, it is possible to set the name and email fields as mandatory for comment submission and activate email notifications on the comment thread replies. Here, you also enable/disable GDPR consent and create text for it.
If you want to inform admins about submitting new comments, enable the relevant feature in the following section, enter email addresses for sending alerts, and choose an email sender and notification email template.

The Recent Posts Block settings provide the ability to specify the number of recent posts displayed in the block, enable short content and display of date and image, and set a limit on the number of symbols for short content, as well as the size of images.

In the following section of the Amasty Magento 2 articles module, you can configure the related blog posts tab shown on product pages and related products block displayed on the blog pages.

In Tags, you can set a minimal posts number per each tag, as well as enable a 3D cloud of tags and specify its parameters: height, text color, tag color for less used tags, tag highlight color, and color scheme.
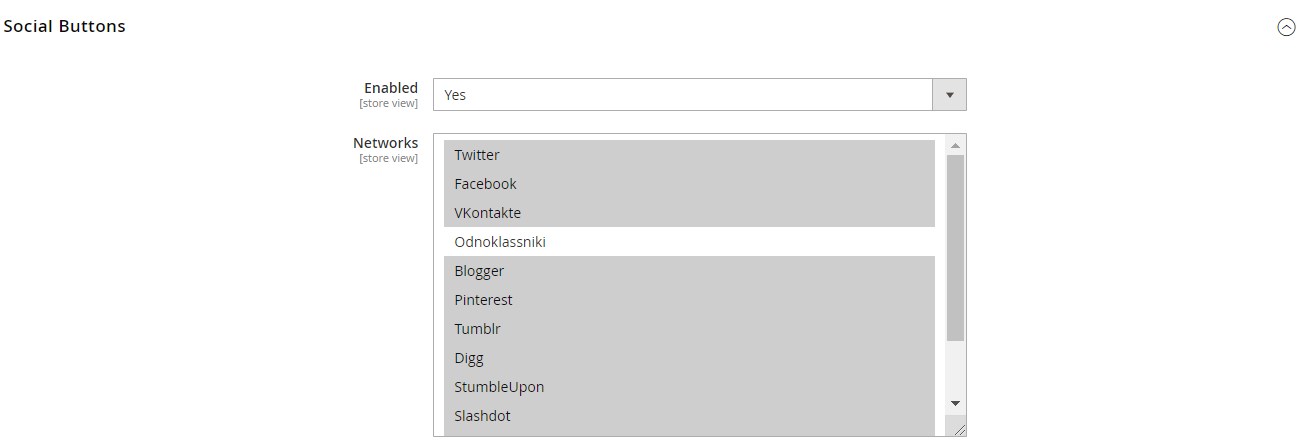
The Social Buttons sub-section allows enabling the social sharing feature and activate specific buttons. Press and hold CTRL to select several social networks.
In Look and Feel, you can select a color scheme for the icons at the top of a blog post. The available options are: Classic, Red, Green, Blue, Grey, and Purple.

The last sub-section with settings of the Amasty forum Magento 2 module allows you to enable the corresponding feature and customize the logo and design of elements displayed on accelerated mobile pages.
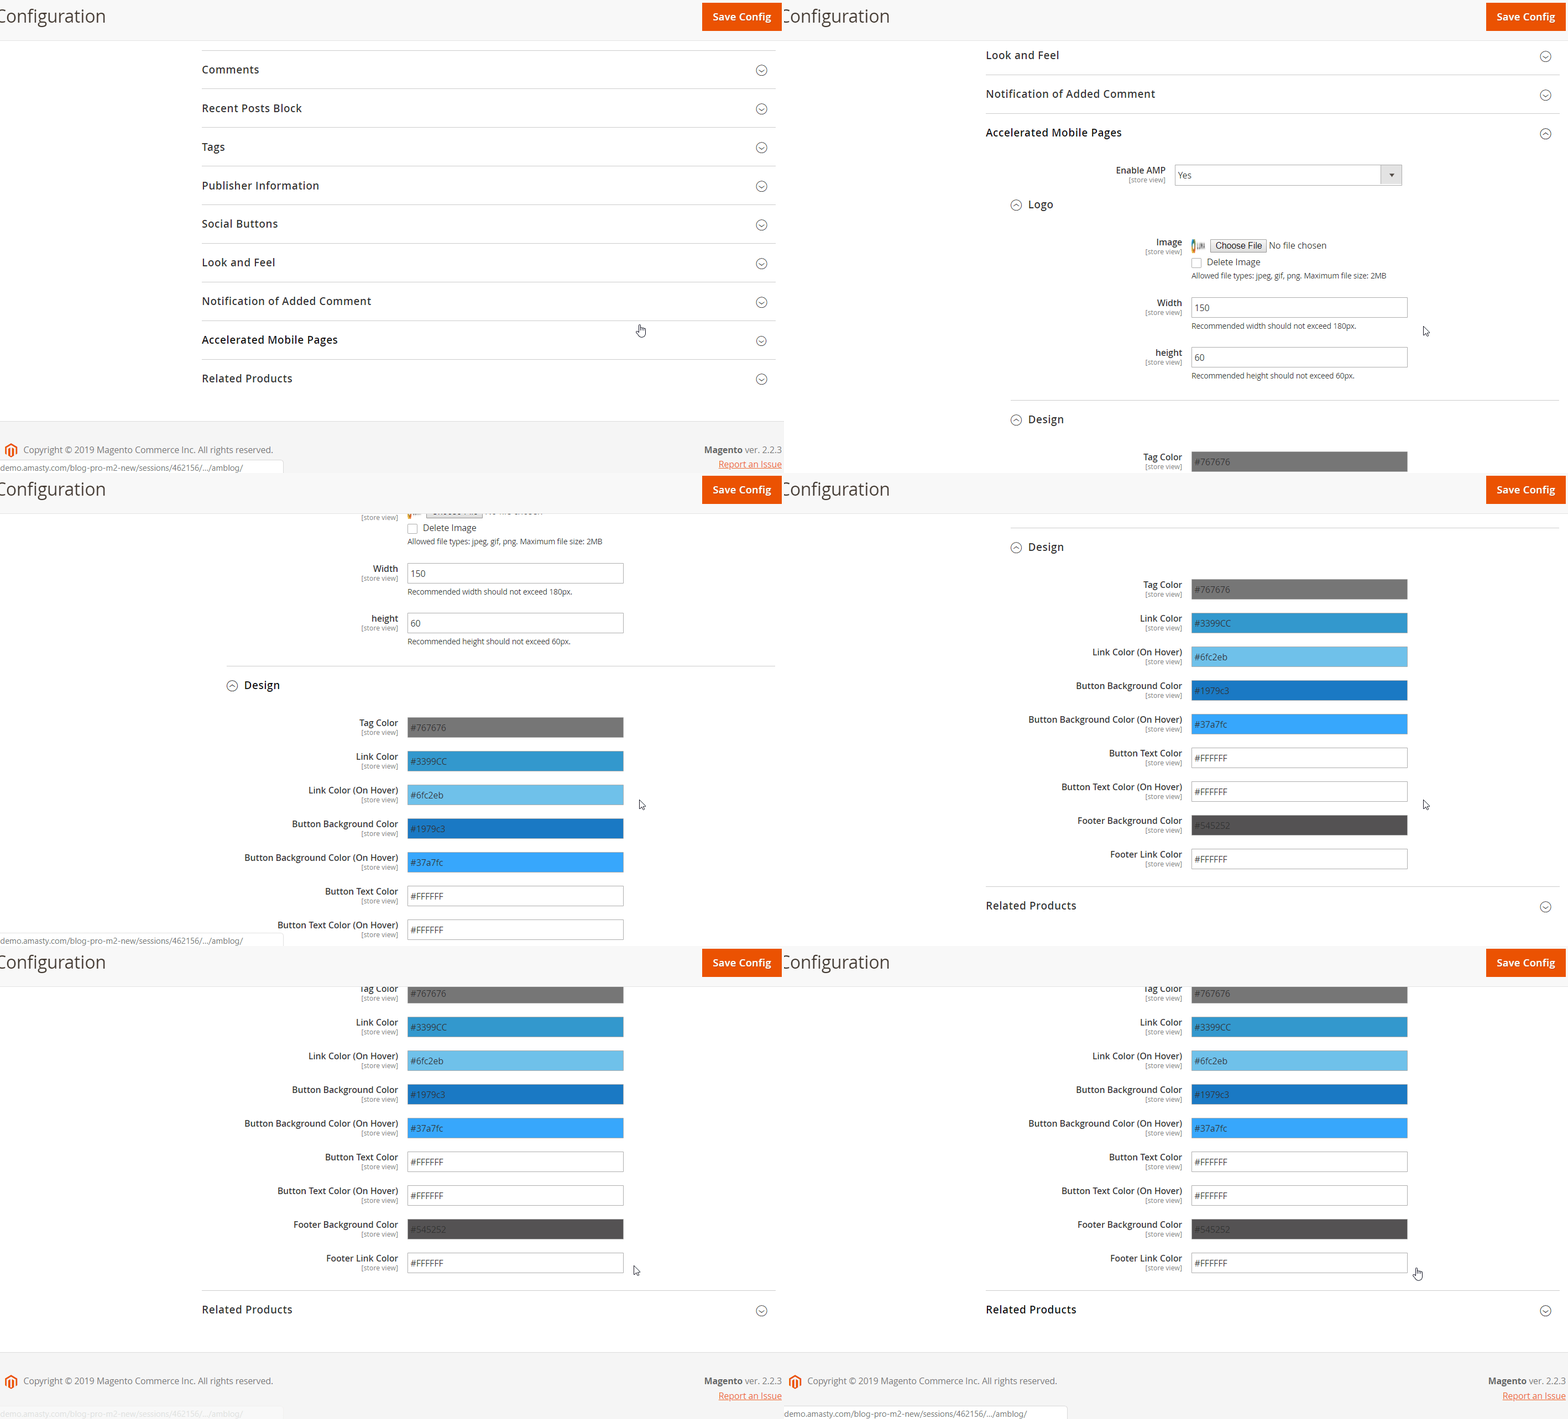
This was an almost endless configuration section of the Amasty Blog Pro Magento 2 extension. Although it seems to be a little bit complicated, you must admit that the module can be configured in line with even the most strict demands. Let’s have a look at other backend sections of the Amasty blog extension.
Posts
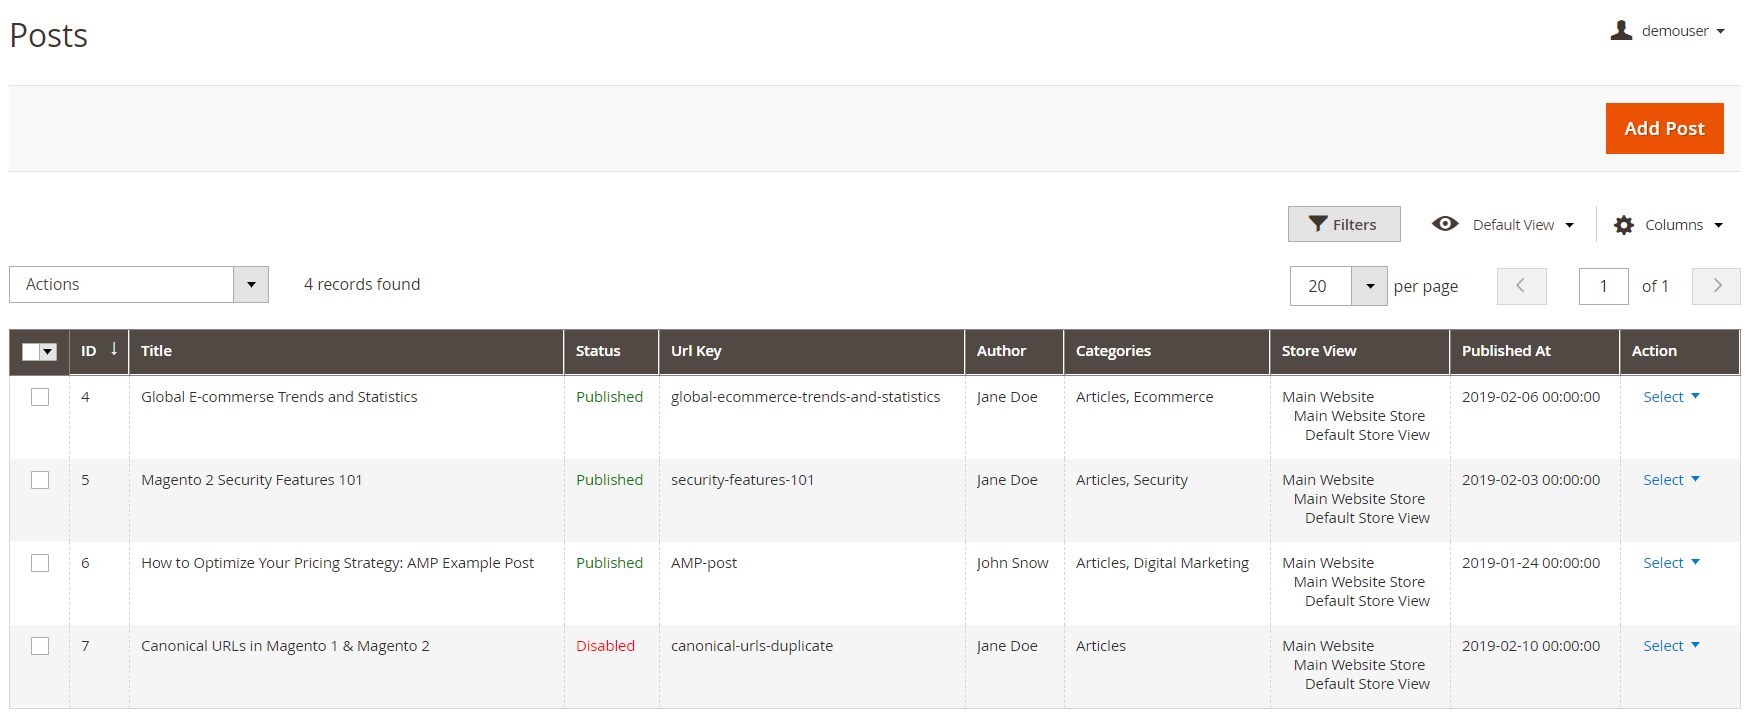
A section with posts is available under Content -> Amasty Blog Pro -> Posts. All posts are gathered in a grid with filters for each column (except Store Views and Action) and mass actions: activate, inactivate, and delete. Besides, you can preview, duplicate, and edit each post from the Action column.
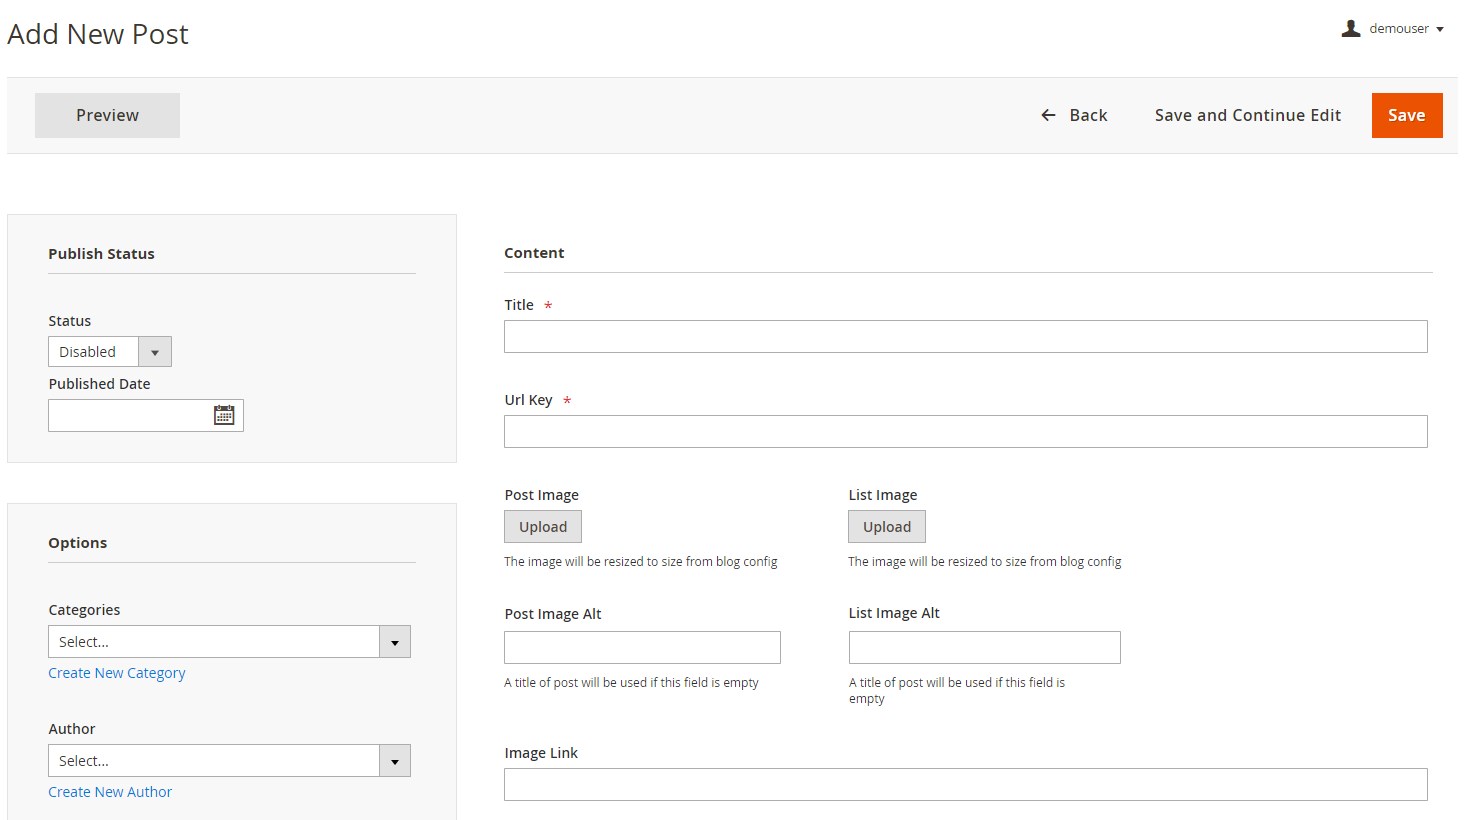
While adding a new post, first, you should type in a title and URL key. You can also upload post and list images, specify the alt text for images, and insert an image link. Besides, there are three grid width options here: Normal, Middle, and Wide.
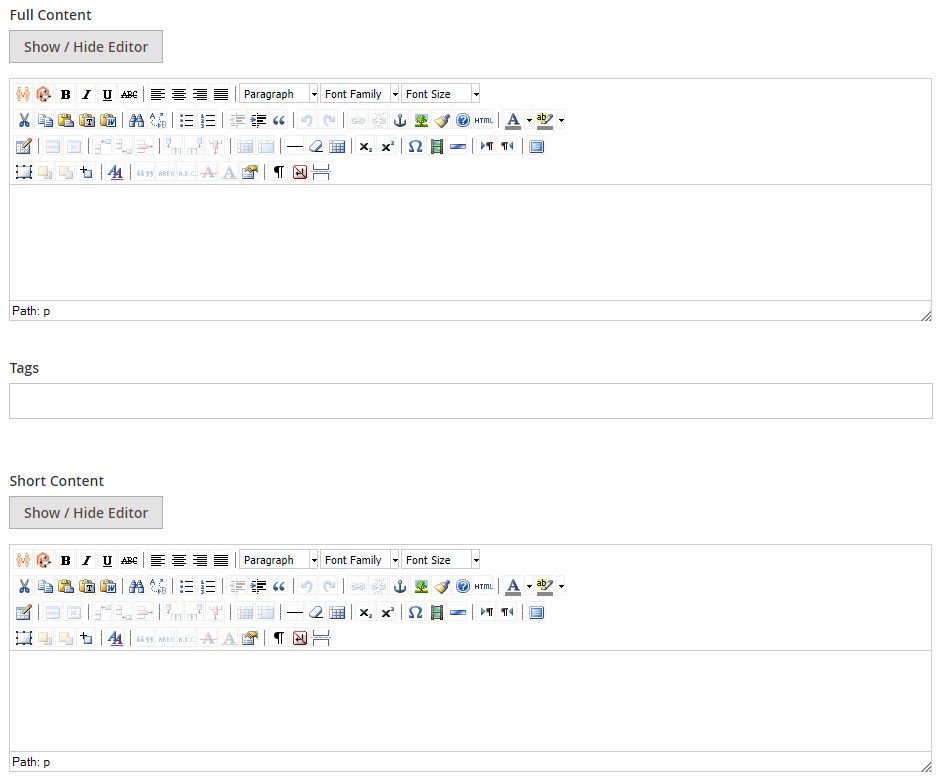
In the Content section, you also add full and short content of your blog post (via WYSIWYG editor) and specify relevant tags.
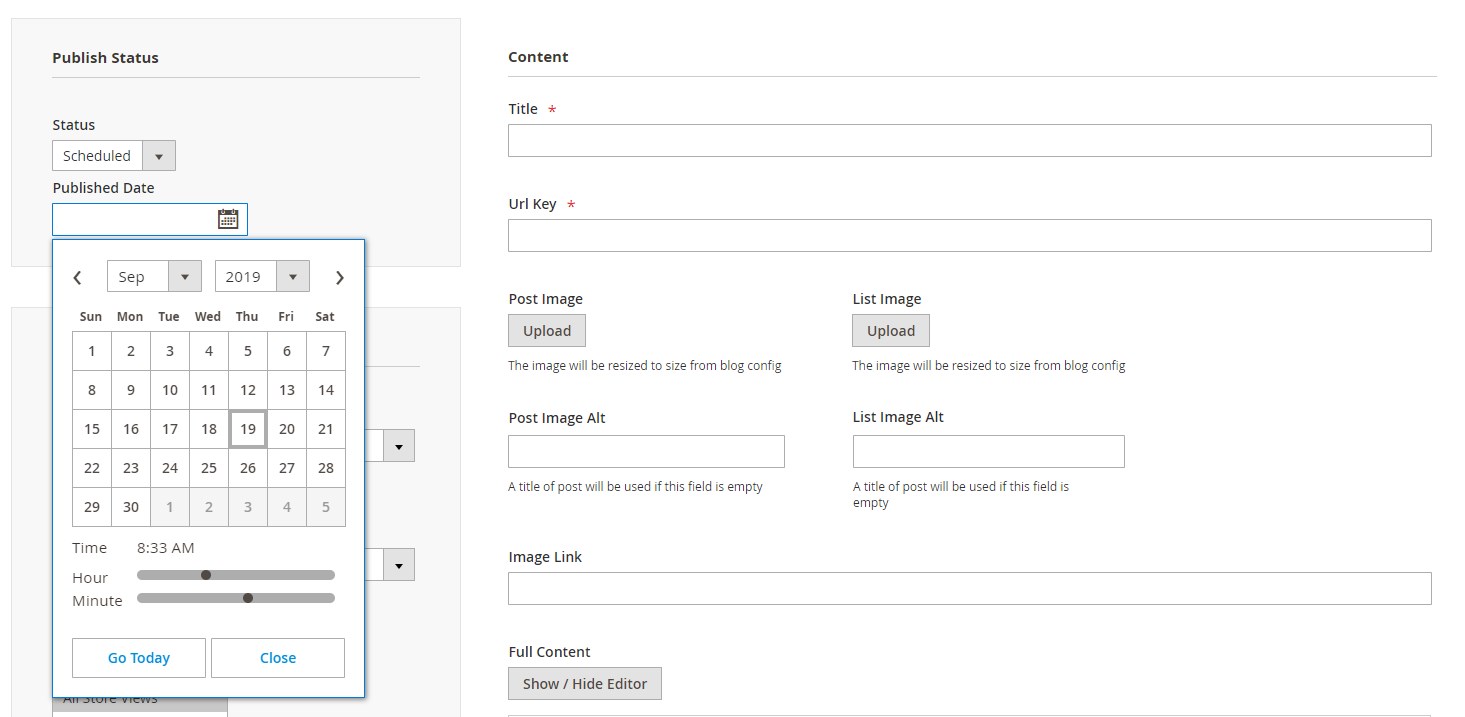
Next, select a status (published, disabled, hidden, or scheduled), and specify the publishing date.
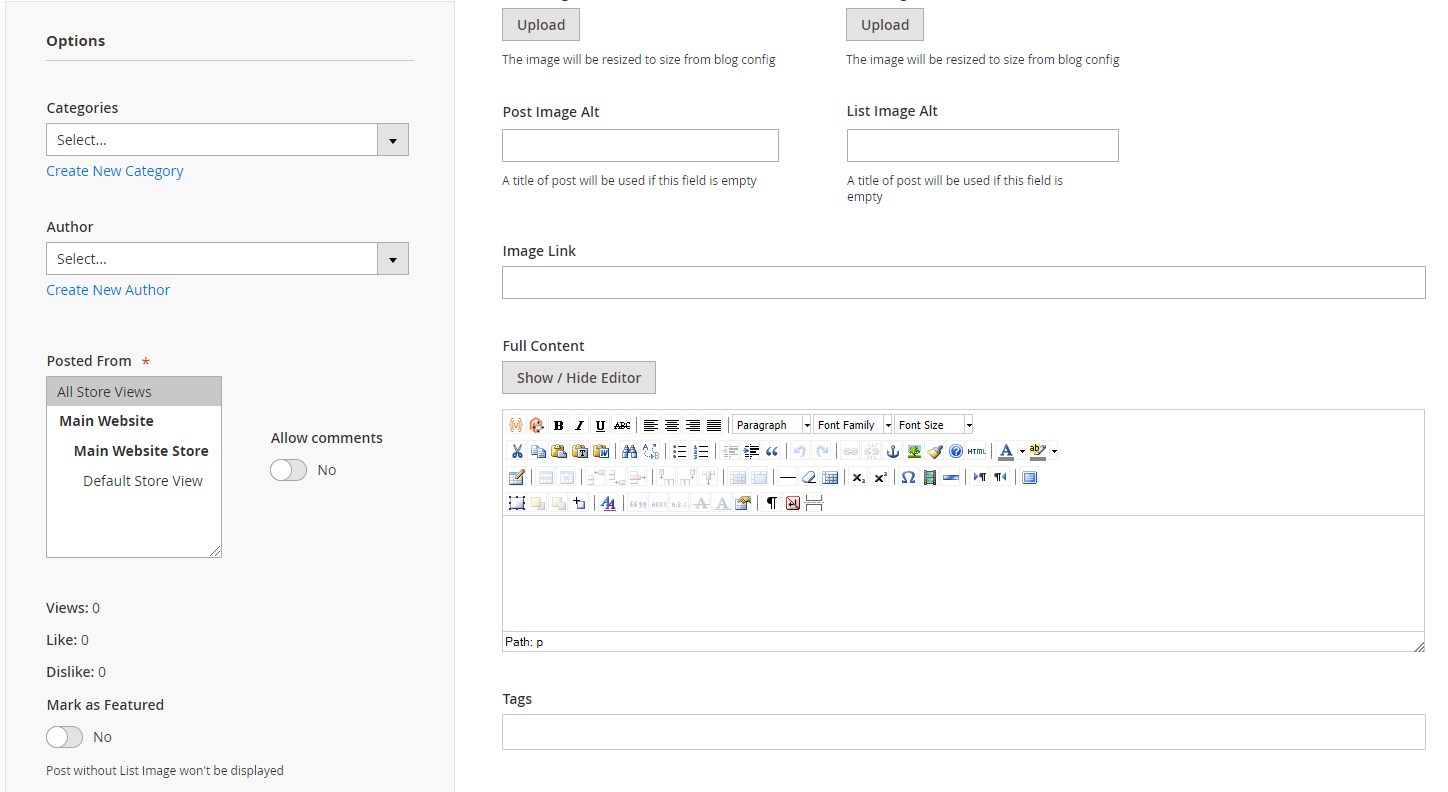
In the Options section, the Amasty Blog Pro Magento 2 extension provides the ability to select categories where to add an article and specify the name of the blog post author. Besides, it is possible to choose a store view from which the article is posted, enable/disable comments, and mark a post as featured to pin it at the top of the blog page. This section also illustrates the number of views of the blog post and the number of likes and dislikes.
In the next section, specify meta data (meta title, tags, and description) for the new post. It is also possible to add other posts to a page with the newly created article by clicking the “Add Related Posts” button, as well as include related products in the blog post page via the “Add Related Products” button.
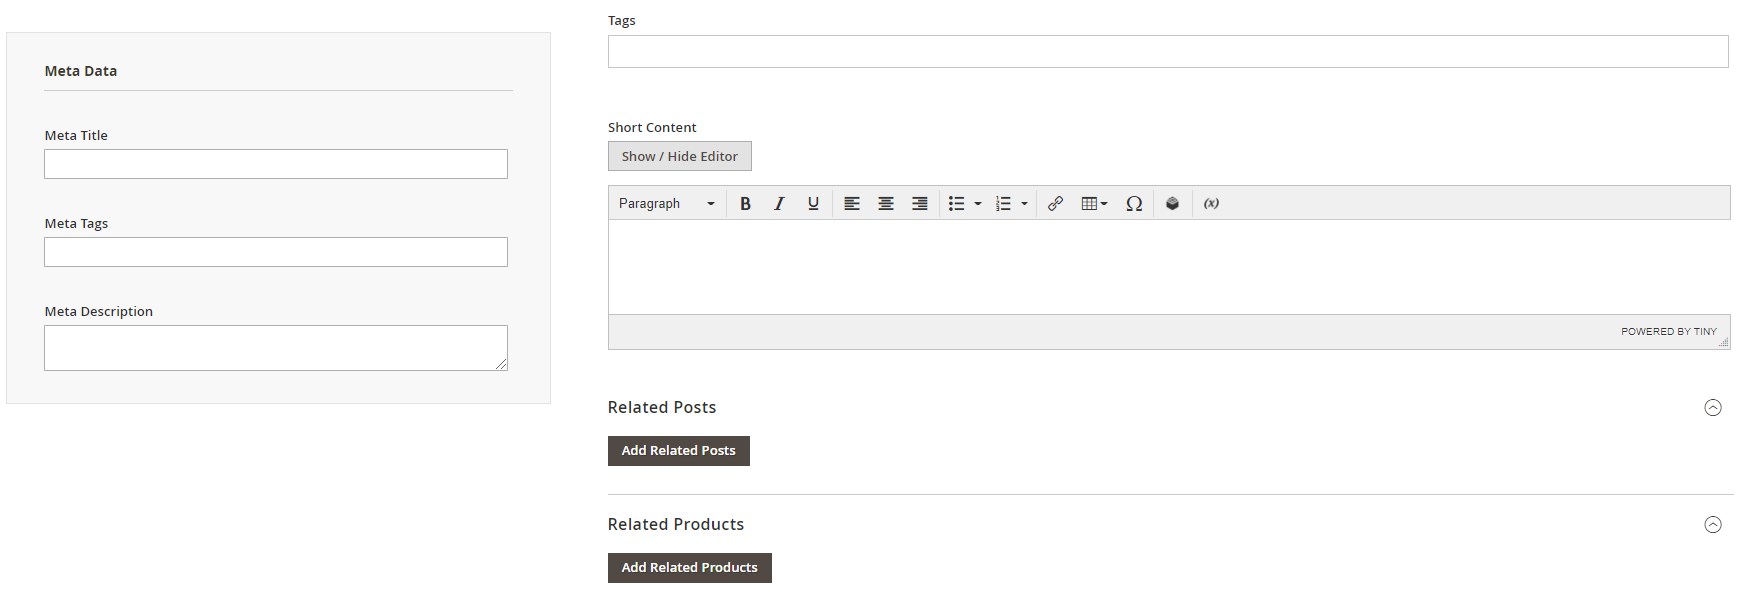
The availability of all these settings allows customizing post display as much as you need. Of course, there are more simple blogging solutions available in the ecosystem. However, this one has a very intuitive interface for creating new posts, despite there are lots of features that make Amasty Blog Pro one of the most robust tools of its kind.
Categories
All existing blog categories are available under Content -> Amasty Blog Pro -> Categories. The grid allows you to edit each category. As for mass actions, they are: activate, inactivate, and delete.
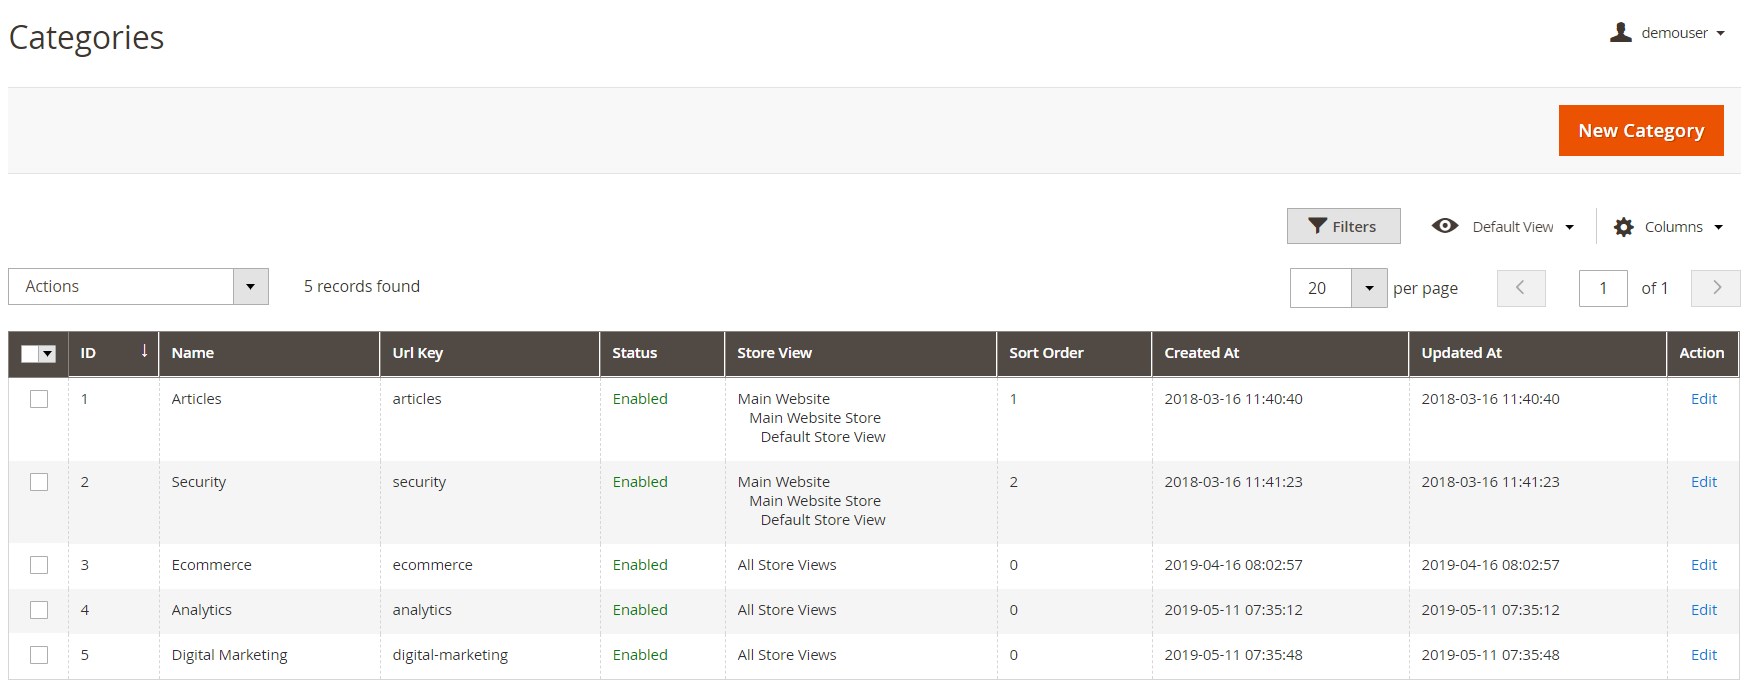
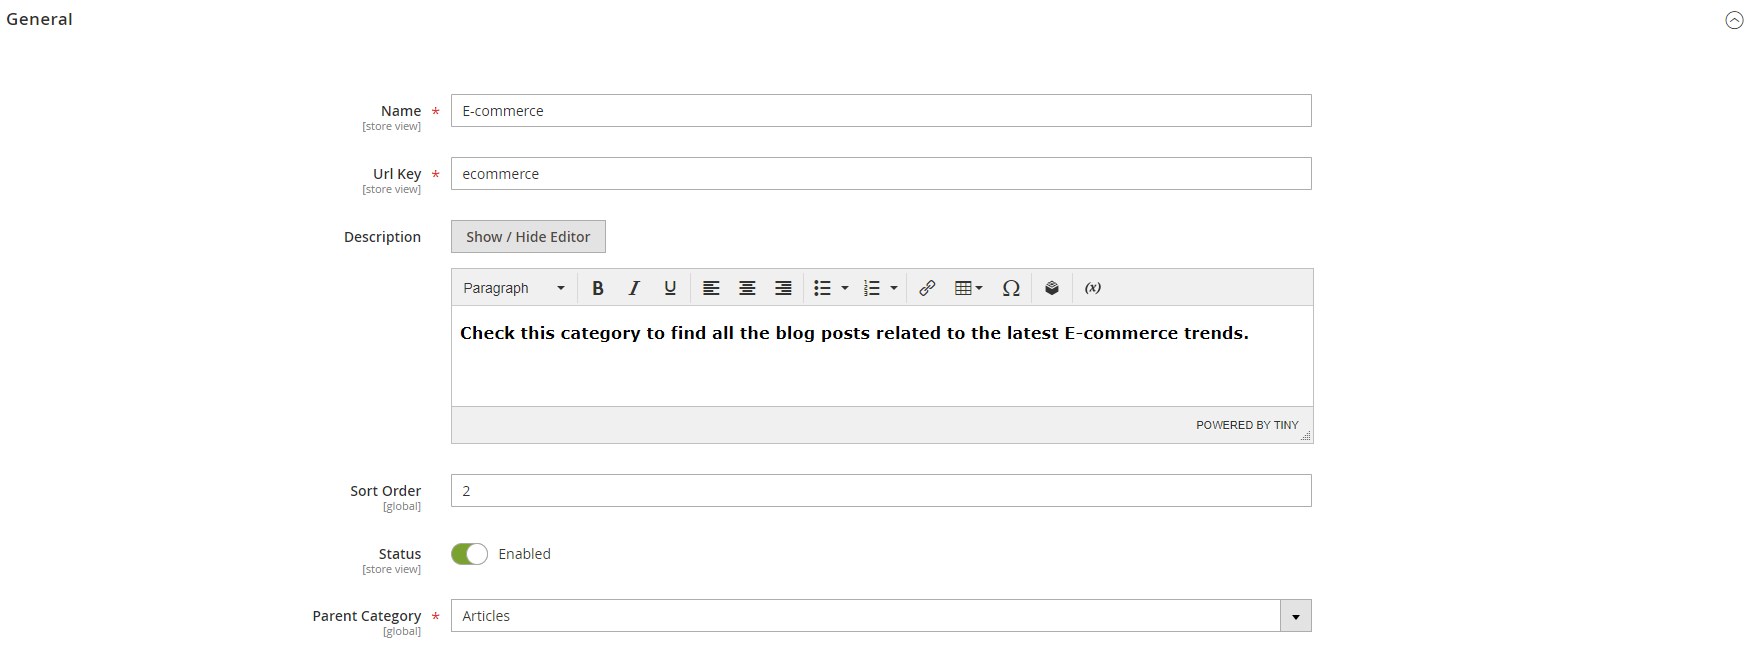
Let’s see how to add a new category. Hit the New Category button, and the Amasty Blog Pro Magento 2 module will redirect you to a new screen that contains two tabs: General and Meta Data. The first one requires specifying a category name, URL key, description, and sort order. Next, you can enable/disable the category and select a parent category if necessary.
As for the Meta Data tab, it allows specifying meta title, tags, and description.

This part of the Magento 2 blog module is quite easy to configure, and the next one is even more simple.
Tags
A grid with tags is located under Content -> Amasty Blog Pro -> Tags. On the Tags grid page, you can delete tags in bulk and edit each one manually.
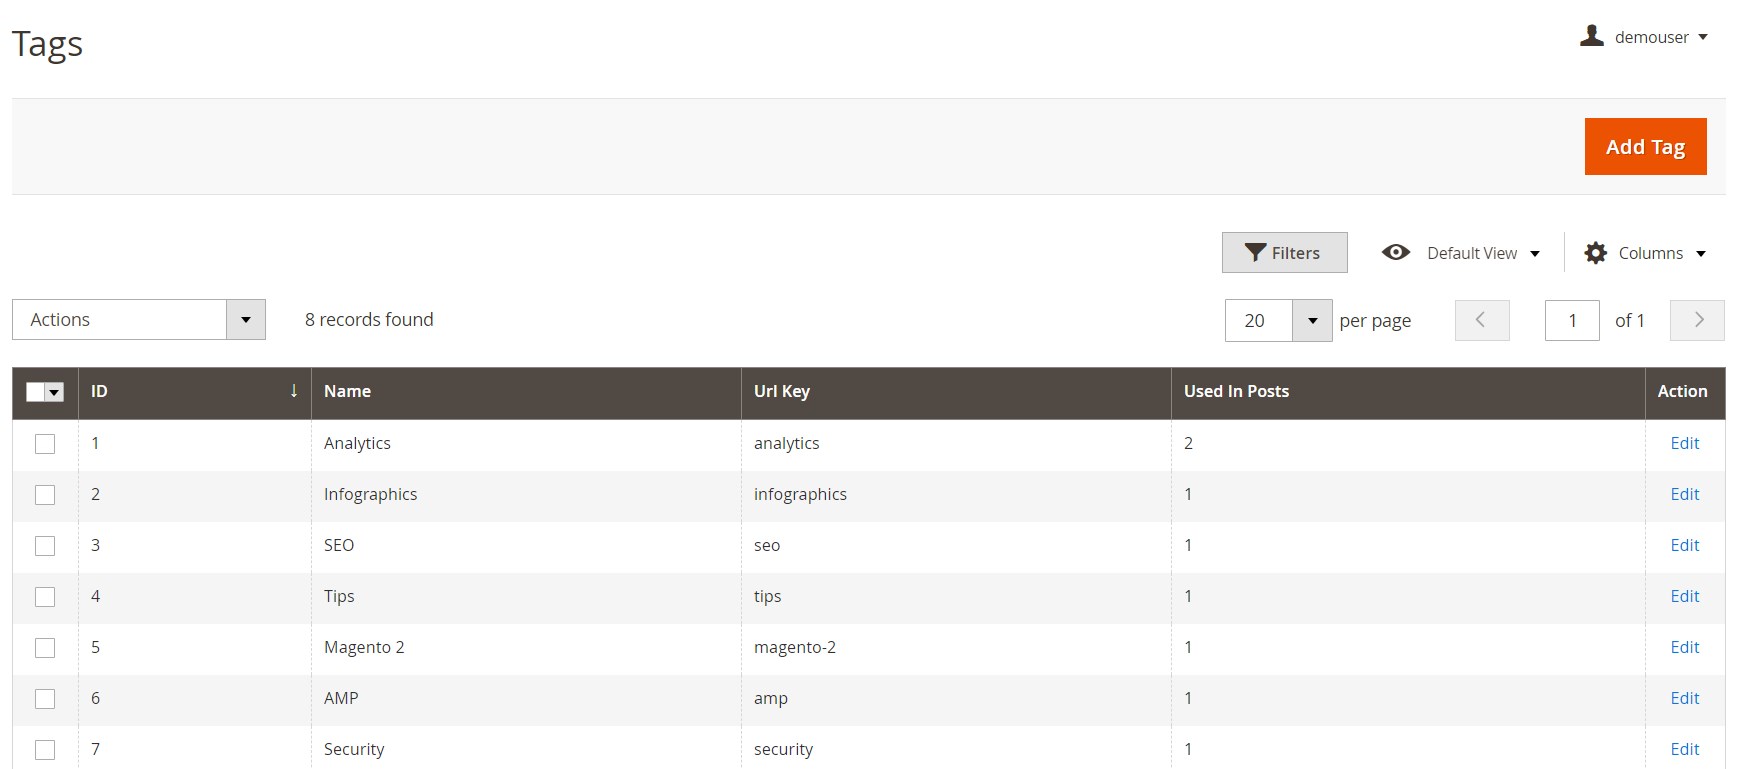
While creating a new tag, you will deal with two tabs: General and Meta Data. If editing an existing tag, you will also see the Tagged Posts tab. The General tab allows typing the tag name and URL key. In Meta Data, specify meta title, tags, and description. As for Tagged Posts, this tab contains the grid that illustrates all posts with the tag.
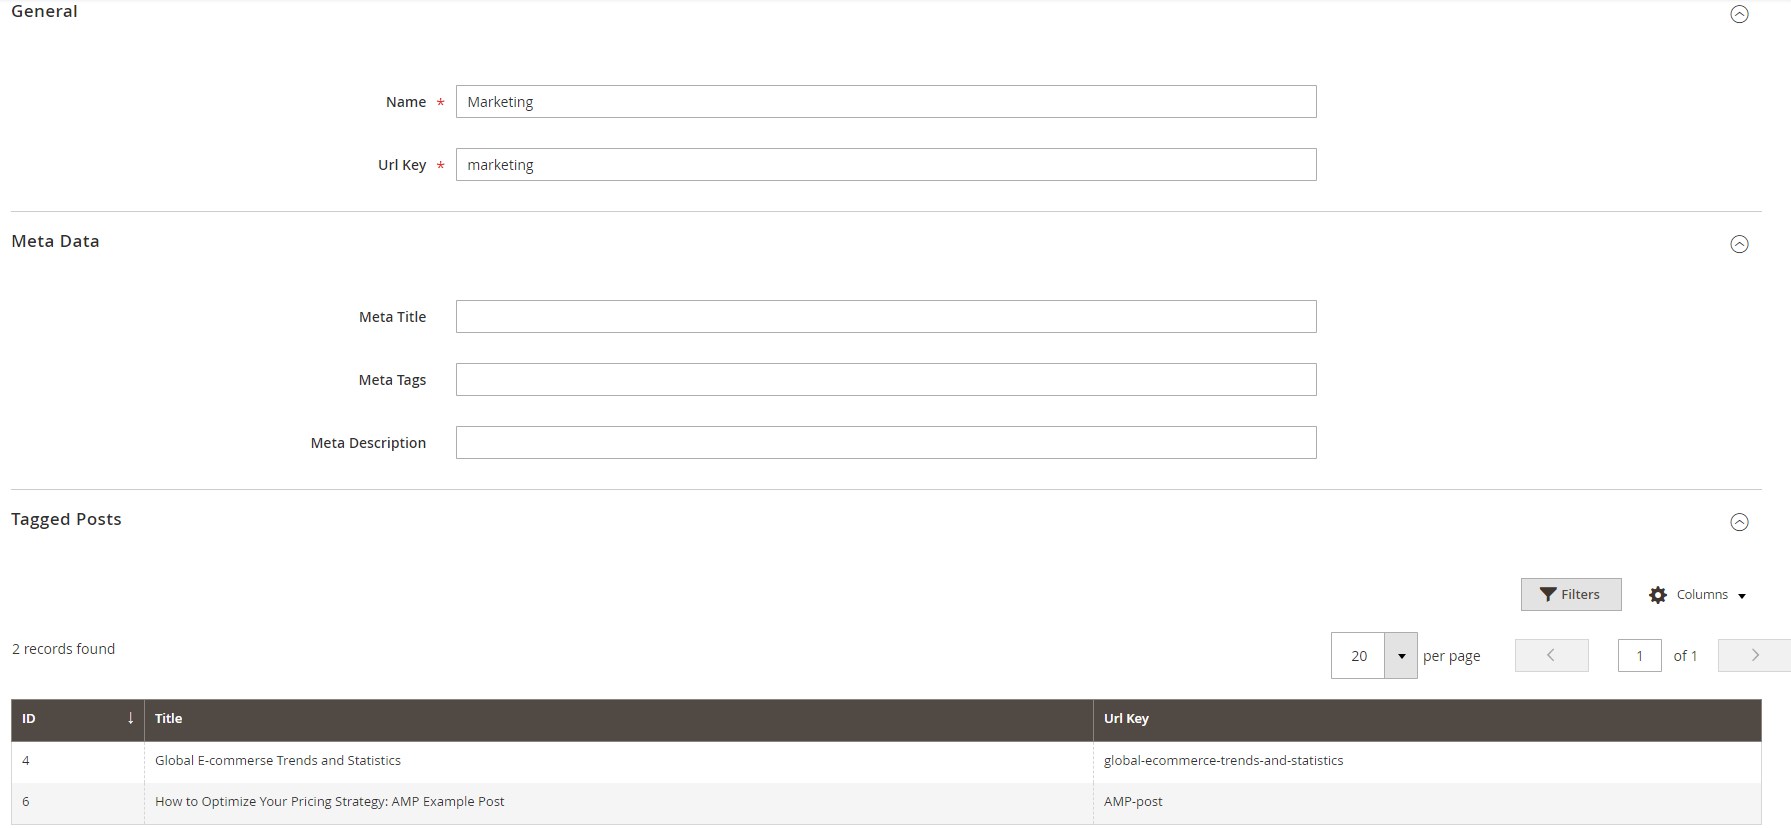
As you can see, tag management is not a problem if you use Amasty Blog Pro, but what about comments?
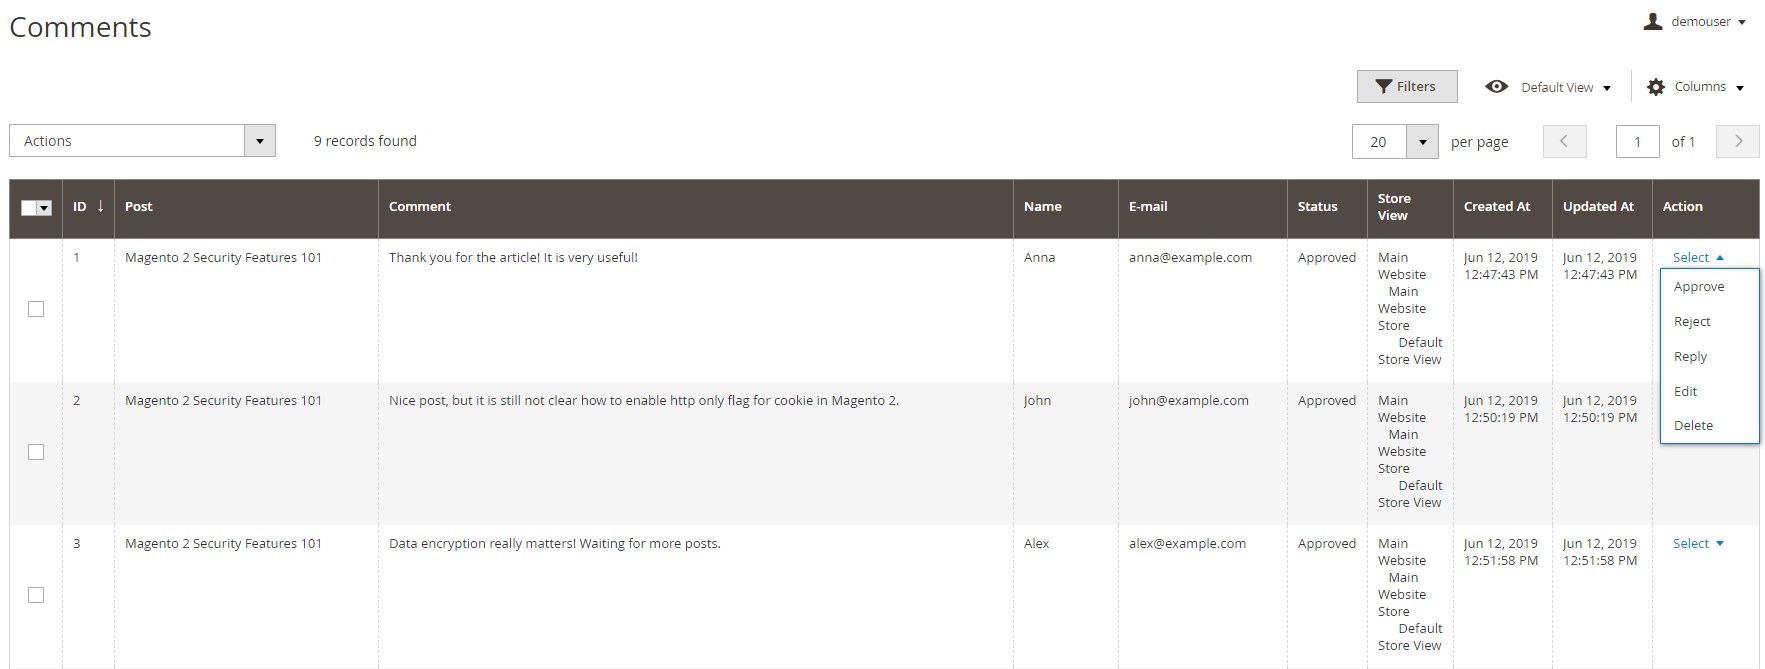
The appropriate section is available under Content -> Amasty Blog Pro -> Comments. Here you can approve, reject, reply to, edit, or delete each comment. Mass actions let to activate, inactivate, or delete comments in bulk. The grid displays such important information as post name, a short text of each comment, author name, status (pending, approved, or rejected), store view, time of creation and modification, and other details.
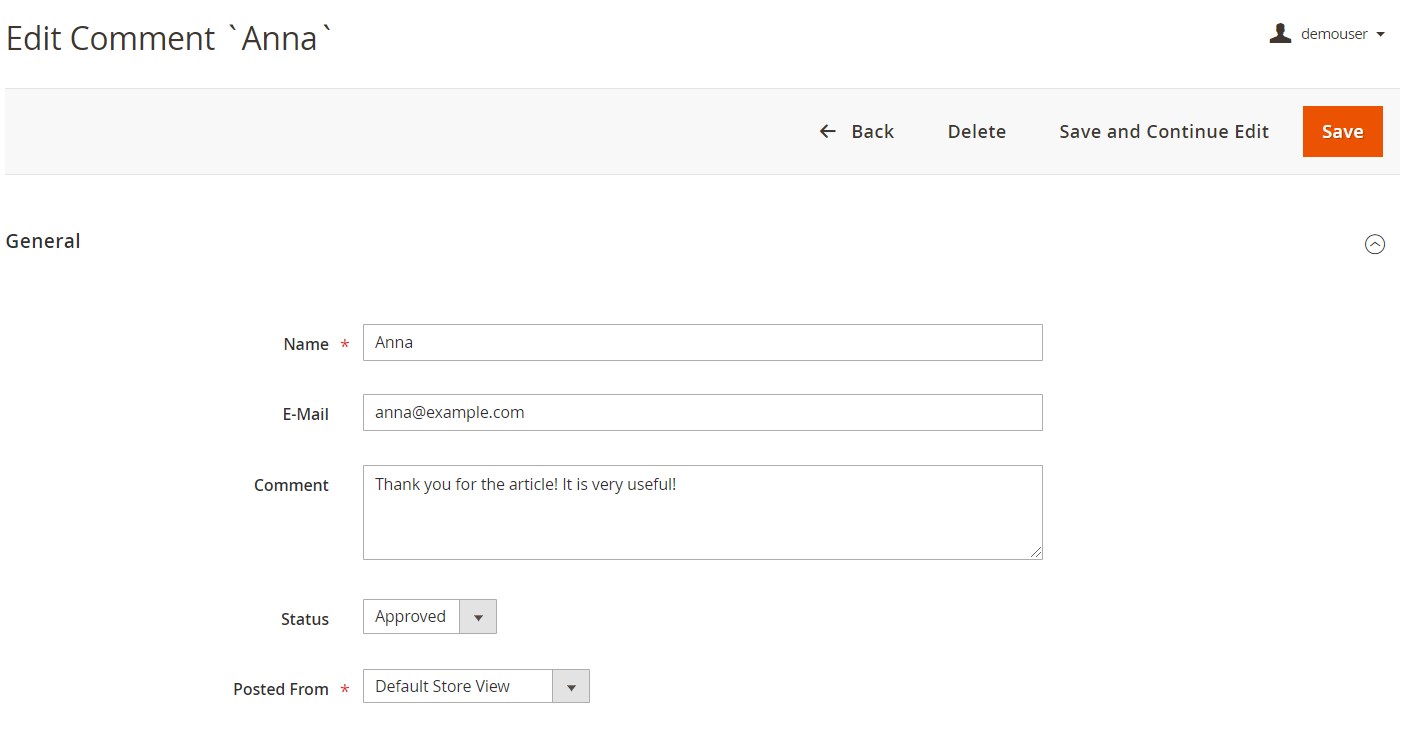
While editing a comment, the Amasty Blog Pro Magento 2 extension enables admins to change an author’s name and email, as well as the text of the comment. Besides, you can change the comment’s status and a store view from which it was posted.
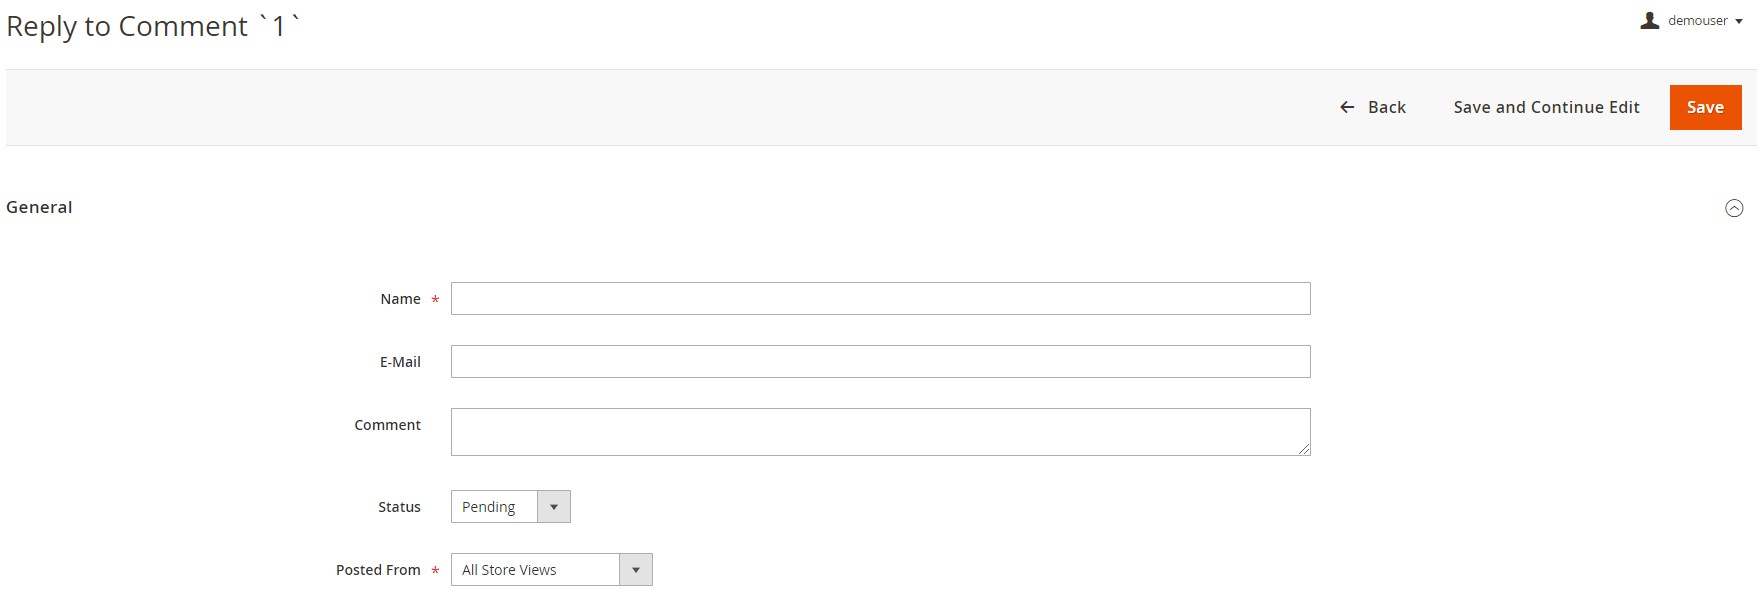
While replying to a comment, you should specify the same parameters: name, email, comment, status, and store view.
These were core backend section settings that help to master the Magento 2 blog plugin by Amasty. Therefore, we can proceed to the frontend section.
Frontend
On the frontend, Amasty Blog Pro has the following appearance. There is a section with recent posts on the top left. Below it, you can see a block with recent comments. The central column contains posts. The following information is displayed for each article: author, time of publication, the number of views, title, short description, tags, and comments. The right part of the blog home page contains a search field and button, categories, and tags.

Blog category pages have the same structure:

Below, you can see how the extension is integrated into the footer.
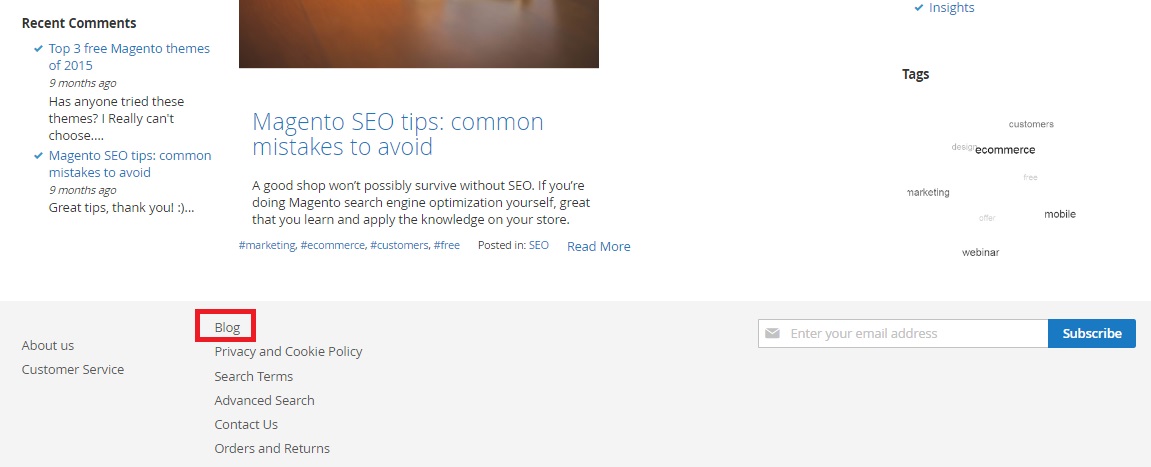
All the elements mentioned above are available on each post page. Besides, you can find social buttons and comments below the article.

Recent Updates
Magento 2 Blog Pro 2.8.0
- Now it is possible to add new blocks to blog post pages via widgets.
Magento 2 Blog Pro 2.7.1
- Now, a related products block can be displayed on the blog pages, and a related posts widget – inserted into product pages.
- The Blog Posts tab was added to the customer account area.
- Canonical URLs were added to the blog pages.
- Now, URL keys can be configured for categories, tags, and authors per store view.
- WhatsApp was added to social share buttons.
- Now it is possible to create a description of blog categories in the backend.
- A new setting was added – customer notifications on replies to their comments.
- Now the replies tree in the comments block is hidden by default.
Magento 2 Blog Pro 2.6.0
- Now users can add more information about blog post authors, including images, descriptions, and links to social media accounts.
- Now, Slash( “/“) can be used as a value in the URL Postfix.
- The main features of the extension were covered with MFTF tests to provide better quality and stability.
Magento 2 Blog Pro 2.5.6
- Multistore configuration was introduced for categories, authors, and tags.
Magento 2 Blog Pro 2.4.6
Magento 2 Blog Pro 2.3.0
Magento 2 Blog Pro 2.2.1
Magento 2 Blog Pro 2.1.1
-
A new user interface of the article creation page in the backend was introduced.
-
Now by clicking on the ‘More from this author’ link in the blog post, a separate page opens.
- The preview function for posts created in the backend was added.
- SEO functionality was extended by adding the microdata (breadcrumbs, author, name, description, image).
Magento 2 Blog Pro 2.0.0
Magento 2 Blog Pro 1.7.0
- Now you can view and manage all cron tasks on the Cron Tasks List grid.
Magento 2 Blog Pro 1.6.0
-
Deep integration with Amasty Page Builder was introduced.
-
Now you can use the drag-and-drop tool of the Page Builder extension for inserting various blog elements, i.e., blog post list, recent blog posts, tag cloud, and others.
Magento 2 Blog Pro 1.4.0
Magento 2 Blog Pro 1.3.1
Magento 2 Blog Pro 1.3.0
-
Now it is possible to place the Blog Category, Blog Recent Posts, and Recent Comments widgets on any website page.
-
Now it is possible to add the link to a blog page to the categories menu and toolbar.
-
Admin notifications on new comments to blog posts were implemented.
Magento 2 Blog Pro 1.2.0
- Now the module is compliant with the latest GDPR EU requirements.
Magento 2 Blog Pro 1.1.0
- Image size settings for blog pages were added.
Magento 2 Blog Pro 1.0.9
- Thumbnails in posts are replaced with images from the gallery.
Magento 2 Blog Pro 1.0.4
- The “Published Date” column was added.
Magento 2 Blog Pro 1.0.2
- A sitemap was added (for compatibility with the Amasty Google XML Sitemap extension).
Final Words
As you can see, with this Magento 2 blog extension, WordPress integration is no longer necessary. Amasty provides essential features that help to customize the appearance of your new blog in conformity with all modern requirements. As a result, both backend administrators and storefront visitors can enjoy the seamless experience of posting, reading, and sharing. The best Magento 2 blog integration is available for $349. For further information, check the links below:
Download / Buy Amasty Blog Pro Magento 2 Extension
Download / Buy Amasty Blog Pro Magento Extension


