
It’s no secret that TikTok has become a powerhouse for e-commerce businesses. Reaching younger audiences and generating brand buzz is easier than ever on this platform. But to truly maximise your TikTok advertising efforts, you need data. You need to understand how your audience interacts with your brand, how your ads are performing, and which users are most likely to convert. That’s where TikTok Pixel tracking comes in. Magento, a popular and powerful e-commerce platform, offers a robust foundation for online stores. However, setting up TikTok Pixel tracking directly within Magento can be a bit of a headache. That’s where Google Tag Manager (GTM) steps in as the hero. GTM streamlines the process, allowing you to manage and implement tracking code without needing to dive into complex Magento code adjustments. Let us look at this step by step guide to set up Magento Tiktok Pixel Tracking using GTM.
Understanding TikTok Pixel
What is TikTok Pixel?
Imagine TikTok Pixel as a secret shopper. It’s a piece of code that you place on your Magento store, quietly observing user actions and gathering valuable intelligence about your audience. This data isn’t just random noise; it’s the key to unlocking powerful marketing insights.
This secret shopper doesn’t just report on what they see; they analyse it. They tell you which products capture the most attention, which ones users linger over, and where they might be abandoning the purchase process. This goldmine of data isn’t just random noise – it’s the key to unlocking a deeper understanding of your audience.
With this knowledge, you can become a marketing mastermind. You can tailor your offerings to what your customers truly desire, personalise your advertising campaigns to resonate with their interests, and identify any pain points that might be hindering sales. In short, TikTok Pixel empowers you to see your store through your customers’ eyes, giving you the tools to craft winning marketing strategies.
Benefits of Using TikTok Pixel for Magento Stores
- Targeted Advertising: Want to show your ads to people who are genuinely interested in your products? TikTok Pixel lets you track user behavior on your site, identify valuable customer segments, and deliver personalized ads that resonate with them.
- Campaign Optimization: Ever wondered which of your TikTok ads are true winners? With TikTok Pixel, you can analyze data, see which campaigns are performing best, and adjust your strategy accordingly.
- Retargeting: Ever had someone abandon their cart? This is where TikTok Pixel proves its worth. It allows you to re-engage those users who have shown interest in your products by displaying relevant ads on TikTok, reminding them of what they left behind.
- Improved ROI: By understanding your audience and optimizing your campaigns based on their behavior, you’ll see a much better return on your TikTok advertising investment.
Key Events to Track
- Page View: Track when users visit specific pages on your Magento store. This helps you understand what content is attracting their attention.
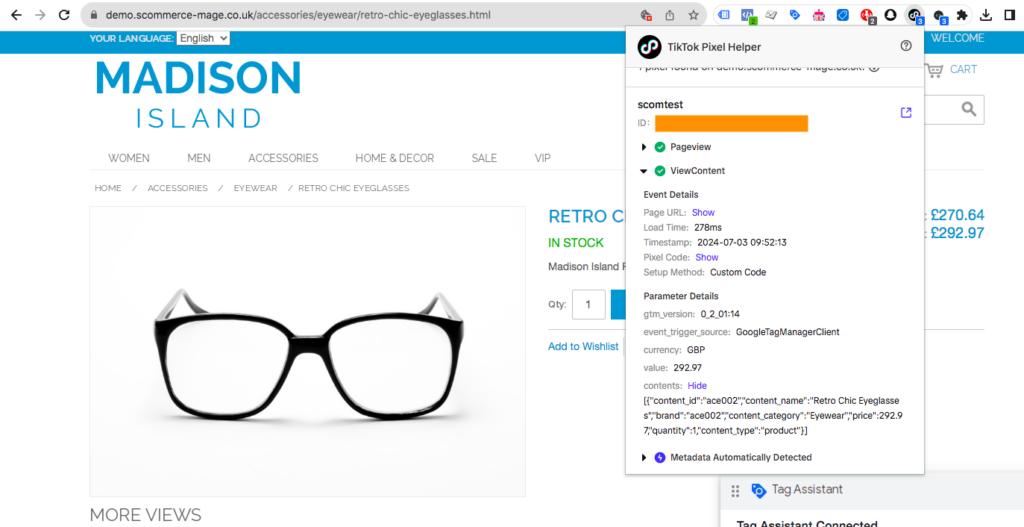
- View Content: Track when users view specific product or content details on your Magento store. This can be triggered by users landing on product pages, blog posts, or other detailed content sections. It helps you understand what content is engaging users beyond just page visits.
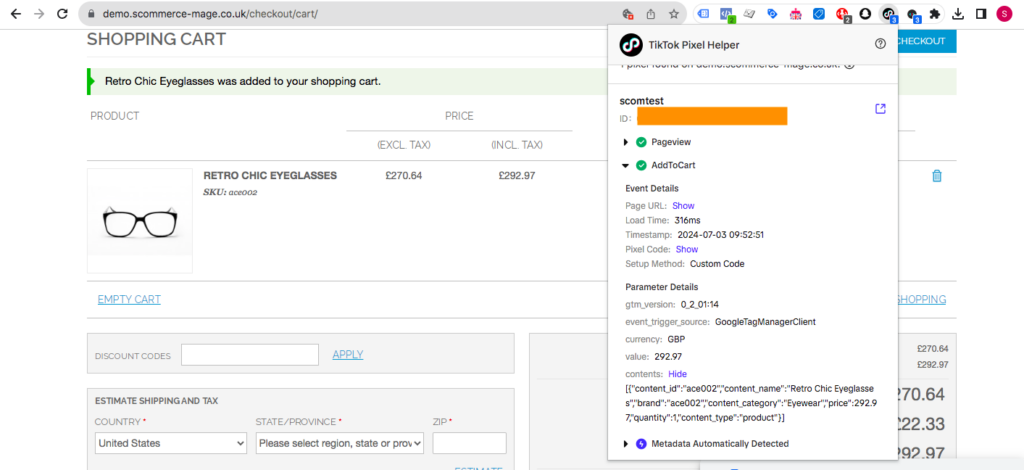
- Add to Cart: Monitor when users add products to their cart, revealing their interest level.
- Initiate Checkout: Track when users begin the checkout process. This indicates their intent to purchase and helps you understand how many users abandon the checkout process at various stages.
- Add Payment Info: Track when users enter their payment information during checkout. This indicates a strong purchase intent and helps you identify any friction points users might encounter during the final checkout steps.
- Purchase: Track when users complete a purchase. This is the ultimate goal, and tracking it helps you measure the effectiveness of your campaigns.
Prerequisites
Before we get started with the setup, make sure you have the following
- Data Layers Implementation: You need data layers implemented to the store. We’ll use the information from these layers to populate TikTok tags. We recommend using our Google Tag Manager Module as it implements various crucial data layers which opens up the possibility of adding various trackings to GTM.
- TikTok Ads Manager Account: A TikTok Ads Manager account where you can create and manage your TikTok campaigns. We will create a tiktok pixel id in the ads manager account to send in the essential events.
- Google Tag Manager Account: A Google Tag Manager account linked to your Magento store. This again can be implemented through our above mentioned module.
Set up Magento Tiktok Pixel Tracking: Step by Step
Creating a TikTok Pixel
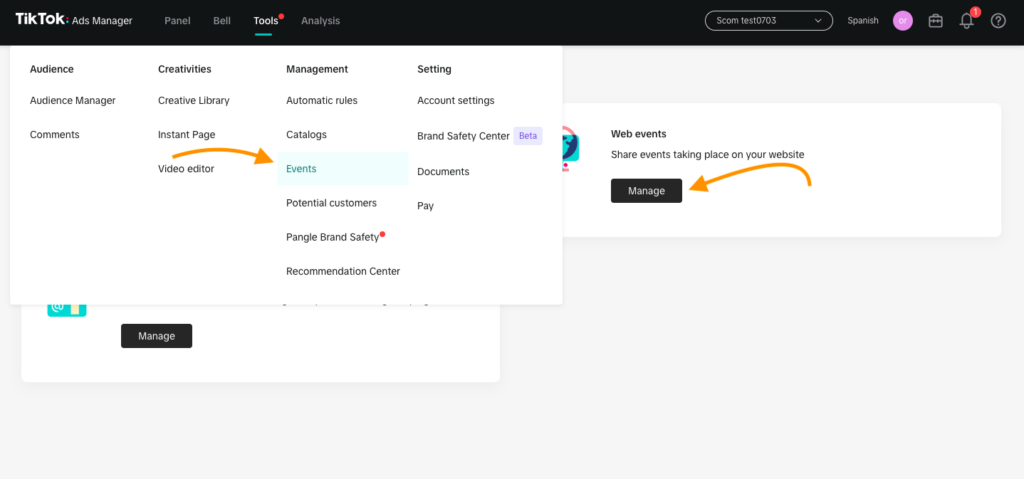
- Accessing TikTok Ads Manager: Log in to your TikTok Ads Manager account. Click on “tools” from the top menu then click on “Events”. Finally click on “Manage” under “Web Events”.
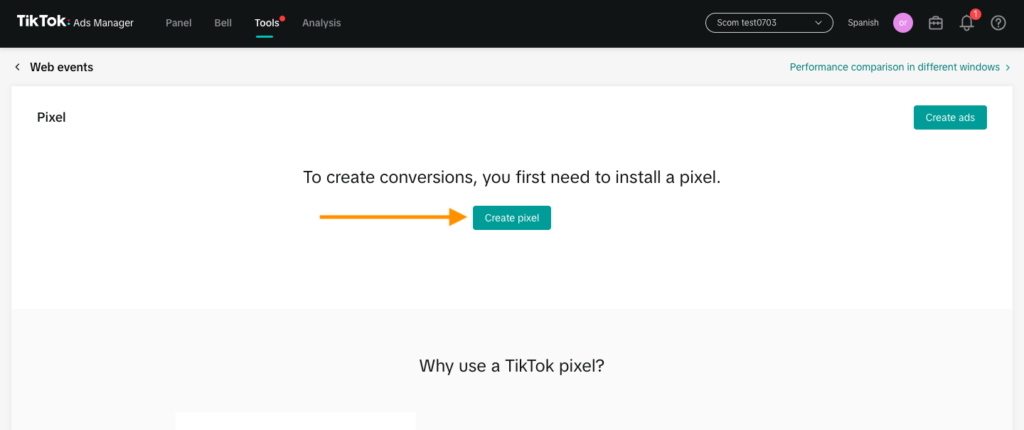
- Generating a New Pixel: Click on “Create Pixel.”
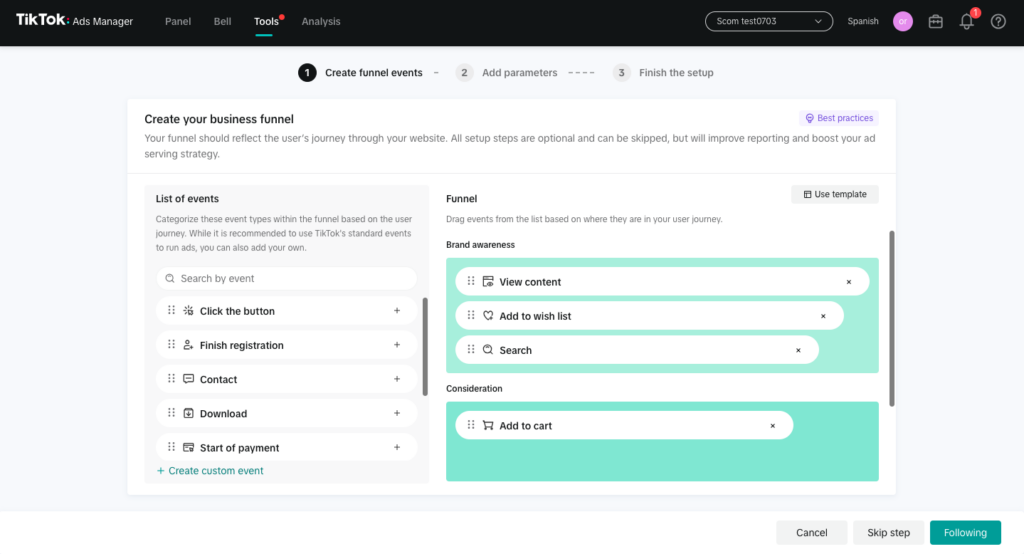
- Copying the Pixel ID: Follow the steps to create the pixel, set up the funnel events as your site. We will set up the standard events. Once your pixel is created, copy the unique pixel ID code. This code is your key to unlocking the power of tracking.
Create Tags, Triggers, and Variables in GTM
Create the tags as per the guidelines mentioned below:-
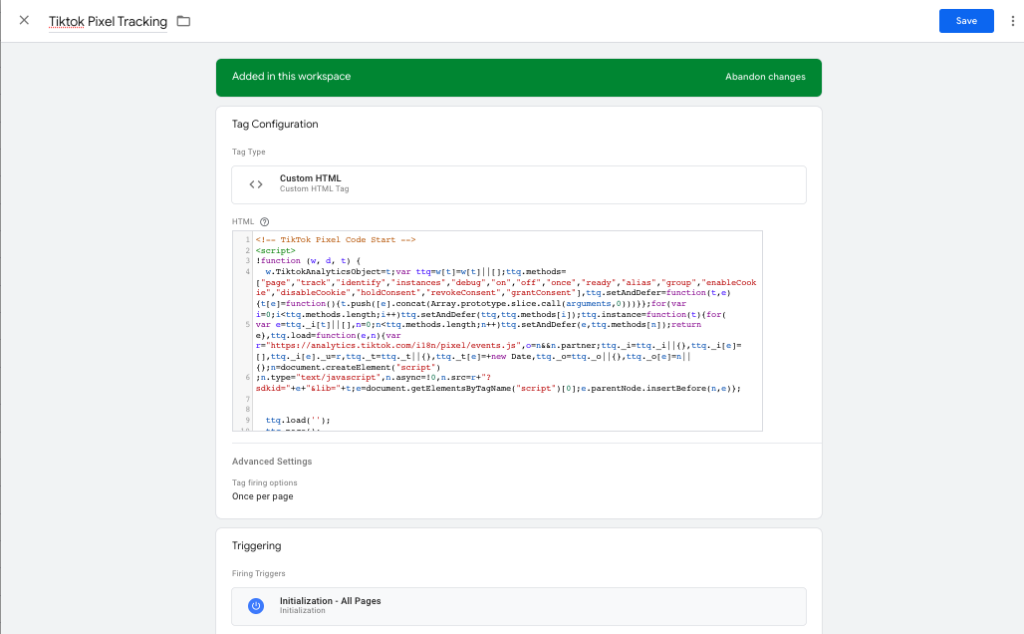
Tiktok Pixel Tracking
- Tag Name:- Tiktok Pixel Tracking
- Tag Type:- Custom HTML
- HTML:- Add the pixel code in the previous step
- Advanced Settings->Tag Firing Options:- Once Per Page
Trigger:- Initalisation – All Pages ( we should fire it on all pages upon initialisation )
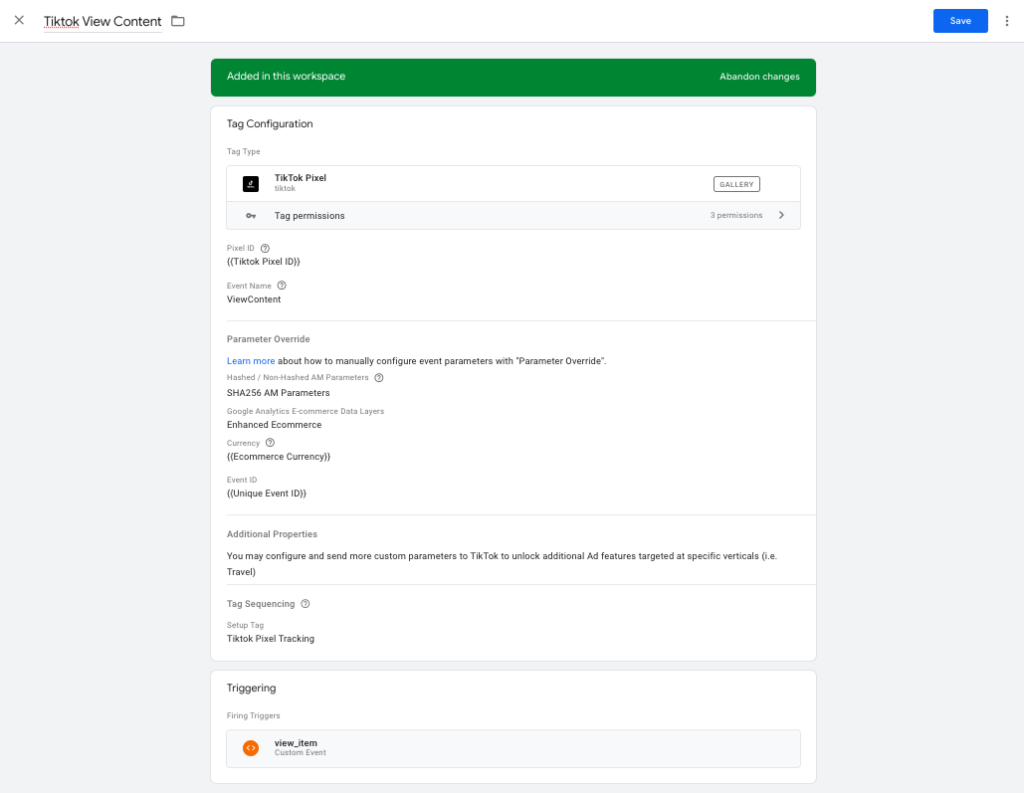
Tiktok View Content
- Tag Name:- Tiktok View Content
- Tag Type:- Tiktok Pixel
- Pixel ID:- {{Tiktok Pixel ID}} (Add the constant variable where youare storing the pixel id)
- Event Name:- ViewContent
- Parameter Override
- Properties
- Check “Use Google Analytics E-commerce Data Layers (Recommended)”
- Select “Enhanced Ecommerce”
- Currency:- {{Ecommerce Currency}} (Select your currency variable as per the data layer push)
- De-duplication Configurations
- Event ID :- {{Unique Event ID}} (Select the variable that generates random unique Event ID)
- Properties
- Advanced Settings->Tag Firing Options:- Once Per Page
- Tag Sequencing
- Check “Fire a tag before Tiktok View Content fires”
- Setup Tag:- Tiktok Pixel Tracking
- Check “Don’t fire Tiktok View Content if Tiktok Pixel Tracking fails or is paused”
- Trigger:- View item (trigger this event when view_item event from ga4 is pushed into the data layers)
Testing:- Test the tag using the Tiktok Pixel Helper browser extension
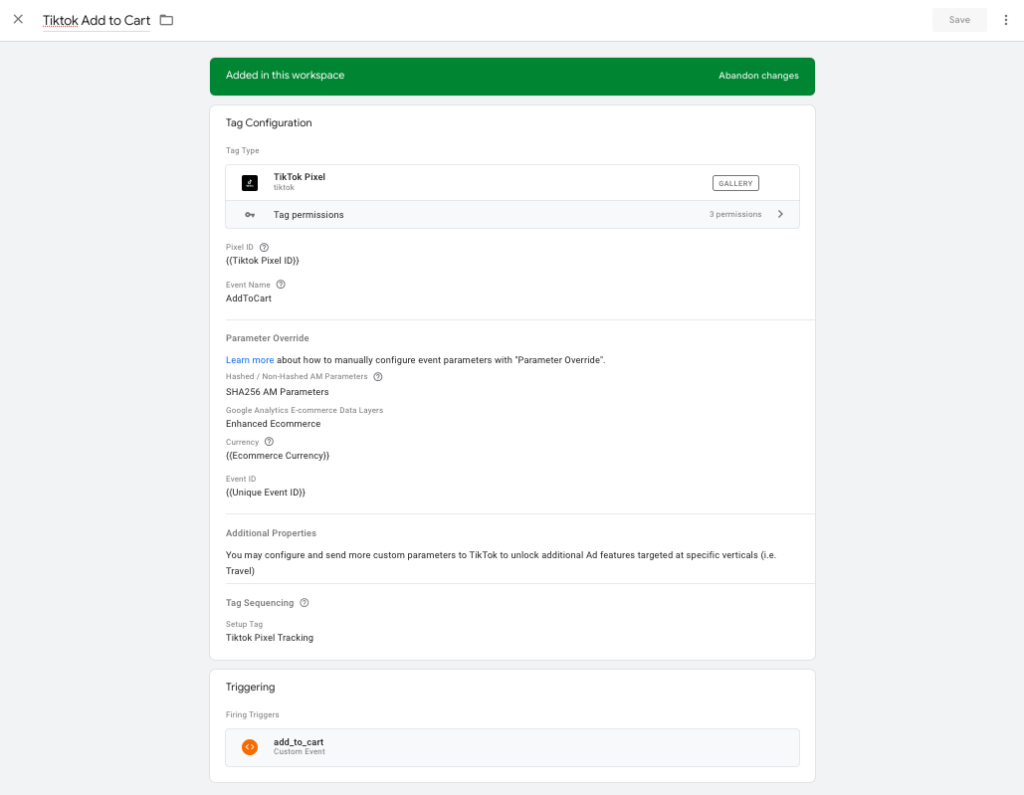
Tiktok Add to Cart
- Tag Name:- Tiktok Add to Cart
- Tag Type:- Tiktok Pixel
- Pixel ID:- {{Tiktok Pixel ID}} (Add the constant variable where you are storing the pixel id)
- Event Name:- AddToCart
- Parameter Override
- Properties
- Check “Use Google Analytics E-commerce Data Layers (Recommended)”
- Select “Enhanced Ecommerce”
- Currency:- {{Ecommerce Currency}} (Select your currency variable as per the data layer push)
- De-duplication Configurations
- Event ID :- {{Unique Event ID}} (Select the variable that generates random unique Event ID)
- Properties
- Advanced Settings->Tag Firing Options:- Once Per Page
- Tag Sequencing
- Check “Fire a tag before Tiktok Add to Cart fires”
- Setup Tag:- Tiktok Pixel Tracking
- Check “Don’t fire Tiktok Add to Cart if Tiktok Pixel Tracking fails or is paused”
- Trigger:- Add to Cart (trigger this event when add_to_cart event from ga4 is pushed into the data layers)
Testing:- Test the tag using the Tiktok Pixel Helper browser extension
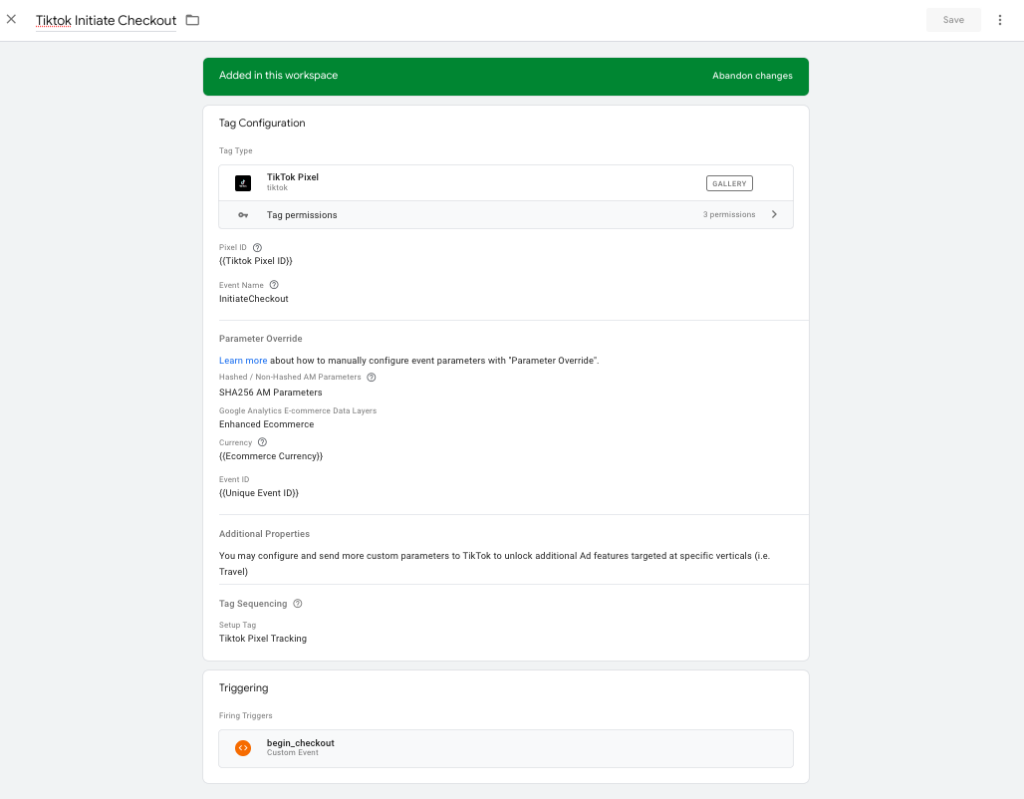
Tiktok Initiate Checkout
- Tag Name:- Tiktok Initiate Checkout
- Tag Type:- Tiktok Pixel
- Pixel ID:- {{Tiktok Pixel ID}} (Add the constant variable where you are storing the pixel id)
- Event Name:- InitiateCheckout
- Parameter Override
- Properties
- Check “Use Google Analytics E-commerce Data Layers (Recommended)”
- Select “Enhanced Ecommerce”
- Currency:- {{Ecommerce Currency}} (Select your currency variable as per the data layer push)
- De-duplication Configurations
- Event ID :- {{Unique Event ID}} (Select the variable that generates random unique Event ID)
- Properties
- Advanced Settings->Tag Firing Options:- Once Per Page
- Tag Sequencing
- Check “Fire a tag before Tiktok Initiate Checkout fires”
- Setup Tag:- Tiktok Pixel Tracking
- Check “Don’t fire Tiktok Initiate Checkout if Tiktok Pixel Tracking fails or is paused”
- Trigger:- Begin Checkout (trigger this event when begin_checkout event from ga4 is pushed into the data layers)
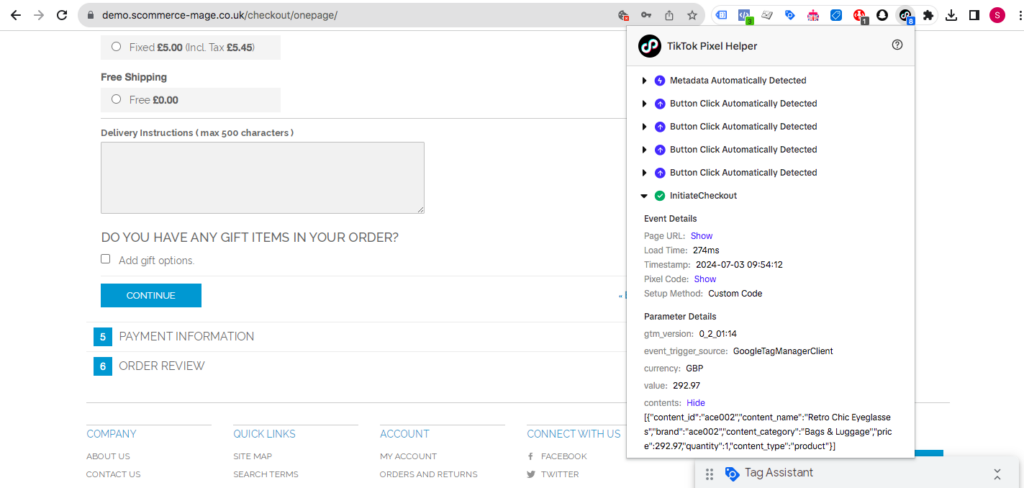
Testing:- Test the tag using the Tiktok Pixel Helper browser extension
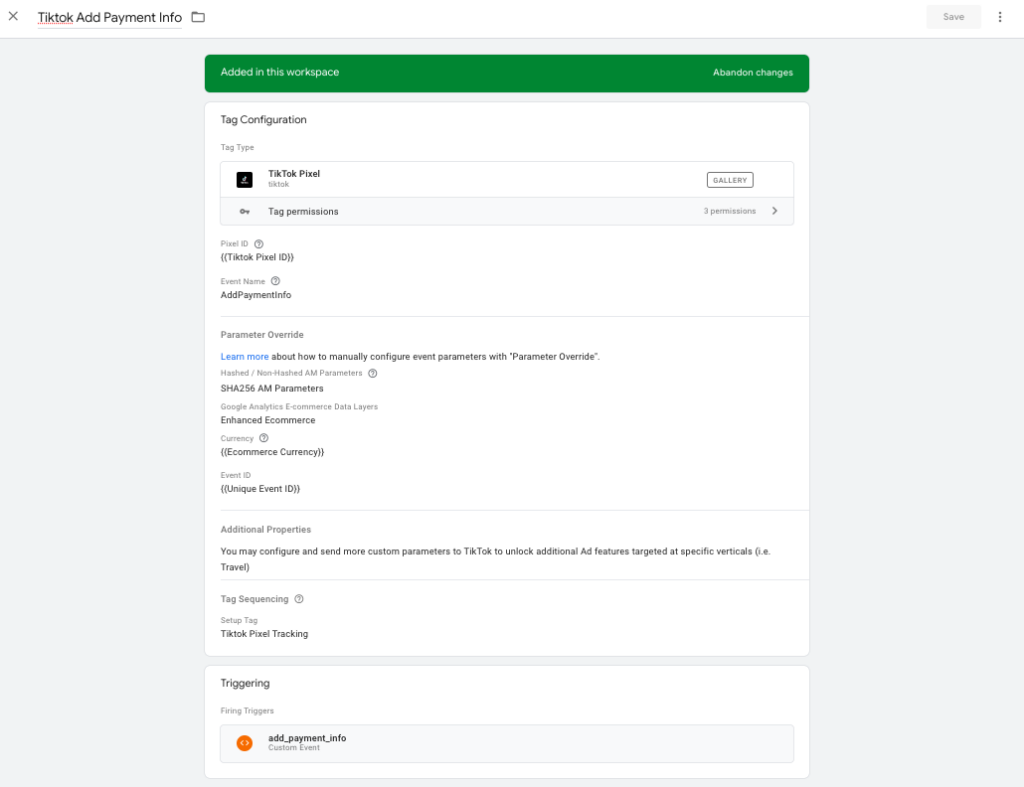
Tiktok Add Payment Info
- Tag Name:- Tiktok Add Payment Info
- Tag Type:- Tiktok Pixel
- Pixel ID:- {{Tiktok Pixel ID}} (Add the constant variable where you are storing the pixel id)
- Event Name:- AddPaymentInfo
- Parameter Override
- Properties
- Check “Use Google Analytics E-commerce Data Layers (Recommended)”
- Select “Enhanced Ecommerce”
- Currency:- {{Ecommerce Currency}} (Select your currency variable as per the data layer push)
- De-duplication Configurations
- Event ID :- {{Unique Event ID}} (Select the variable that generates random unique Event ID)
- Properties
- Advanced Settings->Tag Firing Options:- Once Per Page
- Tag Sequencing
- Check “Fire a tag before Tiktok Add Payment Info fires”
- Setup Tag:- Tiktok Pixel Tracking
- Check “Don’t fire Tiktok Add Payment Info if Tiktok Pixel Tracking fails or is paused”
- Trigger:- Add Payment Info (trigger this event when add_payment_info event from ga4 is pushed into the data layers)
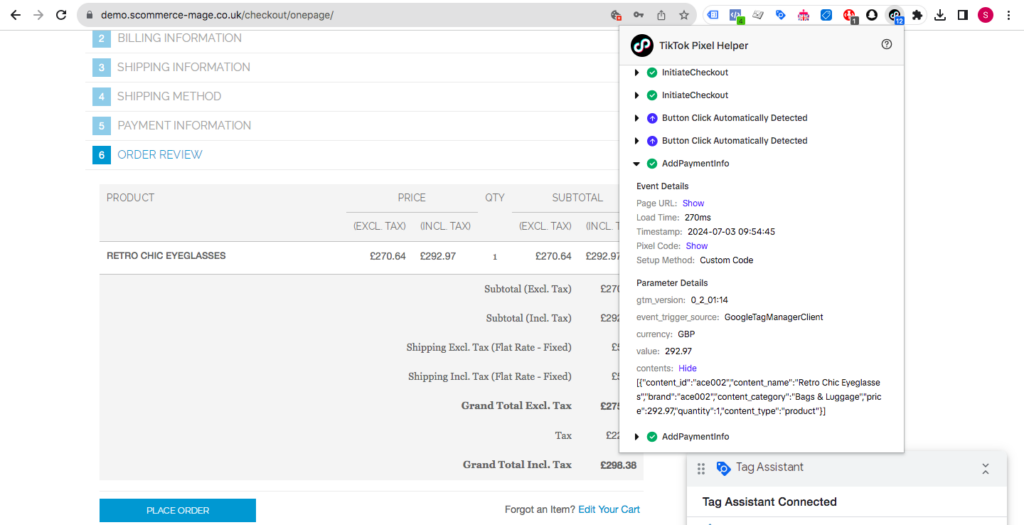
Testing:- Test the tag using the Tiktok Pixel Helper browser extension
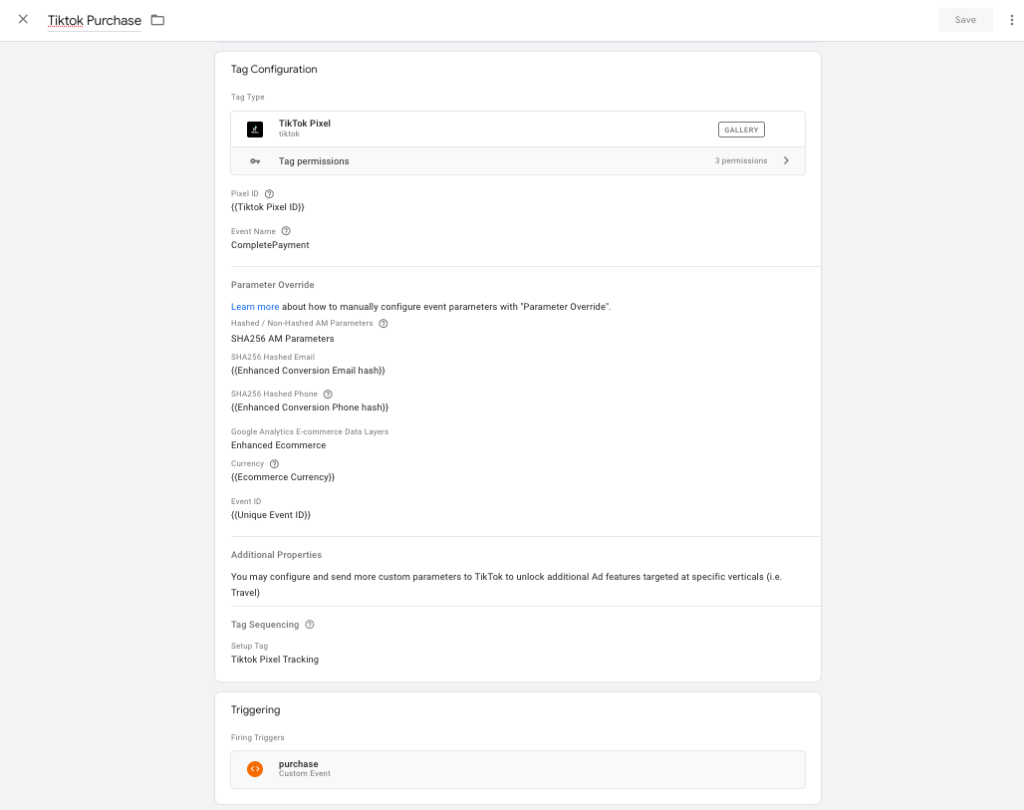
Tiktok Purchase
- Tag Name:- Tiktok Purchase
- Tag Type:- Tiktok Pixel
- Pixel ID:- {{Tiktok Pixel ID}} (Add the constant variable where you are storing the pixel id)
- Event Name:- CompletePayment
- Parameter Override
- Advanced Matching Configurations
- Hashed / Non-Hashed AM Parameters:- SHA256 AM Parameters
- SHA256 Hashed Email:- {{Enhanced Conversion Email hash}} (Add the variable that stores hashed email)
- SHA256 Hashed Phone:- {{Enhanced Conversion Phone hash}} (Add the variable that stores hashed phone number)
- Properties
- Check “Use Google Analytics E-commerce Data Layers (Recommended)”
- Select “Enhanced Ecommerce”
- Currency:- {{Ecommerce Currency}} (Select your currency variable as per the data layer push)
- De-duplication Configurations
- Event ID :- {{Unique Event ID}} (Select the variable that generates random unique Event ID)
- Advanced Matching Configurations
- Advanced Settings->Tag Firing Options:- Once Per Page
- Tag Sequencing
- Check “Fire a tag before Tiktok Purchase fires”
- Setup Tag:- Tiktok Pixel Tracking
- Check “Don’t fire Tiktok Purchase if Tiktok Pixel Tracking fails or is paused”
- Trigger:- Purchase (trigger this event when purchase event from ga4 is pushed into the data layers)
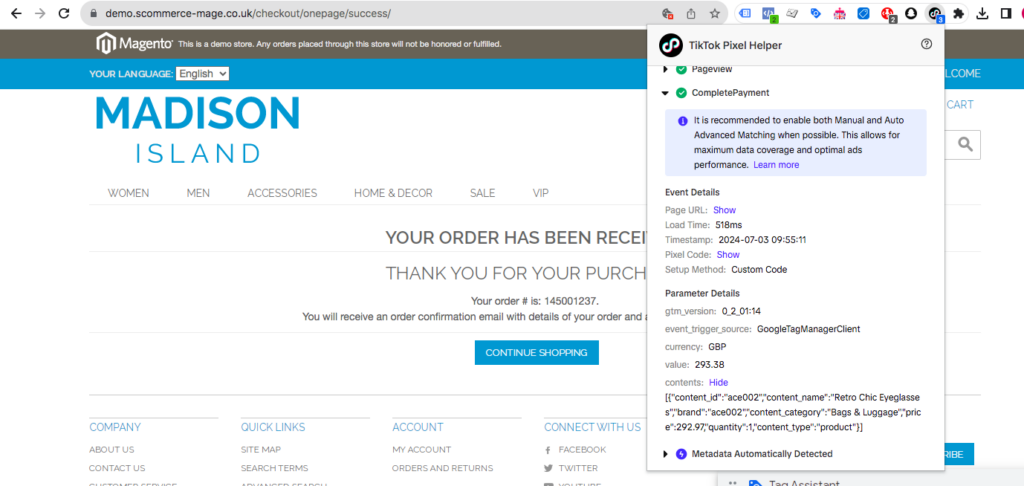
Testing:- Test the tag using the Tiktok Pixel Helper browser extension
Conclusion
Setting up Magento TikTok Pixel Tracking using Google Tag Manager (GTM) can significantly enhance your marketing efforts by providing detailed insights into user behavior and campaign performance. By following the steps outlined in this guide, you can seamlessly integrate TikTok Pixel with your Magento store, ensuring you capture valuable data to optimize your advertising strategies.
However, the process can be time-consuming and requires attention to detail to ensure everything is set up correctly. To simplify this process and save valuable time, consider using our comprehensive solution available for your Magento 1 or Magento 2 stores. Our product includes a ready-to-use JSON import file for GTM that encompasses all the necessary configurations for Magento TikTok Pixel Tracking. This not only streamlines the setup process but also ensures accuracy, allowing you to focus on leveraging the data for your marketing success.
Magento 1:- https://www.scommerce-mage.com/magento-ga4-google-tag-manager.html
Magento 2:- https://www.scommerce-mage.com/magento-2-ga4-google-tag-manager.html


