Our extensions, Shopify

Since Shopify has no built-in mapping instruments, you must rely on additional tools to match product attributes for different data exchange purposes. All core Shopify product metafields, for instance, are mapped automatically if you use Marketplace Connect. Some marketplaces, however, require certain product attributes to be displayed on your listings that aren’t part of your product details in the Shopify admin by default. How to align your mapping efforts with your integration strategies most efficiently? Let’s see!
The following article teaches how to map products on Shopify without headaches. We explain how to create Shopify product mapping presets and use them for integrations with various external systems, including marketplaces, ERPs, CRMs, etc., with the help of the Import & Export Tool for Shopify. Below, you will learn how to create flexible product mapping schemes for both import and export, automating all further data synchronizations.

Table of contents
- 1 Shopify Product Mapping with Import & Export Tool
- 2 How to Map Products on Shopify for Import
- 3 How to Map Products on Shopify for Export
- 4 Final Words
- 5 FAQ
- 5.1 How do I map a product on Shopify?
- 5.2 How do I import third-party data to Shopify?
- 5.3 How do I export Shopify data suitable for external systems?
Shopify Product Mapping with Import & Export Tool
Meet a game-changing application that will take your product mapping to the next level. The Import & Export Tool is a Swiss Army knife for e-commerce data management, offering features that simplify, enhance, and supercharge your data mapping.
This application lets you map product attributes when you import data to Shopify or export it to external systems. These two cases are associated with slightly different features. For instance, export processes introduce default values and the ability to exclude attributes from a CSV file. As for the import side of the process, it provides all the instruments necessary for transferring third-party data to Shopify. Let’s explore each interface to learn how Shopify product mapping is implemented in the Import & Export Tool.
How to Map Products on Shopify for Import
Like in the case of the default Shopify import, it’s a breeze to get started. Click the “New Profile” button under Admin-> Apps -> Import & Export Tool -> Import.
You are on the Select file screen. It’s a place where basic import settings are situated. Here, you can automate your product import, enable notifications, choose XML, XLSX, or Google Sheets as your file format, and select Google Drive, URL, FTP, or manual file upload. And don’t forget to select products as your import entity to enable product mapping. Learn more about this section in our Manual for Import & Export Tool.
With the basic configurations in the bag, it’s time to fine-tune your Shopify product mapping – click Continue to proceed. Next, follow these steps to map products on Shopify:
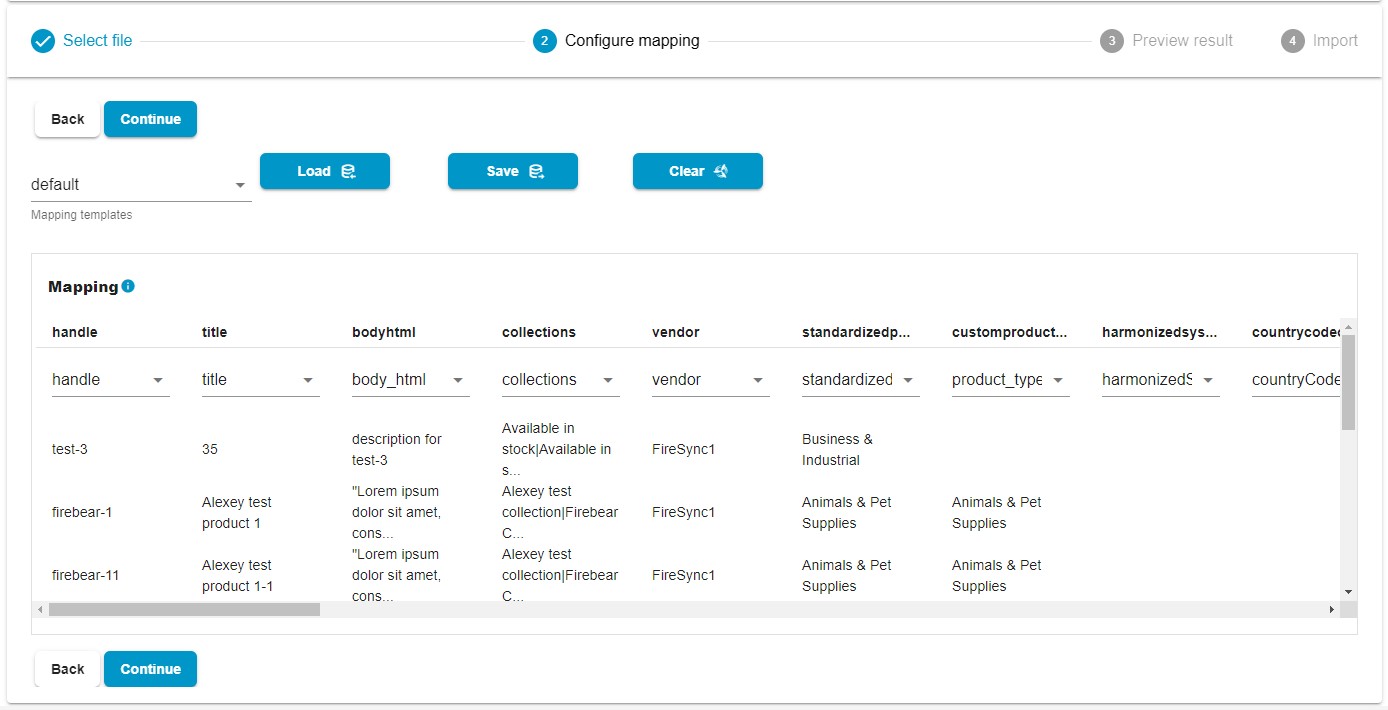
- The app’s mapping screen displays attributes from a CSV file in the first row. Find third-party values.
- Below each attribute, you can see a drop-down list of Shopify’s default attributes. Choose a value from the drop-down list to indicate how columns in your imported file correspond to the product properties in Shopify.

The Import & Export Tool analyzes the update and automatically adds the column names from your import file to the mapping table. Next, you match them to the default namings. For instance, you can see that the CSV’s bodyhtml is mapped to Shopify’s body_html. You just need to find third-party column names and specify the system’s replacement for them below. That’s it!
When the work is done, you can save this mapping preset for further product imports to Shopify.
How to Map Products on Shopify for Export
When it comes to export processes, the Import & Export Tool offers a similar approach. Start a new export profile under Admin -> Apps -> Import & Export Tool -> Export. Hit the New Profile button to get to the Configure export screen. It’s a place where you can work with basic export settings. They are described in our Manual for Import & Export Tool.
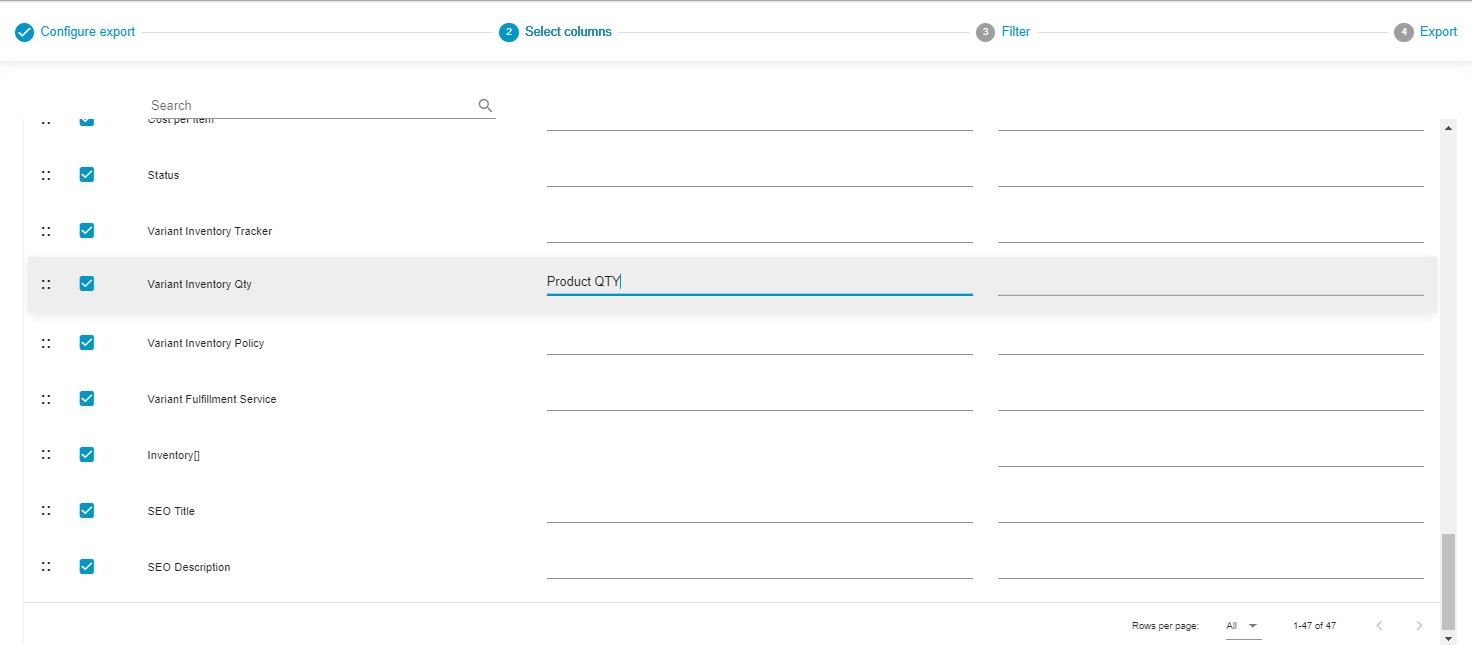
When you are ready with the first part of your export profile, click Continue to proceed to the Select columns screen. Here, Shopify product export mapping takes place. Follow these steps to customize the column titles to meet your partner’s specific requirements:
- Find the default attributes that need to be renamed.
- Specify the new names that a third party requires
Rename a default column title specified in Column by adding a new name in Rename. - Additionally, you can uncheck any columns you prefer not to include in the export.

For instance, the Variant Inventory Qty is mapped to Product QTY in the image above. Just type the correct replacement for a native column name.
Two other features of export product mapping in Shopify are:
- Column Sorting: Sort columns, arranging them in the desired order within the export file through a simple drag-and-drop interface.
- Default Values: Include default values when exporting. If a specific attribute has no value, the export file will automatically include the designated default value in its place.
After finishing the work, you can save this mapping preset for future product exports in Shopify.
Final Words
The Import & Export Tool introduces robust product mapping for both import and export processes. When you need to import third-party data, the app lets you gently match any unsupported attributes to Shopify’s native column names. When it comes to export processes, you get even more. Shopify product mapping is enhanced with default values, column sorting, and the ability to exclude columns from a CSV file. Also, note that products are not the only supported entity. You can also use our tool to map customer and order data in Shopify. Follow these links to discover more facts about the Import & Export Tool:
- Firebear Import & Export Tool for Shopify
- Firebear Import & Export Tool Manual
- Contact us
FAQ
How do I map a product on Shopify?
You can easily map a product on Shopify in both import and export processes with the Import & Export Tool. Install the app, open it, and create a new import or export profile. Next, configure its basic settings and proceed to the mapping screen. For product import mapping, select Shopify’s attribute from a drop-down list below each third-party value. For product export mapping, specify a third-party column name to the right of the original one.
How do I import third-party data to Shopify?
You can import third-party data to Shopify with the help of the Import & Export Tool. The app lets you map external attributes to Shopify’s default column names, freely importing them into the system. Furthermore, you can also transfer XLSX and XML files or import data straight from Google Sheets.
How do I export Shopify data suitable for external systems?
Use the Import & Export Tool to export data that is already suitable for third-party systems. The app’s mapping interface introduces the ability to replace Shopify’s default attributes with any third-party names. In addition to that, you can also rearrange the order of columns in your export table as well as exclude unnecessary product data.

Please enable JavaScript to view the comments powered by Disqus.


