

What is Matrixify? How to use Matrixify? What are its core features and goals? Below, we review the Matrixify Shopify app to let you know the answers. We aim to highlight the core features of this tool, illustrate how Matrixify works, and figure out whether is the number one import and export solution for the Shopify ecosystem or not. A brief Matrixify template tutorial is also available in this article, along with Matrixify pricing plans.
The core goal of the Shopify Matrixify app is to help merchants bulk import and export human-readable Excel and CSV files. Although the default Shopify data transfer instruments are also capable of doing that, the third-party solution dramatically extends the platform’s basic abilities. But is it enough to cover all the data transfer demands? You will find out soon. If you want more information on the default instruments, read these two materials: The Ultimate Guide to Shopify Import & The Ultimate Guide to Shopify Export.

Table of contents
What is Matrixify?
Matrixify is a Shopify import & export app designed for bulk data transfers that introduces more advanced functionalities than the default platform’s instruments and goes far beyond the limits associated with rival third-party solutions.
The tool lets you use Excel or CSV files to import and export a bunch of entities. Unless you are not a Shopify Plus user, the default data transfer capabilities are mostly limited to products, inventory, and customers on import and the same entities + orders on export. That’s why a more fully-featured tool is required to maintain the normal functionality of an e-commerce website that relies on external integrations, even if your only extra demand is the Shopify import of orders. While you can freely export them, an insurmountable obstacle appears in front of you when it is necessary to import orders to Shopify, no matter whether they were generated within the ecosystem or beyond.
The Shopify Matrixify app solves this issue. It not only enables the Shopify order import but also lets you transfer draft orders to and from your e-commerce website. Other supported entities include products, collections, discounts, payouts, customers, companies, pages, blogs, redirects, activity, and files. Even metafields are in the game! Yes, you’ve got it right: the Shopify export of metafields is at your disposal. What about the Shopify metafields import, you will ask? It is also supported. You can have Metafields as additional columns along with items they are linked to. The app provides the ability to edit, add, or delete them.
Thus, you can easily migrate data to your store from other e-commerce platforms, such as Magento, BigCommerce, Shopware, etc. Even importing blog posts to Shopify from your old website is possible with the Matrixify Shopify app. You won’t lose your precious tutorials and how-to guides after the migration. Neither is it necessary to recreate them in Shopify from scratch.
The Shopify import from Etsy, eBay, and other similar sales channels is no longer an attainable goal too. Easily connect your e-commerce website to marketplaces where you already sell your goods or want them to appear.
Even if external data transfers are not your business, the Matrixify Shopify app is still helpful since it empowers you to conduct extended bulk data updates. You can utilize it to apply mass changes to specific fields while keeping existing data intact. Perhaps, inventory updates are the most common use case here. Matrixify lets you apply changes to product quantities by SKU number upon a schedule. It is the tool to manage your whole Shopify store data with overall control over it.
You get the ability to feed data to your store from any of your sources and fit it into Matrixify’s Excel or CSV template. The application is flexible enough to let you update your existing data by individual fields without any necessity to transfer it back and forth multiple times. The idea is to reduce all data transfers to a single file and automate them with the help of a schedule.
The exceptional support for all core entities empowers you to create backups of your whole shop within a few clicks. And the aforementioned schedule-based import and export processes let you keep the latest store version safe.
Another notable goal of the Matrixify Shopify app is to become your number-one time-saver. For instance, the Shopify import of collections is a time-consuming and painful process that requires tons of manual adjustments. Unless you use the Matrixify app. Its ability to import collections in bulk saves days of manual work. You can also explore what’s hidden inside each collection by doing an export. And the app is packed with many more features!
Any field available in the Shopify Admin can be exported and imported with Matrixify. The tool empowers you with the instruments necessary to bulk-update them all together. At the same time, you can apply changes to any of those fields individually.
The core features of the Matrixify Shopify app include:
- Support Of All Entities. Import and export any field available in the Shopify Admin. All exported store contents fit into a single file that can be copied to another website.
- Simple Data Updates. Update the product price, inventory, image alt texts, collection product positions, variants (by SKU, barcode, or option values), metadata, etc. Update only fields that you want to apply changes to without any need to re-import everything.
- Import & Export Automations. Create schedules to transfer data to and from your website.
- Filters. By applying filters and selecting columns, you can export only the data you need.
- Bulk Import/Export. Convert data streams from dropshippers and suppliers using Excel, CSV, or Google Sheets templates, moving multiple entities within a single import. Do the same thing upon export.
- Advanced Product Image Import. Import several images from the same row, separated by semicolons.
- Extended Product Variants Import. Not only update product variants by SKU, barcode, or option values but also reorder product variants.
- Enhanced Customer Management. Send out customer activations in bulk.
- Matrixify Metafields. Update SEO fields for products, collections, pages, and even blog posts.
- Extended Blog Migration. Transfer entire blogs between Shopify and other websites. The app lets you import and export not only blog posts but also comments that customers leave beneath them.
- Multiple Migration Sources. Migrate from numerous e-commerce platforms, including Magento, BigCommerce, and WordPress, transferring products, orders, collections, customers, redirects, and blog posts.
- Numerous Import & Export Destinations. Import from URL, FTP/SFTP, Dropbox, Google Drive, and Google Sheets or use direct file uploads. Export to FTP/SFTP.
- Progress Monitoring. Check the completion time and the number of new, updated, or failed items. View each imported or exported item’s detailed result.
Let’s find out what all these features mean and how Matrixify works.
How Matrixify Works
Properly read this chapter to get a solid understanding of how to use the Matrixify app. Below, we explore how to export Shopify data and then bulk edit it. Also, you will learn how to import data into Shopify and then review the import results right within Matrixify. Automating your bulk data updates is another opportunity introduced in the application. Shopify export of products, orders, collections, customers, and other entities gets a completely new form in Matrixify. So is Shopify import. Let’s study them in more detail.
Matrixify Export to Shopify
You can generate a new export by clicking the “New Export” button on the Export section of the app’s Home page.

Set up your data transfer process on a new page that opens in the app right after you click the button.

Pick export format
First of all, you need to select your export format. Find the “Format” section, where you can see a drop-down menu with all the available options, including Matrixify: Excel, Matrixify: CSV, and Matrixify: Google Sheets, among numerous other options.
Choose one of the “Matrixify:…” formats if your objective is to mass update your Shopify store data or migrate to another Shopify store.
The “Matrixify: Excel” format, which exports an Excel XLSX file, is what we advise. Excel files allow for using formulas, are much more user-friendly, and are much more stable than CSV files.
If you want to export your shop data to a CSV file since it may be too huge for Excel, use the “Matrixify: CSV” format.
As you can see, Matrixify extends the selection of supported file formats compared to the default Shopify export tool. However, you still have to manually convert your exported files if the accepting party requires ODS or something like that.
Pick export entity
To add an entity per sheet in your export file, click the “Select Sheets” button. Remember that unlike in the default Shopify export, you can choose multiple entities for a single export with Matrixify. It seems to be a great advantage and an outstanding time-saver! Check the entities you want to transfer
As you can see, the app displays the number of rows and columns that will be transferred along with the estimated export time. If not all the columns are available for export, the app highlights that.

Pick export columns
To further customize your export process, open the entity sheet. You can do that by simply clicking on it and choosing which field groupings you want to export.
As you can see, the Matrixify template lists the fields in groups, each of which may consist of one or more columns. You can add/remove either all columns in a group by checking/unchecking the group or edit its content by expanding each group.
If you want to learn more about each particular column, check the app’s website, and don’t forget to peruse our Shopify Export Guide since it contains the study of export processes along with a detailed description of attributes and columns available for export.
Note that it is recommended to export the Shopify store data you actually need since this affects how long the export lasts. And If you decide to tame the Shopify export of metafields, get ready for export that is considerably extended in time.
Customize export columns
You can modify the order of your export columns by accessing the “Customize Columns” section. First of all, it is possible to drag the column tags to alter their position.
In addition, you can click the “X” button to eliminate them. However, if you delete something important, like a product ID, Matrixify will suggest returning the column.
With the help of the Command column, you can inform Matrixify about what to do with the imported row. Watch the illustration below to see how Matrixify commands look in the admin.
Pick export data
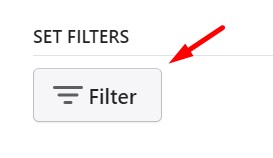
Now, when all the necessary columns are selected, you can’ proceed to the Filters section to narrow your selection of exported items to a certain list of objects. Follow these steps:
- Click the “Filter” button in the SET FILTERS section.
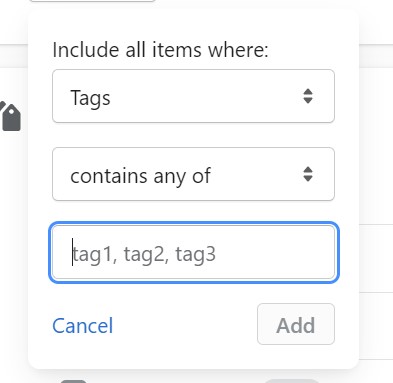
- Select a filter basis. It is one of the columns available for export.
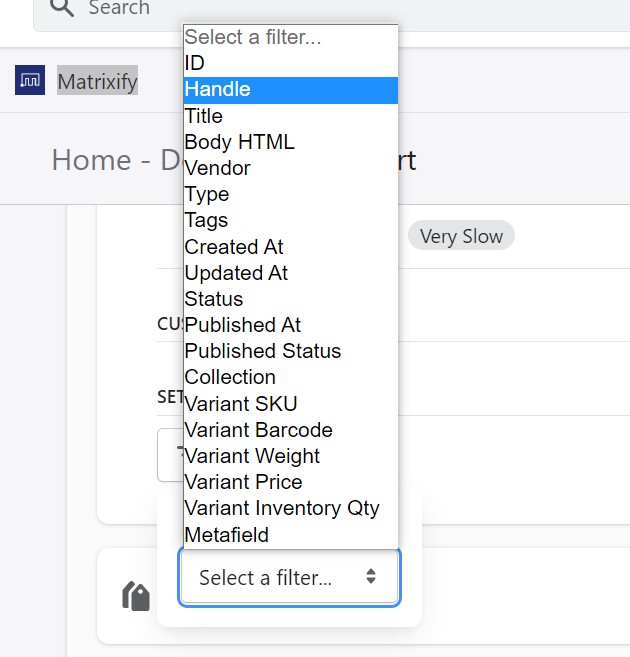
- Now, choose a filter condition, such as “contains any of’ or “contains none of”. Note that filter conditions depend on the selected filter basis (column).
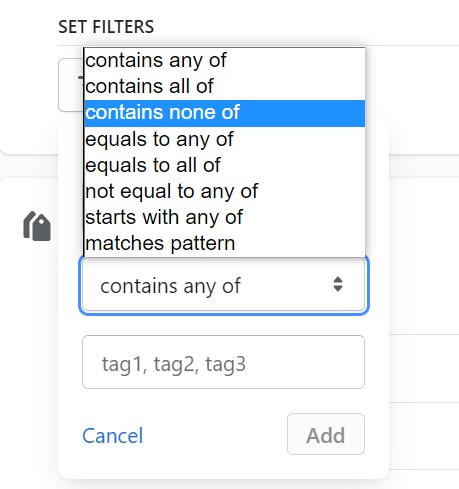
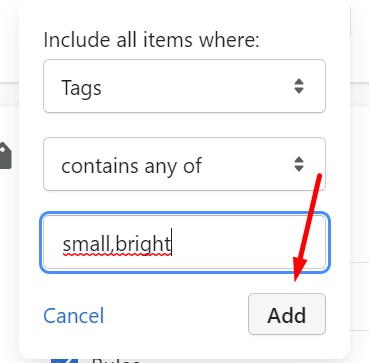
- Finally, you can add particular values your filter will use to narrow down the selection of records you want to transfer.
- Click the Add button to save and apply the filter.


Note that all your filters are available in the SET FILTERS section. You can edit or remove them via the corresponding buttons.

Pay attention to the fact that the item count and estimates will not change when you apply the filter in Matrixify; they will change when you actually begin the export. Matrixify still needs to search through your entire store to locate certain filters, though.
Additional Export Options
When automating data transfers in Matrixify, you can specify extra settings for the export, such as scheduling for a specified time and date. Let’s look at the provided opportunities available under the Options section.
Schedule
You can plan your export job for a particular date and time due to the Schedule on option. At the same time, it is possible to repeat your data transfer according to a schedule that you specify in the Repeat every row.

Custom File Name & Upload
To ensure that the exported file URL never changes, you can give the export a unique file name. It is useful for recurring backups or sending out Shopify store data streams. Use Dynamic placeholders to add shop subdomain, shop name, entities, date and time, etc., to your custom file name. You can also choose a time source for your placeholders. And don’t forget to specify your upload point in the Upload to row.

Shopify Item Order
Matrixify lets you export items sorted in an order as they come from Shopify. Check the corresponding option.

Time format
Import auto-detects the date format, so it is recommended to use the ISO format on export. However, you can choose one of the other options.
Configuring prefix values with apostrophes is another feature at your disposal. The ‘ prefix forces Excel and Google Sheets to interpret cell values as text and not to convert them to dates or scientific numbers.

Format-specific options
Some options are associated with a specific export format only. Let’s see what format-specific configurations Matrixify offers:
- Excel:
- Format date columns as Excel date-time without timezone – By default, the exported date will is the complete ISO date with a timezone, such as 2022-11-16 19:21:08 +0200, but you can choose this Export Option to put the proper date and time columns in Excel. However, keep in mind that since Excel doesn’t support time zones, the time will be displayed without the time zone.
- CSV:
- Zip CSV files – By default, a ZIP file will be created when exporting to a CSV file. Uncheck this box if you don’t need to compress the CSV files. As a default, it is enabled.
- CSV column delimiter – Choose from a variety of other common delimiters or create your own. It is a comma by default.
- CSV quote symbol – For programs like Excel to identify where a new cell starts and not treat a new line in a file, CSV file cells must be wrapped in quotes. By default, it is a double quote.
- CSV quotes forced – Adding the quote mark to every cell in the exported file makes it easier to open in Excel. If not enabled, Matrixify encloses only cells that need to be enclosed. As a default, it is enabled.
- CSV with included BOM – (Automatically enabled) When a CSV file is opened in Excel, special characters from languages other than English encoded in UTF-8 are displayed as corrupted. The CSV file must begin with the BOM characters to inform Excel that the file is in UTF-8 encoding and, as a result, have those non-English characters displayed appropriately.
However, the BOM characters may not be properly translated if the CSV files are processed using automation scripts, so it is preferable to exclude them if you use automation scripts or other services to handle CSV files. The BOM characters will not be exported if this option is deselected. - CSV newline symbol – You can use this option to specify a CSV file’s newline symbol. It is LF [n] by default in both Shopify and Matrixify.
- CSV file encoding – Here, you can specify a file encoding format. By default, it should be UTF-8.

Exported Item Count
You may see the precise number of objects that have been exported as well as the export’s progress as it is taking place.

This is useful for determining the precise number of items in your file when applying various filters to your export. The following parameters are at your service:
- Exported: This figure shows the number of items that have been exported and are included in your exported file.
- Limited: This figure shows the number of items that haven’t been exported.
- Total: This figure shows how many of each item you have in stock. For instance, exporting Products is what you are doing now, and your store contains 24 products.

Edit Shopify Data
Now, when you have an export file, you can apply changes to it and re-import the file back. You do not need to import all columns. Matrixify provides the ability to transfer only the columns that you need to update.
Note that a product is identified by “ID,” “Handle,” or “Variant SKU” in the app. With only a few columns or all of them, Matrixify creates new Collections, Customers, Orders, Pages, etc., or updates the existing records in your database. Use the Command column to apply changes.

Matrixify Commands Column
With the help of the Command column, you can inform Matrixify about what to do with the imported row. For instance, you can utilize the following:
- NEW – creates a new item. It fails if the item already exists.
- MERGE – updates an item if it exists. If the item doesn’t exist, the command creates a new item.
- UPDATE – updates an item if it exists. It fails if the item does not exist.
- REPLACE – replaces an existing item with a new one created from data in the file.
- DELETE – deletes items.
By default, the app assumes that the MERGE command is specified if nothing is typed in the column. However, the NEW command is used in the same case if you import Orders and Draft Orders. Below, you can see that we replaced MERGE with UPDATE for one of the exported products.

The program integrates your variant rows with existing variants when updating related items, such as product variants, by first locating an existing version of the product by its Variant ID, then by SKU, then by barcode, and last by option values.
Use the “Variant Command” column with the value “DELETE” to delete Variants. Alternatively, use “REPLACE” if you wish to transfer all of that product’s variants to your new variant rows, as shown below

Other sheets and products, such as product images, also employ the same idea. Although you can also DELETE or REPLACE photos, Matrixify blends current images with your image links by default. Below, you can see Matrixify image commands:

Since our goal is to explore the potential of Matrixify, we won’t describe all the available columns. The documentation sections of each sheet contain comprehensive information about each command. You can find more information here.
Metafields
Since Matrixify Metafields are represented in additional rows and columns in the import file, you can simply set the required values for Shopify metafields import there. Read more about Metafields here. In a Sheet, the corresponding columns get the following appearance:

Matrixify Import to Shopify
Now, we’d like to draw your attention to the opportunities associated with the Matrixify import to Shopify. The application turns the default routine into a more admin-friendly process and introduces several important enhancements. Let’s illustrate everything in a step-by-step Matrixify import guide.
Sheet name
The Matrixify app is intelligent enough to understand what entity it imports. On your side, it is necessary to name the import sheet properly to inform Matrixify what you are transferring. The only requirement is related to an entity name that should be available in your sheet name. For instance, you need to import orders. Then, your “7928475928” CSV file with orders should be renamed to something like “Orders_7928475928” or similar. The same is about products, customers, pages, etc.
File size
You can upload files up to a maximum of 7 GB in size. If utilizing compressed CSVs, the total size of all CSV files inside an archive cannot exceed 30GB. Compared to the default Shopify constraint of 15 MB, it’s a plethora of information.
Another limitation impacts the number of records in a sheet. Although the Excel format itself has a 1 million row capacity, it is advisable to utilize the “Matrixify: CSV” format with not more than 600,000 rows per file.
Import formats
Regarding import formats, Matrixify doesn’t show something extraordinary. The application supports a decent selection of common file standards along with a few variations, including Excel, CSV, Google Sheets, etc. If they are not enough to comply with your business requirements, you can ask to add custom file formats as additional services. Also, you can import CSV files to Shopify via Matrixify zipped or unzipped.
Another vital aspect of file format support in Matrixify is that the app automatically detects CSV file encoding, so your ISO-8859-1 (Latin 1), ISO-2022-JP, or whatever are automatically detected and converted to UTF-8 as needed for Shopify.
To save you from unnecessary work, the program immediately analyzes the uploaded file when you provide it to the system. After that, if everything appears in order, you can select your settings and click “Import.”
Import File Locations
With Matrixify, you can upload an import file directly or use a bunch of URLs to transfer data from remote locations, such as:
- A file hosted on the web;
- a file stored on an FTP server;
- a file stored on an SFTP server;
- a Dropbox file;
- a Google Drive file;
- a Google Sheet on Google Docs;
- a Microsoft SharePoint file.
As you can see, the selection of possible file locations outreaches the number of import sources available in Shopify by default. It means that you no longer need to transfer your sheets manually from, for instance, Dropbox to upload them to your website. Just pick up a file on your computer or provide its URL for a supported location to start import in Matrixify:

Shopify also has several restrictions on how much you can import to maintain platform stability. Even if you are using Matrixify, take these factors into account before importing a huge dataset.
Matrixify Import Options
Before beginning your import, you can choose from a number of parameters and choices provided by the Matrixify import application.
However, you can import files with the default settings for the majority of imports without making any adjustments. Before choosing an option, be sure you know what it means:
- Scheduling. This group contains the following two options:
- Schedule on. Pick the date and time when to do this import.
- Repeat every. Pick a particular time interval to repeat this same import.

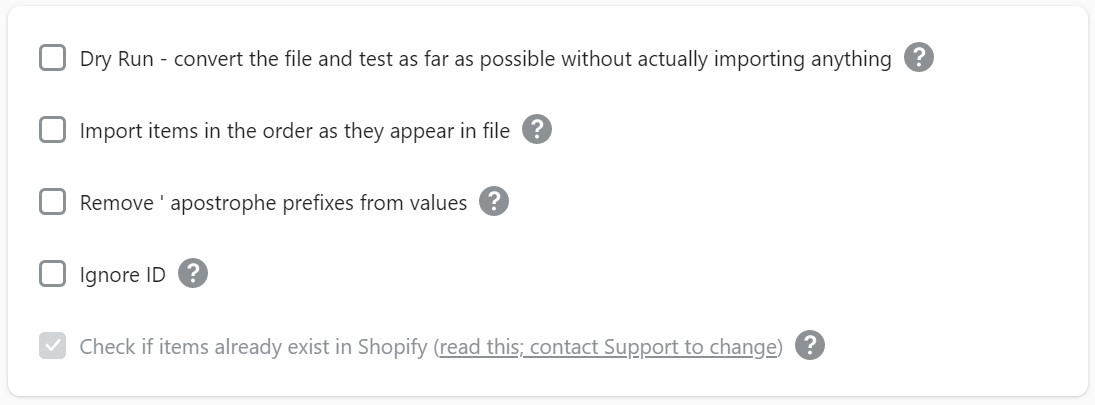
- File Processing. This group contains the following five options:
- Dry Run. Run a test without actually importing anything. It will help you check what Matrixify will tell you about your items.
- Import items in the order as they appear in file. This feature is aimed at Big or Enterprise Plans since they allow for importing several items in parallel. The feature enables importing items in the same order as they appear in your file, reducing the import speed.
- Remove ‘ apostrophe prefixes from values. If you exported a file with apostrophe prefixes, use this feature to import it back.
- Ignore ID. This option lets you skip the ID values of the imported file items increasing the transfer performance if importing an export file from another store. However, you must not ignore IDs if you import data from the same store.
- Check if items already exist in Shopify. Remove this checkbox to create new items faster. However, it may also result in duplicates and errors if such items already exist.
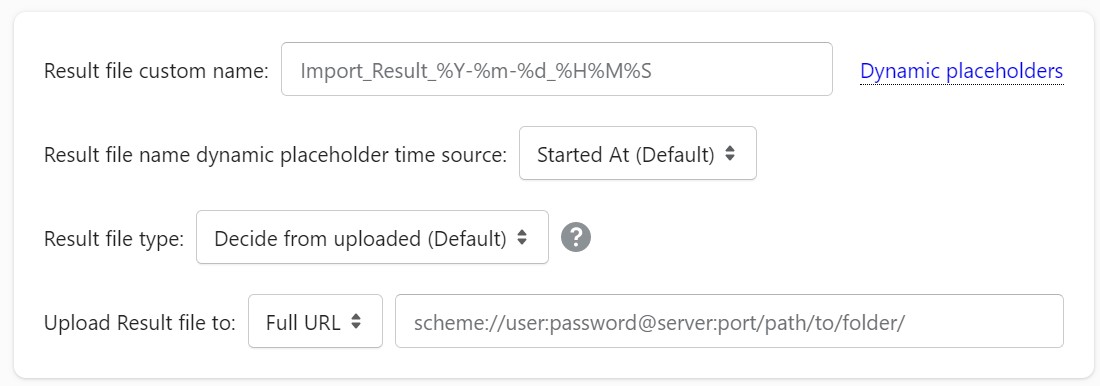
- Result File. This group contains the following options:
- Result file custom name. Since every import procedure returns the Import Result file, you can set its custom name here, including dynamic placeholders in it.
- Result file name dynamic placeholder time source. Use either the exact launch time or the scheduled time here.
- Result file type. Set the file type for the result file.
- Upload Result file to. Set a path to upload your Result file.
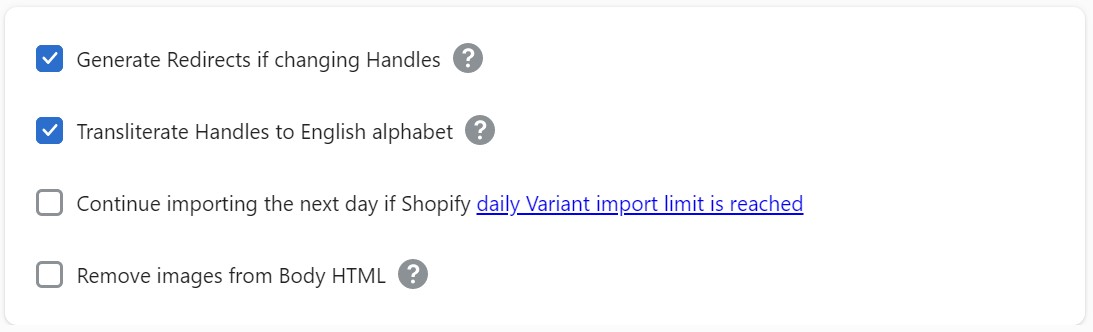
- Item Specific. This group contains the following options:
- Generate Redirects if changing Handles. If your import changes Handles for any of the items, the system automatically generates redirects from the old Handle to the new one if this feature is active.
- Transliterate Handles to the English alphabet. While importing Handles that are written with non-English characters, the system generates Handles with English characters if this feature is active.
- Continue importing the next day… Shopify has a daily variant limit. If it is reached, enable this checkbox to automatically continue importing the rest of the items the next day.
- Remove images from Body HTML. If your Shopify products have Body HTML with images, activate this option to remove images from product descriptions in bulk.


Import Progress
Matrixify displays your import progress, including the approximate remaining time.

In addition to that, the app shows how many items among the imported records are New, Updated, Replaced, Deleted, or Failed. The program also displays the top 5 errors if your import contains any failed items.
You have the option to either let the import proceed or to stop it at any point. You can download the Results file after the job is finished or after you terminate the import.
Import Results
The software will create an Import Results file after you import data. You can download it right after the import is finished. Click the Download Import Results button.

This file includes two additional columns that describe the status of each imported item as well as a thorough error message if the import fails.

The rows that were imported are the sole rows in the matrixify file. In this manner, you can examine what was imported and identify any mistakes. Additionally, you will be able to reject those already imported records from the subsequent import if you need to proceed because you will know which products were already imported.
The fact that each Product (or other items) has the same “Import Comment” value for all of its rows is not usual, but it is quite beneficial. The convenience in this situation is that you can easily filter the rows in Excel if you need to, and you’ll know that your filtered results will include every row for the product because the value of the “Import Comment” column is constant.
Import & Export History
The “View All Jobs” button allows you to view every previous import and export. It is situated at the bottom of the app’s homepage. Every file for every job is available for download. Additionally, you can view their results. Jobs scheduled for the future are also available here. As a store administrator, you can suspend any ongoing or scheduled tasks from this page.

Settings
It is also necessary to say a few more words about the Settings section of the Matrixify Shopify app. You can find it in your Shopify admin under Settings -> Apps and sales channels -> Matrixify. Here, you can edit privacy and permission details along with numerous other options.

Click More actions to edit its preferences:
Overall Experience
Now, let’s talk about the overall admin experience of Matrixify:
- Browser. You can close Matrixify and check on the progress later instead of keeping the browser open all the time. Visit the “All Jobs” section to get a list of your previous, present, and upcoming jobs, including those still active. The app’s jobs and pages each have their own distinct browser URL. This enables you to save particular jobs as bookmarks to reuse as templates.
- Estimates. Since it mostly depends on your actual data and any API restrictions imposed by Shopify on your site, initial import and export estimates are only generally accurate. When the export or import really begins, the estimates become extremely accurate because they are then based on actual data and reflect your current export or import.
- Queued jobs. Due to Shopify API restrictions, the Matrixify app does not let execute several imports or exports at once because doing so would significantly slow down each process. To eliminate waiting for the prior task to finish, you can queue your job. Simply start a new job on the Matrixify Home page once your import or export has been launched. The program will automatically queue the job and then launch it when the currently running job is finished.
The overall experience is great. The application is powerful and intuitive. It dramatically exceeds the boundaries created by the default import and export apps, providing the ability to transfer more file formats, use additional sources, import & export much heavier files, and work with all possible entities available on your e-commerce website. Are there any similar rival solutions? We don’t know any. If you use one that offers an even more feature-rich import-export experience, please, let us know.
However, Matrixify still lacks some important functionalities. For instance, you cannot apply changes to the imported data right within tha application. However, it is extremely important when you import information from external systems. Since Shopify has its own unique standards, you cannot take, for instance, Magento data and freely move it into your store. To achieve this goal, it is necessary to apply tons of changes to your sheet manually or request a corresponding import format template. Below, we focus on several nuances of the app’s templates.
How to use the Matrixify: Template Guide
Below, we explore the Matrixify format template. It works for Excel, CSV, and Google Sheets files and tables and lets you manage your Shopify data in bulk. Before proceeding to the first section of this Matrixify template guide, download the Matrixify template here: Download the Excel template file.
Sheet name
As mentioned above, the sheet name provides Matrixify with an understanding of what data is about to be imported. However, XLSX and CSV files have slightly different conditions related to their sheet name.
XLSX
The file name is irrelevant to an XLSX file because you can import several sheets simultaneously; however, you must supply a sheet/tab name for each sheet in the file. If your file contains two sheets, “Products” and “Products data,” the program will only import “Products” and disregard “Products data” because the sheet/tab name in an Excel file can contain additional words. The word “customers” must appear in the sheet name when importing customers, and the word “blog posts” must appear in the sheet name when importing blog posts, etc. The logic is the same as the one described above, except for the necessity to name each tab individually.

CSV
The situation around CSV files is exactly the same as we’ve described: since a CSV file can only have one sheet, its name matters. The entity you want to import should be in the file name, but unlike in the XLSX case, you can also include other phrases. Thus, the app can recognize the word “customers” in “my-shopify-customers.csv” and presume you are importing “Customers.” The same is about any entity, e.g., Matrixify analyzes the “these-are-discounts 2019-12.csv” name, discovers “discounts’ among other words, and understands that you import “Discounts”.
The pro tip is to combine all the CSV sheets into a ZIP file to upload many CSV files at once. Still, the software would examine each CSV file’s name. In addition to that, it will automatically detect the CSV file encoding, converting it to UTF-8.
Supported formats
In addition to the formats mentioned above – Matrixify: Excel, Matrixify: CSV, Shopify: CSV, and Matrixify: Google Sheets – the Matrixify app for Shopify also lets you leverage the following variations aimed at particular platforms:
- Shopify Products CSV;
- The Art Of Books;
- Brandsdistribution;
- Banggood;
- Turn14 API;
- Magento;
- Lightspeed.
Think of these external 3rd party formats as of templates that adapt the external output for Shopify upon import. It means that you can transfer entities from Magento or Banggood to your e-commerce website with the minimum of headaches!
Now, let’s explore each format im more detail.
Matrixify: Excel
A single Excel file associated with the Matrixify Template can contain all of your store’s data. The information is arranged in multiple sheets of tables that are easy to read and understand. It is possible to export and import the same file in the way we described above. Get the Excel template file to see how the template looks and feels.
Multiple Shopify entities, including Customers, Products, and more, can be stored in a single Excel file as sheets – tabs at the bottom of every Excel document. Each sheet’s name informs the app what kind of data is contained therein. Recognized sheet names are:
- Products;
- Customers;
- Smart Collections & Custom Collections;
- Discounts;
- Orders & Draft Orders;
- Pages;
- Blog Posts;
- Redirects;
- Shop.
Basically, these are all the entities that you can import to Shopify. However, sheet names must be exact with capital and small letters, as shown above. Be careful when choosing names for your Excel tabs, or better yet, use the exported file or the template to follow the strict requirements of Matrixify. And don’t forget that you can maintain your reference data sheets in the same Excel file because sheets with other names are ignored. It means that you can create a tab called “Customers” for importing along with “Prospects” for keeping it for reference.
Columns and rows
Now, let’s see what columns and rows are supported on the Matrixify Excel template.
Values
The values in the cells match the relevant field value for that particular item. Values can be text, numbers, or even TRUE or FALSE.
Typically, Excel will recognize what a text is, what a number is, and what TRUE or FALSE is when you enter that data into it. See our Shopify Import Guide for further information.
Columns
The data fields in table columns are essentially the same as the ones you fill out in your Shopify Admin. Columns for products can include Handle, Title, Vendor, etc.
The program will only update the fields whose columns you are importing; thus, imports don’t need to include all of the columns. The program will set the field value to empty if you have a column with no values. So, if a field value is something you don’t want to change, leave it out of the import.
Sometimes while updating data, you only want to change one field, such as the product price. The software will then update only this one field and leave the other fields unaltered. You need to remove all other columns in that situation.
Also, note that the order of the columns is irrelevant. Although you can add custom columns, the app will import only the recognizable columns. It ignores the columns it doesn’t know.

Colors in columns serve as visual cues to you about how logically certain columns group together. While their colors are disregarded during import, columns are highlighted when examining import results. For instance, columns with white text indicate that they were disregarded; the app was unaware of what they are and how to import them.
Rows
In Shopify, rows relate to items: one row essentially equals one item. The exception is when a single item requires a few rows. If a product has many photos or multiple versions, for instance, you could require several rows. One customer may have many addresses; thus, you can have multiple rows for them. Thus, each new version and each exported image for Products will have its own row. Nevertheless, you can import many pictures by dividing them with a semicolon (;).

The row must either contain the same ID value, the same Handle value (if the ID is empty), the same Title, or both for the app to recognize that it belongs to the same item.
The ID is a special number that Shopify assigns to every item. Leave it blank when creating new items; Shopify will generate them for you. When updating existing things, the ID is utilized so that the app can recognize which item has to be updated.
When repeating rows, simply duplicate them, including all values for those columns where only one value is required for each item. For instance, if you copy the same Title value into all of the Variants rows, the program will only use that value and disregard the others. The column’s color and starting name both indicate that it is a part of a repeating row. For instance, all variant columns have the same color and begin with “Variant…”.
Note that the file must be sorted before importing to group together repeated rows for the same item because it will be treated as the next item as soon as the ID, Handle, or Title changes.
Matrixify: CSV
The “Matrixify: CSV” format, which has no size restriction at all and may hold data well above several millions of rows, can be used if your store is so big that an Excel file won’t fit all the data and might exceed Excel constraints. It can help you export more than 1 048 576 rows, 16 384 columns, and 32 767 characters per cell. The format follows the conditions associated with a Matrixify Excel file but adds the following differences:
- Usually, it is a zip file that contains one or several CSV files.
- Different CSV files are used instead of tabs: each sheet is represented by a separate CSV file. Therefore, the CSV file name inside the zip file plays the same role as a sheet name in the Excel file.
- To ensures that Excel can open the file correctly, CSVs must follow these requirements:
- The comma (,) is a column delimiter;
- Double-quotes (“) are used to separate text values;
- Files are UTF-8 encoded.
- Zip your CSV files to make them smaller and increase import speed.
Shopify: CSV
You can use the Matrixify app to import a Shopify CSV file that contains Products. Export it from the Admin, apply changes, zip the file, and start the upload. Note that this template lets you import files with ANY names. The only requirement is their extension – .csv. The comma (,) is a column delimiter, while double-quotes (“) are used to separate text values. That’s all you need to know about the Shopify: CSV format.
Matrixify: Google Sheets
The exact same steps you used to generate the “Matrixify: Excel” file can be utilized to prepare your Google Sheets file.
Just make a sheet with the data you want to import available for public viewing only. Then, enter its URL into the Matrixify Shopify app and initiate the import process. That’s it!
Matrixify Pricing
Matrixify offers several pricing plans to choose from, depending on the size of your data transfer operations. The following four options are at your service. First of all, it is a free demo plan limited to 10 imported/exported items. Next, you can choose the Basic plan for $20 per 30 days, the Big plan for $50 per 30 days, or the Enterprise plan for $200 per 30 days. The following table illustrates the core difference between them:
| Plan | Basic | Big | Enterprise |
| Price | $20 | $50 | $200 |
| Products | 5k | 50k | No limit |
| Smart Collections | 300 | 3k | No limit |
| Custom Collections | 300 | 3k | No limit |
| Customers | 2k | 20k | No limit |
| Companies | 50 | 500 | No limit |
| Discounts | 300 | 3k | No limit |
| Draft Orders | 1k | 10k | No limit |
| Orders | 1k | 10k | No limit |
| Pages | 50 | 500 | No limit |
| Blog Posts | 50 | 500 | No limit |
| Redirects | 10k | 100k | No limit |
| Payouts | 366 | 3’660 | No limit |
| Activity | 10k | 100k | No limit |
| Files | 1k | 10k | No limit |
| Shop | 1 | 1 | 1 |
As you can see, only the Enterprise plan lets you import and export an unlimited number of products, customers, orders, and other entities. It has 10 times increased speed and supports batch import.
Conclusion
Is Matrixify as powerful as its creators claim? Yes, it is! Matrixify provides an excellent overall experience, being both powerful and user-friendly. It vastly outperforms the default import and export tools of Shopify, allowing you to transfer more file types, access more sources, import and export considerably larger files, and deal with all possible entities on your e-commerce website. Are there any competing solutions like that? We are unaware of any. Please let us know if you know one.
However, Matrixify is still missing a few key features. As we’ve already mentioned, you cannot make changes to the imported data from within the program. However, it is critical when importing information from external systems. Because Shopify has its own set of standards, you cannot freely import Shopware or BigCommerce data into your store. To accomplish this, you must either manually make numerous changes to your sheet or obtain a comparable import format template. But we are going to save you from tons of unnecessary work with our new project. Our team has a huge experience in the sphere of data transfers between Magento websites and far beyond this ecosystem. Therefore, we will introduce an even more powerful import and export app for Shopify than Matrixify. Contact us for further information.
Matrixify FAQ
What is Matrixify on Shopify?
Matrixify, which was formerly known as Excelify, introduces revolutionary import and export tools for Shopify. You can use it to schedule daily inventory syncs across your warehouses, update products in bulk, and export information for external systems, such as ERPs and bookkeeping services.
What is Excelify Shopify?
Excelify is the old name of the Matrixify Shopify App. It is a tool for importing data to your e-commerce website and exporting it from your database. It lets you use Excel sheets or CSV templates for transfers.
How do I download a CSV file from Shopify?
Moving your existing products or other entities to a new Shopify store or beyond the ecosystem looks as follows:
Go to your products and click Export.
From the dialog box, choose the products you want to export.
Select which type of CSV file you want to export.
Click Export products.
As for Matrixify, it dramatically simplifies this process and, at the same time, lets you narrow down the selection of the data you transfer: both columns and rows of your export file.
The Matrixify App lets you update or delete Tags on Shopify items in bulk as follows:
Export Products you need to update.
Delete unnecessary columns.
Update the following columns: “Tags” and “Tags Command”.
Import the update.
What are Shopify collections?
Shopify collections are product groups that you can create to make it easier for your consumers to browse all products under a specific category. A fashion retailer, for example, might curate a range of men’s shirts.
How do I add items to a collection in Shopify in bulk?
You can add items to collections in Shopify as follows:
Go to your Shopify admin -> Products -> Collections.
Hit Create collection.
Provide your new collection with a title and description.
Go to the Collection type section and click Manual.
Save your collection.
Search for products in the Products section and then add the products you want to have in the collection.
How to import collections to Shopify?
Use Matrixify to import collections to Shopify:
Go to Admin -> Apps -> Matrixify.
Scroll down to the Import section.
Add you CSV or EXLX file with product collections. Alternatively, you can provide its URL.
Wait while the file is uploaded and analyzed.
Configure import options and click the Import button.
Your product collections are now uploaded to Shopify.


