

The management of your store’s products, inventories, clients, and other entities can be streamlined with the help of import and export processes. By default, BigCommerce offers tools for moving data to and from your e-commerce website. You can use BigCommerce import to update customers and product catalogs and BigCommerce export to apply bulk adjustments to them. In the following article, we focus on the import side of these processes. We briefly explore the default capabilities and then proceed to a more in-depth analysis of each particular opportunity associated with the BigCommerce import.
Although the platform’s only file format for importing data is CSV, it still supports a few more import entities. Thus, BigCommerce product import and BigCommerce customer import are at your disposal. Also, you can transfer related entities, such as product options and images, as well as customer passwords to your e-commerce website. Below, we’ll discuss the many data types that can be imported, including those not supported by default, such as BigCommerce order import, BigCommerce category import, and BigCommerce customer review import. You will learn how to transfer products, product options, product images, customers, customer passwords, 301 redirects, orders, categories, and customer reviews to your website. For additional information on the topic, go to the corresponding BigCommerce Export Guide.

Table of contents
BigCommerce Import General Overview
Any changes you make will immediately apply when you import data via a spreadsheet into your store. It’s a fantastic approach to develop new goods, acquire new clients, or quickly alter already existing items in your catalog without wasting tons of time in the BigCommerce backend. Let’s briefly explore the BigCommerce Import.
Supported Entities
The default BigCommerce import tool lets you import the following entities:
- Products along with product options and images;
- Product SKUs for your inventory updates;
- Customers with all the related details;
- Tracking Numbers for shipping and order monitoring;
- 301 Redirects for SEO purposes.
Along with that, you can rely on third-party applications to extend the default capabilities. Thus, various BigCommerce apps provide the ability to import orders, categories, product reviews, and other entities.
What are the combined import use cases for an average BigCommerce website? They usually include the following processes:
- Run product import to create new products or update the existing ones (Default tools are enough);
- Run product import to create product options (Default tools are enough);
- Run customer import to add new customers to your database or update existing customer details (Default tools are enough);
- Run product import to transfer items from another BigCommerce store (Default tools are enough) or external e-commerce platforms (Third-party tools are required);
- Run product import to synchronize inventory between your channels (Third-party tools are required);
- Import tracking numbers to monitor delivery status (Default tools are enough);
- Import product reviews to save valuable comments your customers left on another website (Third-party tools are required);
- Run multiple import processes to migrate from another website (Third-party tools are required).
As you can see, the default BigCommerce import is enough for basic e-commerce needs. However, when you need to go beyond the boundaries of products and customers, it is necessary to harness third-party apps.
Import File Constraints
Official guidelines advise taking the time to match the column headings in your third-party CSV with the attributes present in BigCommerce if you want to import data from a third party, such as a distributor or another e-commerce platform. This will guarantee accurate data import. By default, it is possible to manually do that in the spreadsheet editor or the admin. However, various applications empower the default admin experience with way more user-friendly import. We will return to these enhancements soon.
It is also recommended to import your file via the server rather than through the control panel if it contains a lot of data. This will make the import process more stable. To begin, you must establish a WebDAV connection and add your file to the import files folder there. What about third-party apps, you will ask? Some of them let you import files of any size directly without leveraging WebDAV.
Then, start the import procedure for your customers, goods, or other data. Select Use a file that is already on the server rather than uploading one. Choose your file from the dropdown menu that displays, and then carry on with the import procedure as usual.

Although this process doesn’t look like the most convenient data import, it is still quite admin-friendly, especially if you transfer data from another BigCommerce website.
Now, when you are familiar with the BigCommerce import essentials, let’s proceed to a more in-depth exploration of the associated processes.
BigCommerce Import: Products
When importing products to BigCommerce, you should be especially careful to avoid situations when your catalog is damaged and cannot be restored. If you don’t know what you’re doing, don’t activate the settings that delete existing images or downloads (Delete existing images and Delete existing downloads). Your current product photos and digital product data will be wiped out if they are enabled. Since these files cannot be recovered on the BigCommerce side, using automatic backups based on third-party apps is also a good idea in addition to keeping a local copy of your files.
As for the transfer itself, it doesn’t look complicated. You can import products to BigCommerce as follows:
- Visit a product import section in your admin. It is situated under Products -> Import.
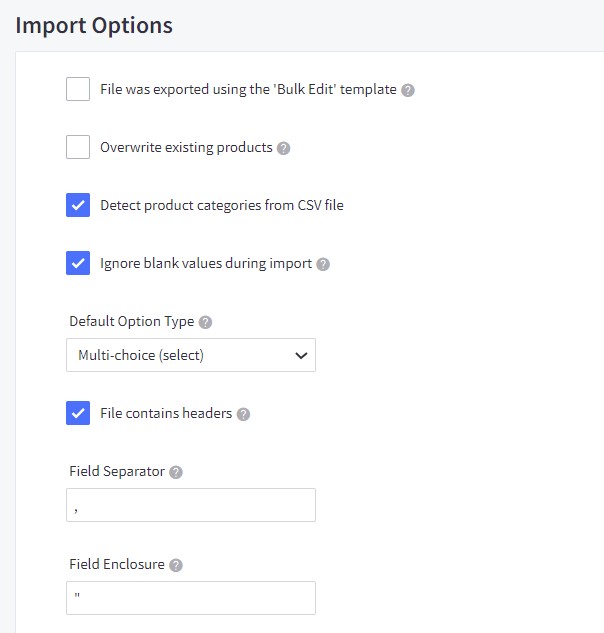
- Fill in Import Options activating the necessary features. If you use a default BigCommerce product CSV, use the following settings:

Where:
- File was exported using the ‘Bulk Edit’ template – you should enable this option if you exported your file using the corresponding template or a sample CSV. Another use case is when your BigCommerce import product sheet contains the same column names as listed in the table of supported fields. So, if this option is active, you also preselect the rest of the Import Details settings. Furthermore, importing files similar to the default sheets lets you bypass the Matching Fields step during the product import process.
- Overwrite existing products – Enable this option to update your products upon import.
- Delete existing images and Delete existing downloads – As we’ve already mentioned, these options remove all of your product images and digital product files, so enabling them is not recommended for most cases.
- Detect product categories from CSV file – With this option enabled, you let the import instrument auto-detect category names. However, you can choose to have all of your goods placed in a category in this list if you forgot to fill out the Category column in your CSV.
- Ignore blank values during import – Any blank fields in your import file will have their associated data deleted if you uncheck this item. As a result, the official BigCommerce import guide strongly advises keeping this setting active. For instance, if you left the product description field empty and disabled this setting, the product description would be removed silently from your store.
- Default Option Type – Use this feature if you’re trying to generate options, but the option type hasn’t been properly stated in the file. The option type should be ideally specified in your CSV file, but you can also choose to use a single option type with this feature enabled.
- The following settings can usually be left alone. They are used if you need to provide the import settings while uploading a spreadsheet:
- File contains headers – This option indicates whether the file contains column headings or not;
- Field Separator – You should specify a character used to separate the fields here;
- Field Enclosure – You should specify a character used to tie phrases together (such as “Shirts and Blouses”)
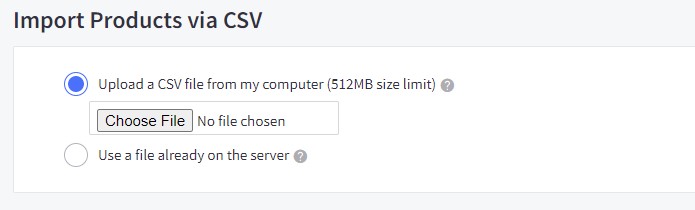
- Next, you can upload your BigCommerce product import file from your computer. Keep in mind that in this case, its size should be equal to or less than 512MB. Alternatively, you can upload a file from your server, as we’ve already described above.
- When done, click the Next button.
- After that comes the matching phase. Ensure that every piece of information you’re importing has been compared to its BigCommerce equivalent. This step can be skipped if you use Bulk Edit Re-import. See Table of Supported Fields for reference.
When data is marked as “ignore,” it doesn’t get matched. It works with “Ignore blank values during import.” Any blank fields in your import file will have their associated data deleted if you uncheck this option. So it is strongly advised to keep the setting selected.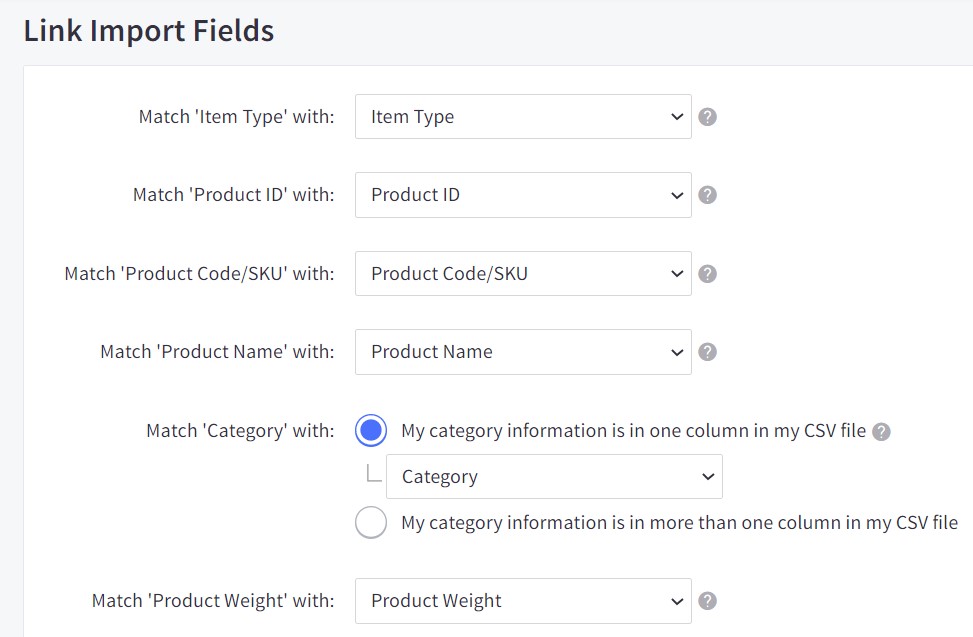
- Click Next to proceed to product data transfer to your e-commerce website.
- Now, you can finally import products to BigCommerce. Hit the Start Import button to launch the procedure. An import summary displays when the procedure is complete.
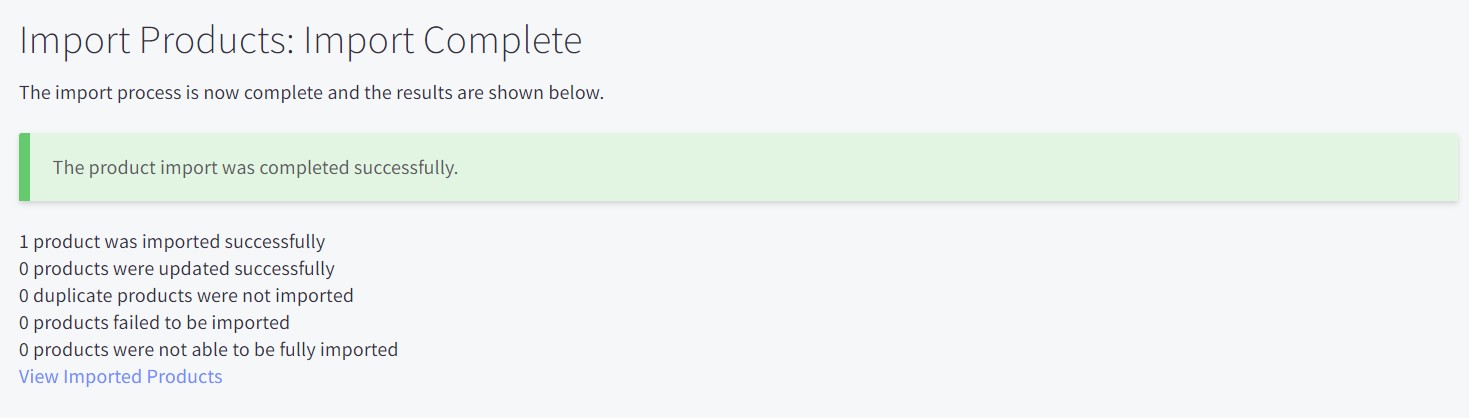


In case of errors, the system generates warnings. Click More Information to see what is the cause of failure.
Below, you can see how simple the default BigCommerce product import is if you follow the default requirements:
How to Create New Products via Import in BigCommerce
Importing is the quickest way to add new products to your BigCommerce website, whether you combine the import file from scratch or get a CSV file from a distributor. You must list the information about new items in a CSV file to import them. To get started, make use of the official sample template. You are welcome to exclude any columns you don’t require. The file will successfully import as long as you have the fields given below that are necessary.
To create a product via import in BigCommerce, include the following fields in your CSV file:
- Product Name
- Category
While Product Name fields must be filled in, Category fields must be included, but the corresponding values can be left blank.
Avoid the following fields or leave them blank; otherwise, products won’t be created upon the Bigcommerce import:
- Product ID
How to create products in BigCommerce via import if the fields of a CSV file from a third-party distributor may not exactly match BigCommerce’s product details?
To let your product data import go smoothly, you must execute one of the following. Change the column headers in your CSV file to correspond with those in BigCommerce by following the example template as a guidance. You can find the corresponding link in this chapter above. Alternately, BigCommerce lets you match column headers with the appropriate product attribute on the Match Fields step.
In both cases, you do that manually either in a spreadsheet editor or in your admin. However, some services offer presets that dramatically simplify product attribute matching. You just select a preset for BigCommerce and a platform where the imported CSV was created, and the third-party software does everything for you.
Here are a few more tips on making sure your product import to BigCommerce runs smoothly. Don’t import more than a few hundred items, SKUs, or photos at once. Thus, this tip doesn’t guarantee a 100%-seamless import but dramatically increases its probability. The import will proceed more quickly if there is fewer data to process (items, SKUs, rules, and photos). A data-heavy import is more likely to stall.
And, as we’ve already mentioned, you can choose Bulk Edit Reimport when importing data using the sample template or a file that replicates its structure to bypass the Match Fields stage. That’s it. Let’s look at the product attributes that usually appear in a CSV file and then proceed to the BigCommerce import of product images.
Table of Supported Fields
All fields that can be exported and imported using the Bulk Edit Template through a CSV file are listed in the table below. A field cannot be manually imported, exported, or created if it is not included in the list below (for example, bulk pricing).
For a list of fields that are not present in the Bulk Edit template but can still be manually inserted and re-imported, see Manually Entered Fields.
| Field | Mandatory or Advised | Description | Format / Additional Information |
| Item Type | Defines the item as a Product, SKU, or Rule | Specify product for products, SKU for SKUs, and rule for product rules. | |
| Product ID | + | The system-generated product identifier; cannot be created manually | This field is required for updates but must be blank for creating new products. |
| Product Name | + | The name of your product; no two can be the same | |
| Product Type | + | Defines whether the item is physical or digital | Specify P for physical products and D for digital products. |
| Product Code/SKU | + | Stock-keeping unit number you use for inventory | Alphanumeric field. |
| Bin Picking Number | Identifies where in a warehouse the item is located | ||
| Brand Name | The brand or manufacturer of a product | ||
| Option Set | The option set name | ||
| Option Set Align | Determine whether the options are to the right or below the product image | Specify right to display product options on the right side of the product image or below to display options beneath it. | |
| Product Description | A description of your product | Can contain text or HTML. | |
| Price | + | Your product’s base price | Use numbers (23.95), avoid using units. |
| Cost Price | The cost of the product for you (accounting purposes only) | Use numbers (23.95), avoid using units. | |
| Retail Price | The retail price (MSRP); if entered, it will appear next to your base or sale price | Use numbers (23.95), avoid using units. | |
| Sale Price | The sale price; if entered, it will replace the base price | Use numbers (23.95), avoid using units. | |
| Fixed Shipping Cost | The price to ship one unit of your product; the product will ship at that price internationally, regardless of all other shipping settings | Use numbers (23.95), avoid using units. | |
| Free Shipping | Your product will ship for free; if enabled, this intentionally overrides any other shipping settings | Specify Y to enable free shipping, or N to disable free shipping on the product level. | |
| Product Warranty | Product warranty information | Can contain text or HTML. | |
| Product Weight | + | Product weight (physical only) | Use numbers, avoid using units. |
| Product Width | Your product’s width for calculating shipping | Use numbers, avoid using units. | |
| Product Height | Your product’s height for calculating shipping | Use numbers, avoid using units. | |
| Product Depth | Your product’s depth for calculating shipping | Use numbers, avoid using units. | |
| Allow Purchases? | + | Allows the product to be purchased from your store | Specify Y to allow the product to be purchased or pre-ordered or N to indicate that the product cannot be purchased or pre-ordered. |
| Product Visible? | Allows the product to be visible in your store | Specify Y to allow the product to be visible and N to disable product visibility on the storefront. | |
| Product Availability | A brief description of how long it takes for your product to ship | Text only. | |
| Track Inventory | + | Enable or disable inventory tracking on the product. If enabled, track by option or by a product | Specify none to disable inventory tracking entirely, by product to track inventory on the product level, or by option to track inventory by SKU. |
| Current Stock Level | Number of units in stock (only applies if tracking inventory) | Numbers only. | |
| Low Stock Level | Inventory level at which you are sent a notification to restock (only applies if tracking inventory) | Numbers only. | |
| Category | + | Categories and subcategories applied to a product | Use the format Category1; Category2/Subcategory1;Category2/Subcategory2. If your category name starts with a slash (/), denote it with / (like Mittens/Gloves). |
| Product File – 1 | The file name of your digital product (digital products only) | Use the file name and extension, such as yourfilename.txt. | |
| Product File Description – 1 | A description of your file | ||
| Product File Max Downloads – 1 | The maximum number of times a single customer can download their purchase | Numbers only. | |
| Product File Expires After – 1 | The period after which the download link will not work for your customer | Use # Days, # Weeks, # Months, # Years, or Never. | |
| Product Image ID – 1 | The system-generated product image ID | ||
| Product Image Description – 1 | The alt tag for the product image | ||
| Product Image Is Thumbnail – 1 | If there is more than one image for the product, specify one to be the thumbnail | Specify Y to select this image to be used as the product thumbnail or N to deselect the image. Selecting one image per product is possible. | |
| Product Image Sort – 1 | If there is more than one image, specify which order they should appear in (keep in mind that lower numbers appear earlier) | Use whole numbers only. | |
| Search Keywords | Keywords for your store’s search | Separate keywords by commas. | |
| Page Title | Your product’s page title; will use the product name if left blank | ||
| Meta Keywords | If left blank, the field will use keywords entered in the Website Settings | Separate keywords by commas. | |
| Meta Description | If left blank, the field will use what’s entered in the Website Settings | ||
| MYOB Asset Acct | If MYOB is used, you can utilize this setting | ||
| MYOB Income Acct | If MYOB is used, you can utilize this setting | ||
| MYOB Expense Acct | If MYOB is used, you can utilize this setting | ||
| Product Condition | Product condition for Google Shopping | Specify New, Used, or Refurbished. | |
| Show Product Condition? | Show the product condition on your product page | Specify Y to display the product condition field or N to not display that field on the product page. | |
| Sort Order | The order in which a product appears on a category page relative to other products; 0 is default | Use whole numbers only. Negative numbersare supported. | |
| Product Tax Class | The tax class applied to a product | ||
| Product UPC/EAN | Product’s Universal Product Code (UPC) or European Article Number (EAN) | ||
| Stop Processing Rules | For Rules, stop processing all rules placed below that rule | Specify Y to stop processing rules or N to continue to process rules. | |
| Product URL | The relative path of your product’s URL on your store; if left blank it will default to the product name | Utilize the following structure: /new-relative-url/. | |
| Redirect Old URL? | If you change the product URL, you can select whether or not to create a 301 Redirect | Specify Y to create a 301 redirect or N to not create a redirect from the old product URL. | |
| GPS Global Trade Item Number | Product’s Global Trade Item Number (GTIN) identifier | ||
| GPS Manufacturer Part Number | Product’s Manufacturer Part Number (MPN) identifier | ||
| GPS Gender | Deprecated | ||
| GPS Age Group | Deprecated | ||
| GPS Color | Deprecated | ||
| GPS Size | Deprecated | ||
| GPS Material | Deprecated | ||
| GPS Pattern | Deprecated | ||
| GPS Item Group ID | Deprecated | ||
| GPS Category | Deprecated | ||
| GPS Enabled | Deprecated | ||
| Tax Provider Tax Code | Product’s unique tax ID; used for enabled automatic tax calculation. | ||
| Product Custom Fields | Name of custom field=Name of value; Name of custom field #2=Name of value #2 | Utilize the following structure: name=value (like Color=Blue;Material=Cotton). |
Manually Added Fields
The following fields can be manually added and reimported using Bulk Edit Re-Import even though they are not by default included in the Bulk Edit template. Additionally, they will be automatically matched in the Match Fields area.
| Field | Description | Format |
| Brand + Name | The brand or manufacturer name and the product name | |
| Calculated Price | The calculated price displayed on the storefront | |
| Product Not Visible | Enable to set the product as not visible on your website | Use Y for yes, and N for no. |
| Product Inventoried | Enable to track the product for inventory | Use Y for yes, and N for no. |
| Date Added | The date the product was added to the store. | MM/DD/YYYY |
| Date Modified | The date the product was last modified. | MM/DD/YYYY |
| Product File Path | The file location in WebDAV | |
| Product File Total Downloads | The number of times the file has been downloaded | |
| Category Details | The category ID, Name and URL path | |
| Product Image File – 1 | Image file name (if stored in WebDAV) or full URL | Utilize the file name and extension (yourimagename.jpg), or the URL path (l_http://fullurl.com/yourimagename.jpg_) |
| Product Image URL – 1 | Full image URL | Use the URL path (http://fullurl.com/yourimagename.jpg) |
| Minimum Purchase Quantity | Setting this value will enforce a minimum quantity limit when customers order this product from your store (on a per-order basis) | Numbers only. |
| Maximum Purchase Quantity | Setting this value will enforce a maximum quantity limit when customers order this product from your store (on a per-order basis) | Numbers only. |
| Shipping Groups | Product’s unique ShipperHQ shipping group; | It is available if ShipperHQ is enabled. |
| Origin Locations | Product’s unique ShipperHQ origin group; | It is available if ShipperHQ is enabled. |
| Dimensional Rules | Product’s unique ShipperHQ dimensional rule group; | It is available if ShipperHQ is enabled. |
| GPS Custom Item | Deprecated |
BigCommerce Import: Images
The quickest way to attach photographs associated with your products is to include them in your import process. There are two ways to go about doing this:
You can import images using the image path in a CSV file if they are currently available on the internet. You need to know their URL, placing it in a CSV file as shown in the table above. After that, run a standard BigCommerce product import.
Also, instead of uploading the pictures manually, you can use WebDAV to import product images to BigCommerce if they are available on your computer.
Note that in both cases, it is necessary to follow image requirements.
Product Image Requirements
Products may lack images if you try to import or upload an image that does not adhere to the following requirements:
- There cannot be any spaces or special characters in image file names.
- The following characters are supported for image file names: a-z, 0-9, –, and _.
- JPEG/JPG, GIF, and PNG are the only supported image file types. TIFF, BMP, or PDF files are not permitted.
- Your product photos should be 1280 x 1280 pixels in size. Other product images (such as thumbnails) are generated from the original image.
How to Use Image Path to Import Product Images to BigCommerce
If your product photographs are already available online, you can import them with your items by including the complete image path in your product CSV file.
Find the product picture column in your CSV file. Product Image File – # (where # is a number) is what you are looking for if you use the Bulk Edit template. Make sure to omit the Product Image ID column when importing new products. Keep it empty:
Caution! If your CSV contains product image IDs without product image file information, the images connected to those items will be deleted when updating existing products.
Enter the complete URL of the image for each product (for example, http://youroldstore.com/images/yourproduct-image.png). Note that BigCommerce does not support non-http URLs.

Create a new column and label it Product Image File – # to upload multiple photos for one item (increasing the number each time you make a new column). Create a new column with the appropriate title and the same number as the relevant image to include any additional information for that image, such as descriptions.
For instance, you add additional columns and name them as follows if you want to import a product with two images:
- Product Image ID – 2
- Product Image File – 2
- Product Image Description – 2

Import your products along with product images to BigCommerce when you’re ready. Match the Product Image field to the appropriate column on the Link Import Fields phase of the product import if you’re using a template other than Bulk Edit.

How to Use WebDAV to Import Product Images to BigCommerce
As an alternative to image URLs, you can use WebDAV to upload images from your PC to your shop and then specify them in the CSV using the corresponding file names.
Start by establishing a WebDAV connection to your BigCommerce store. Open the product_images folder first, then proceed to the import folder. Next, drag the photographs from your computer and place them there.
Find the column for product images in your product CSV. Its name is Product Image File – (#) if you are bound to the Bulk Edit template. Specify the image file’s name there (for example, image.png).

Your file names (including the extension) should correspond to those in the import folder because WebDAV is case-sensitive. As we’ve already mentioned, the only permitted characters are a-z, 0-9, -, and _.
Create a new column and label it Product Image File – # to upload multiple photos for one item (increasing the number each time you make a new column). Create a new column with the appropriate title and the same number as the relevant image to include any additional information for that image, such as descriptions.
Import your goods when you’re ready. Don’t forget to match the Product Image field to the appropriate column on the Link Import Fields stage of the BigCommerce product import if you’re using a template other than Bulk Edit.
BigCommerce Import: Product Options
You must include sub-product SKUs with the corresponding attributes in order to build product variants related to product options as an alternative way to establish them in the control panel. Additionally, you might need to create rules to associate a specific action with the SKU/option, such as changing the pricing or displaying a new image. Making the base product first, exporting it, and then adding the SKUs and rules is the simplest way to achieve this goal. If you need to update a lot of products with options, this may be a quicker alternative to inputting each product individually in the control panel.
The BigCommerce import also allows for the creation and revision of rules for variant options and modifiers. Modifier options themselves, however, cannot be generated or changed via import. You need to apply these changes straight in your admin interface.
Supported Variant Options
So, the standard BigCommerce product option import empowers you to generate the following variant options:
- Multiple Choice
- Swatch
How to Add Rows for Options and Rules upon Import
You must first export the products to create a new option or rule for them. Utilize the export template for Bulk Edit. Also, it would be good to make a copy of your export file as a backup in case you need to roll the product back. The export procedure is quite intuitive, so watch the video illustration below and use the Bulk Edit template to export the product you want to add variants to.
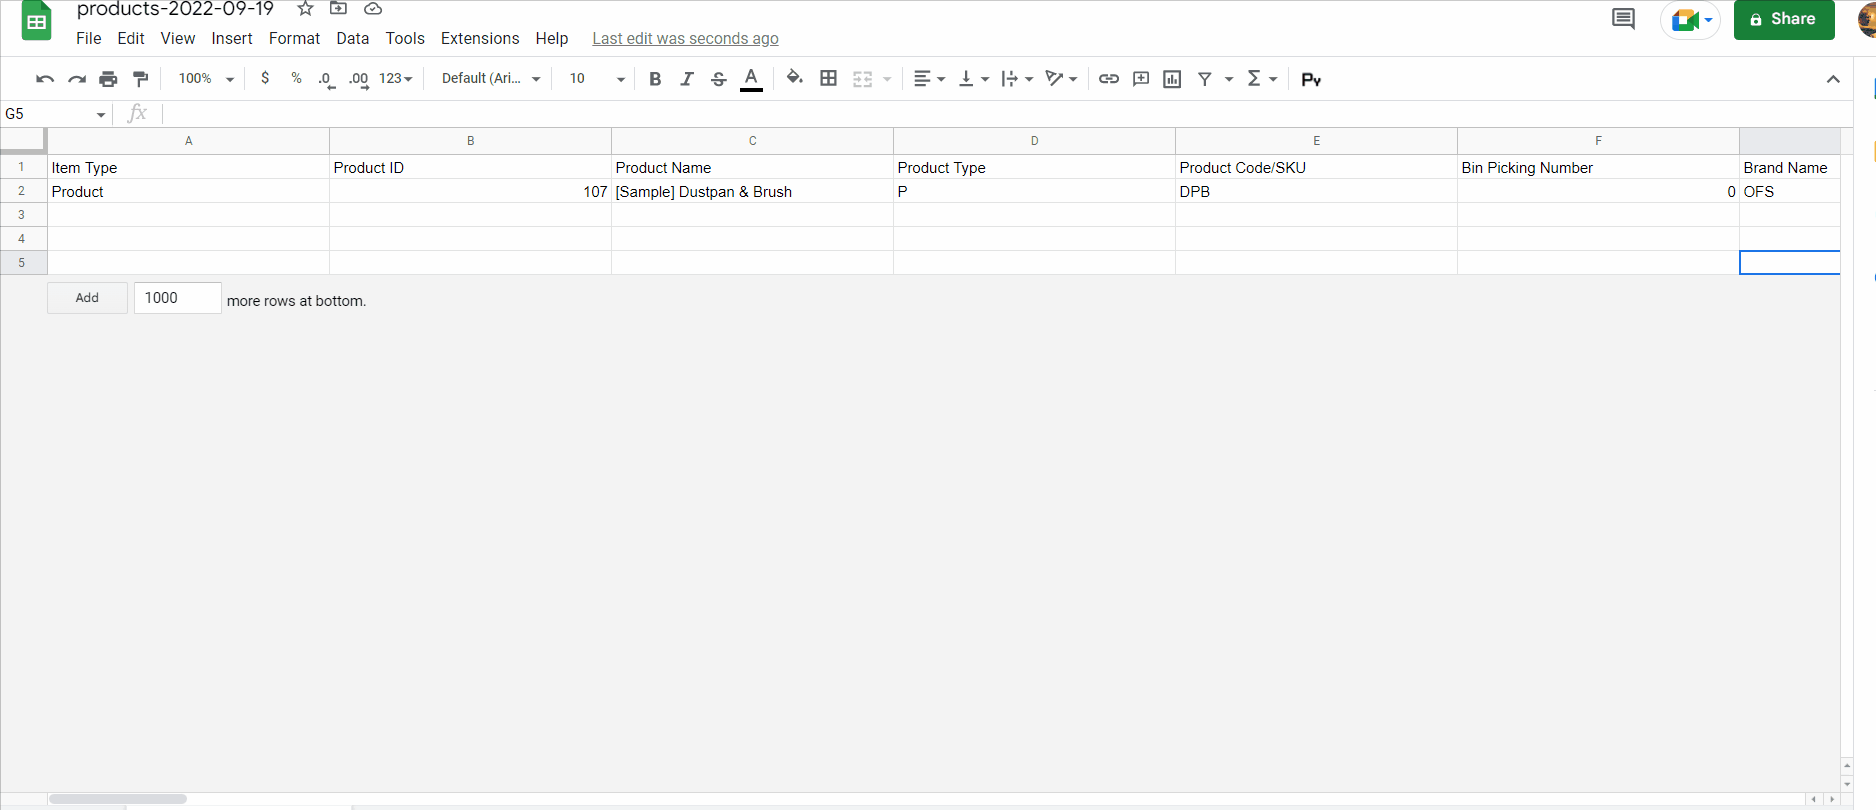
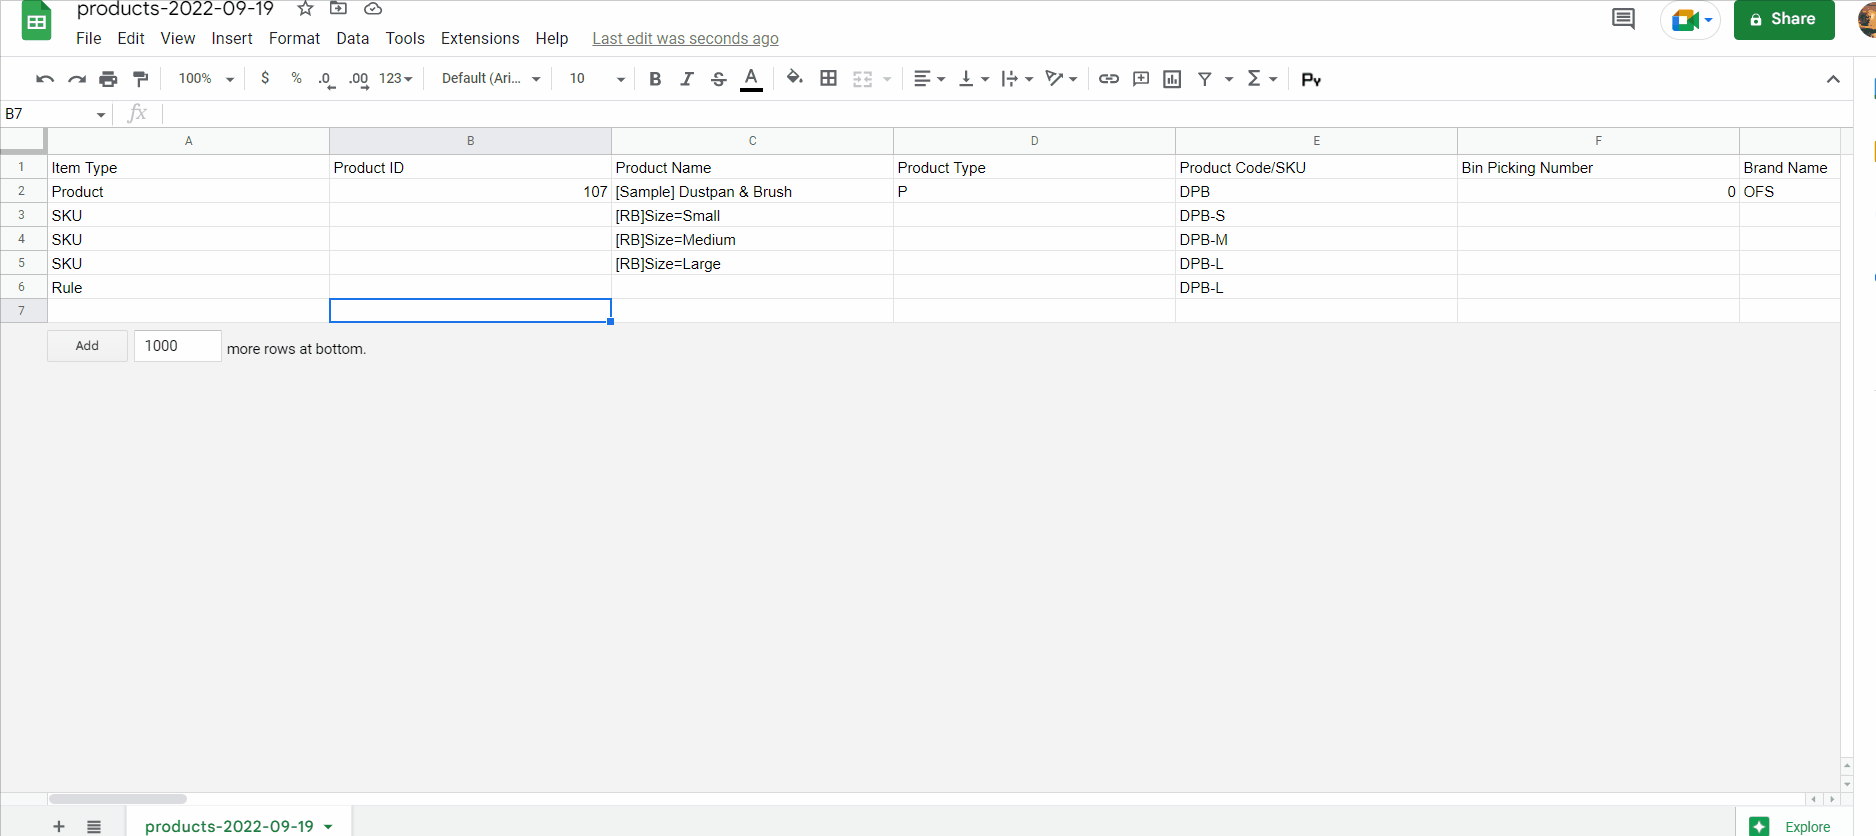
Now, launch your spreadsheet editor, navigate to your exported CSV file, open it and add a row directly under the product that is planned to get the new option or rule, as depicted below:

You will need to fill in the following fields of the new row: Item Type, Product ID, Product Name, and Product Code/SKU.
| Item Type | Type in SKU to create variant options. You will use a SKU Item Type row to define or change a variant’s Dimensions, Cost, UPC/EAN, Bin Picking Number, MPN, Stock Level, or Low Stock Level.
Type in Rule to create rules for variant options and modifier options. You will use a Rule Item Type row to define or change a product’s Price, Weight, Purchasability / Availability, Image, or Rule Processing (Stop Processing Rules). |
| Product ID | BigCommerce automatically assigns this value, so it should be left blank when creating new variant options. |
| Product Name | This field should be formatted using the option or rule markup described below. |
| Product Code/SKU | The unique product code that identifies this variant. |
When finished, save your file and re-upload it back into your store to import product options to BigCommerce.
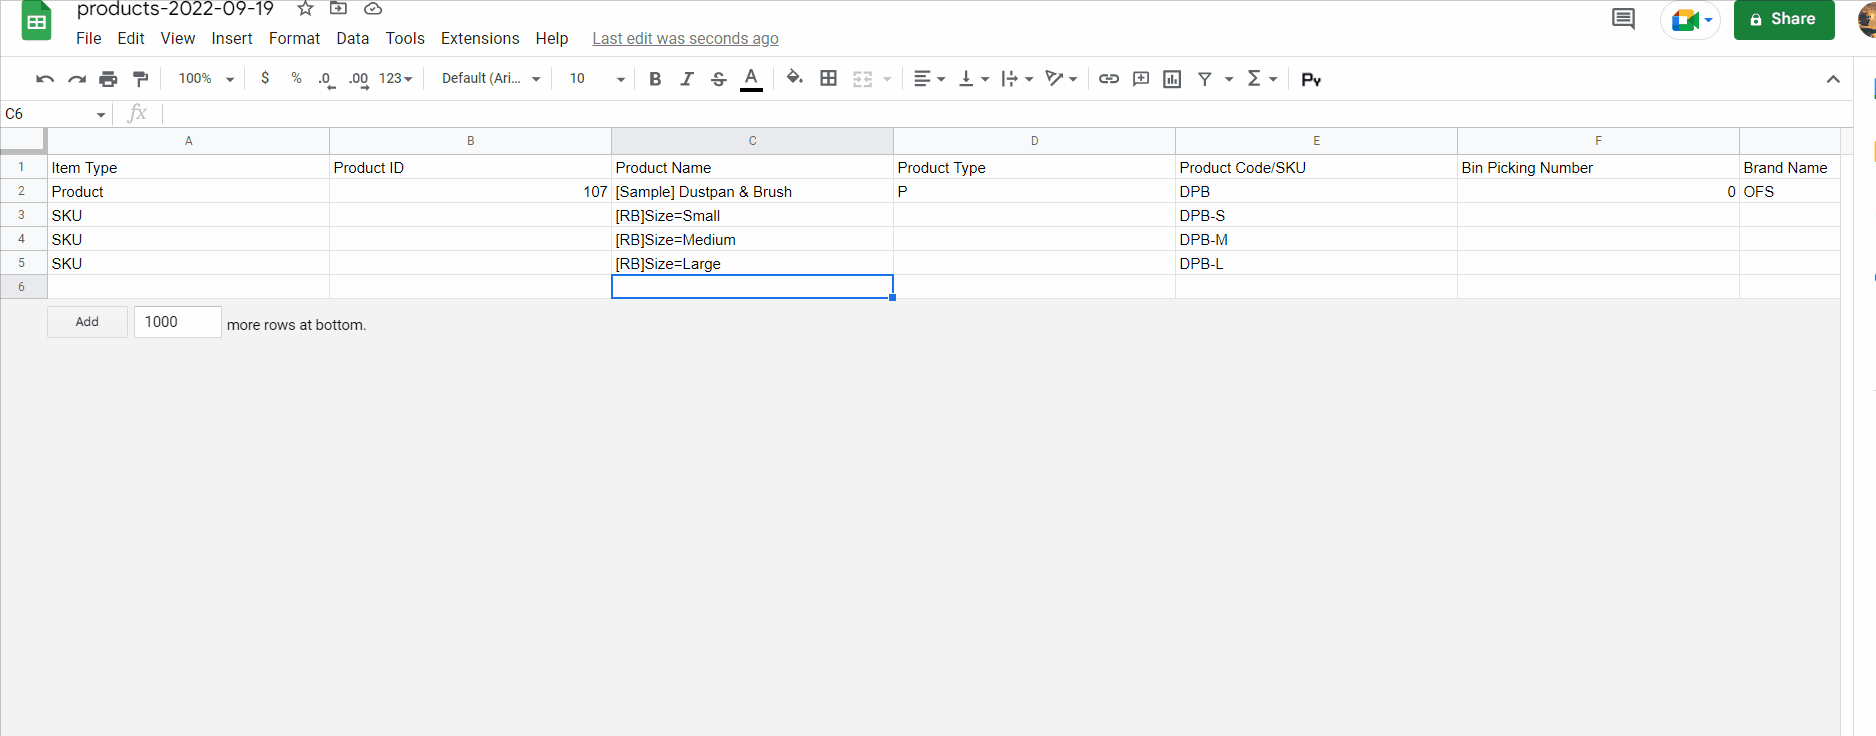
How to Format Variant Options for Import
You will need to format the Product Name column of your new SKU row described in the chapter above to specify a variant option type that you are importing. Utilize the following formulas for multiselect:
| Radio Button | [RB]OptionName=Value | [RB]Size=Small |
| Dropdown | [S]OptionName=Value | [S]Size=Small |
| Rectangle List | [RT]OptionName=Value | [RT]Size=Small |
As for swatches, you can format them as follows:
| Color | [CS]OptionName=Value:#hexcode | [CS]Color=Blue:#0000FF |
| Pattern | [CS]OptionName=Value:URL | [CS]Pattern=Plaid:http://mystore.com/ product_images/import/ plaid.jpg |
The following example illustrates three new rows that add size variations to the product.
Re-importing this file leads to the appearance of three variant options on the product detail page on the storefront.

Also, keep in mind the following requirements when importing product variant options to BigCommerce. When formatting your CSV, use a comma to separate any options that exist for a single SKU. For instance, the Product Name column for an SKU variant with a tiny size and blue color might be [RB]Size=Small,[CS]Color=Blue:#0000FF. If you use swatch choices, they require a URL for patterns and a hex code for colors. The product images/import folder should receive image files for pattern-type swatches over WebDAV. In the CSV, the file name and URL must absolutely match.
How to Format Rules for Import
Now, let’s explore how to create a rule for a variant or modifier option via BigCommerce import. The procedure is similar to the one that we’ve just described. In a nutshell, you’ll need to format the appropriate column of your CSV file with products. Note that rule rows appear beneath any SKU rows a product may have. Use the formulas in the tables below to apply changes.
Adjust Price
You can create a rule to adjust the price of your product variant options upon import in the Price column with the help of the following formulas:
| Add an amount | [ADD]# | [ADD]5 |
| Remove an amount | [REMOVE]# | [REMOVE]30% |
| Set a fixed amount* | [FIXED]# | [FIXED]15 |
*Not compatible with [FIXED] modifier rules.
You can also use #% for price to calculate a percentage instead of a fixed amount.
Adjust Weight
You can create a rule to adjust the weight of your product variant options upon import in the Product Weight column with the help of the following formulas:
| Add an amount | [ADD]# | [ADD]3 |
| Remove an amount | [REMOVE]# | [REMOVE]5 |
| Set a fixed amount* | [FIXED]# | [FIXED]10 |
*Not compatible with [FIXED] modifier rules.
Show a Different Image
You can create a rule to display different images for your product variant options upon import in the Product Image File – 1 column with the help of the following formulas:
| Show this image | Full image URL
OR Image file name |
http://mybcstore.com/product_images/import/filename.jpg
OR filename.jpg |
Pay heed to the fact that the image file must be online or uploaded to your product_images/import folder before you start importing the CSV. If you decide to use a file name instead of an URL, image files should be uploaded to your product_images/import folder.
If you want to make your product variation unavailable for purchases, go to the Allow Purchases column and specify N to disable purchases or Y to allow them.
Stop Processing Rules
If you want to stop processing rules, proceed to the corresponding column (Stop Processing Rules) and fill in Y.
Note that BigCommerce associates rules to variants using the variant’s Product Code/SKU.
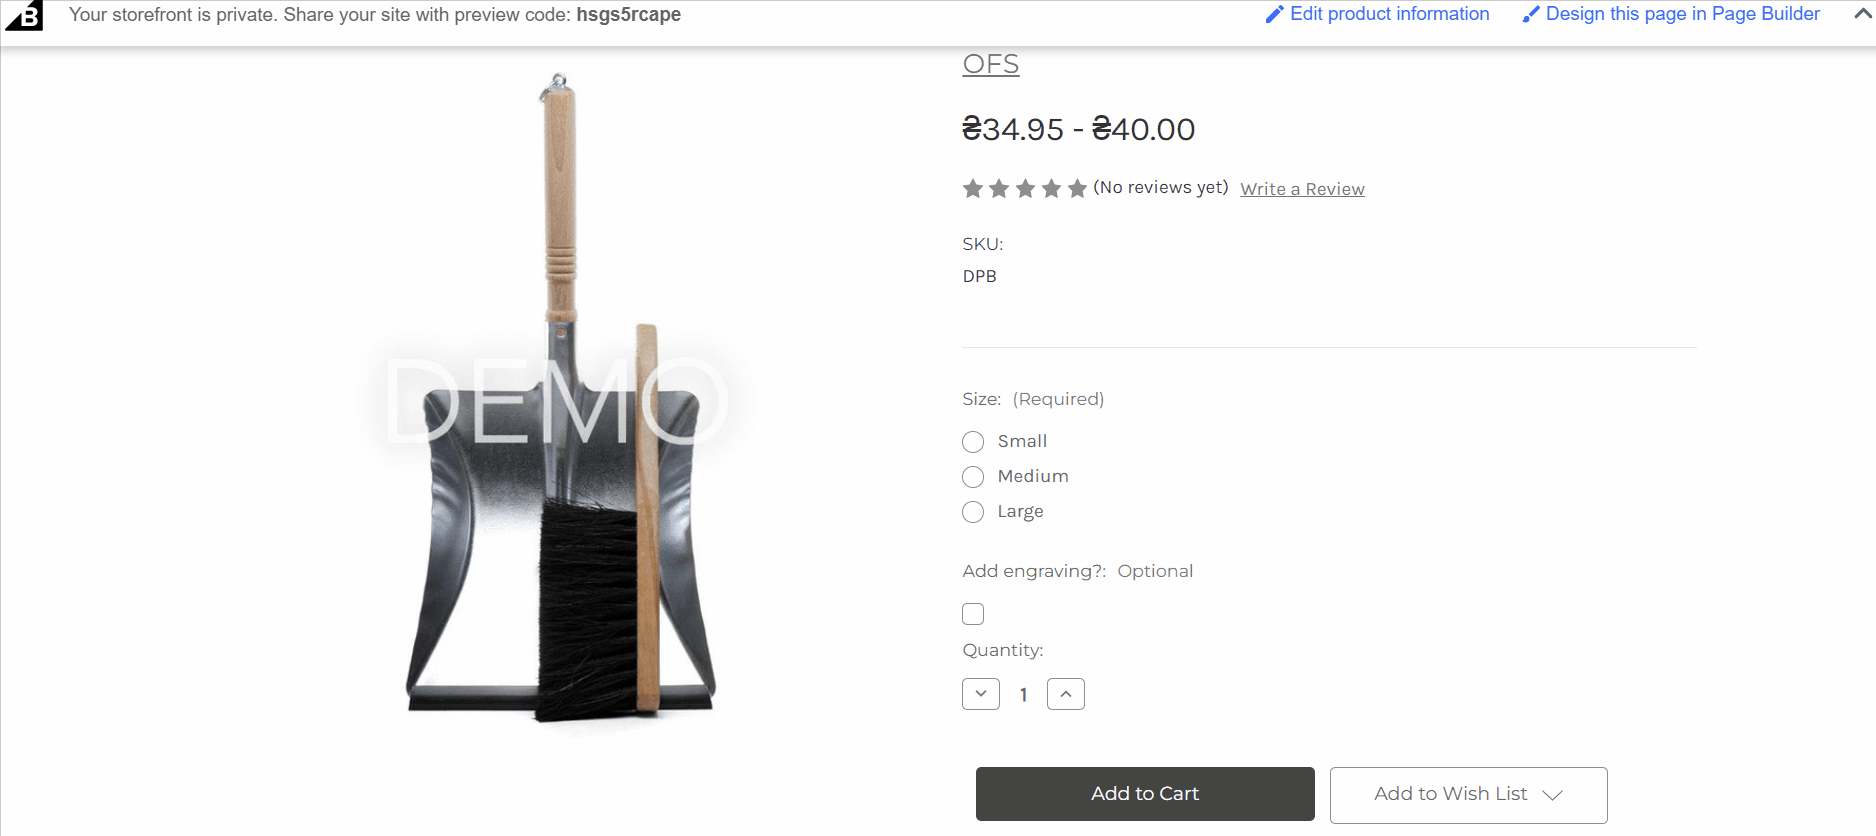
Let’s take a look at a spreadsheet example to illustrate the above formulas. Below, you can see a rule that applies changes to the price and weight of a product variant: The large Dustpan & Brush gets a price of ₴40, and a weight of 1.2 lbs. You can also see that there is the same value in the Product Code/SKU column for the product variant and the associated rule.
When it comes to the storefront display, the update displays when the large variant is selected.

Please, note that it is impossible to import sale prices and MSRPs on products in BigCommerce by default.
Price Change Rule for Modifier Option
Let’s see how to add a price change rule for a modifier option upon the BigCommerce import.
As we’ve already mentioned, you need to create a modifier option in the control panel first. In our example, it is a checkbox called “Add engraving?” that looks as follows in the admin:

Now, you can go to the CSV file to add a new rule row. As you can see, the new rule adds $5 to the price when that box is checked (the checked value is Yes).
It is important to mention that the modifier option is not represented in a CSV file. You can only add its associated rules to the sheet. And as we’ve stated previously, it is impossible to update or create modifier options upon import to BigCommerce.
However, if we upload a CSV file like the one above, it results in the following two changes.
Firstly, your new rule associated with the modifier appears on the storefront:
Secondly, you can see it in the BigCommerce admin on a product detail page under Customizations › Rules.

BigCommerce Import: Customers
Now, when we are finished with products, it is time to explore what happens on the side of your clients. Below, we explore how to import customers in BigCommerce.
Before going any further, create a backup of your customers, which is just a plain unedited Bulk Edit export file. It will help you put things back to how they were if something goes wrong.
So, you can import customers to BigCommerce as follows:
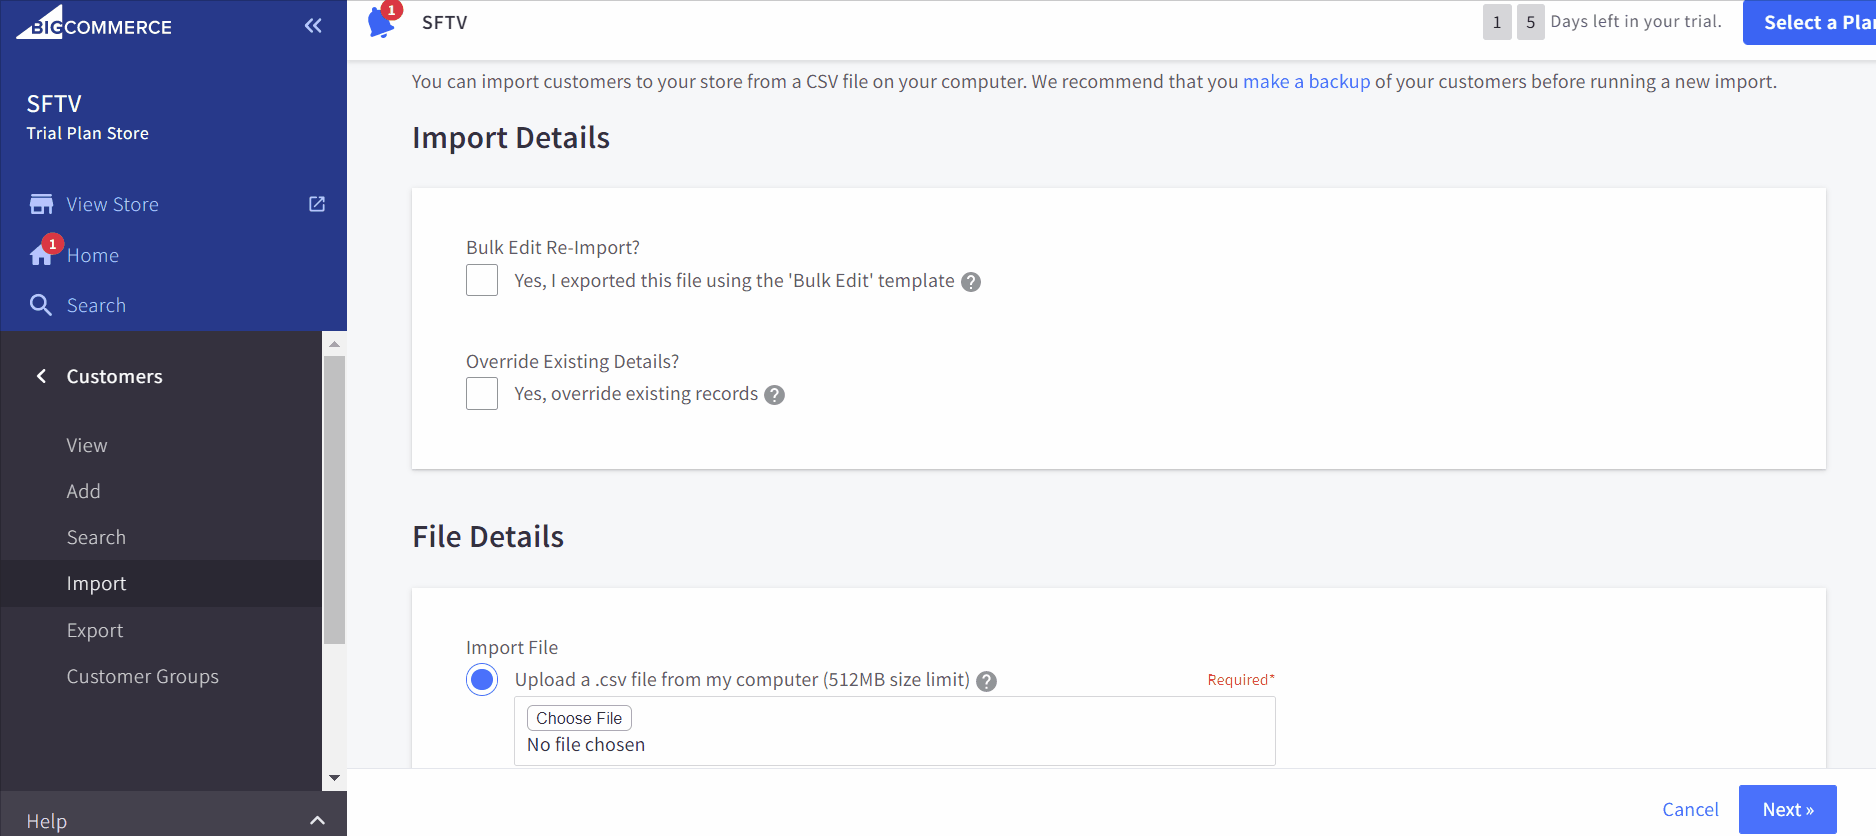
- Visit a customer import section in your admin. It is situated under Customers -> Import.
- Just like in the case of product export, BigCommerce lets you check the Bulk Edit Re-import option selecting the recommended settings and automatically configuring the Match Import Fields step. You can do that if you export your customer file using the Bulk Edit template of the CSV that adheres to the default BigCommerce requirements.
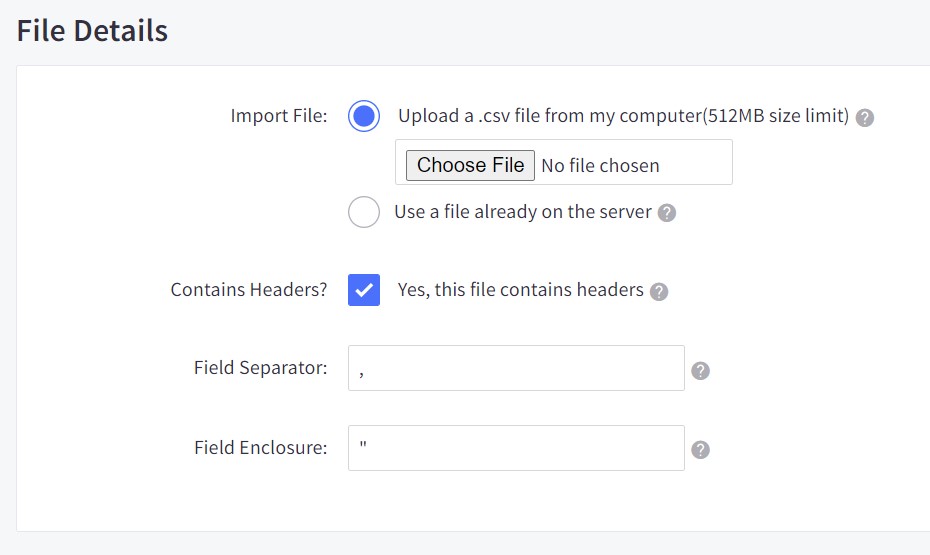
You must match your column headers to their respective fields during the import if your CSV file doesn’t use the same column headings as those in the Bulk Edit template. - Next, go to the File Details section to upload your customer file directly from your computer. If your import file is bigger than 512MB, it is recommended to split it into several smaller CSVs.
- Configure the additional File Details settings if you are uploading a non-spreadsheet CSV:
– Use a file already on the server – connect to WebDAV as we described at the beginning of this article and import your file from the import_files folder on the server. Note that such files can be also up to 512 MB.
– File contains headers – This option indicates whether the file contains column headings or not;
– Field Separator – You should specify a character used to separate the fields here;
– Field Enclosure – You should specify a character used to tie phrases together (such as “Shirts and Blouses”).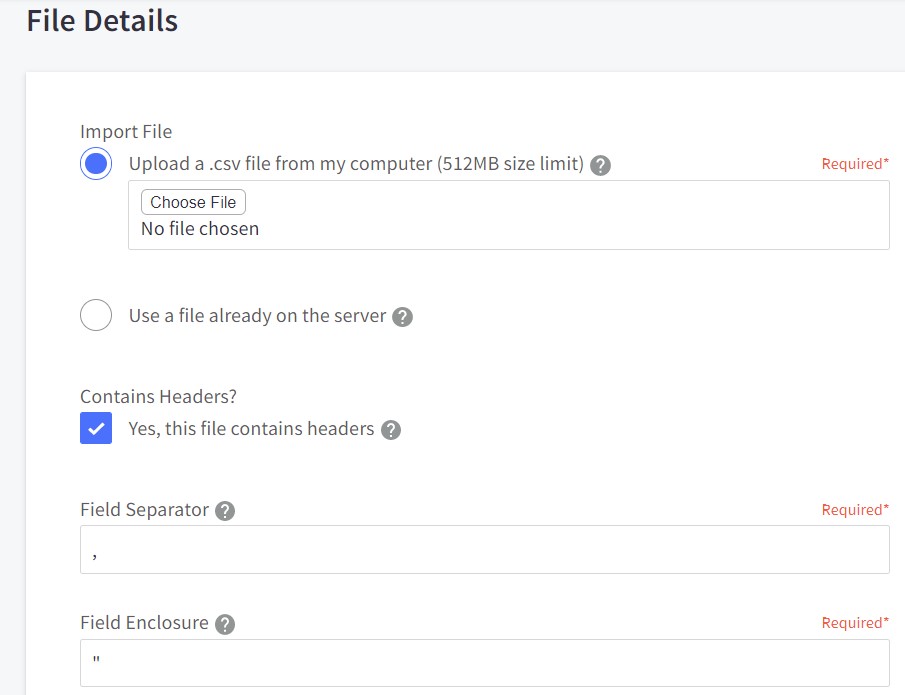
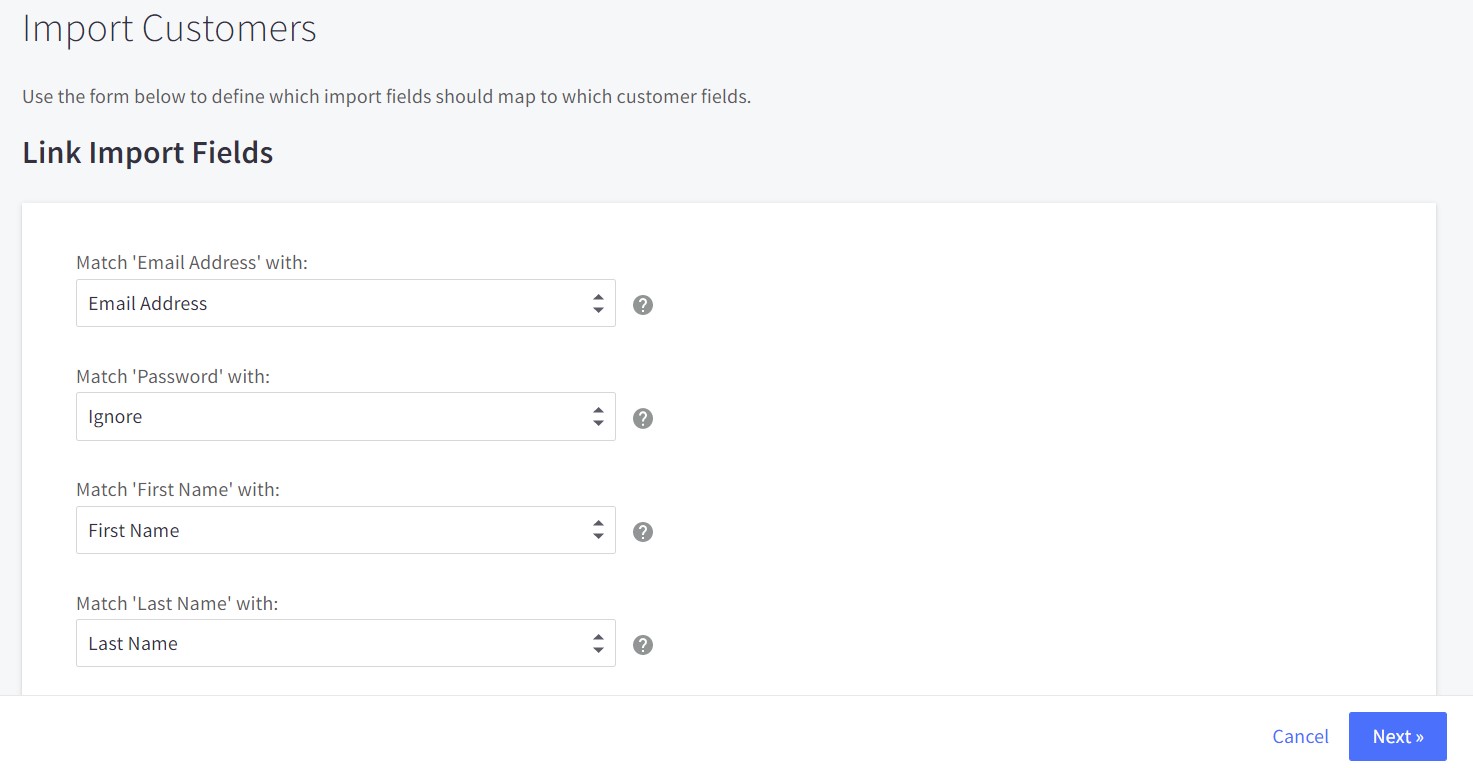
- Click the Next button to proceed. If your CSV file doesn’t incorporate the Bulk Edit template headers, you will need to assign them manually. Link import fields to proper headers by selecting your CSV file’s corresponding column name from the drop-down. Click Next when done.
- Hit the Start Import button to begin importing customers into BigCommerce. The system displays the import summary when the upload procedure is complete. Click More Information to get more detail on errors.


If you use the Bulk Edit template, your BigCommerce customer import looks as follows:
How to Import Customer Passwords in BigCommerce
While it is impossible to export passwords in BigCommerce, you can still import them to your website via CSV. However, they cannot be exported. Add a new column to your customer import file labeled as Password. Next, you need to put your customers’ passwords there.

And don’t forget to match the Password column with the password field when you match import fields.

For customers imported without a password, BigCommerce requires the password reset process.
Table of Supported Fields
All customer attributes that can be exported as CSV are included in the table below. When utilizing the Bulk Edit export template, the majority of these fields are present. For a list of fields that can be added to a custom export template but are not included in the Bulk Edit template, see Manually Added Fields.
| Field | Required | Description | Example |
| Email Address | + | The client’s email address | john.sweet@gmail.com |
| First Name | + | The client’s first name | John |
| Last Name | + | The client’s last name | Sweet |
| Company | The company, if the client orders on behalf of a business | Firebear | |
| Phone | client’s phone number | 666-666-6666 | |
| Notes | Your notes about the client | client is tax-exempt | |
| Store Credit | This will allow the client to pay with store credit. | 50 (uses your default currency; for example, 50 means $50 if you are using USD) | |
| Customer Group | Assigned customer group if using the Customer Group feature | Retail | |
| Address ID | The unique system-created ID for the address | 100 | |
| Address First Name | The first name linked to a particular address | Sarah Jessica | |
| Address Last Name | The last name linked to a particular address | Sweet | |
| Address Company | The company linked to a particular address | Firebear | |
| Address Line 1 | The first line with an address; normally contains street and house/housing complex number | 123 Main St | |
| Address Line 2 | The second line with an address; normally contains care of information and unit or building number | Apartment 201 | |
| City/Suburb | The address’ city or suburb | Austin | |
| State/Province | The address’ state or province | Texas | |
| Zip/Postcode | The address zip or postal code | 78726 | |
| Country | The address country | Germany | |
| Address Phone | The phone number linked to that address | 666-666-6666 | |
| Address Form Fields | If you created address form fields, your clients’ responses will be included here | Question: Special Instructions for Home Delivery Response: Gate Code is 101. | |
| Form Fields | If you created form fields, your clients’ responses will be included here | Question: Where did you hear about us? Response: Word of mouth | |
| Receive ACS/Review emails | Records whether the client opted in or out of receiving product review requests or abandoned cart saver emails | Yes = Y, No = N |
Manually Added Fields
These fields are not exported in the Bulk Edit export template by default but can be added to a custom export template.
| Field | Description | Example |
| Customer ID | The system-created unique ID for the client | 100 |
| Customer Name | The client’s first and last name | John Sweet |
| Date Joined | The date the client account was created | 10/15/2022 |
| Address: Address Name | The full name linked to a particular address can be different from the client placing the order | Sarah Jessica Sweet |
| Address: State Abbreviation | The abbreviated form of the address’ state or province | TX |
| Address: Building Type | The address building type (commercial or residential). Used for shipping purposes. | Residential or Commercial |
| Orders | The number of orders the client has placed (exportable only) | 2 |
| Tax Exempt Code | Only used if you have enabled automatic tax calculation |
BigCommerce Import: Tracking Numbers
A great technique to hasten order fulfillment in BigCommerce is to import tracking information for your shipments. You can enter the tracking numbers on a spreadsheet (CSV) and use the import tool to link them to the appropriate orders rather than manually entering them on each order, which leaves room for human mistakes.
Orders requiring numerous shipments or orders with multiple shipping addresses are not intended for use with this feature. You have to enter tracking numbers for them manually in your control panel.
How to Create Order Tracking Number CSV in BigCommerce
Download the tracking number CSV sample to view an example of an import file. It should contain these three columns: order_number, tracking_number, and tracking_carrier. Provide the following details in each column to format the tracking number CSV properly:
- order_number – Specify the order number for the order you are updating in this field;
- tracking_number – Type in the tracking number for the order here;
- tracking_carrier – Fill in the code for the shipping service provider who offered the tracking number. Note that BigCommerce supports 300+ carriers.

The shipment notification issued to the client will link the tracking number to AfterShip’s tracking status page when the tracking carrier field is filled in. When you’re done, make sure to save the file to your computer as CSV.
.How to Import Order Tracking Numbers into BigCommerce
Now, when you know how to create a tracking number import file, let’s see how to import tracking numbers to BigCommerce:
- Go to the Orders page and then proceed to Tracking Numbers.
- Choose an order status to update your orders with. Select Do Not Update to avoid status updates.
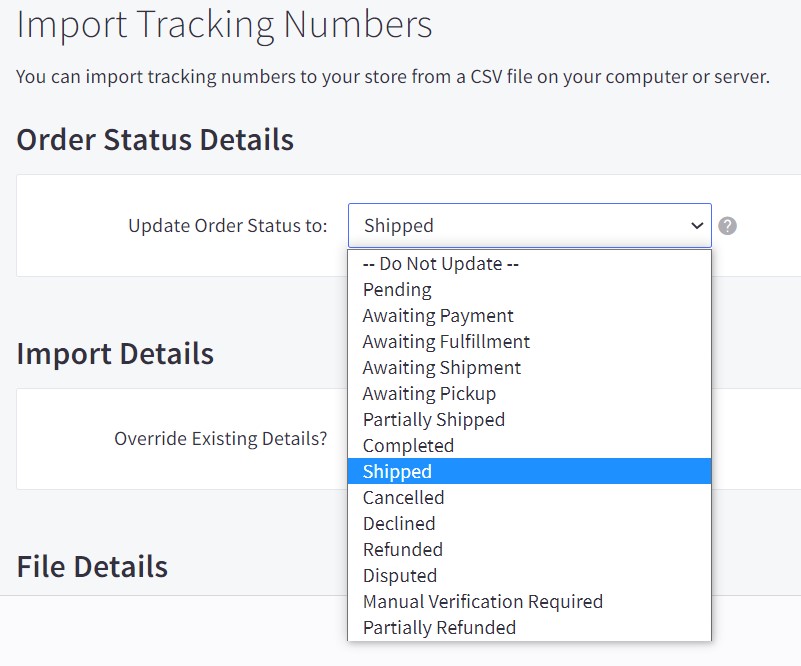
- Select your tracking number import file from your computer, and click Next. Alternatively, you can use a file that is available on your server.
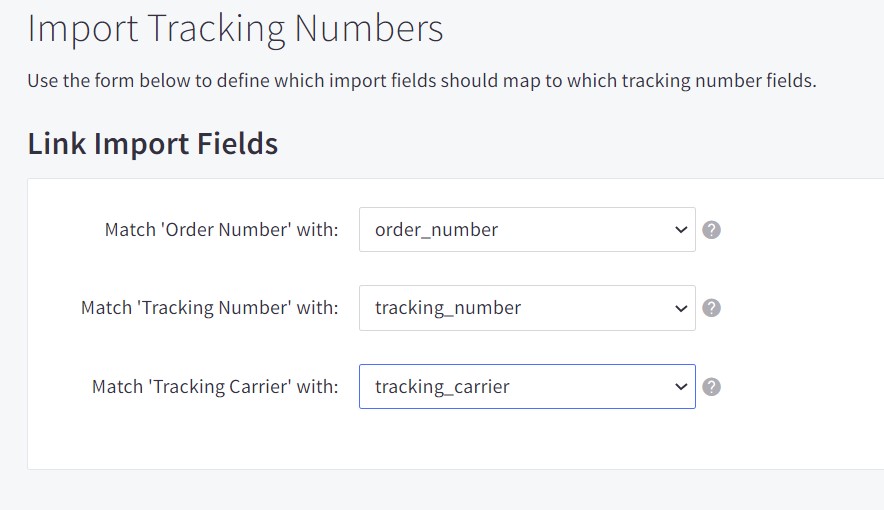
- After the file is uploaded, you need to map its column headers. For instance, Order Number – to order_number, Tracking Number – to tracking_number, and Tracking Carrier – to tracking_carrier.
- Hit Next and then click the Start Import button. When the process is complete, BigCommerce displays a message that shows which tracking numbers were successfully imported and which ones failed. Click More Information to get more detail on errors.
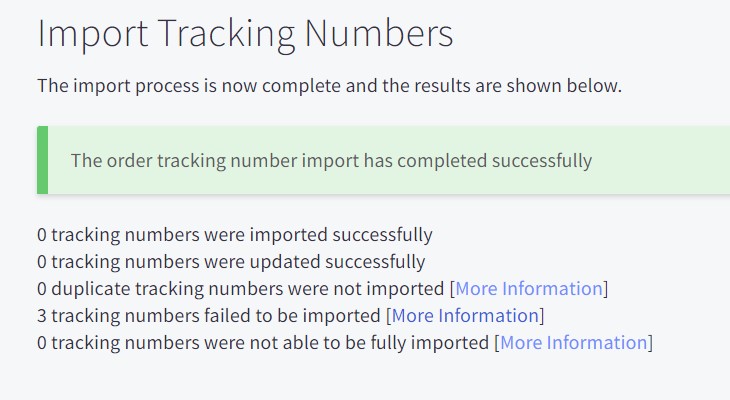


The process of importing tracking numbers to BigCommerce looks as follows on our demo store:
It probably fails because we have no orders with the specified numbers.
BigCommerce Import: 301 Redirects
Note that only mass manual 301 redirect creation is supported in BigCommerce upon import. As for the existing 301 redirects, you cannot update them using the 301 redirect import functionality. However, you can still do that by exporting and deleting all of your redirects from the control panel. Do that if you need to make bulk changes and complete the instructions provided in this chapter.
A CSV file with two columns—Old URL and New URL—is required to import 301 redirects into BigCommerce. Please use the sample 301 redirect CSV file as a reference.

- Go to Settings and proceed to the 301 redirect page. Hit the Bulk Import button there.
- Use the Choose File field to select a 301 redirect CSV file from your computer. If it has a proper structure – headers for Old URL and New URL – check This file contains headers options.
- Launch the 301 redirect import procedure. If it finishes successfully, the 301 Redirects page will display your changes after reloading.

Firebear Improved Import & Export App for BigCommerce
The Firebear Improved Import & Export App can greatly enhance all import procedures on your BigCommerce website. Our tool allows you to transfer data blocks between your online storefront and any external systems in addition to working with all of the aforementioned entities.
Our application offers comprehensive support for products, inventories, orders, customers, and categories, unlike the usual import solution. It also delivers the following functionalities:
- All entities’ import and export mapping. This implies that you can describe how to adapt external data input to adhere to the BigCommerce platform’s native requirements.
- Support for Google Sheets, Excel, and CSV. In addition to CSV files, our addon also supports Excel tables. Furthermore, you may directly import data from Google Sheets.
- BigCommerce import: categories. Use the app to import categories to BigCommerce in a matter of a few clicks. Create missing parent or sub- categories on the fly.
- Adaptable launch. In addition to manually executing import and export tasks, as is the case with native BigCommerce import tools, you can also rely on scheduling or events. For instance, you can begin updating your inventory each day or as soon as a new order is placed.
- Sources for custom exports and imports. You can immediately upload data files to the system, import them from a URL, or move them over FTP/SFTP using the Improved Import & Export BigCommerce app.
- Diff only import, update only. By using the product ID/SKU, you can edit stock information and other fields.
- Alter data instantly. Before beginning import and export, you can make as many adjustments as your CSV file requires. Our tool offers the most natural approach to numerous processes. For instance, you can seamlessly merge and divide values, use RegExp, search and replace attributes, and modify capitalization.
For further information on the enhanced BigCommerce import possibilities we offer, contact us. We can also help you with data transfers between BigCommerce and numerous external systems.
Other BigCommerce Import & Export Apps
Let’s see what other BigCommerce import and export applications are available to extend the default data transfer capabilities. Below, we highlight a few interesting solutions from the app store:
- Product Review Importer & Exporter. This application lets you import Product Reviews into your BigCommerce store via CSV. In addition to that, you can export the corresponding information from your website and transfer it to Yotpo and other similar systems.
- Price List Importer/Exporter. This app lets you utilize a simple and user-friendly interface to manage and change your price lists. You can export them as CSV files, edit them, and then re-import them back. Multiple currencies are supported.
- Spreadr Amazon Importer. With this tool, your BigCommerce website is empowered to import products from Amazon. You just need to paste the Amazon product URL into the dashboard and click Add. The official Amazon API is utilized to pull product info and insert it into your BigCommerce website. Note that Amazon products will be displayed in the same look and feel as your e-commerce website except for the ‘Add to cart’ button, which is replaced with ‘View on Amazon.’ In addition to that, you can customize the product name, description, and other details.
Each imported item in your store has a unique URL that may be indexed and crawled. All of your BigCommerce website’s product photographs are saved there, enabling you to resize, optimize, and display them quickly. They may also be pinned on Pinterest and indexed by Google. To guarantee that your website runs quickly and is always accessible, BigCommerce stores all product information in its database. - MultiChannel Importer by CedCommerce. The MultiChannel Importer app offers the simplest method for transferring products from Etsy, Amazon, Wish, and eBay to BigCommerce. With its help, each and every aspect of a product is imported, including its images, inventory, price, and description. Add a variety of product photos to your BigCommerce store, enable inventory and price syncing for all products from the chosen marketplace, and use the Profiling tool to upload items into several BigCommerce categories.
- Amazone DropShipper Product Importer. Import products to your BigCommerce store from Amazon and Walmart US. This app transfers 100% of the product details, images, variants, and prices. Thus, you can effortlessly start your dropshipping business or join the Amazon Affiliates Program. Also, note that this application empowers you to import every main image and price for up to 25 variants per product.
- Bulk Category Import and Edit. The name of this app speaks for itself. The Bulk Import and Edit application lets you bulk import categories to your Big-Commerce website. Export them or an overview, apply changes, and re-import them back to update your catalog with existing categories or create new ones.
Conclusion
As you can see, the default BigCommerce import is quite straightforward. Following this guide, you can easily transfer clients, items, tracking numbers, and 301 redirects into your store. As for more advanced processes, they are available via third-party apps, such as Improved Import & Export for BigCommerce. This extension not only provides more advanced and flexible BigCommerce import of products, customers, tracking numbers, and redirects but also lets you update orders, categories, reviews, etc. Also, contact us regarding data transfers to and from your website. We can help you with any synchronization and integration related to your e-commerce business.
BigCommerce Import FAQ
Below, we provide brief answers to the most important questions associated with the BigCommerce import.
How to import a CSV file into BigCommerce?
You can import a CSV file into BigCommerce as follows:
– Navigate to a product, customer, order, or 301 redirect page.
– Open the corresponding import setting.
– Select a CSV file you want to import on your computer. Alternatively, you can upload it to your server.
– Configure import parameters, such as various data modification options, field separators, and enclosure characters depending on the selected entity.
– Match custom column headers to default BigCommerce column headers.
– Import a CSV file into BigCommerce.
How to import products into BigCommerce?
You can import products into BigCommerce as follows:
– Visit a product import section under Products -> Import.
– Fill in Import Options activating the necessary features.
– Upload your BigCommerce product import file from your computer.
– Ensure that every piece of information you’re importing has been compared to its BigCommerce equivalent by matching column titles.
– Proceed to transferring product data to your e-commerce website.
How to import product options into BigCommerce?
You can import product options into BigCommerce as follows:
– Visit a product import section in your admin under Products -> Import.
– Fill in Import Options activating the necessary features.
– Next, you can upload your BigCommerce product import file from your computer. Alternatively, you can upload a file from your server, as we’ve already described above.
– When done, click the Next button. Ensure that every piece of information you’re importing has been compared to its BigCommerce equivalent.
– Click Next to proceed to transferring product data to your e-commerce website. Hit the Start Import button to launch the procedure.
How to import product images into BigCommerce?
If your product photographs are already available online, you can import them with your items by including the complete image path in your product CSV file. If they are available on your server, you can use a product image name.
Find the product picture column in your CSV file. Product Image File – # (where # is a number) is what you are looking for.
How to import product variants into BigCommerce?
You must include sub-product SKUs with the corresponding attributes in order to build product variants related to product options as an alternative way to establish them in the control panel. Additionally, you might need to create rules to associate a specific action with the SKU/option, such as changing the pricing or displaying a new image. Making the base product first, exporting it, and then adding the SKUs and rules is the simplest way to achieve this goal. If you need to update a lot of products with options, this may be a quicker alternative to inputting each product individually in the control panel.
How to import customers into BigCommerce?
You can import customers into BigCommerce as follows:
– Visit a customer import section in your admin under Customers -> Import.
– Check the Bulk Edit Re-import option, selecting the recommended settings and automatically configuring the Match Import Fields step.
– Next, go to the File Details section to upload your customer file directly from your computer.
– Configure the additional File Details settings if you are uploading a non-spreadsheet CSV.
– Click the Next button to proceed. If your CSV file doesn’t incorporate the Bulk Edit template headers, you will need to assign them manually.
– Hit the Start Import button to begin importing customers into BigCommerce. The system displays the import summary when the upload procedure is complete.
How to import customer passwords into BigCommerce?
While it is impossible to export passwords in BigCommerce, you can still import them to your website via CSV. However, they cannot be exported. Add a new column to your customer import file labeled as Password. Next, you need to put your customers’ passwords there. And don’t forget to match the Password column with the password field when you match import fields.
How to import orders into BigCommerce?
Unfortunately, you cannot import orders to BigCommerce by default since the system only lets you transfer tracking numbers. However, it is possible to get the missing functionality with the help of the Improved Import & Export BigCommerce app. This tool lets you import orders to your e-commerce website as follows:
– Open import profile.
– Choose Orders as your import entity.
– Upload your data file with orders and configure various import parameters.
– Match column headers from your import file to ones used in BigCommerce.
– Import orders to BigCommerce.
How to import categories into BigCommerce?
Unfortunately, you cannot import categories to BigCommerce by default. However, it is possible to get the missing functionality with the help of the Improved Import & Export BigCommerce app. This tool lets you import categories to your e-commerce website as follows:
– Open import profile.
– Choose Categories as your import entity.
– Upload your data file with categories and configure various import parameters.
– Match column headers from your import file to ones used in BigCommerce.
– Import categories to BigCommerce.
How to import an Excel file into BigCommerce?
While the default BigCommerce import supports CSV files only, the Improved Import & Export lets you also use Excel files to transfer data to your e-commerce website. Use this app to import an Excel file into BigCommerce.
How to import a JSON file into BigCommerce?
While the default BigCommerce import supports CSV files only, the Improved Import & Export lets you also use JSON files to transfer data to your e-commerce website. Use this app to import a JSON file into BigCommerce.
How to import an XML file into BigCommerce?
While the default BigCommerce import supports CSV files only, the Improved Import & Export lets you also use XML files to transfer data to your e-commerce website. Use this app to import an XML file into BigCommerce.
How to import data into BigCommerce via API?
While the default BigCommerce import supports only direct file uploads or server uploads, the Improved Import & Export lets you also use APIs to transfer data to your e-commerce website. Use this app to import data into BigCommerce via API.
How to import data into BigCommerce from Google Sheets?
While the default BigCommerce import supports only direct file uploads or server uploads, the Improved Import & Export lets you also use Google Sheets to transfer data to your e-commerce website. Use this app to import data into BigCommerce via Google Sheets.
Sources
The following article is inspired by the official BigCommerce documentation. It combines several BigCommerce import guides, expanding and enhancing them to cover the BigCommerce import as much as possible.
Also, note that you can find all CSVs mentioned in this article on Google Sheets here.


