
Inconvenient delivery options usually become the main reason to leave the checkout page without completing the purchase. Therefore, it is necessary to add several ways to ship the goods you sell to let potential buyers become your customers. With the Shopware 6 Shipping settings, you can easily achieve this goal. The platform offers flexible conditions when it comes to delivery options. It is even possible to apply rules and configurations per sales channel. Below, we shed light on the Shopware 6 shipping settings. You will find out how to add shipping methods in Shopware 6 and assign them to a sales channel. Also, you will learn what availability conditions are possible, how to enable tax calculations, what price matrices are at your disposal. Let’s see how everything is arranged in your administration.
 ‘
‘
Note that we provide Shopware integration with external platforms. Contact our support for further information or try our Improved Import & Export Extension for Shopware.
Get Improved Import & Export for Shopware by Firebear Studio
Explore Shopware
Table of contents
Shipping Settings in Shopware 6 Admin
Let’s find the Shipping Settings page in the Shopware 6 backend:
- Go to your Shopware 6 administration;
- Open its main menu;
- Proceed to the Settings section;
- Open the Shop subsection;
- Hit the Shipping icon.
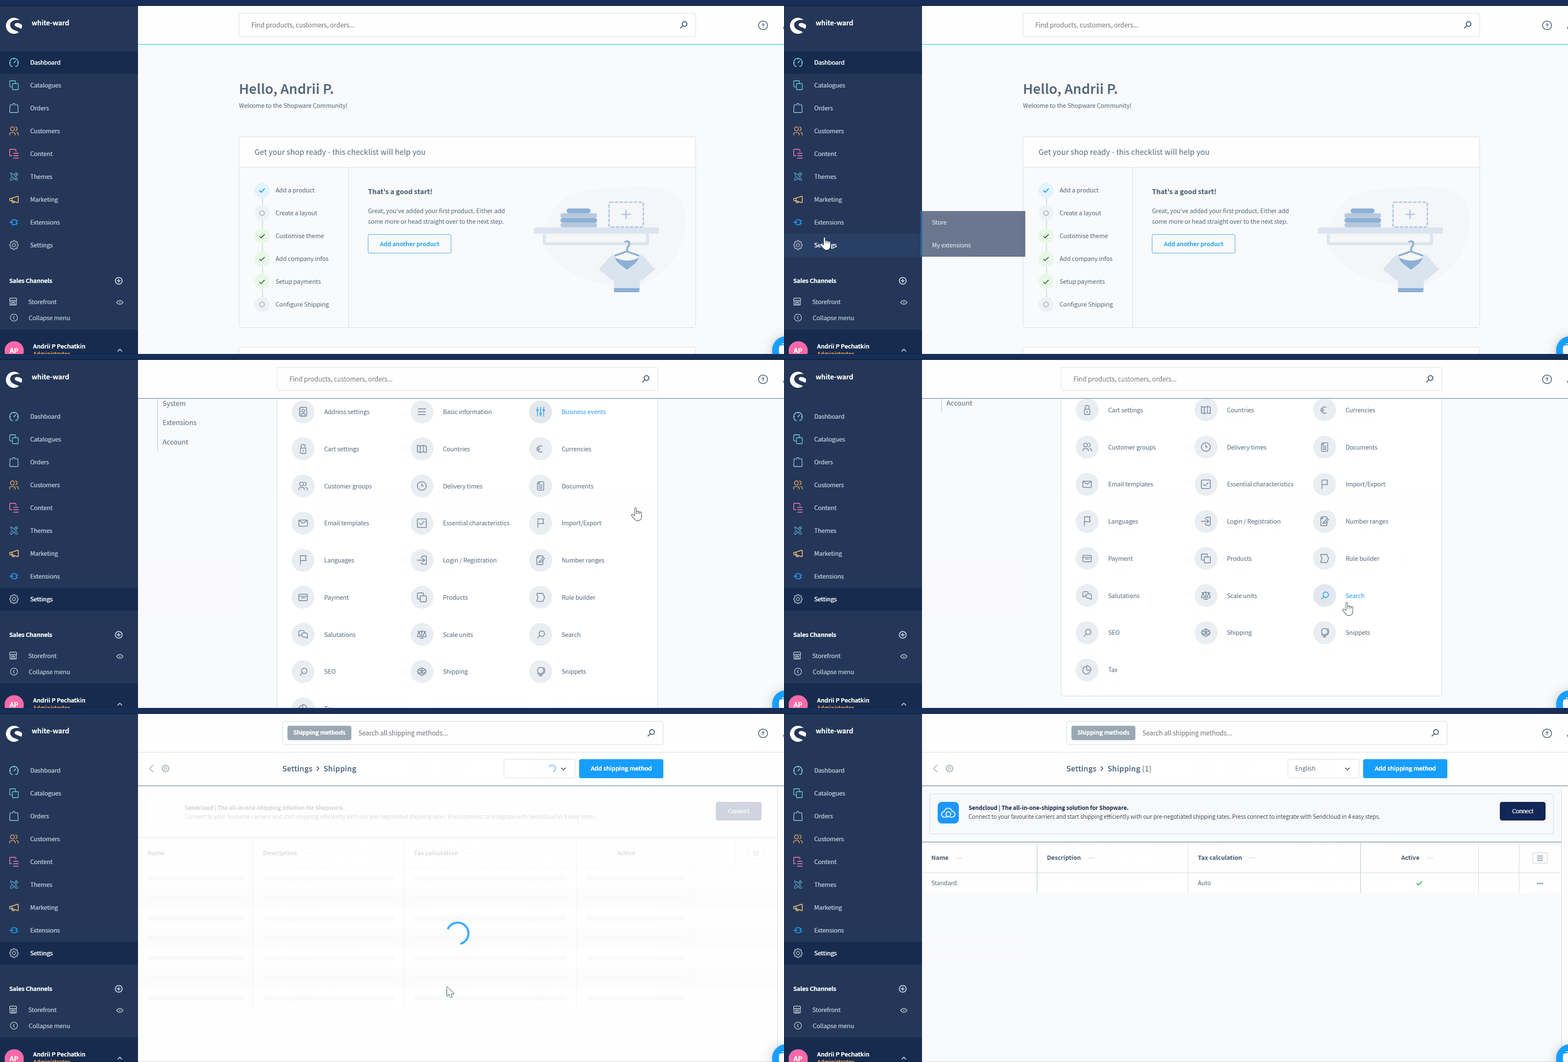
All the available shipping methods are displayed here. You can see their names, descriptions, and activity statuses.
Shopware 6 lets you edit, duplicate, or delete shipping methods with the help of the context menu.

Adding shipping method in Shopware 6
Hit the Add shipping method button to create a new shipping method in Shopware 6.

The system redirects you to a new screen divided into several sections, including Basic Information, Availability, Tax Calculation, and Rules & Conditions.
Basic information
The Basic Information section looks as follows:
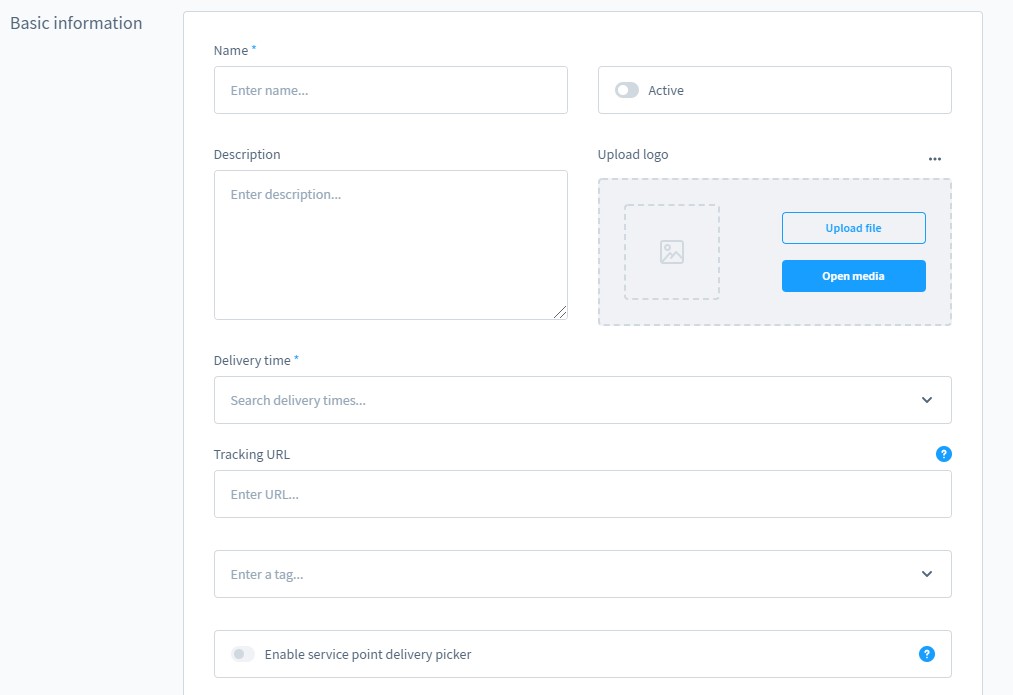
It lets you specify several parameters:
- Name – the name of the shipping method is displayed at both backend and frontend;
- Active – this toggle lets you enable/disable the shipping method;
- Description – the description of the shipping method is also displayed at both backend and frontend;
- Upload logo – you can upload a logo for your shipping method here;
- Delivery time – specify a delivery time for your shipping method here; activate the Show delivery time in cart option under Settings -> Shop -> Shopping cart.
- Tracking URL – enter the tracking number of your shipping service provider: specify the “%s” placeholder to insert the correct code for each order from the order details automatically;
- Tags – specify keywords for your new shipping method here.
Availability
In this section, you can select a rule created within the Rule Builder. Note that availability rules should determine whether it is possible to use this shipping method or not. For instance, you can apply restrictions per country or product dimensions.

Tax Calculation
This section lets you choose the corresponding tax rate for your shipping method.

Additional Rules and Conditions
The section where you create additional rules and conditions looks as follows:
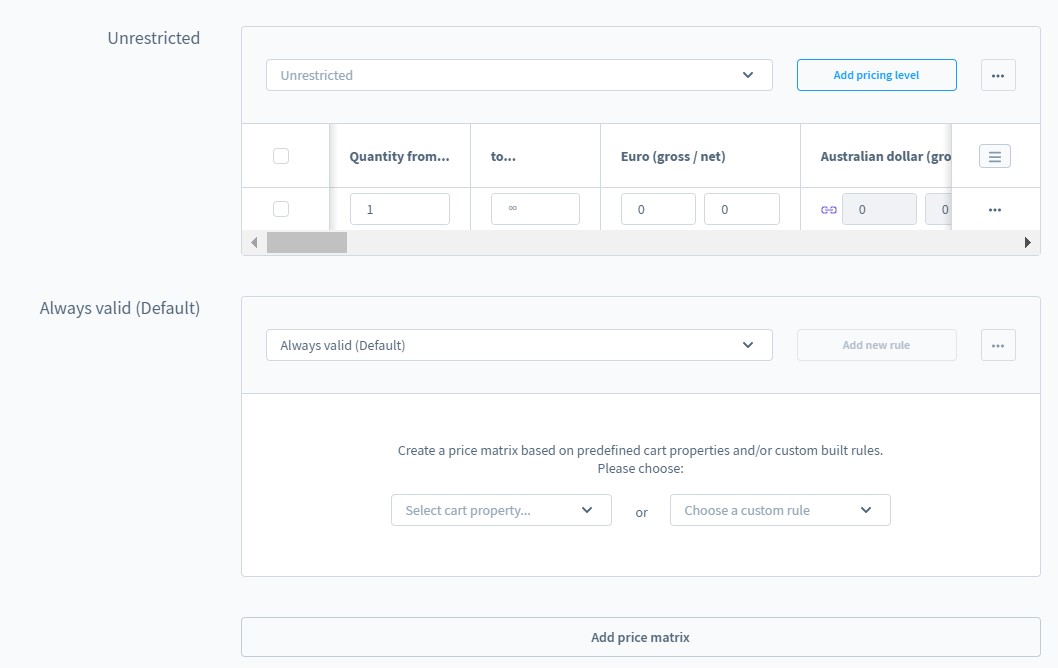
It lets you determine the shipping costs for your new shipping method. Shopware 6 lets you assign price rules in the corresponding matrix.
Firstly, you specify a restriction to this matrix, selecting a rule from the Rule Builder. It is also possible to create a new one at this stage. Note that the price matrix is used only when the condition is fulfilled.
Select no rules to apply the matrix for this shipping method all the time.
The system provides two ways to create the price matrix. It can be based on predefined properties either on rules from the Rule Builder.
After your price matrix is created, you can add an additional rule by clicking the Add pricing level button. The context menu on the right from the button provides the ability to remove or duplicate the complete price matrix.
The main price matrix field lets you select a predefined shopping cart property or an individually created rule as your matrix base.
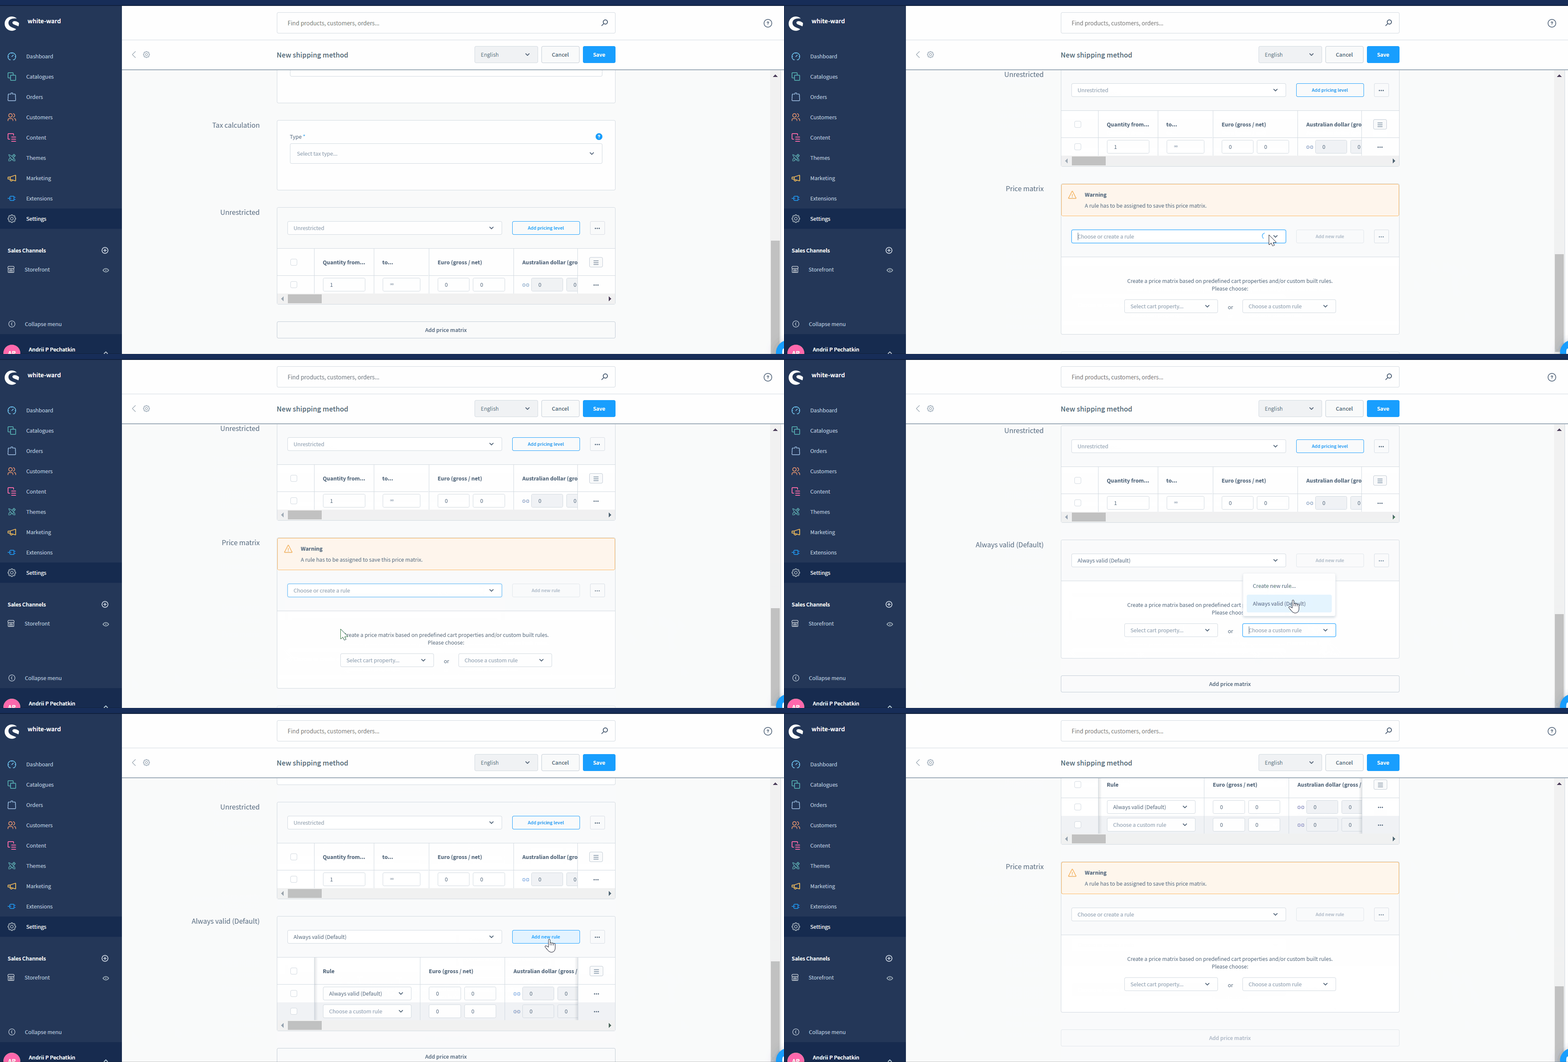
Hit the Add price matrix button to add another matrix to make your shipping method more flexible.
Price matrix by property
Creating a price matrix based on a property lets you leverage the number of positions, shopping cart value, weight, volume, etc. For instance, a price matrix looks as follows:

The system lets you fill the price matrix with as many price rules as your business case requires. In the image above, the first rule is related to a shopping cart value that varies between 0 and 5. The shipping price, in this case, is €4,90. According to the second price rule, all shopping carts with a value of more than 5 are linked to the €3,90 delivery.
Price matrix by rules
Alternatively, you can create a price matrix according to a self-defined rule instead of the given properties.

In the image above, all deliveries to Germany cost €4,90. Shipping to other countries is more expensive – €8,90.
Assign shipping method to a sales channel
Before going any further, you need to assign your new shipping method to a sales channel. Otherwise, customers won’t be able to use it.
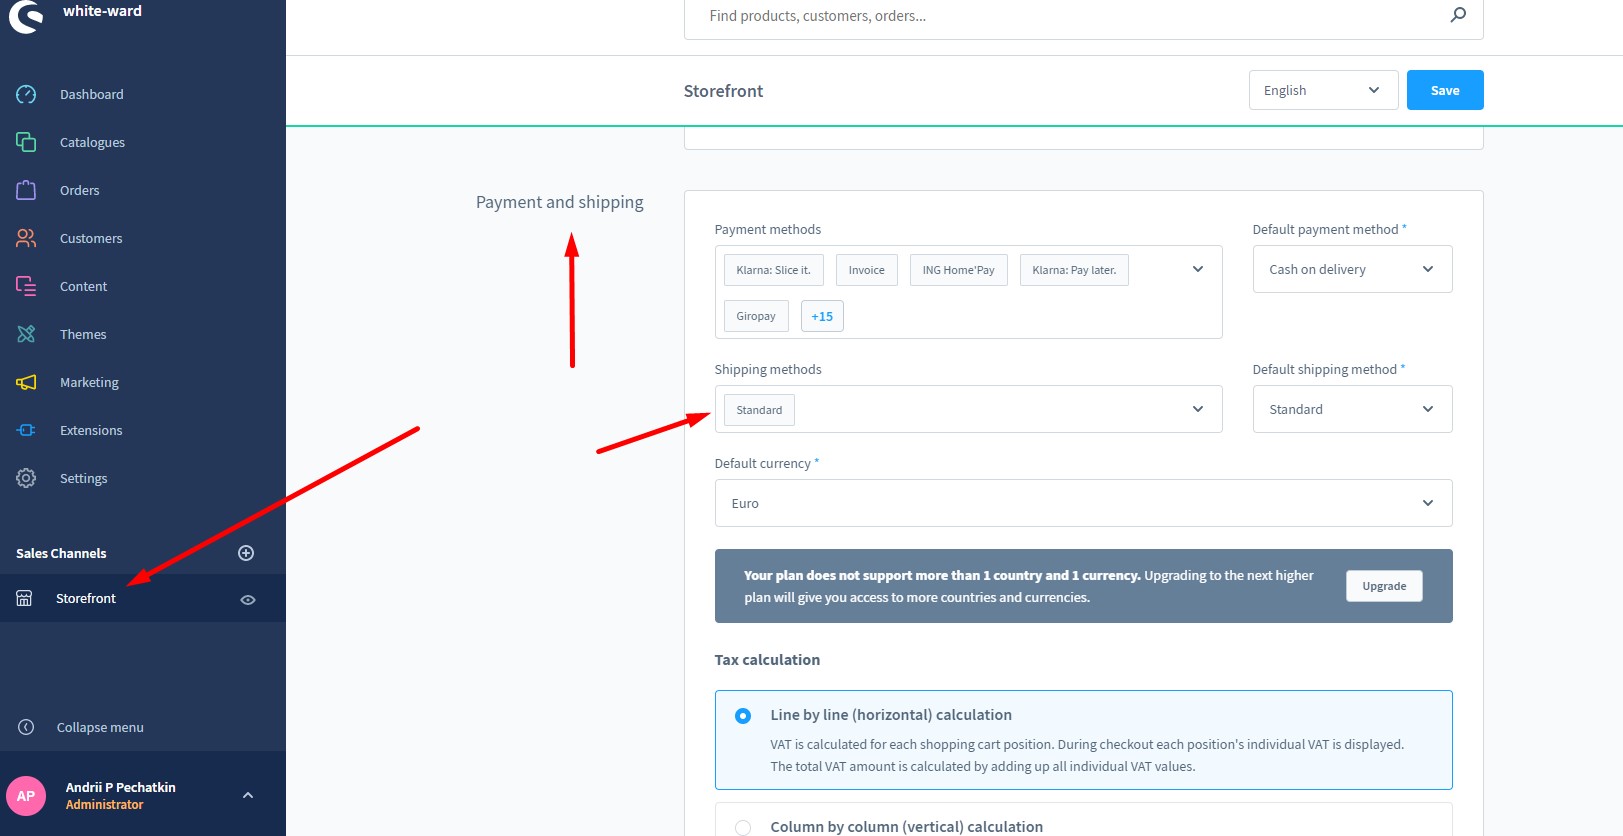
You can find the corresponding option in the general settings of your sales channel under Sales Channel -> General Tab -> Payment and Shipping -> Shipping methods.
How to import Shipping methods to Shopware 6
Although importing shipping methods to Shopware 6 doesn’t make any sense, you may need to transfer the rules necessary for creating flexible shipping conditions. With the help of our team, there is no need to recreate them manually. You can simplify and automate this process with the proper import procedure. Contact our support for more details and try our Improved Import & Export Extension for Shopware. You can use it to import any entity to Shopware 6, including all data related to shipping. The module provides the ability to transfer data automatically according to a schedule. Besides, it lets you create presets to apply changes to imported and exported information so that it becomes suitable for Shopware 6 upon import or the connected system upon export.
Shopware 6 Shipping Settings FAQ
How to find shipping settings in Shopware 6?
The Shopware 6 Shipping settings are situated under Settings -> Shop -> Shipping.
How to edit shipping settings in Shopware 6?
Go to Settings -> Shop -> Shipping and edit your shipping settings here.
How to delete shipping methods in Shopware 6?
Go to Settings -> Shop -> Shipping and delete your shipping methods here.
How to create rule-based shipping methods in Shopware 6?
Go to Settings -> Shop -> Shipping, create a new shipping method and assign a price matrix to it. You can use either a rule-based or property-based price matrix.
How to assign shipping methods to sales channels in Shopware 6?
You can assign a shipping method to a sales channel in the configuration section of your sales channel. Proceed to the Shopping methods section and choose the necessary options there.
Shopware 6 Essentials FAQ
How to create a Shopware account?
You need to get to the registration page to create a Shopware account. Click the Register Now link and fill in the form. After that you will receive a confirmation email. Follow the instructions provided in it.
What about a Shopware ID?
Your Shopware ID is provided during the registration automatically.
How to deal with Shopware master data and what is it?
All the data about your company that you provide to the system is called Shopware 6 master data. It usually contains company physical addresses, phone numbers, emails, etc.
How to add a new Shopware shop?
You can add a new shop in Shopware 6 in your merchant area. You need to choose the type of your new shop and provide the information required by the system. Note that two supported shop types are a cloud storefront and an on-premise installation.
How to add a payment method to your Shopware account?
In Shopware 6, you need to add payment methods for internal purposes under Basic Information -> Accounting. There, it is necessary to specify PayPal, credit card, or direct debit as a preferred way to pay for extensions and themes.
How to create a deposit in Shopware?
Now, when your payment method is activated, you can create a deposit to purchase extensions and themes for your Shopware 6 website. You can do that under Merchant Area -> Shops. Choose a shop to provide funds to and click Open Account Details. Note that the deposit should be equal to the amount of your future purchase.
How to purchase Shopware extensions?
Shopware Marketplace and Plugin Manager introduce two ways to purchase extensions for Shopware 6. In both cases, you need to create a deposit, choose a tool you want to buy, and complete the checkout.
How to get support in Shopware?
Try the following email and phone number – financial.services@shopware.com and +49 2555 9288 510 – if you have questions regarding accounting and financial services. Write to info@shopware.com and call +49 2555 9288 50 regarding account or license issues.
How to automate import and export processes in Shopware 6?
You can automate import and export processes in Shopware 6 with the help of a third-party tool, such as the Improved Import & Export extension for Shopware 6. It is suitable for maintaining recurring data transfers without interaction on the admin side. You get the ability to create schedules to simplify regular data updates. Next, it is possible to launch the corresponding import and export processes according to the specified time frames.
How to migrate to Shopware 6?
The Improved Import & Export module also lets you migrate to Shopware 6. You can move not only from Shopware’s previous versions but also from other e-commerce platforms. Create mapping schemes and connect your new website to other e-commerce systems to transfer data from them. Note that we also offer export solutions for such platforms as Magento and Shopify to lets you seamlessly migrate from them. Contact us for more information.
How to integrate Shopware 6 with external systems?
The Improved Import & Export extension provides the ability to connect your Shopware 6 website to ERPs, CRMs, accounting tools, and other similar platforms. The module automates repetitive import and export processes with the help of schedules and modifies data with the help of mapping presets. Thus, you follow the requirements of your Shopware store during import and the rules of the connected platform during export. No interaction on the admin side is necessary but you need to configure the tool properly.
Get Improved Import & Export for Shopware by Firebear Studio
Explore Shopware
 ‘
‘


