

The article below provides a detailed description of the Invoices screen situated in the depths of the Magento 2 admin. We shed light on how to work with the corresponding grid and individual invoice pages. Besides, you will discover how to import/export invoices in Magento 2 most efficiently.
The Magento 2 Invoices Screen chapter unveils various control elements associated with the corresponding admin page and describes the default Magento 2 Invoices grid. After that, we proceed to an individual invoice view associated with Magento 2. You will also learn how to create Magento 2 invoices, invoice orders, and print invoices. Besides, the article sheds light on how to import and export invoices in Magento 2 with the help of the Improved Import & Export extension.

Table of contents
Magento 2 Invoices Screen
You will discover the Invoices screen under Sales -> Invoices.

Control elements
Now, when you are on the Invoices screen, you can leverage numerous control elements common to the Magento 2 admin.
You have a search field on the top left part of the screen and a dropdown with mass actions below. You can create PDF invoices for multiple grid items simultaneously.

The top right area above the Invoices grid lets you apply filters, switch between grid views, show/hide columns, export grid content, select the number of orders per page and switch between grid pages.

You can use the search field to find invoices by different parameters. Just type a keyword and hit the Enter button.

To apply mass actions to invoices in Magento 2, select ones you want to manage – tick them in the first column manually (you can also choose Select All, Deselect All, Select All on This Page, or Deselect All on This Page from the dropdown in the first column) – and select an action you want to apply from the Actions dropdown:

Now, let’s explore the available filters. The corresponding section lets you narrow down the selection of invoices in the grid. You can specify the following parameters:
- Invoice Date;
- Order Date;
- Grand Total (Base);
- Grand Total (Purchased);
- Purchased From;
- Invoice;
- Order #;
- Bill-to Name;
- Status.

As you can see, filters are based on the available columns, but the Invoices grid includes more elements than we’ve just mentioned. Actually, you can show/hide the following 19 columns:
- Invoice;
- Invoice Date;
- Order #;
- Order Date;
- Bill-to Name;
- Status;
- Grand Total (Base);
- Grand Total (Purchased);
- Purchased From;
- Billing Address;
- Shipping Address;
- Customer Name;
- Email;
- Customer Group;
- Payment Method;
- Shipping Information;
- Subtotal;
- Shipping and Handling;
- Action.

After changing the appearance of the Magento 2 Invoices grid, you can save it as a new view:

The default Magento 2 Invoices grid
Now, let’s explore how the grid with invoices looks by default. It usually consists of the following 9 columns:
- Checkboxes – select orders for mass actions;
- Invoice – you can see an invoice number here;
- Invoice Date – when it was created;
- Order # – a corresponding order number;
- Order Date – when an order was placed;
- Bill-to Name – a name of your customer specified in order details;
- Status – Paid, Pending, or Cancelled;
- Grand Total (Base) – value in the default store currency;
- Grand Total (Purchased) – value in the corresponding store view currency;
- Action – you can view each invoice individually.

Magento 2 Invoice View
Use the last column from the default grid view to see all information specified in each invoice. The data is split between the following sections:
- Order & Account Information;
- Address Information;
- Payment & Shipping Method;
- Items Invoiced;
- Order Total.
In Order & Account Information, you can view order number, date, status, and purchase point. At the same time, the section displays customer name, email, and group.

Address Information contains shipping and billing addresses. You can view and edit them.

In the Payment & Shipping Method section, you can find the corresponding data.

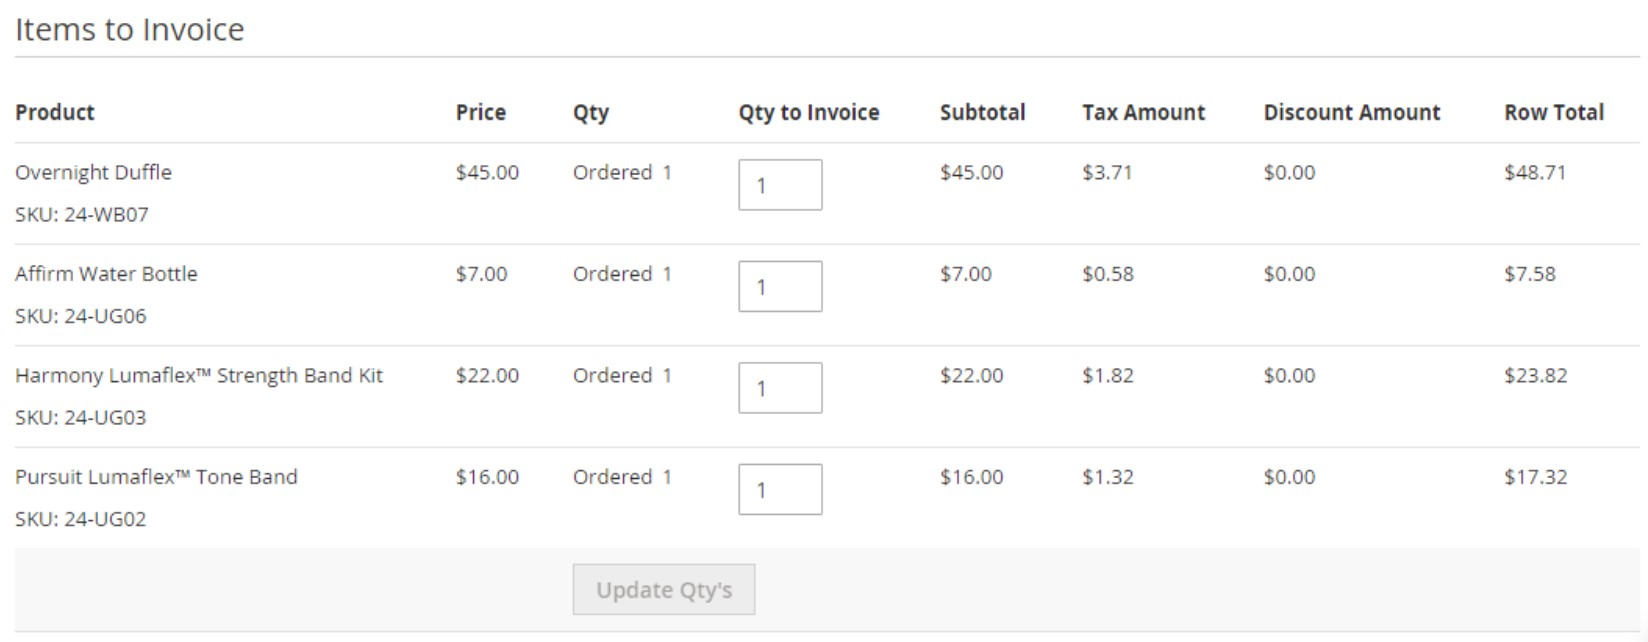
The Items Invoiced section shows purchased products including their name, SKU, attributes, price, quantity, subtotal, tax, discount, and order total.

In Order Total, it is possible to add comments, notify customers about them, or enable/disable their visibility on the frontend. At the same time, invoice totals are displayed here: subtotal, shipping & handling, tax, and grand total.

How to create a Magento 2 invoice
Note that creating an invoice for an order is an unstoppable process. It converts the temporary sales order into a permanent record of the order. Yes, you cannot cancel it.
A new invoice page has an appearance similar to a completed order. However, some additional fields are added. Every order-related activity is noted in the invoice’s Comments section.
Depending on the payment methods, Magento 2 offers several ways invoices are created. Usually, orders are invoiced and shipped after payment is received. But in the case of purchase orders, you can generate an invoice before payment is received. The system lets you generate an invoice with a packing slip. Besides, you can get shipping labels from your carrier account. Also, note that a single order can be divided into partial shipments. In their turn, these shipments are invoiced separately, if necessary.
Magento 2 lets you invoice all items automatically. The corresponding opportunity appears when the state of a new order is set to “Processing:” the configuration section includes the “Automatically Invoice All Items” then. To print an invoice, you have to generate it for an order.
Invoice an order
- Go to Admin -> Sales -> Orders.
- Filter out all orders with the Processing status. Select the one you want to invoice: click View in the Action column.
- There is the Invoice option in the header of the sales order. However, it doesn’t appear if the payment method is set to Authorize and Capture.
- You can also generate a packing slip for the shipment if the items are ready to ship:
- Go to the Shipping Information section and click the Create Shipment checkbox.
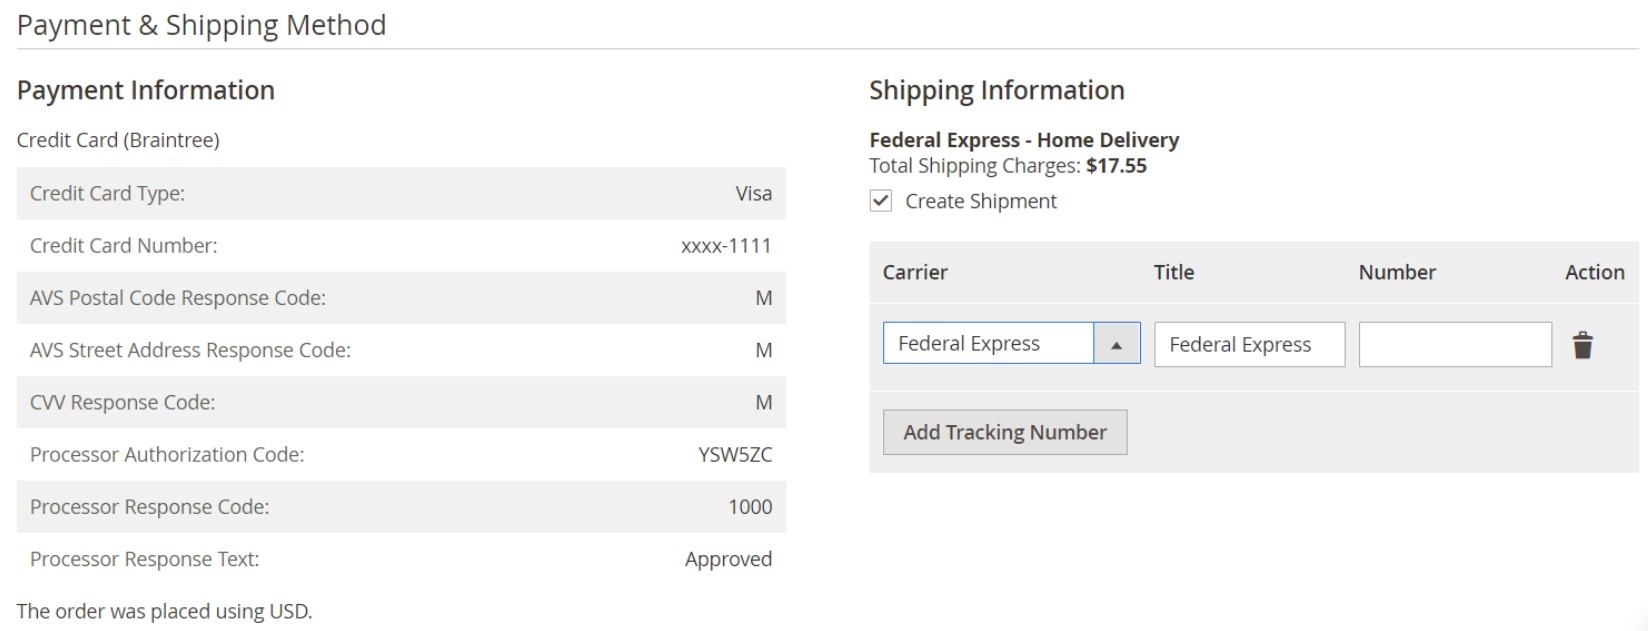
- To include a tracking number, hit the Add Tracking Number button and enter tracking details: Carrier, Title, and Number.
- To generate a partial invoice, go the Items to Invoice section. Here, you can update the Qty to Invoice column so that it includes specific items in the invoice.
- Go to the Shipping Information section and click the Create Shipment checkbox.
- Note that you have to set Amount to the appropriate option if an online payment method was used for the order.
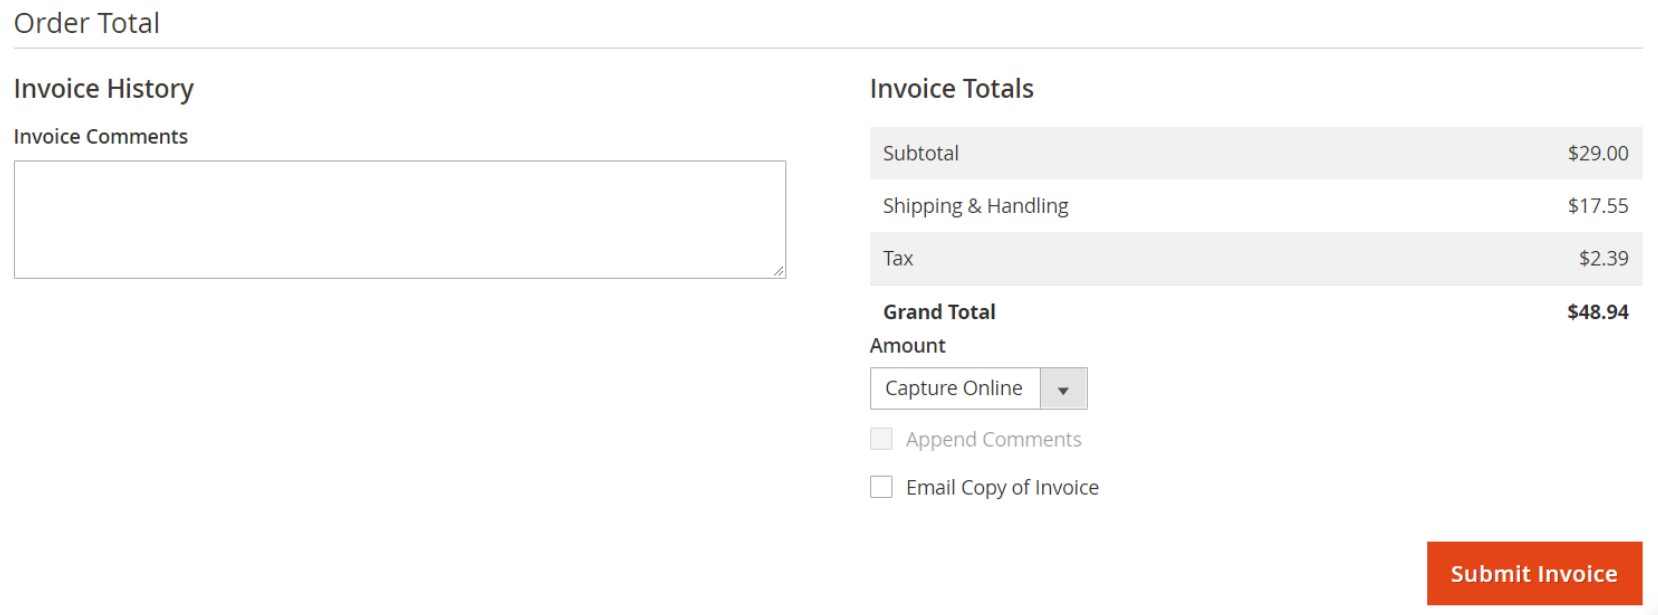
- You can enable a customer notification by selecting the Email Copy of Invoice checkbox or adding Invoice Comments (mark the Append Comments checkbox).
- Submit the invoice by clicking the corresponding button at the bottom of the page. This action will change the order status from Pending to Complete.


How to print the invoice
- Go to the top of the workspace and click the Print option to generate a PDF version of the invoice.
- Save it as a file or print the invoice.

For further information, check the official documentation: Creating an Invoice in Magento 2.
How to Import Invoices to Magento 2
You can import invoices to Magento 2 using the Improved Import & Export extension. The module provides better opportunities than the default data transfer solution since it supports numerous file formats and connection points, lets you apply mapping presets, and automated data synchronization with the help of schedules. We will describe its benefits in a separate section below. Now, let’s figure out how to import invoices to Magento 2.
Go to System->Improved Import/Export->Import Jobs and hit the “Add New Job” button.

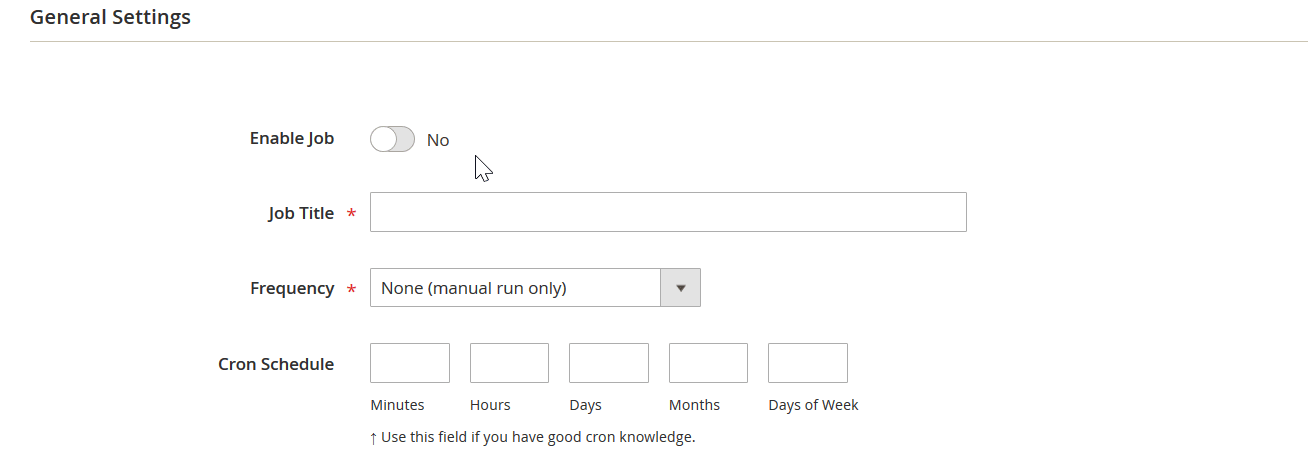
In General Settings, enable the job, specify its title, choose the manual run frequency, select a language (locale), and enable/disable the following features depending on your business needs:
- Generate Unique Url if Duplicate;
- Re-Index after Import;
- Send email from new tracks.

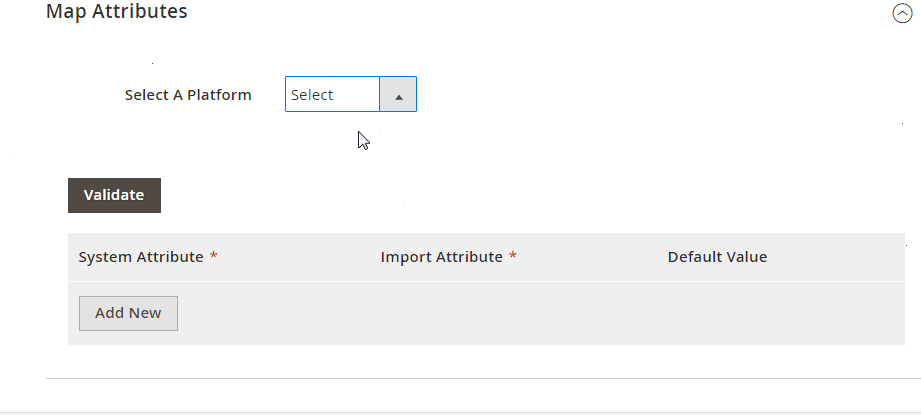
In Import Settings, enable/disable API depending on your needs, choose Orders in the Entity dropdown (the extension will import invoices to Magento 2 as a part of your orders file), and select a platform to apply a mapping preset.

In Import Behavior, select Add/Update from the dropdown, choose a validation strategy, specify the maximum possible number of errors, and type separators.

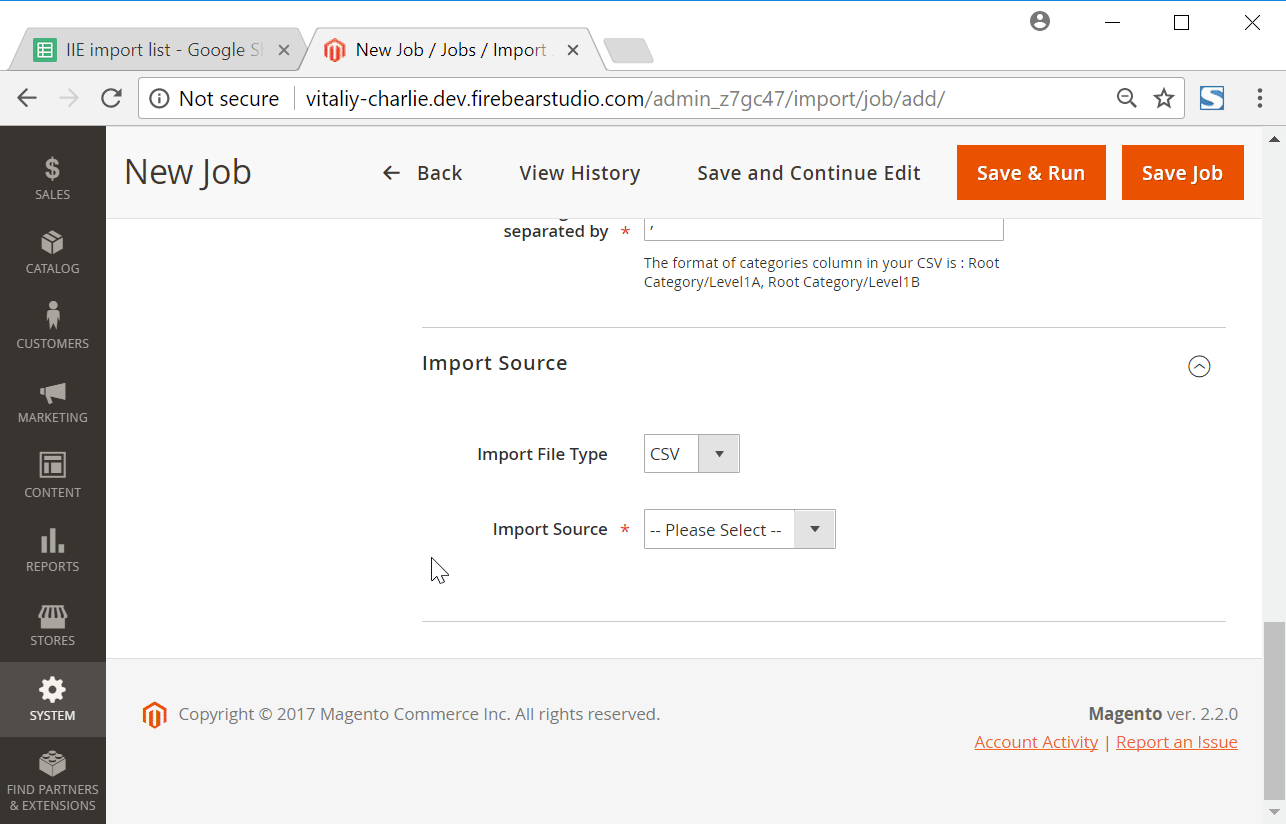
In Import Source, select CSV as your import file type (or choose another standard if your data file is not CSV). Next, specify your import source. You can import a data file from a server, Dropbox account, URL, or upload it directly. In the case of Dropbox, specify a file path, access token, and remote images directory.

And don’t forget to validate the data file with invoices. If it contains attributes that are not supported by Magento 2, you can apply mapping.
To start importing invoices to Magento 2, hit “Save & Run” in the top right corner of the screen. For further information about invoice import in Magento 2, follow the link below and contact our support:
Get Improved Import & Export Magento 2 Extension
How to Export Invoices From Magento 2
To export invoices from Magento 2, we also recommend using the Improved Import & Export Magento 2 extension. This module not only automates the default invoice export process but also lets you eliminate manual data files modification. Let’s imagine that you need to provide an accounting system with invoices on a daily basis. Follow these steps to achieve your goal:
Go to System->Improved Import/Export->Export Jobs and hit the “Add New Job” button.

In General Settings, enable the job, type its title, and select a frequency (every day at 3:00am). Choose a local file language and divide additional attributes if necessary.

In Export Settings, select Order from the Entity dropdown and enable Consecutive Export.

In Export Behavior, select a format of your export file (your accounting system should support this format) and choose order entities that should be provided to the external platform – invoices.

In Export source, specify where your invoices should be transferred to. You can select FTP, SFTP, or a data file as a destination. Check the connection before going any further.

Next, you can map attributes and add filters to provide the external system with the exact data it needs.

To start the export process, hit “Save & Run” in the top right corner of the screen. For further information about invoice export in Magento 2, follow the link below and contact our support:
Get Improved Import & Export Magento 2 Extension
Improved Import & Export Features

Now, let’s pay a little bit more attention to the features of the Improved Import & Export extension. The tool is designed to turn your Magento 2 admin into a central hub where you control all integrations; therefore, it is much more potent than any import/export solution currently available on the market. Even the default transfer tools of Magento 2 Commerce don’t offer anything similar.
The extension provides several ways of moving invoice data to and from your e-commerce website, including a direct connection between two systems. As an admin, you can manage all integrations right in the backend interface. And as it was mentioned above, the plugin allows automating all invoice import and export processes in Magento 2. Let’s start the exploration with this feature.
Automated Import & Export Processes
The Improved Import & Export Magento 2 extension offers two different ways of automated invoice data import and export: schedules and event-based triggers. The principle behind both mechanisms is described below. You only have to configure your import/export job, and the extension does everything for you. Let’s see how schedules work.
Schedules
With the Improved Import & Export Magento 2 extension, you can use the default cron syntax to create export schedules moving Magento 2 invoices to a remote platform. The module provides the ability to specify any custom intervals so that you can create a schedule suitable for your specific business needs. At the same time, you can select one of the predefined intervals which are also fully customizable. And don’t forget about the opportunity to create import and export profiles which have no schedules. If you only need to move data once, there is no need to schedule the profile.
Another cool feature related to schedules is the ability to launch every profile manually. For instance, you need to transfer invoices to an external accounting system every day at 6 PM, but no orders have been placed yet. If the first order has been placed after 6 PM, you can easily move it to an eternal system manually transferring all the related invoices.
Events
Event-based triggers represent the second way of automating data transfers in Magento 2. The Improved Import & Export extension enables real-time updates based on them. Create and configure a trigger specifying conditions to synchronize two systems right after a certain action takes place. For further information, check this article: How to Run Magento 2 Import or Export After Specific System Event or Process.
Advanced Mapping Features
The following chapter discusses another important aspect of the Improved Import & Export Magento 2 extension – the ability to solve problems caused by different attribute standards. Our module provides several exclusive mapping features that dramatically simplify the way you import and export invoices in Magento 2
Mapping Presets
The Improved Import & Export Magento 2 extension offers a very straightforward way of matching external attributes to ones used internally. You get a series of mapping presets – predefined mapping schemes that provide the ability to implement attribute matching in a few clicks. After creating and configuring a new job, choose a suitable preset in the mapping section of your new profile. Next, the Improved Import & Export Magento 2 extension will do all the work for you.
Instead of figuring out what third-party attributes are utilized in your invoice file, you let our module analyze the input data and match all third-party designations to the internal ones. Any manual interactions with data files are eliminated. Here is how everything happens in the admin:
Matching Interface
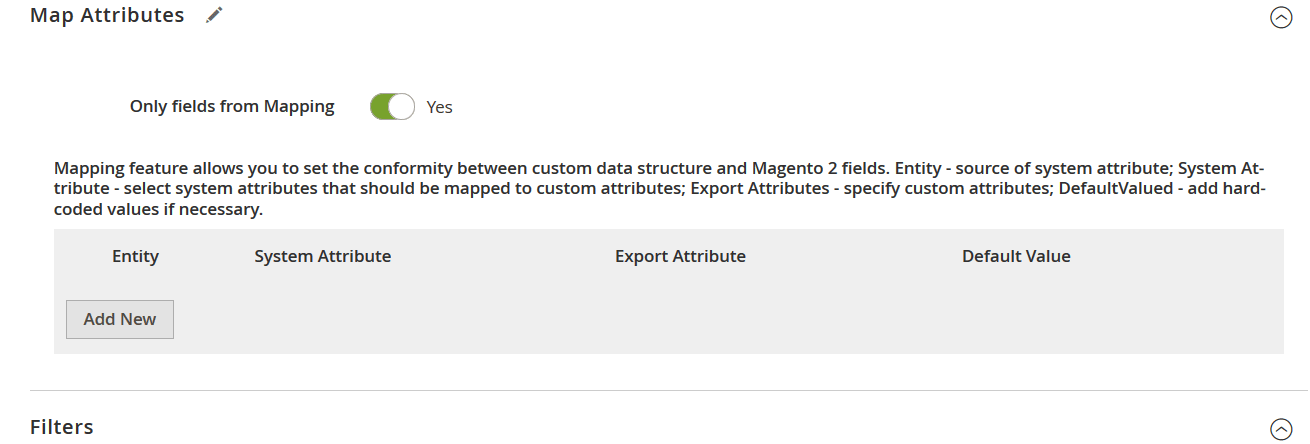
If there is no preset suitable for your integration or you want to make an import/export file suitable for third-party requirements manually, utilize the matching interface of the Improved Import & Export Magento 2 extension. It lets you map attributes by yourself in the admin. Select an entity, choose a system attribute and specify the corresponding external one in front of it as shown below:
In the grid above, there is also the third column – “Default Value” – where you can specify hardcoded (default) values, which are attribute values automatically provided to every item related to the attribute. It is handy when, for instance, you import products from multiple store views to a single one.
Filters
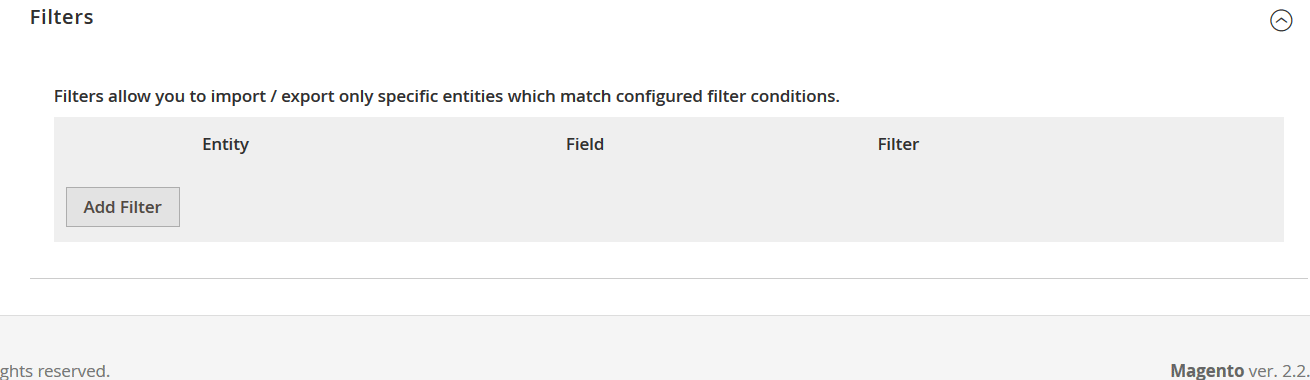
Now when you know how to apply mapping and use hardcoded (default) values, we’d like to describe another feature that lets you export Magento 2 invoices to a remote system – filters. Follow these steps to master the tool:
- Click the ‘Add Filter’ button;
- Select an entity;
- Select a system attribute that will be used as a basis of a new filter;
- Specify parameters applied for filtering;
- Repeat the previous steps to create more filters.
Note that parameters applied for filtering vary, depending on the chosen attribute. Everything is simple and intuitive:
Attribute Values Mapping
Besides, the Improved Import & Export Magento 2 extension provides the ability to match attribute values. Since incorrect values may prevent import processes or may not be accepted by third-party systems, it is essential to replace all unsupported designations with the proper ones. As you might have already guessed, the default Magento tools don’t let you do that.
As for our plugin, it offers an interface similar to the one we’ve just described above. Choose a third-party designation and specify a corresponding internal one in front of it. Repeat matching until no external values are left. For further information, read this article: Attribute Values Mapping.
Attribute Values Editing
The Improved Import & Export Magento 2 module lets you not only map attribute values but also edit them in bulk via the following rules:
- Add a prefix to multiple attribute values;
- Add a suffix to multiple attribute values;
- Split multiple attribute values;
- Merge multiple attribute values.
Note that the module provides the ability to create various conditions to increase the efficiency of editing. For further information, check this article: How to Modify Attribute Values During Import and Export in Magento 2.
Category Mapping
Another feature of the Improved Import & Export Magento 2 extension that simplifies the way you import data from any source is category mapping. It is especially useful when you transfer data from third-party catalogs that have a unique structure. The module provides the ability to match external product categories to ones used internally as follows:
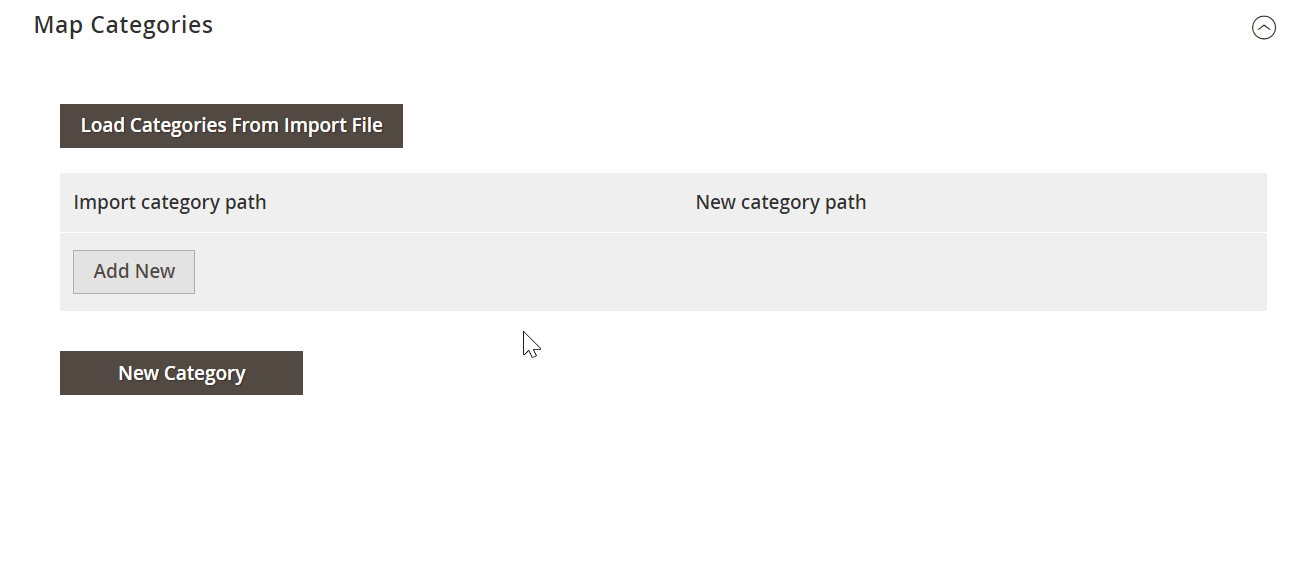
And you can create new categories on the fly. Both features are described here: Category Mapping.
Attributes On The Fly
Another feature that dramatically simplifies import processes is the ability to create attributes on the fly. If an update file doesn’t include all the required data, our module allows using the following general form to specify all parameters used to get all missing attributes automatically:
Attribute|attribute_property_name:attribute_property_value|…
The procedure is described in more detail here: Product attributes import.
Extended Connectivity Options
As mentioned above, the Improved Import & Export Magento 2 extension allows extending the default opportunities related to data transfers. Our module offers a bunch of extended connectivity options described below.
Multiple File Standards
The Improved Import & Export Magento 2 extension lets you import and export invoices and other data with the help of the default CSV format as well as XML, JSON, ODS, and Excel. Thus, the necessity to convert files of these standards into CSV and vice versa is completely eliminated!
Multiple File Sources
And the vital improvement that enables extended invoice file import/export in Magento 2 is support for multiple sources:
- FTP/SFTP. Transfer data files using a local or remote server.
- Dropbox. Use a Dropbox account to establish a connection between the two systems. Alternatively, you can rely on Box, OneDrive, Google Drive, iCloud, and Amazon Drive.
- URL. A direct URL can be used to import a data file as well.
In case an update file is compressed, the Improved Import & Export Magento 2 extension will extract it automatically!

Alternative Ways of Import & Export
The alternative ways of import and export, which are not represented in Magento 2, include data transfers via API and intermediary services.
The Improved Import & Export extension provides the ability to leverage REST other APIs (SOAP and GraphQL) to import and export invoices between Magento 2 and any external systems.
As for the intermediary services, they are Google Sheets, Office 365 Excel, and Zoho Sheet. The following image shows how to use Google Sheets to move data to Magento 2:
Another important feature is support for WSDL and WADL.
The video below displays other details of our extension:
[embedded content]
Get Improved Import & Export Magento 2 Extension
Final Words
Working with invoices in Magento 2 is not a problem. Due to a user-friendly and intuitive admin interface, everyone can master this part of daily e-commerce duties. As a store administrator, you can easily convert orders into invoices, print the documents, as well as import and export them.
Invoice Import & Export FAQ
Let’s take a look at other nuances of importing and exporting invoices in Magento 2 with the help of the Improved Import & Export Magento 2 extension.
How to import and export invoices to Magento 2 automatically?
It is possible to import invoices to Magento 2 automatically on a regular basis with Improved Import & Export. The default import and export tools don’t support automation unless you use Adobe Commerce. Our extension in its turn utilizes a cron scheduler to automate these and other data transfers. As a store admin, you get the ability to import and export invoices between Magento 2 and external destinations automatically after specifying a schedule of updates.
How to import invoices with third-party attributes to Magento 2?
Magento 2 doesn’t let you import data that doesn’t follow its requirements. However, you can avoid the existing limitations with the Improved Import & Export plugin. If a table with invoices contains third-party attributes, you no longer need to edit it manually. Our module lets you create a mapping scheme where you match third-party attributes and values to ones used within Magento 2. As a result, any external data, including invoices, is easily adapted to the native Magento 2 standards. When it comes to export processes, you can also apply mapping to them, creating the output your partners require.
How to import and export invoices to Magento 2 via API?
You can transfer invoices along with other documents and entities via API with the help of the Improved Import & Export Magento 2 module. Create API connections for transferring data to and from Magento 2 straight in the module’s import/export jobs. Specify the parameters necessary to sync the two systems right there. Create a schedule to automate the synchronization. Also, you can map attributes and apply other features to simplify the API-based integration.
How to import and export invoices to Magento 2 via ODS files?
It is not a secret that Magento 2 works with CSV files only. However, you can still move invoices in ODS files or export data using this format since the Improved Import & Export module supports it along with a bunch of other standards.
How to import and export invoices to Magento 2 via XLSX files?
While Magento 2 transfers only CSV files, you can still move invoices in XLSX files or export data using this format since the Improved Import & Export module supports a bunch of standards in addition to the default one.
How to import and export invoices to Magento 2 via JSON files?
You can move invoices via JSON files or export data using this format since the Improved Import & Export module supports a bunch of standards along with CSV.
How to import invoices to Magento 2 via compressed files?
If your invoices are compressed as ZIP or TAR archives, use the Improved Import & Export module to transfer them to Magento 2. Remember that your file archive should contain CSV, XML, ODS, JSON, or XLSX.
How to import invoices to Magento 2 from Google Sheets?
You can use the Improved Import & Export extension to import invoices from Google Sheets to your e-commerce website. It is only necessary to specify the address of the corresponding table. You can also export invoices from Magento 2 to Google Sheets with the help of our module.
How to import and export invoices between Magento 2 and Dropbox?
The Improved Import & Export extension provides the ability to transfer invoices between Magento 2 and Dropbox. You can transfer CSV, JSON, XML, ODS, or XLSX files or ZIP and TAR archives.
How to import and export invoices between Magento 2 and Google Drive?
Google Sheets and Dropbox are not the only exchange points the Improved Import & Export extension supports. It also lets you import and export invoices between Magento 2 and Google Drive. You should use CSV, JSON, XML, ODS, or XLSX files and ZIP or TAR archives.


