In the following article, you will find everything about Magento 2 shared catalogs. It is a guide dedicated to this B2B entity where we also explore various associated management processes. You will find out what Magento 2 shared catalogs are, how to create shared catalogs, what the nuances of sharing are, and how to import and export shared catalogs in Magento 2. The entity has huge potential for B2B merchants; however, if you don’t know how to manage shared catalogs you will probably waste it. Therefore, arm yourself with patience and peruse this guide. If you don’t know how to import or export shared catalogs between your Magento 2 store and an external e-commerce website, you’ve come to the right place. But let’s first define what shared catalogs are.

Table of contents
As you might have already guessed, shared catalogs are a B2B feature. When you want to share a discount with one of your partners while others should not know about it, this Magento 2 instrument comes in handy.
As a Magento 2 administrator, you get the ability to set special rules – custom pricing – for different companies/groups of users including the visibility of categories and products. Such, you can have different product catalogs available for different customer groups/companies.
Magento 2 offers two types of shared catalogs: Public and Custom. While the former is the default shared catalog displayed at the storefront to guests and not-logged-in customers, the latter is visible to assigned users associated with a special company only.
A Public shared catalog is created during the B2B installation automatically. Note that Magento 2 allows you to have only one public shared catalog unlike Custom shared catalogs which number is unlimited. And, as you might have already guessed, it is possible to assign Custom catalogs to specific companies.
First of all, you need to have Magento 2 B2B extension installed on your Magento 2 instance. The good news is that the B2B extension is available free of charge, however only to Magento 2 Commerce/Cloud users.
It is also necessary to mention that you can still have a master catalog in addition to the Shared one. If the latter is enabled, the original master catalog continues to be visible from the Admin only. As for the frontend appearance of your e-commerce store, the system displays the Public shared catalog instead.
To access your Magento 2 shared catalog, you should go to the Shared Catalogs grid. All shared catalogs that are currently in existence are displayed here. Besides, multiple dedicated tools are available here as well. Check the appearance of the Shared Catalog grid:
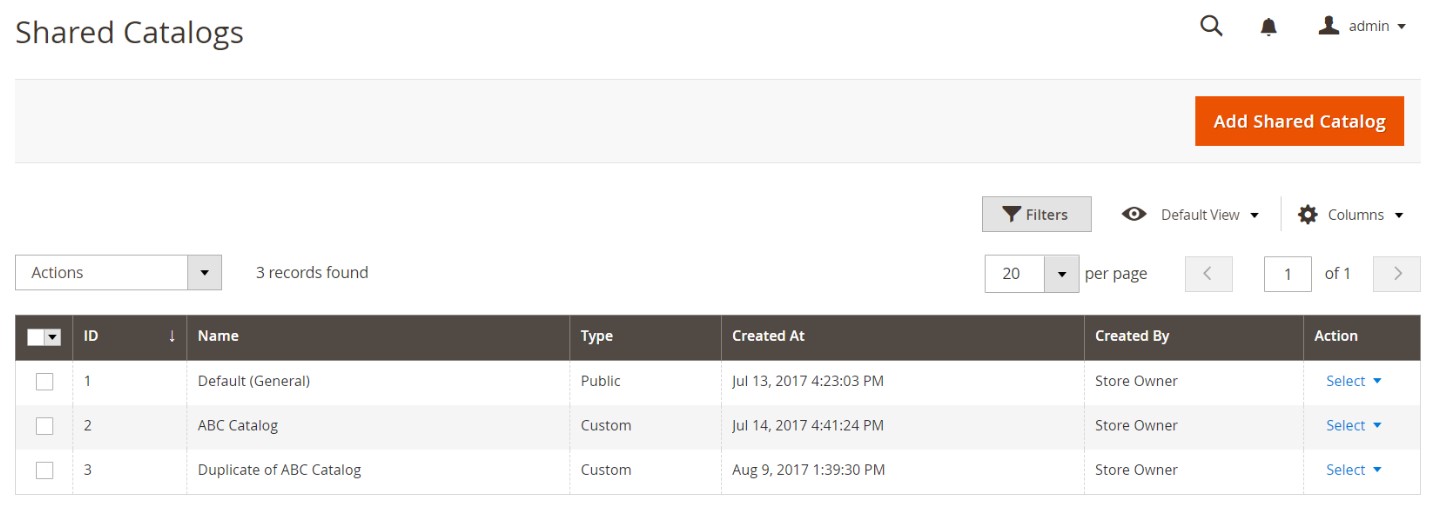
The Shared Catalogs page is available under Admin Sidebar -> Catalog -> Choose Shared Catalogs.
Magento 2 offers two ways to create a custom shared catalog: add or duplicate. Note that a newly created catalog includes no products. Furthermore, it is not assigned to any partners.
When you create a custom shared catalog, the system automatically generates a new customer group by the same name. As a result, you should assign customers (your partners) to the newly created customer group to share the catalog with them.
Unlike a newly created shared custom catalog which does not include products, custom pricing, or company associations, the public one is automatically assigned to guests and customers who are not associated with a company.
When you create a new custom shared catalog, set up the following parameters:
- Catalog Scope
- Product Selection
- Custom Prices
- Company Assignment(s)
Follow these steps to create a custom shared catalog:
- Under Admin Sidebar -> Shared Catalogs, tap ‘Add a Shared Catalog’ in the upper-right corner.
- Enter a new shared catalog name which will be displayed throughout the Admin and customer dashboard as well as assigned to a newly created customer group.
- Set Type to “Custom.”
- Choose the appropriate Customer Tax Class.
- When complete, tap Save.
That’s it! 5 small steps – and you’ve enabled the robust B2B feature without installing any third-party modules! Now, you can find the new catalog in the Shared Catalogs grid.
When you duplicate an existing shared catalog, it is named “Duplicate of” the original catalog by default. The created copy retains the pricing model and structure of the original except the company associations. Even a new customer group is created, which gets the same name as the duplicate catalog. Also, note that when you duplicate a public shared catalog, its type changes to “custom.”
To duplicate an existing shared catalog, you have to follow the steps below:
- Go to Admin Sidebar -> Catalog -> Shared Catalogs.
- In the Action column of the grid, choose General Settings.
- Tap Duplicate.
- Update the following parameters of the catalog: Name, Type, Customer Tax Class, Description.
- Duplicate Shared Catalog
- Tap Save when complete.
You can find the new catalog in the Shared Catalogs grid with a unique ID. Now, configure the appropriate product selection, company assignments, and category permissions.

Unfortunately, it is impossible to import, and export shared catalogs in Magento 2 by default. But you can always rely on third-party modules that extend the default functionality of our favorite e-commerce platform. Therefore, we’d like to introduce you to the Improved Import & Export Magento 2 extension with B2B Add-On – your number one time saver when it comes to all possible data transfers.
The plugin provides the ability to move most Magento 2 entities including shared catalogs. If you don’t want to spend time on recreating them on your new website, give our extension a try.
To import a Magento 2 shared catalog, follow these steps:
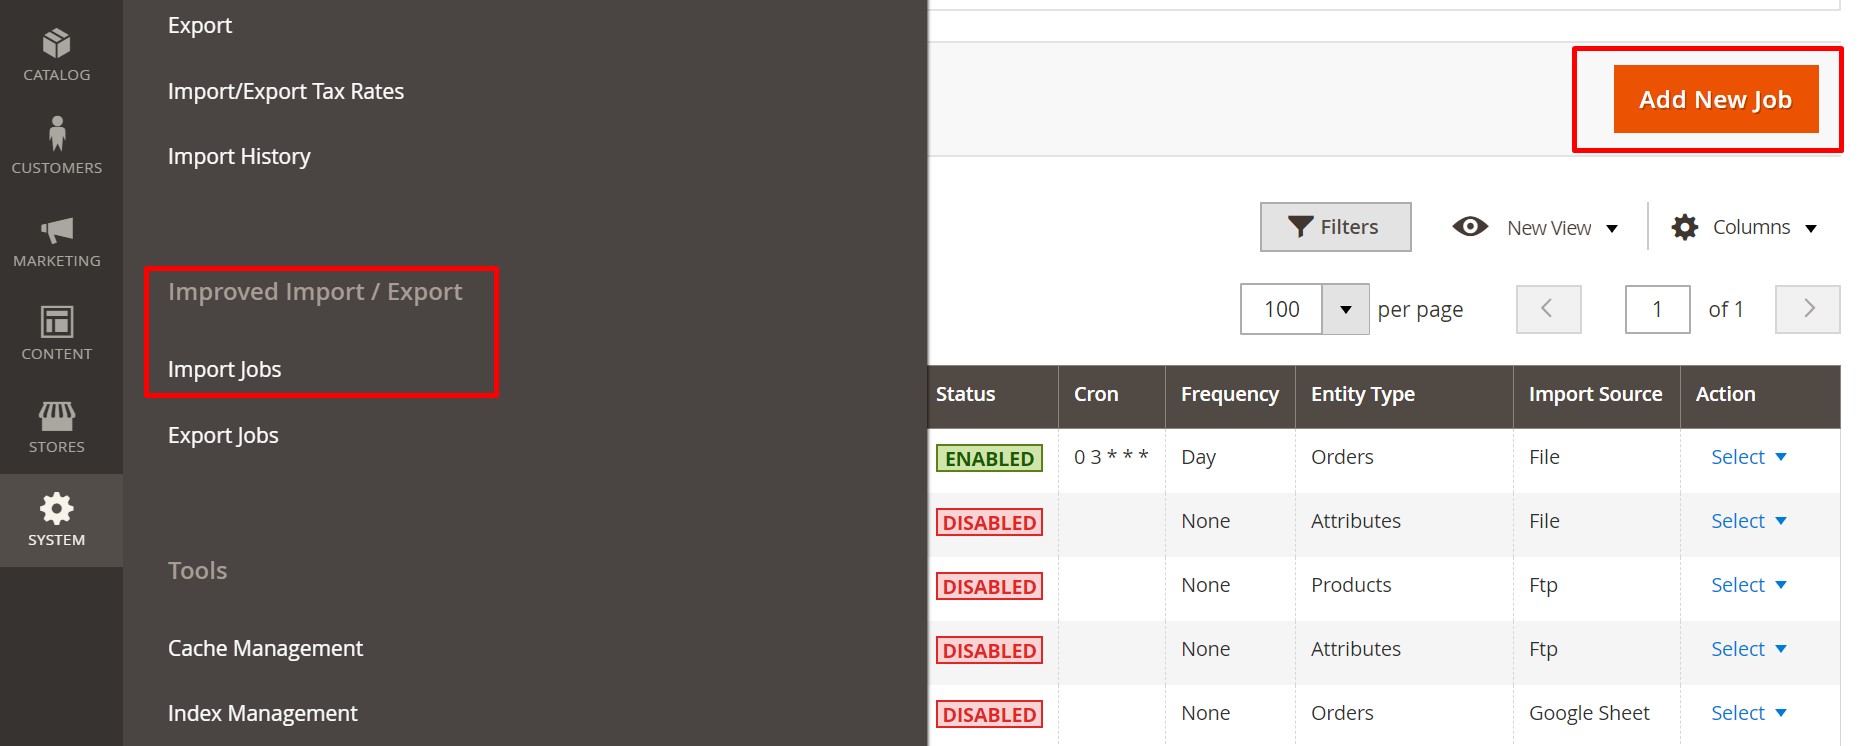
- Under System -> Improved Import / Export -> Import Jobs, hit the Add New Job button.
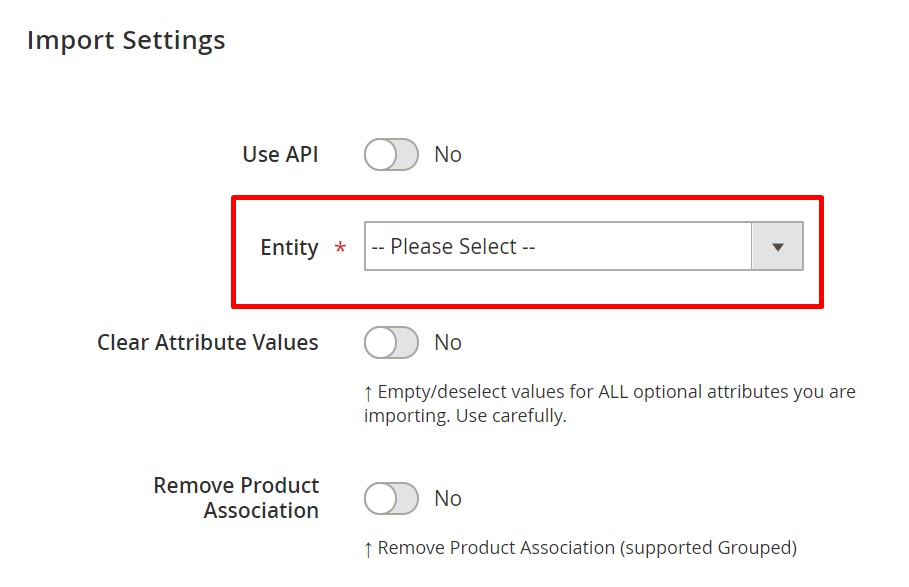
- Configure General Settings and proceed to the Import Settings section. Here, you can select Shared Catalog in the Entity drop-down.
- When the job is configured, save it and run the update.
As for the Magento 2 shared catalogs export, you can configure it under System -> Improved Import / Export -> Export Jobs doing similar actions.
For further information about import and export jobs, follow the link below. You can contact our support, read the extension’s manual, or explore other materials:
Get Improved Import & Export Magento 2 Extension
If you require extensive instructions on how to import or export Magento 2 Shared Catalogs – read our dedicated Magento 2 B2B import/export blog post. In this post you will find every Shared Catalog attribute described with sample values and sample import tables you can start your import with.
Firebear team has also composed a dedicated Google Sheet B2B Master Table where you can find the sample table for shared catalogs.
Get sample Magento 2 shared catalog table with all attributes
Improved Import & Export Features
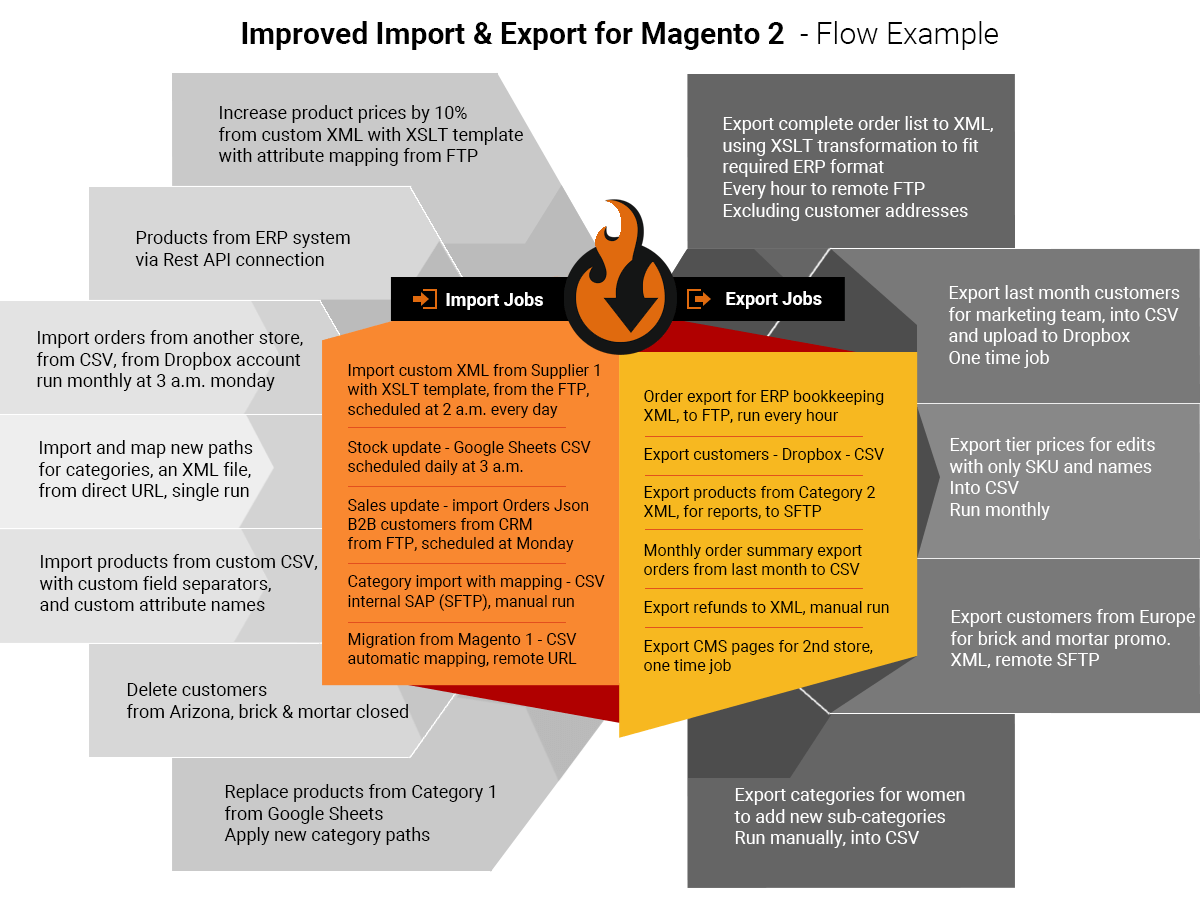
Now, when you know how to import and export Magento 2 shared catalogs, we should also draw your attention to other features of the Improved Import & Export extension. Our module will help you automate all data transfers, solve problems caused by different attribute standards, and match external categories to ones used in your database, but let’s take a look at the extended connectivity options provided by the plugin first.
Extended Connectivity Options
The Improved Import & Export module dramatically extends the native Magento 2 connectivity standards that are quite limited. By default, the platform lets you import and export information with the help of CSV files only. Our extension not only supports multiple more file formats but enables you to use other ways of transferring data.
Multiple File Standards
Since the Magento platform bounds you to CSV files only, you should always convert other formats to this standard to make import processes possible. And the opposite procedure is necessary when you export data to external platforms which don’t work with CSV files.
As for the Improved Import & Export Magento 2 extension, it entirely solves the problem extending the number of supported standards. In addition to CSV, our module offers the ability to use XML, JSON, ODS, and Excel files.
Note that all standards are equally supported so that you can apply all features of the Improved Import & Export extension despite the chosen file format.
Multiple File Sources
In addition to multiple file formats, the Improved Import & Export Magento 2 extension also offers several file sources. You can exchange data files using the following connection points:
- FTP/SFTP. Use a local or remote server to exchange data between your e-commerce website and an external platform.
- Dropbox. As for an alternative replacement, it is a Dropbox account that can be utilized for the same purpose.
- URL. When it comes to import processes only, use a direct URL address.
Besides, the Improved Import & Export Magento 2 extension unpacks compressed data automatically, so that you can freely import archives with data files right into your store.

Direct Connections
But data files are not the most flexible way of integration. They are not flexible at all and has many limitations. Instead, you can use direct API connections with the Improved Import & Export Magento 2 extension. Thus, our module provides the ability to connect to an external system directly. To build a bridge between two systems, our module lets you use REST, SOAP, or GraphQL APIs.
Intermediary Services
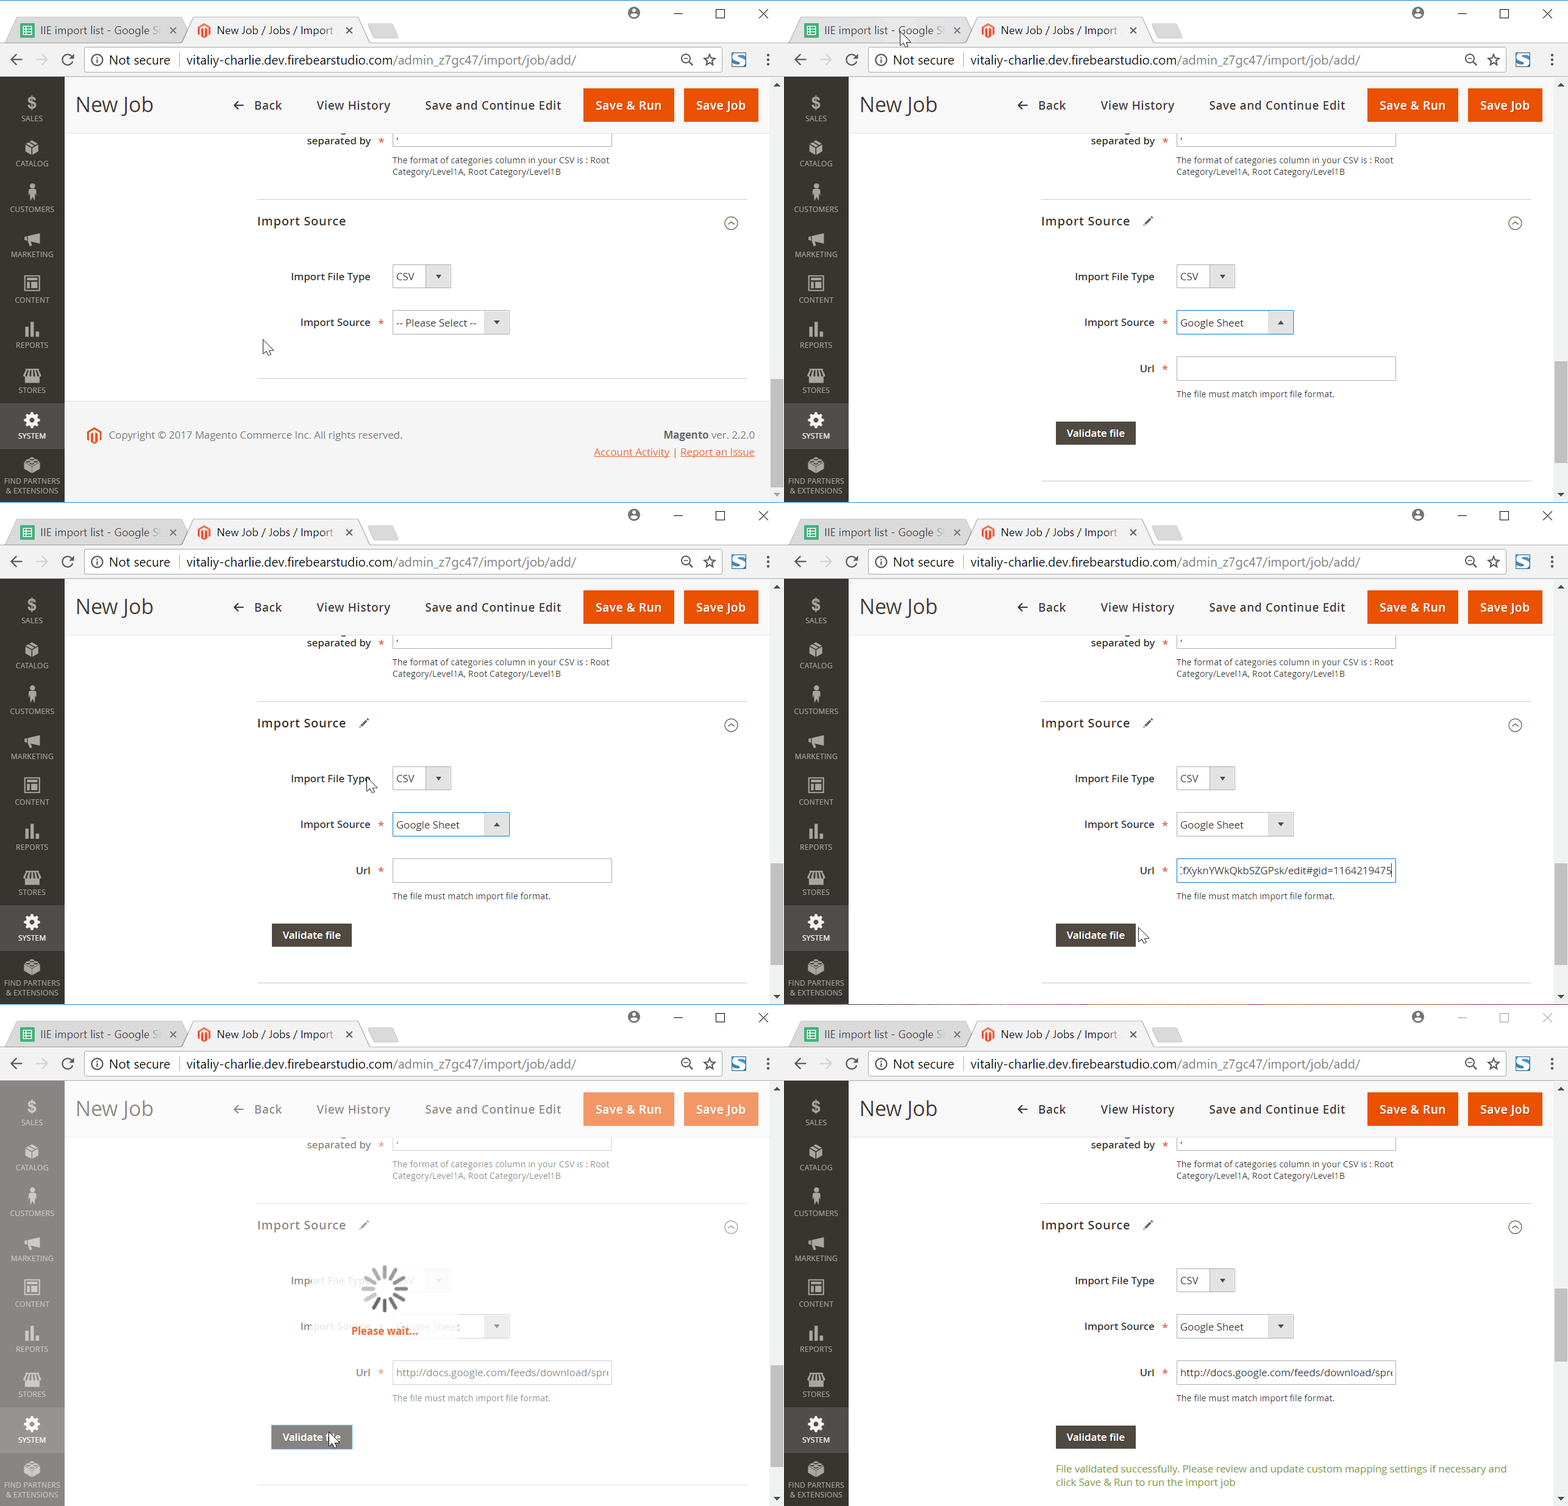
In addition to files and APIs, the Improved Import & Export Magento 2 extension allows using various intermediary services such as online sheets. If neither API connections nor file transfers are helpful, rely on this connection type. Currently, our plugin supports the three following platforms: Google Sheets, Office 365 Excel, or Zoho Sheet. Below, you can see how to transfer data using Google’s solution:
Automated Import & Export Processes
To improve your daily duties and release some additional free time, the Improved Import & Export Magento 2 module lets you automate all data transfers. Instead of relaunching import and export processes every time a new update is provided or required, let our module do everything for you. The extension offers two different ways of automation: schedules or event-based triggers. Let’s explore each feature separately.
Schedules
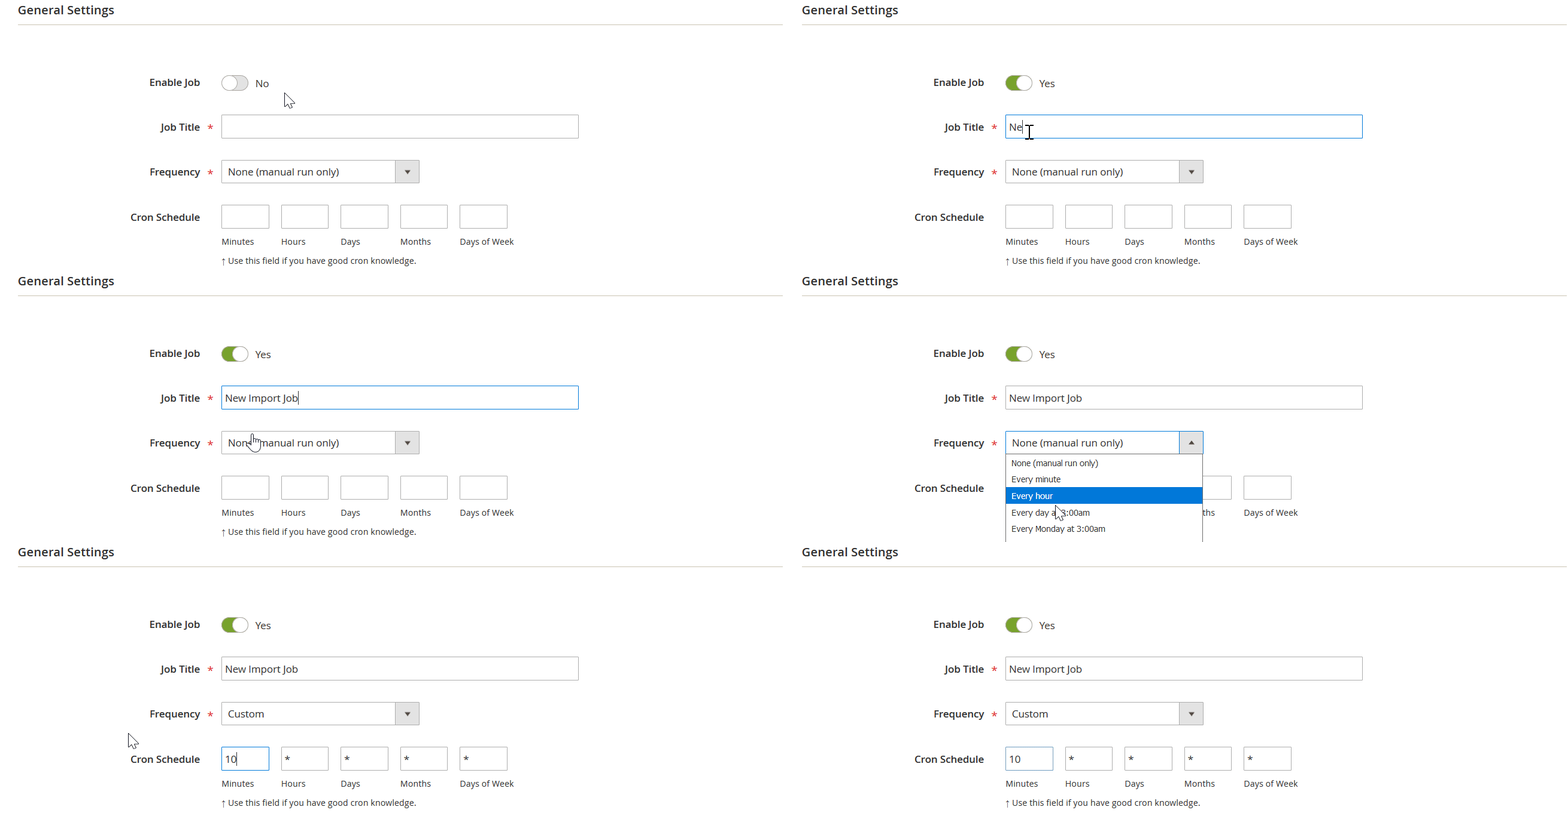
The most common way of automation is based on cron. Use its default syntax to create custom update schedules. Alternatively, you can select one of the predefined intervals. Since the extension incorporates the same interface for both, each predefined range can be customized as well.
At the same time, you can create profiles that have no schedules. Due to single data transfers and asynchronous updates, you may face the necessity to import data only once or do that in a random order.
And you can launch every profile manually even if it has a schedule. If your partner delayed the update, there is no need to wait until the next planned event. Launch the import/export process manually whenever you want. A schedule is configured as follows:
Events
In addition to cron-based schedules, the Improved Import & Export extension allows utilizing event-based triggers. Being an alternative way of automating import and export processes, this feature enables real-time updates. For instance, you can set a trigger on the basis of a placed order. When a customer completes checkout, this trigger can launch an order data export to an external system.
The Improved Import & Export Magento 2 extension lets you select either system events or custom processes as triggers. Choose specific conditions to increase their efficiency. For further information, read this article: How to Run Magento 2 Import or Export After Specific System Event or Process.
Advanced Mapping Features
And one of the most important time-savers introduced in the Improved Import & Export Magento 2 extension is its mapping capabilities and various features oriented towards attributes and their values. When you work with external systems, it is usually impossible to transfer data from them right to your store due to different data standards. But our module effectively solves the problem via the following features:
Mapping Presets
With mapping presets, you get the most straightforward way of solving problems caused by different data standards. Unlike time-consuming manual data file editing, predefined mapping schemes dramatically improve the process which is reduced to a single action: select a preset suitable for your particular integration. Next, the Improved Import & Export extension will analyze the input data and match all third-party designations to the corresponding internal ones. You select a scheme, and the module does everything for you like displayed below:
Matching Interface
And of course, the Improved Import & Export extension enables you to do everything manually. This method will save you if a preset for a particular integration is absent. Of course, you can contact our support and ask for help, but it will take some time until we will propose a solution. If you need to run the integration immediately, leverage the convenient interface and match everything manually.
The complicated data file editing is reduced by the ability to select a third-party designation and specifying the appropriate internal one in front of it. You should repeat the procedure for every attribute that differs from the ones used in Magento 2, but it won’t take as much time as manual data file editing does. The process is illustrated below:
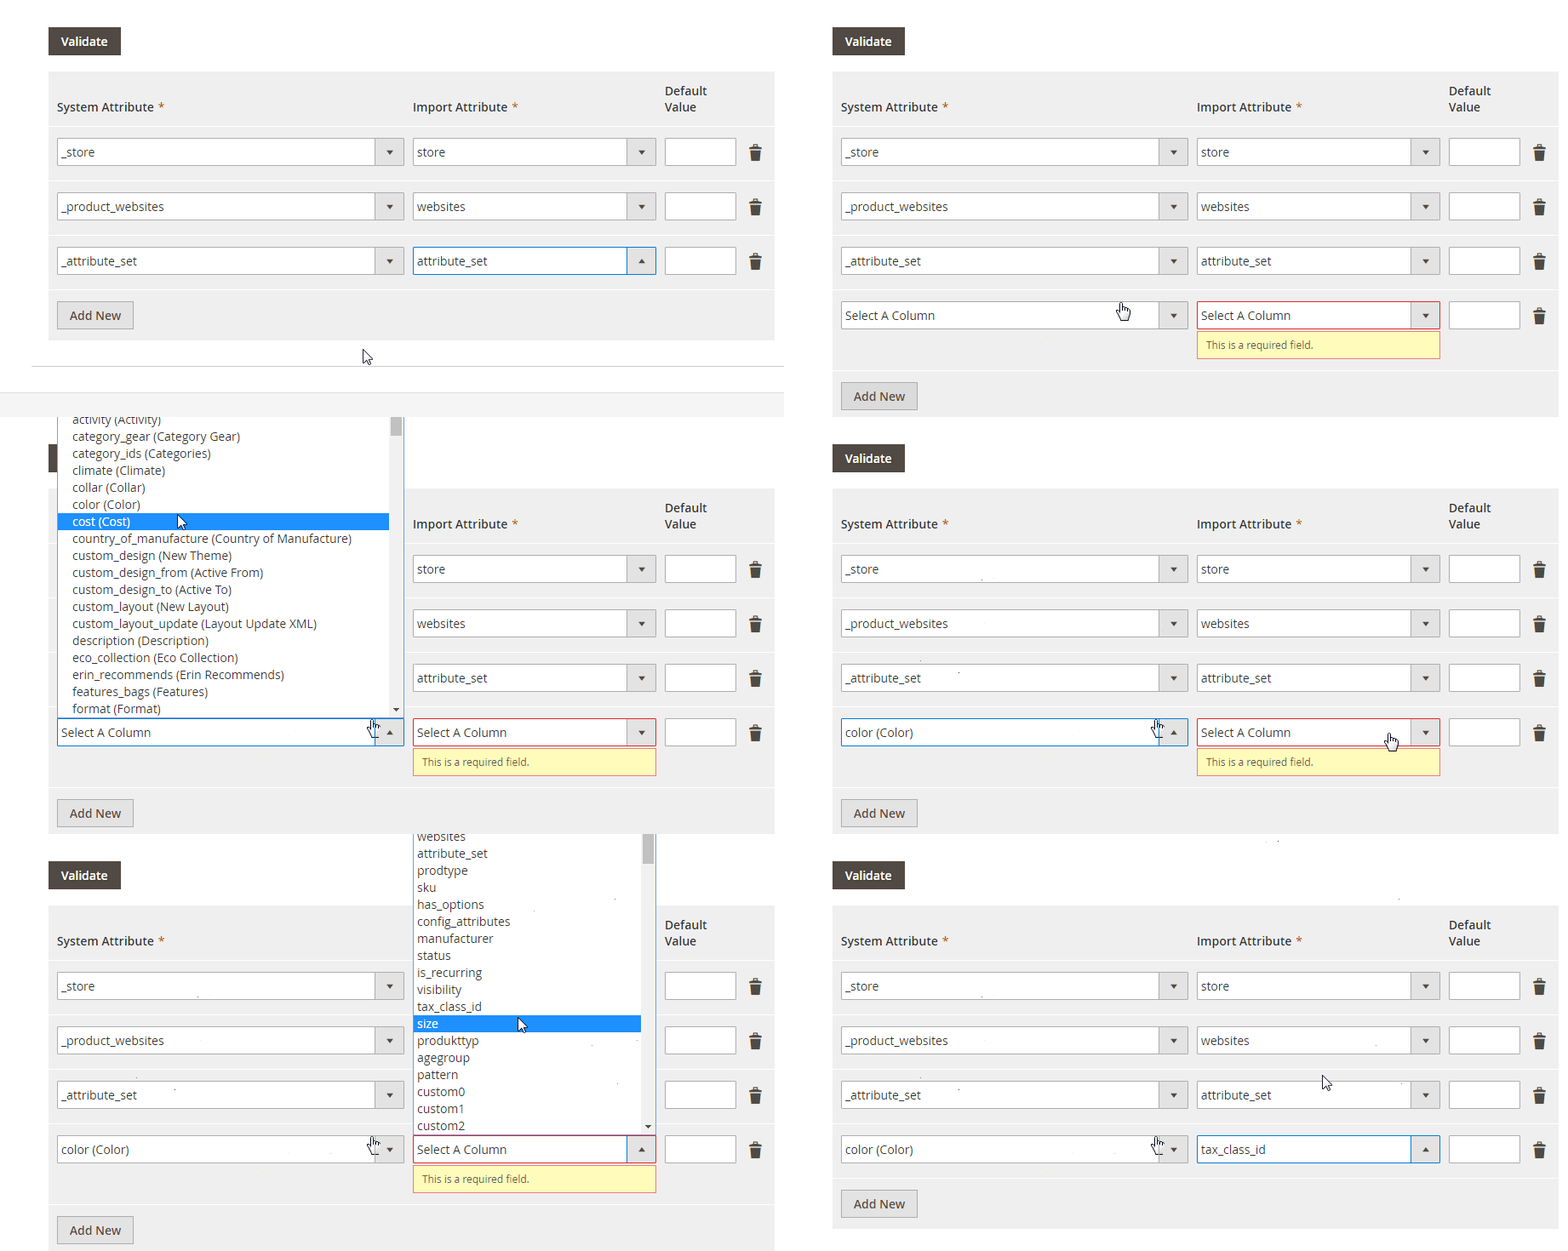
As you can see, the gif above shows three columns one of which is called “Default Value.” It allows setting a value provided to all items related to the attribute. Thus, you can specify hardcoded attribute values with the Improved Import & Export Magento 2 extension.
For instance, you import products related to different store views, but your website contains only one store view. Instead of editing a data file manually – you won’t be able to import such products – link all products the same store view via the hardcoded value feature.
Attribute Values Mapping
In addition to attributes, you can also map their values. Our module utilizes the same principle for modifying them as we’ve just described. Although third-party values usually don’t prevent import processes (but there are situations when they do that), they require lots of time and effort for editing after an update is already transferred. That’s why we provide an intuitive interface designed to simplify attribute values mapping as much as possible.
Forever forget about manual data file editing and endless admin modifications with the Improved Import & Export Magento 2 extension. The module allows matching third-party attributes to their internal designation and then repeating the same action for their values. For further information, follow this link: Attribute Values Mapping.
Attribute Values Editing
But values matching is not the only feature that improves your daily duties in this area. With the Improved Import & Export Magento 2 extension, you can edit attribute values in bulk using the following core rules:
- Add a prefix;
- Add a suffix;
- Split attribute values;
- Merge attribute values.
Combine them and create special conditions to increase the efficiency of applied changes. For further information, read this article: How to Modify Attribute Values During Import and Export in Magento 2.
Category Mapping
Besides, the Improved Import & Export Magento 2 extension provides the ability to map categories. If you import products with a third-party catalog structure, it is necessary to apply changes to each imported product individually from the admin interface, which is a very time-consuming routine. Instead, our module lets you match the external categories to the ones used internally during the import process as shown below:

And you create new categories on the fly as well. The process is simplified to selecting a parent category and specifying the name of a new one. Both features are described in this article: Category Mapping.
Attributes On The Fly
If attributes are not available in your data file, create them on the fly specifying all the necessary parameters via the following general form:
Attribute|attribute_property_name:attribute_property_value|…
More information is provided here: Product attributes import.
The following video shows the Improved Import & Export Magento 2 extension in action:
[embedded content]
If you require more information on how to import and export Magento 2 B2B entities or any other entity of your Magento 2 store, you might want to have a look at Firebear explicit Magento 2 import/export Guide List.
Check Magento 2 import/export Guide List
We have gathered and put to good use much more information on Magento 2 import and export than Magento 2 team ever had! Please feel free to read and share every guide you need.
Final Words
As you can see, the Improved Import & Export extension is a powerful tool that dramatically simplifies all data transfers. With its help, you can move everything from your store to any external system and vice versa. And Magento 2 Shared Catalogs are not an exception. For further information, follow the link below and contact our support:
Get Improved Import & Export Magento 2 Extension
Let’s take a look at other nuances of importing and exporting shared catalogs in Magento 2 with the help of the Improved Import & Export Magento 2 extension.
If you need to move shared catalogs between Magento 2 and third-parties or other Magento 2 websites on a regular basis, you can use the Improved Import & Export extension since it utilizes a cron scheduler to automate data transfers. As a store administrator, you get the ability to import and export shared catalogs between Magento 2 and external destinations automatically. Just specify a schedule of updates and the module will do everything for you.
Magento 2 blocks the import of third-party data that doesn’t follow its requirements and B2B shared catalogs are not an exception. But don’t be afraid. You can still transfer third-party data with the help of the Improved Import & Export extension. The module lets you create a mapping scheme where you match third-party attributes and values to ones used within the system. As a result, any external data, including shared catalogs, is easily adapted to the native standards of your e-commerce website. Note that you can also apply mapping to export processes to generate the output your partners require.
The Improved Import & Export Magento 2 extension provides the ability to create API connections for transferring shared catalogs along with other entities. There is a dedicated section in the module’s import/export jobs where you specify the parameters necessary to sync the two systems. Note that you can create a bi-directional API connection for transferring shared catalogs.
Improved Import & Export lets you move shared catalogs via ODS files. You no longer need to convert them to CSV to fit the Magento 2 requirements. You can also export data using this file format.
In addition to ODS, Improved Import & Export lets you move shared catalogs via XLSX files. You no longer need to convert them to CSV to fit the Magento 2 requirements. You can also export data using this file format.
Also, Improved Import & Export lets you move shared catalogs via XLSX files. You no longer need to convert them to CSV to fit the Magento 2 requirements. You can also export data using this file format.
How to import data to Magento 2 via compressed files?
If your files with shared catalogs are compressed, you can transfer them to Magento 2 with the help of the Improved Import & Export extension. Remember that your file archive should be in a ZIP or TAR format. Our module supports compressed CSV, XML, ODS, JSON, and XLSX files.
How to import data to Magento 2 from Google Sheets?
If shared catalogs are stored in Google Sheets, it is no longer a problem. The Improved Import & Export extension lets you move the corresponding information straight from Google Sheets to your e-commerce website. It is only necessary to specify the address of the corresponding data table. Besides, you can export shared catalogs from Magento 2 to Google Sheets.
The Improved Import & Export module lets you transfer shared catalogs between Magento 2 and Dropbox. You can store them there in CSV, JSON, XML, ODS, or XLSX files or ZIP and TAR archives.
In addition to Google Sheets and Dropbox, the Improved Import & Export extension provides the ability to import and export shared catalogs between Magento 2 and Google Drive in CSV, JSON, XML, ODS, or XLSX files and ZIP and TAR archives.


