Facebook Pixel Audience and Conversion Tracking tracks all events and measurements then sends this data to Facebook Analytics and Facebook Ads Manager. This data can be used to improve your sales funnel and create better channels to boost conversions. It’s a must-have tool in your arsenal if you are running an eCommerce store like Magento 2. In this article, we will focus on the integration of Magento 2 Facebook Conversion Tracking with GTM (Google Tag Manager). We have provided a thorough step-by-step guide for you to set up the entire Facebook Conversion Tracking on your own. Follow each of the steps carefully to get the setup successful.
List of Events Tracked by Facebook Conversion Tracking via GTM
We will track the following events in Facebook Conversion Tracking via GTM. However, there are more standard events that you can track.
| Event Name | Event Description | Object Properties |
| ViewCategory | Category of the page/product. | content_ids, currency, value
None required. |
| ViewContent | A visit to a web page you care about (for example, a product page or landing page). ViewContent tells you if someone visits a web page’s URL, but not what they see or do on that page.
A person lands on a product details page. |
content_ids, content_category, content_name, content_type, contents, currency, value
None required. |
| AddToCart | When a product is added to the shopping cart.
A person clicks on an add to cart button. |
content_ids, content_name, content_type, contents, currency, value
None required. |
| InitiateCheckout | When a person enters the checkout flow prior to completing the checkout flow.
A person clicks on a checkout button. |
content_category, content_ids, contents, currency, num_items, value
None required. |
| AddPaymentInfo | When payment information is added in the checkout flow.
A person clicks on a save billing information button. |
content_category, content_ids, contents, currency, value
None required. |
| Purchase | When a purchase is made or checkout flow is completed.
A person has finished the purchase or checkout flow and lands on thank you or confirmation page. |
content_ids, content_name, content_type, contents, currency, num_items, value
Required: currency and value |
| Search | When a search is made.
A person searches for a product on your website. |
content_category, content_ids, contents, currency, search_string, value
None required. |
Facebook Conversion Tracking and Audience Tracking Setup via GTM
Let us start by setting up the base code for Facebook Conversion tracking on every page of your store. In order for this tag to work, we will need a variable to store the Facebook pixel ID.
Create a Variable to Store Facebook Pixel ID
We will show you how to create a variable. Please follow the same steps with the information given in each section to create necessary variables. Follow the steps below:-
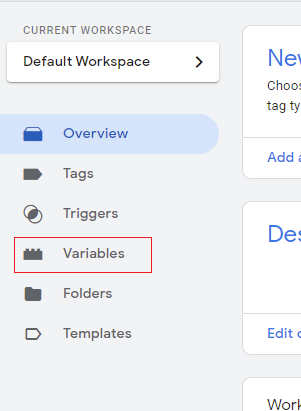
Step 1:- Go to your GTM container and from the left navigation choose Variables.
Step 2:- Click on New in the top right corner to create a new variable.
Step 3:- Enter the variable name as “facebookPixelID” in the top left corner and click on Variable Configuration.

Step 4:- Front the Choose Variable Type popup select Constant.
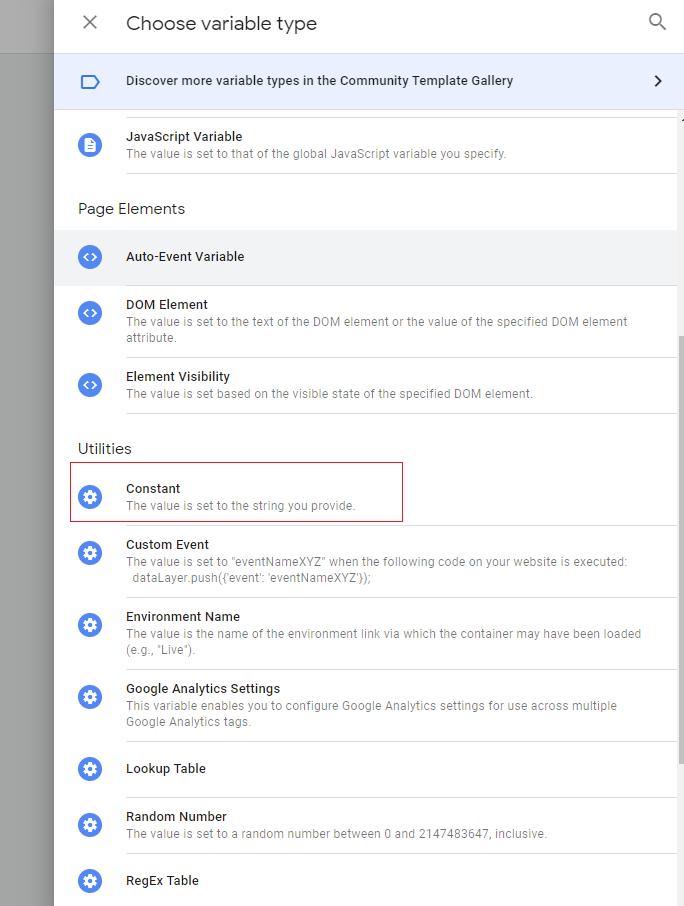
Step 5:- Enter your Facebook Pixel ID in Value and click Save to finish the setup.

Create a Trigger that Fires on All Pages
Our audience tracking tag is the base tag so it should fire on all pages of the store. So we will create a trigger that fires on all page views. Please follow the steps below:-
Step 1:- Go to the GTM container of your store and from left navigation choose Triggers.
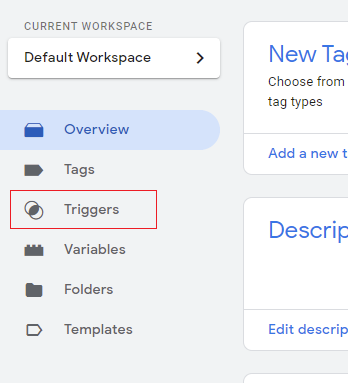
Step 2:- Click on New from the top right corner to create a new trigger.
Step 3:- Enter the trigger name as “All Pages” and click on Trigger Configuration

Step 4:- From the Trigger Type menu choose “Page view”.
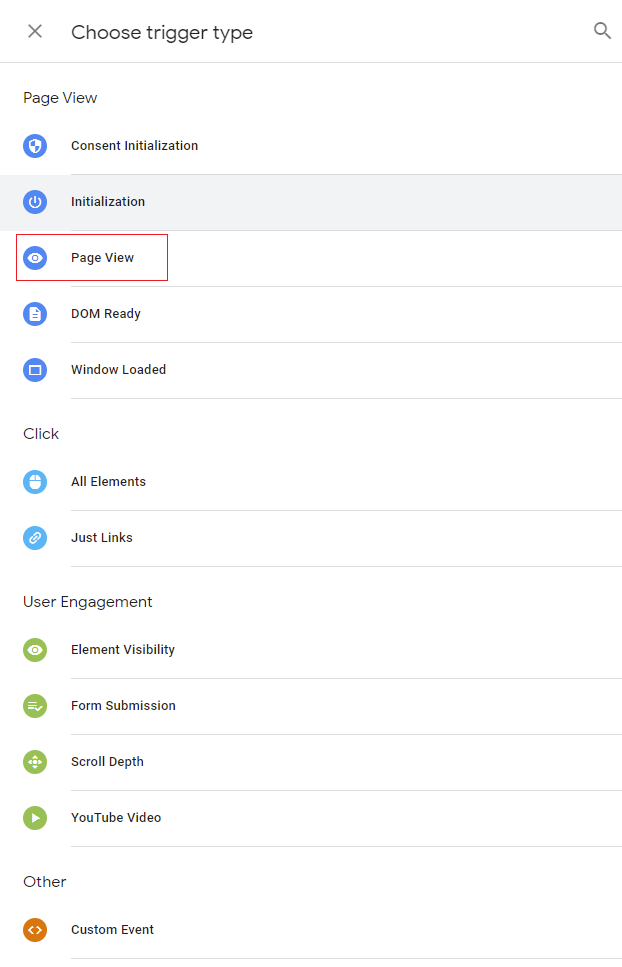
Step 5:- Make sure This trigger fires on is “All Page views”. Lastly, click on Save to save your newly created trigger.
Create the Facebook Audience Tracking Tag
Finally, we will create the Facebook Audience Tracking tag using the variable and trigger that we just created. Please follow the steps below:-
Step 1:- Go to your GTM Container and from left navigation choose Tags.
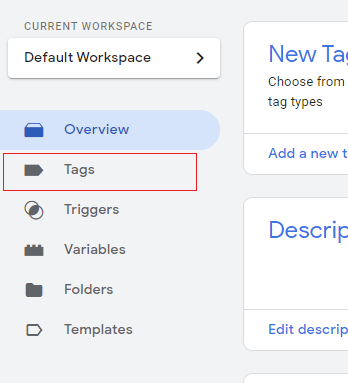
Step 2:- Click on New to create a new tag.
Step 3:- Enter the Tag name in the top left corner and click on Tag Configuration.
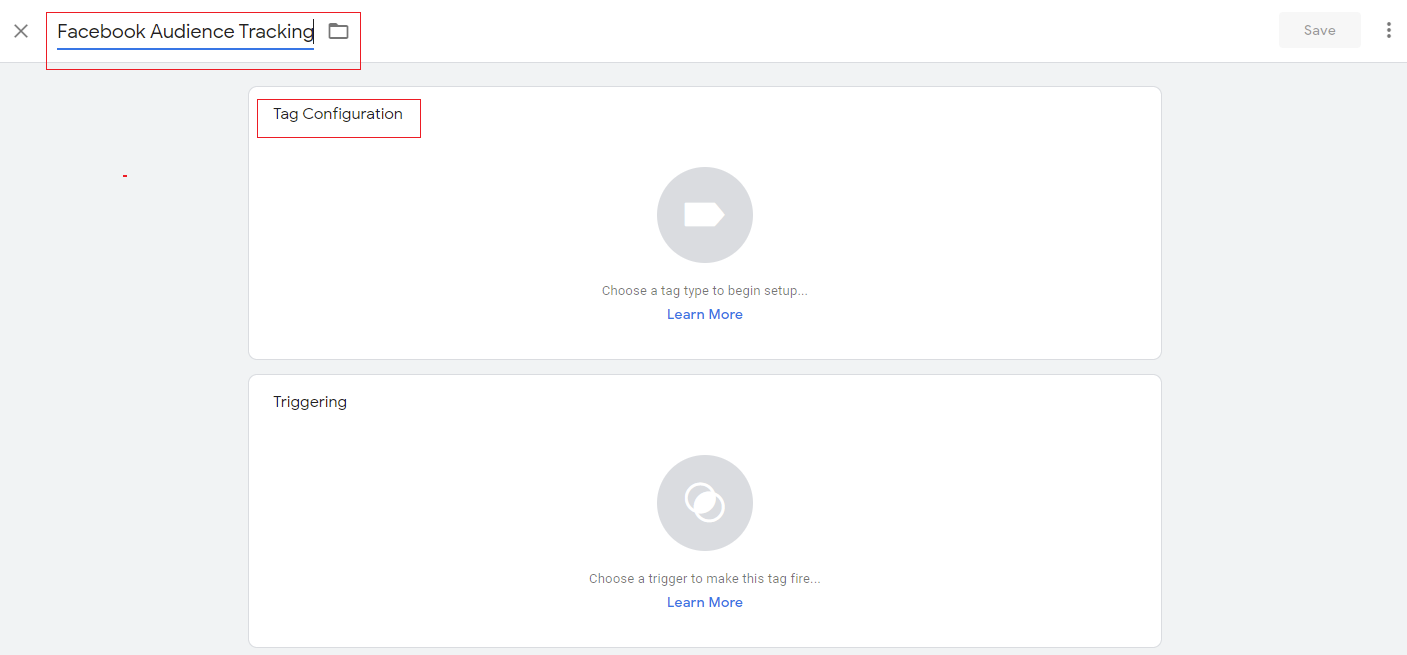
Step 4:- From the Choose Tag Type menu select “Custom HTML”.
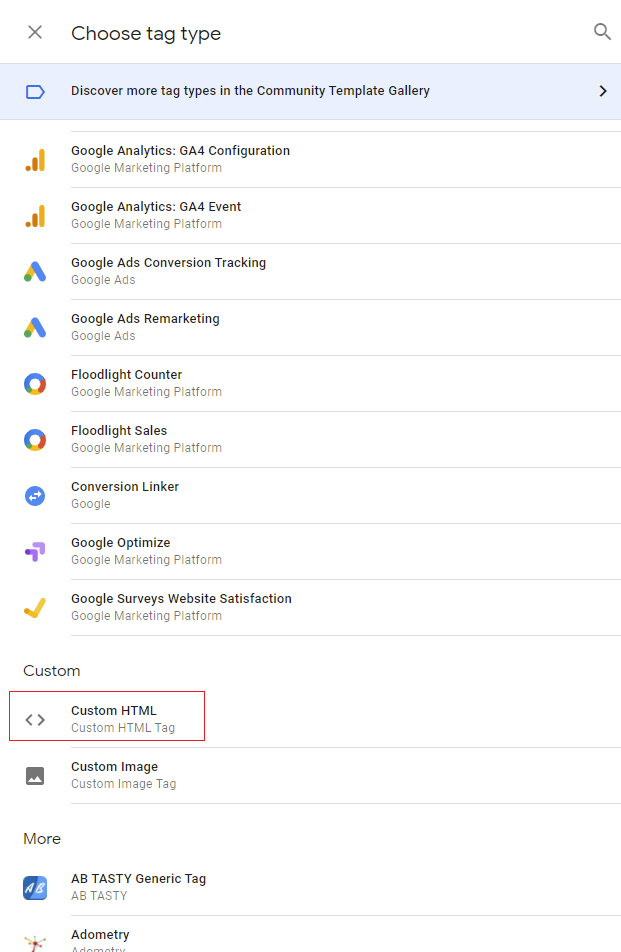
Step 5:- In HTML paste the script given below:-
Paste the following with script tags:-
!function(f,b,e,v,n,t,s){if(f.fbq)return;n=f.fbq=function(){n.callMethod?
n.callMethod.apply(n,arguments):n.queue.push(arguments)};if(!f._fbq)f._fbq=n;
n.push=n;n.loaded=!0;n.version='2.0';n.queue=[];t=b.createElement(e);t.async=!0;
t.src=v;s=b.getElementsByTagName(e)[0];s.parentNode.insertBefore(t,s)}(window,
document,'script','//connect.facebook.net/en_US/fbevents.js'); fbq('init', '{{facebookPixelID}}');
fbq('track', 'PageView');
Paste the following with noscript tags:-
<img height="1" width="1" style="display:none"
src="https://www.facebook.com/tr?id={{facebookPixelID}}&amp;ev=PageView&amp;noscript=1"
Step 6:- Click on Triggers and from the menu Choose “All Pages”.
Step 7:- Lastly, click on save and your new tag is created. It should look something like this:-
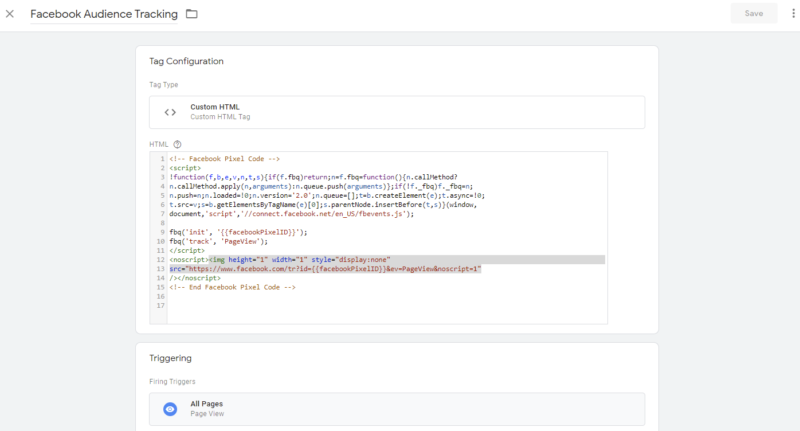
Now our Facebook Audience Tracking will fire on all pages of the store. You can see the tag firing in Facebook Pixel Helper extension and it will look like this:-
Tag setup to Measure Category Views in GTM
Our next tag will be Facebook Category view content. It will be a category viewed by customers.
Sample Datalayer:-
window.dataLayer = window.dataLayer || [];
dataLayer.push({ 'event' : 'ViewCategory', 'content_type':'product', 'content_ids': ['32'], 'value': 24.00, 'currency': 'GBP'
});
Create Necessary Variables
Please use the information given below and follow the steps above as we did in the previous tag set up to create the following variables:-
1.productID:-
Variable Name:- productID
Variable Configuration(Variable Type):- Data Layer Variable
Data Layer Variable Name:- google_tag_params.ecomm_prodid
Data Layer Version:- Version 2
Variable Screengrab:-

2.productPrice:-
Variable Name:- productPrice
Variable Configuration(Variable Type):- Data Layer Variable
Data Layer Variable Name:- google_tag_params.ecomm_pvalue
Data Layer Version:- Version 2
Variable Screengrab:-

3.currencyCode:-
Variable Name:- currencyCode
Variable Configuration(Variable Type):- Constant
Value:- GBP(Enter your store’s currency)
Variable Screengrab:-

Create Trigger
Please use the information provided below and create the trigger for this event:-
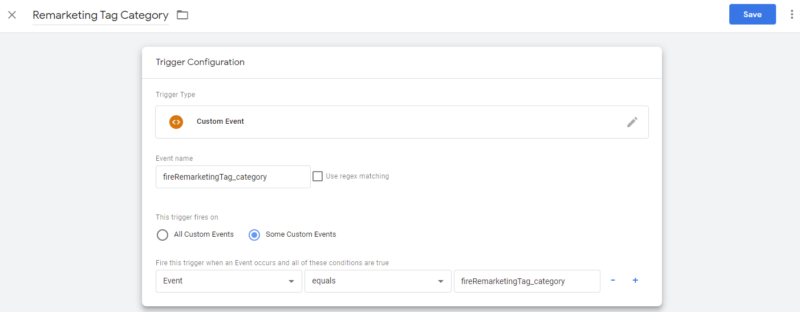
Trigger Name:- Remarketing Tag Category
Trigger Configuration(Trigger Type):- Custom Event
Event Name:- fireRemarketingTag_category
This Trigger Fires On:– Event Equals fireRemarketingTag_category
The trigger should look similar to the below image after setup:-
Set up Facebook Category View Content Tag
Our last step is the tag setup please follow the steps in the previous section and use the information below to create this tag:-
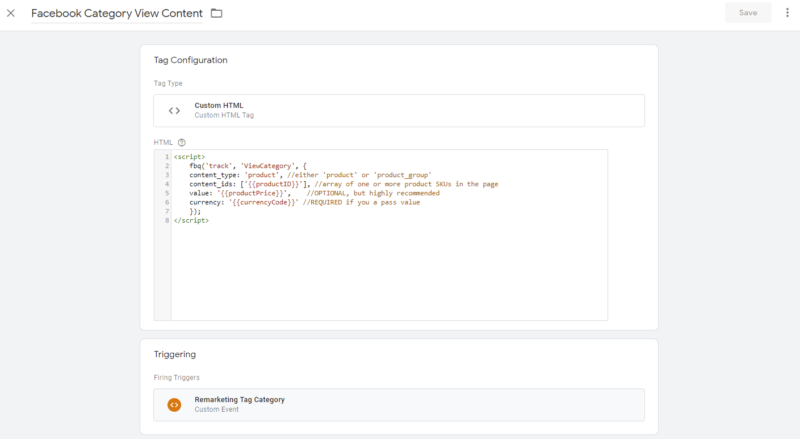
Tag Name:- Facebook Category View Content
Tag Configuration(Tag Type):- Custom HTML
HTML:- Paste the script below with script tags in this section:-
fbq('track', 'ViewCategory', {
content_type: 'product', //either 'product' or 'product_group'
content_ids: ['{{productID}}'], //array of one or more product SKUs in the page
value: '{{productPrice}}', //OPTIONAL, but highly recommended
currency: '{{currencyCode}}' //REQUIRED if you a pass value
});
Trigger:- Remarketing Tag Category
Your tag should look similar to the below image after setup:-
Tag setup to Measure Product Views in GTM
Next, we will set up Facebook Product view content tag for Facebook Conversion tracking via GTM. Follow the steps in the previous sections and use the information provided to complete the setup. Let’s start by creating the required variables.
Sample Datalayer:-
window.dataLayer = window.dataLayer || [];
dataLayer.push({ 'event' : 'ViewContent', 'content_type':'product', 'content_ids': ['32'], 'value': 24.00, 'currency': 'GBP'
});
Creating Necessary Variables
We don’t need to create any variables for this tag as we are going to use the same variables that we created in the Facebook Category View Content Tag. Make sure you have the following variables created before proceeding with this tag setup:-
- productID
- productPrice
- currencyCode
Create Trigger
Please use the information provided below and create the trigger for this event:-
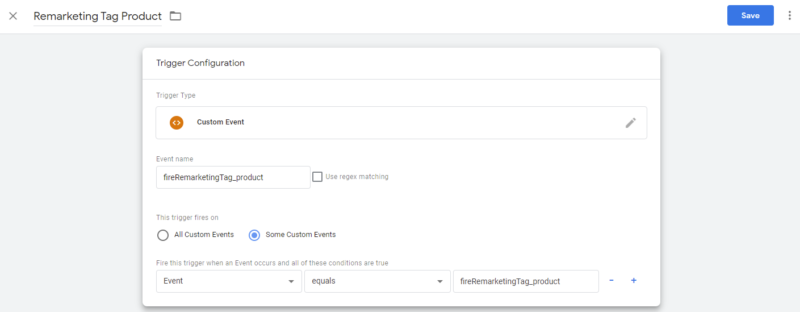
Trigger Name:- Remarketing Tag Product
Trigger Configuration(Trigger Type):- Custom Event
Event Name:- fireRemarketingTag_product
This Trigger Fires On:– Event Equals fireRemarketingTag_product
The trigger should look similar to the below image after setup:-
Set up Facebook Product View Content Event Tag
Our last step is the tag setup please follow the steps in the previous section and use the information below to create this tag:-
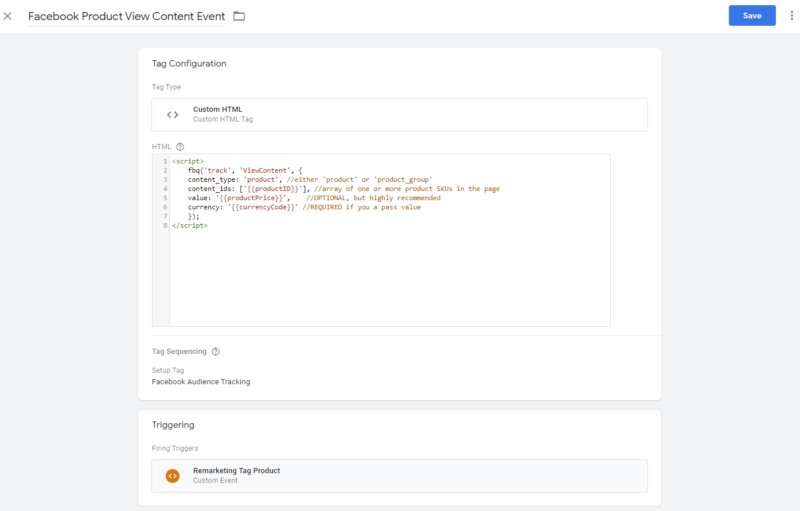
Tag Name:- Facebook Product View Content Event
Tag Configuration(Tag Type):- Custom HTML
HTML:- Paste the script below with the script tags in this section:-
fbq('track', 'ViewContent', { content_type: 'product', //either 'product' or 'product_group' content_ids: ['{{productID}}'], //array of one or more product SKUs in the page value: '{{productPrice}}', //OPTIONAL, but highly recommended currency: '{{currencyCode}}' //REQUIRED if you a pass value });
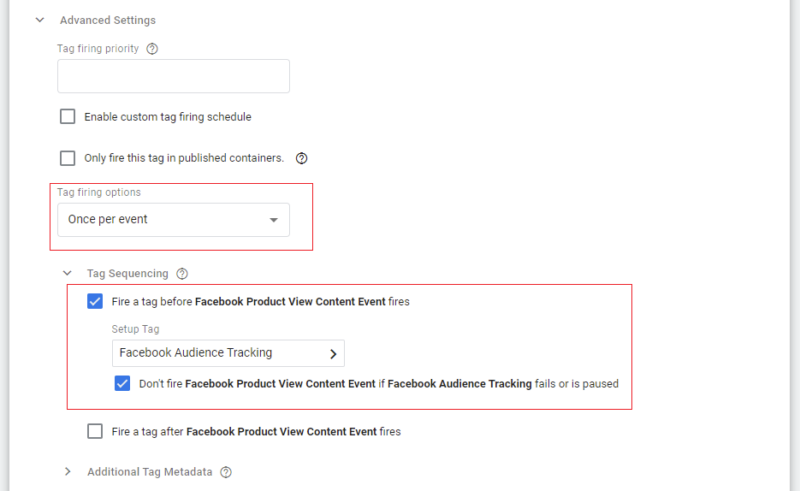
Tag Sequencing:- check the following boxes and select Tag Type “Facebook Audience Tracking”. Look at the image below:-
- Fire a tag before Facebook Product View Content Event fires
- Don’t fire Facebook Product View Content Event if Facebook Audience Tracking fails or is paused
Trigger:- Remarketing Tag Product
Your tag should look similar to the below image after setup:-
Tag setup to Measure Add to Cart Event in GTM
Next in line is our Facebook Add to Cart Event Tag setup for Facebook Conversion Tracking via GTM. Same as above use the information provided in each section to create the necessary variables, triggers, and tags.
Sample Datalayer:-
window.dataLayer = window.dataLayer || [];
dataLayer.push({ 'event' : 'ViewContent', 'content_ids': ['32'], 'content_type': 'product', 'content_name': 'duffle bag', 'value': 24.00, 'currency': 'GBP'
});
Creating Necessary Variables
Create the following variables with the information given below. One of the variables we have created in the previous section so make sure you have this variable in GTM.
1.currencyCode (created in the previous section, make sure it’s there in GTM)
2.addedPname
Variable Name:- addedPname
Variable Configuration(Variable Type):- Data Layer Variable
Data Layer Variable Name:- ecommerce.add.products.0.name
Data Layer Version:- Version 2
Variable Screengrab:-

3.addedPPrice
Variable Name:- addedPPrice
Variable Configuration(Variable Type):- Data Layer Variable
Data Layer Variable Name:- ecommerce.add.products.0.price
Data Layer Version:- Version 2
Variable Screengrab:-

Create Trigger
Please use the information provided below and create the trigger for this event:-
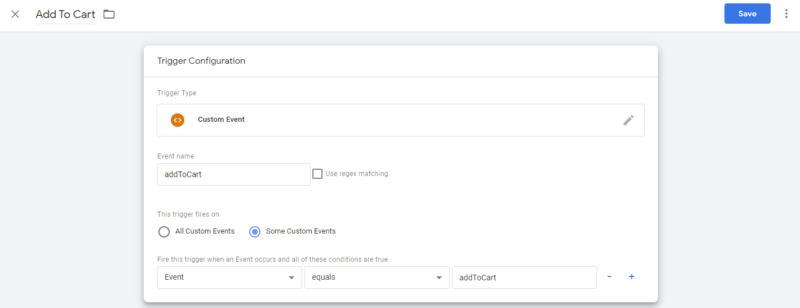
Trigger Name:- Add to Cart
Trigger Configuration(Trigger Type):- Custom Event
Event Name:- addToCart
This Trigger Fires On:– Event Equals addToCart
The trigger should look similar to the below image after setup:-
Set up Facebook Add to Cart Event Tag
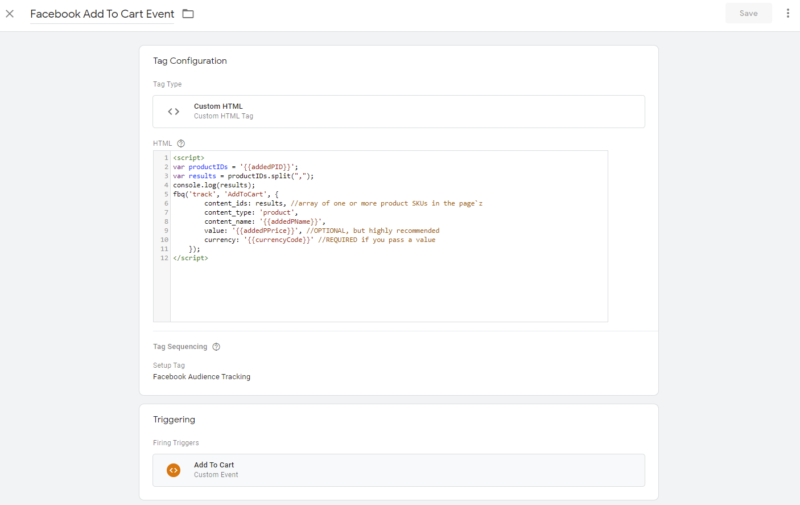
Our last step is the tag setup please follow the steps in the previous section and use the information below to create this tag:-
Tag Name:- Facebook Add to Cart Event
Tag Configuration(Tag Type):- Custom HTML
HTML:- Paste the script below with the script tags in this section:-
var productIDs = '{{addedPID}}';
var results = productIDs.split(",");
console.log(results); fbq('track', 'AddToCart', { content_ids: results, //array of one or more product SKUs in the page`z content_type: 'product', content_name: '{{addedPName}}', value: '{{addedPPrice}}', //OPTIONAL, but highly recommended currency: '{{currencyCode}}' //REQUIRED if you pass a value });
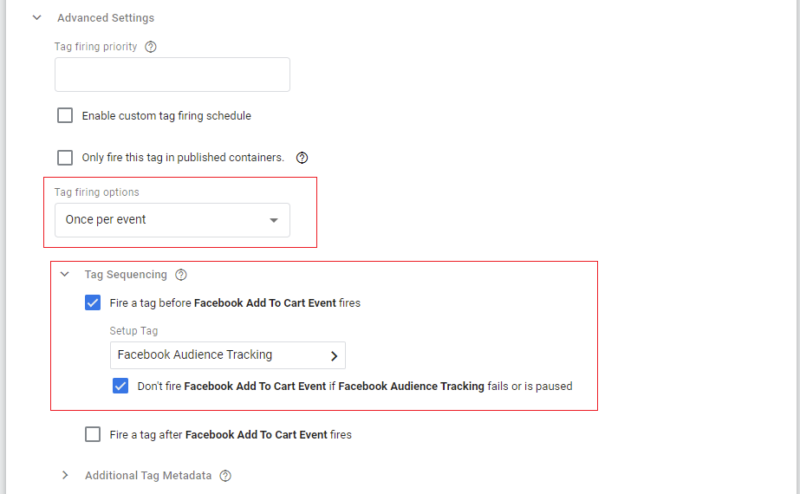
Tag Sequencing:- check the following boxes and select Tag Type “Facebook Audience Tracking”. Look at the image below:-
- Fire a tag before Facebook Add To Cart Event fires
- Don’t fire Facebook Add To Cart Event if Facebook Audience Tracking fails or is paused
Trigger:- Add to Cart
Your tag should look similar to the below image after setup:-
Tag setup to Measure Initiate Checkout Event in GTM
Our next Facebook Conversion Tracking event is Facebook Initiate Checkout Event. Same as above follow the instructions in the above sections with the information provided below to create the necessary Variables, Triggers, and Tags.
Creating Necessary Variables
You do not need any variables for this event tag.
Create Trigger
Please use the information provided below and create the trigger for this event:-
Trigger Name:- CheckoutInitiate
Trigger Configuration(Trigger Type):- Page view
This Trigger Fires On:– Some Page Views
Page URL ends with checkout/
The trigger should look similar to the below image after setup:-

Set up Facebook Initiate Checkout Event Tag
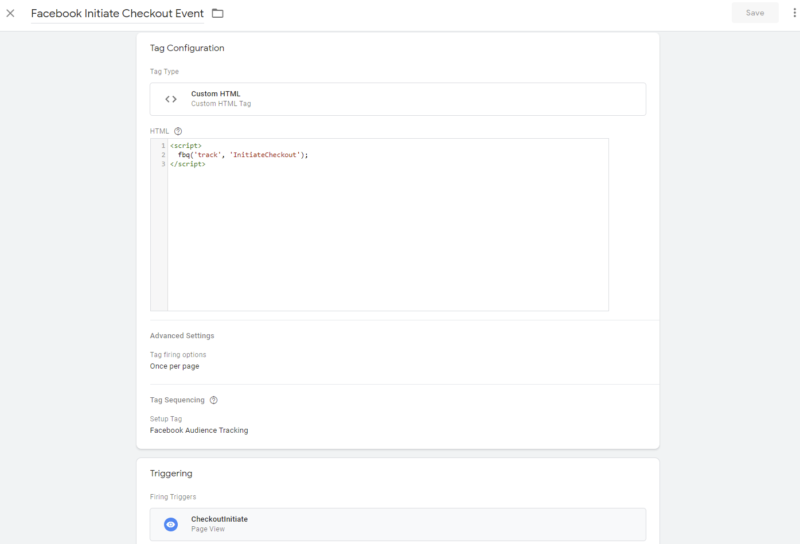
Our last step is the tag setup please follow the steps in the previous section and use the information below to create this tag:-
Tag Name:- Facebook Initiate Checkout Event
Tag Configuration(Tag Type):- Custom HTML
HTML:- Paste the script below with the script tags in this section:-
fbq('track', 'InitiateCheckout');
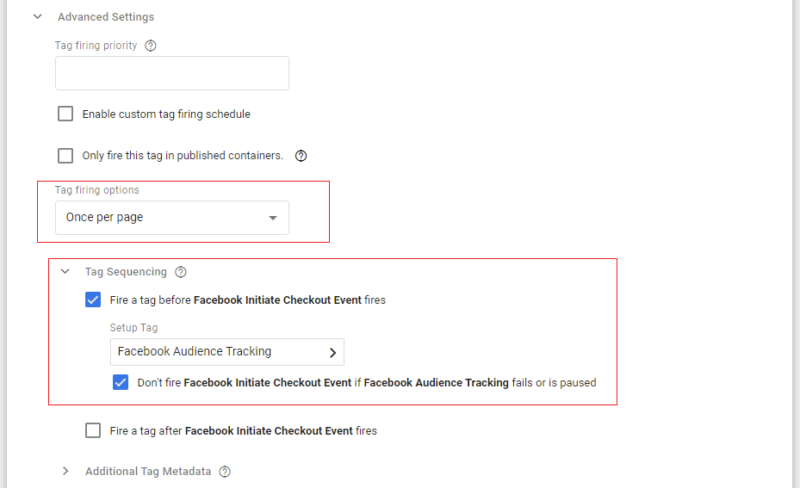
Tag Sequencing:- check the following boxes and select Tag Type “Facebook Audience Tracking”. Look at the image below:-
- Fire a tag before Facebook Initiate Checkout Event fires
- Don’t fire Facebook Initiate Checkout Event if Facebook Audience Tracking fails or is paused
Trigger:- CheckoutInitiate
Your tag should look similar to the below image after setup:-
Tag setup to Measure Initiate Payment Event in GTM
Our next Facebook Conversion Tracking event is Facebook Initiate Payment Event. Same as above follow the instructions in the above sections with the information provided below to create the necessary Variables, Triggers, and Tags.
Creating Necessary Variables
We need to create only one variable that will be used with the trigger. The variable name is checkoutSteps. Please use the information given below to create this variable:-
Variable Name:- checkoutSteps
Variable Configuration(Variable Type):- Data Layer Variable
Data Layer Variable Name:- ecommerce.checkout.actionField.step
Data Layer Version:- Version 2
Variable Screengrab:-

Create Trigger
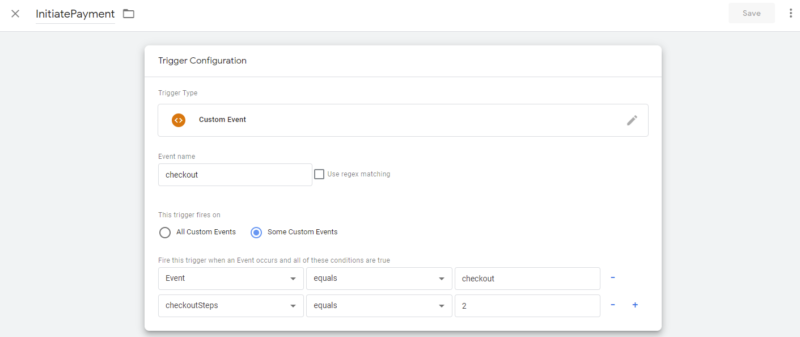
Please use the information provided below and create the trigger for this event:-
Trigger Name:- InitiatePayment
Trigger Configuration(Trigger Type):- Custom Event
Event Name:- checkout
This Trigger Fires On:– Some Custom Events
Event Equals Checkout
checkoutSteps Equals 2
The trigger should look similar to the below image after setup:-
Set up Facebook Initiate Payment Event Tag
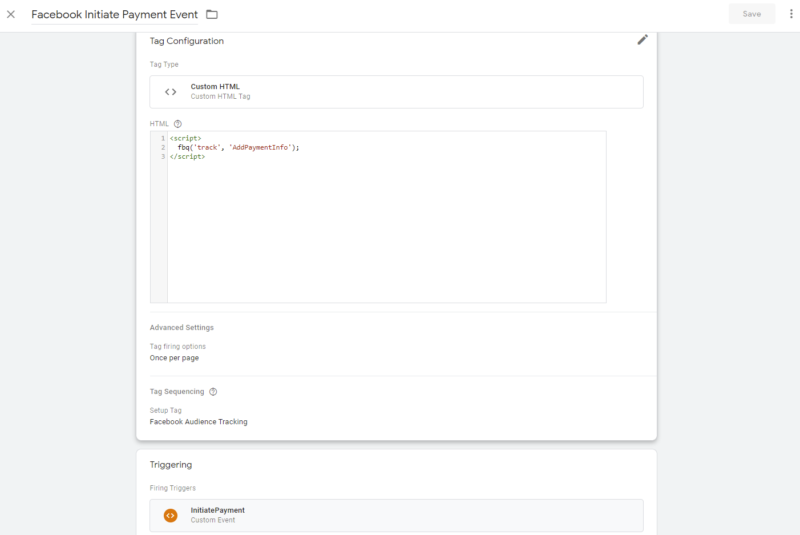
Our last step is the tag setup please follow the steps in the previous section and use the information below to create this tag:-
Tag Name:- Facebook Initiate Payment Event
Tag Configuration(Tag Type):- Custom HTML
HTML:- Paste the script below with the script tags in this section:-
fbq('track', 'AddPaymentInfo');
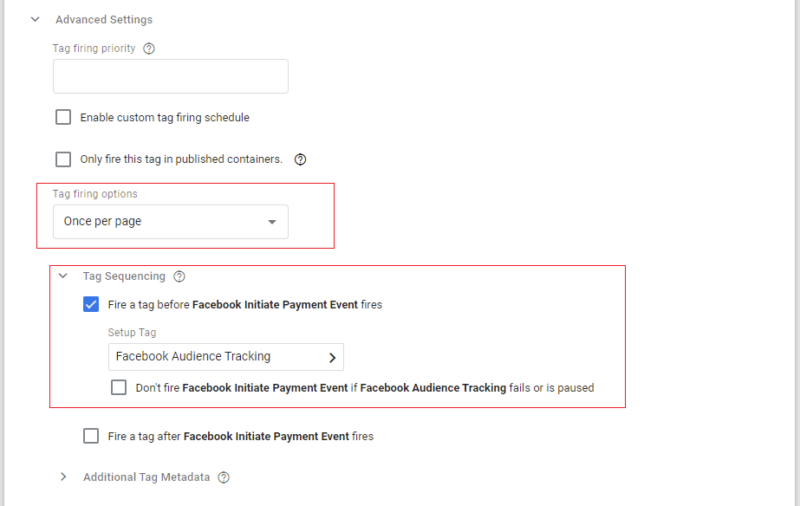
Tag Sequencing:- check the following boxes and select Tag Type “Facebook Audience Tracking”. Look at the image below:-
- Fire a tag before Facebook Initiate Payment Event fires
- Don’t fire Facebook Initiate Payment Event if Facebook Audience Tracking fails or is paused
Trigger:- InitiatePayment
Your tag should look similar to the below image after setup:-
Tag setup to Measure Facebook Purchase / Conversion Event in GTM
Facebook Purchase Event Tag in Facebook Conversion Tracking is one of the most important tags to set up. It will measure all conversions/purchases on your store. Please use the information given in the below sections to create necessary Variables, Triggers, and Tag.
Sample Datalayer:-
window.dataLayer = window.dataLayer || [];
dataLayer.push({ 'event' : 'ViewContent', 'content_type': 'product', 'content_ids': ['32'], 'value': 24.00, 'currency': 'GBP'
});
Creating Necessary Variables
We need three variables for this tag namely productID (to fetch the product ID), total (total price), and currencyCode (currency used for purchase). We have already created productID and currencyCode in previous sections so let’s create the total variable.
Variable Name:- total
Variable Configuration(Variable Type):- Data Layer Variable
Data Layer Variable Name:- google_tag_params.ecomm_totalvalue
Data Layer Version:- Version 2
Variable Screengrab:-

Create Trigger
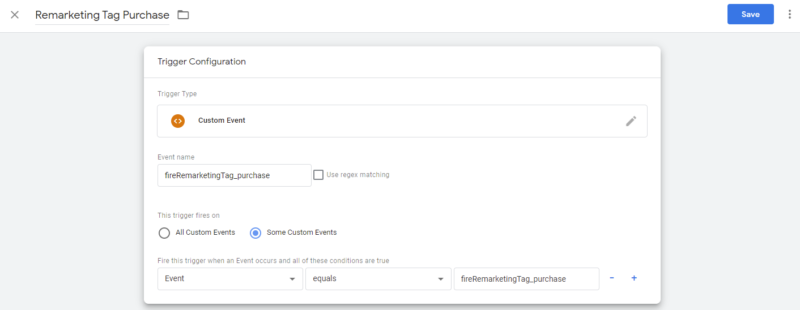
Please use the information provided below and create the trigger for this event:-
Trigger Name:- Remarketing Tag Purchase
Trigger Configuration(Trigger Type):- Custom Event
Event Name:- fireRemarketingTag_purchase
This Trigger Fires On:– Some Custom Events
Event Equals fireRemarketingTag_purchase
The trigger should look similar to the below image after setup:-
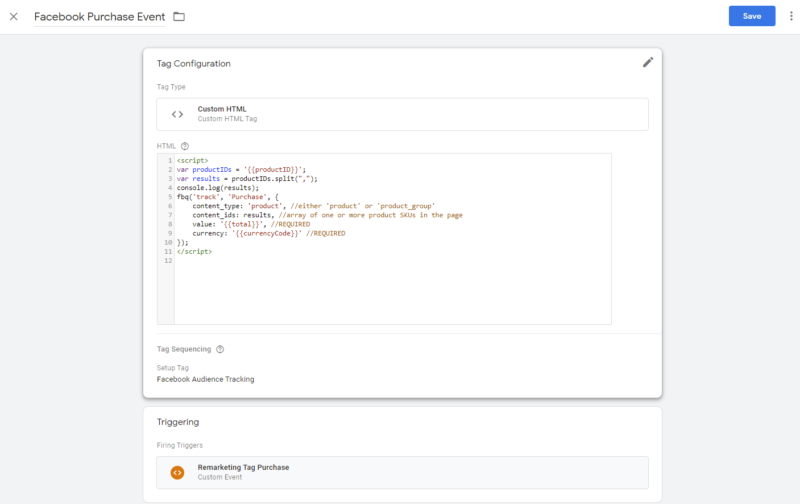
Set up Facebook Purchase Event Tag
Our last step is the tag setup please follow the steps in the previous section and use the information below to create this tag:-
Tag Name:- Facebook Purchase Event
Tag Configuration(Tag Type):- Custom HTML
HTML:- Paste the script below with the script tags in this section:-
var productIDs = '{{productID}}';
var results = productIDs.split(",");
console.log(results); fbq('track', 'Purchase', { content_type: 'product', //either 'product' or 'product_group' content_ids: results, //array of one or more product SKUs in the page value: '{{total}}', //REQUIRED currency: '{{currencyCode}}' //REQUIRED
});
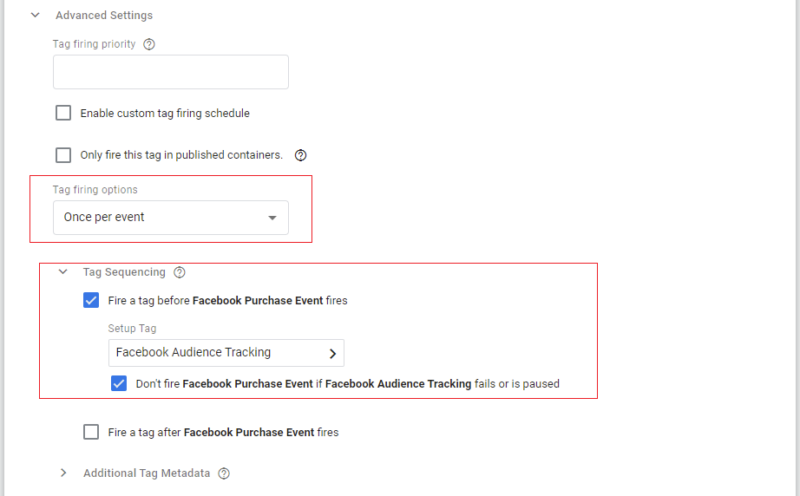
Tag Sequencing:- check the following boxes and select Tag Type “Facebook Audience Tracking”. Look at the image below:-
- Fire a tag before Facebook Purchase Event fires
- Don’t fire Facebook Purchase Event if Facebook Audience Tracking fails or is paused
Trigger:- Remarketing Tag Purchase
Your tag should look similar to the below image after setup:-
Tag setup to Measure Facebook Search Event in GTM
Our last Facebook Conversion Tracking Event is the Facebook Search Event. It will track all searches on your store. Please use the information in the below sections to create the necessary Variables, Triggers, and Tag.
Sample Datalayer:-
window.dataLayer = window.dataLayer || [];
dataLayer.push({ 'event' : 'ViewContent', 'content_ids': ['32'], 'content_type': 'product', 'search_string': 'bags', 'value': 24.00, 'currency': 'GBP'
});
Creating Necessary Variables
Please create the following variables required with this tag:-
1.Search – ProductID
Variable Name:- Search – ProductID
Variable Configuration(Variable Type):- Data Layer Variable
Data Layer Variable Name:- ecommerce.impressions
Data Layer Version:- Version 2
Variable Screengrab:-

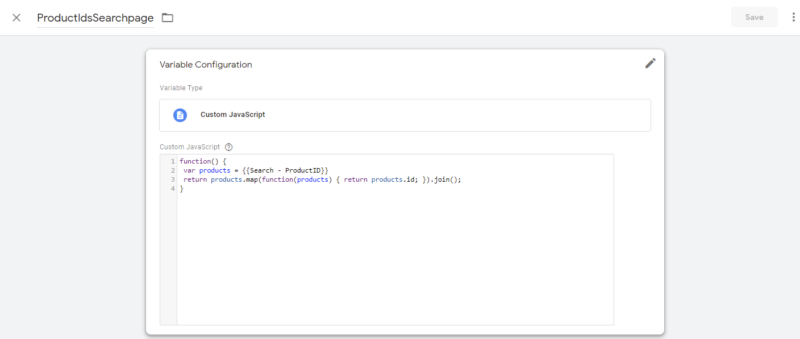
2.ProductIdsSearchpage
Variable Name:- ProductIdsSearchpage
Variable Configuration(Variable Type):- Custom Javascript
HTML:- Please paste the script given below in this section:-
function() { var products = {{Search - ProductID}} return products.map(function(products) { return products.id; }).join();
}
Variable Screengrab:-
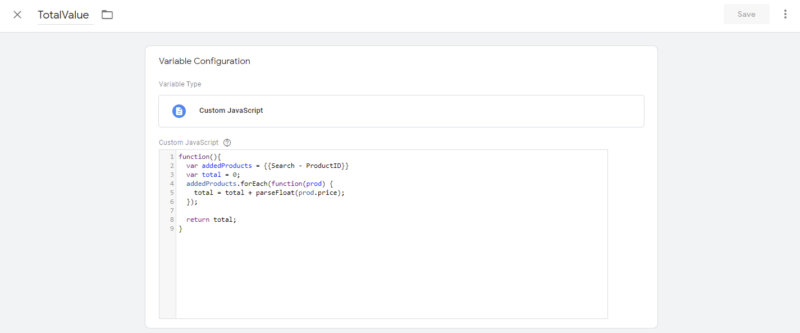
3.TotalValue
Variable Name:- TotalValue
Variable Configuration(Variable Type):- Custom Javascript
HTML:- Please paste the script given below in this section:-
function(){ var addedProducts = {{Search - ProductID}} var total = 0; addedProducts.forEach(function(prod) { total = total + parseFloat(prod.price); }); return total;
}
Variable Screengrab:-
4.Query – Url
Variable Name:- Query – Url
Variable Configuration(Variable Type):- URL
Component Type:- query
Component Key:- q
Variable Screengrab:-

Create Trigger
Please use the information provided below and create the trigger for this event:-
Trigger Name:- Search Result Page
Trigger Configuration(Trigger Type):- Page View
This Trigger Fires On:– Page URL contains result
The trigger should look similar to the below image after setup:-

Set up Facebook Search Event Tag
Our last step is the tag setup please follow the steps in the previous section and use the information below to create this tag:-
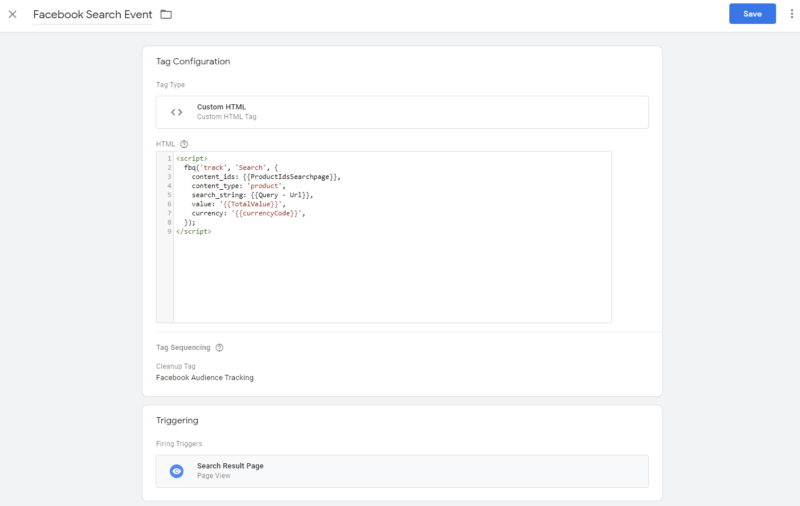
Tag Name:- Facebook Search Event
Tag Configuration(Tag Type):- Custom HTML
HTML:- Paste the script below in this section:-
fbq('track', 'Search', { content_ids: {{ProductIdsSearchpage}}, content_type: 'product', search_string: {{Query - Url}}, value: '{{TotalValue}}', currency: '{{currencyCode}}', });
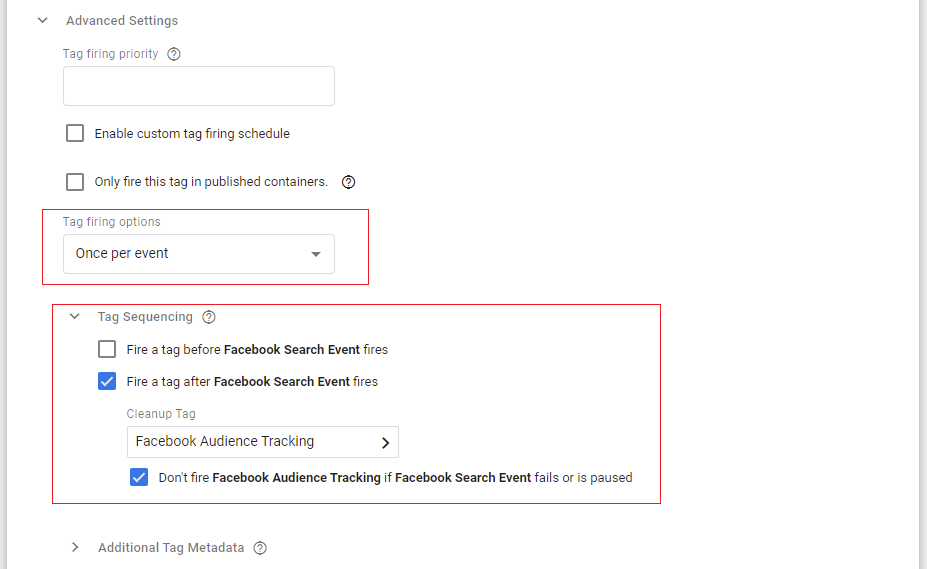
Tag Sequencing:- check the following boxes and select Tag Type “Facebook Audience Tracking”. Look at the image below:-
- Fire a tag after Facebook Search Event fires
- Don’t fire Facebook Search Event if Facebook Audience Tracking fails or is paused
Trigger:- Search Result Page
Your tag should look similar to the below image after setup:-
Conclusion
We hope that following this guide your Magento 2 Facebook Conversion Tracking via GTM(Google Tag Manager) was successful. If you find this guide too complicated or don’t want to go through the hassle of the entire setup then please check out our ready-made Magento 2 Facebook Conversion Tracking extension. The entire setup is included in a JSON file provided with the extension. You can directly import it into your GTM container and all the setup will be done. Simply change the pixel ID and your tracking will start working.

