
Do you want to design your very own custom theme in magento2? Today we are going to learn exactly that step by step. You will need a functional Magento set up to implement the below instructions. Magento2 comes with two preinstalled themes luma and blank. You can expand on any one of these themes to implement your custom designs. Today, we will use the blank theme to start as a base for basic theme creation and logo customization. Magento2 offers several reusable components that we as designers and developers can reuse to implement our templates.
Begin by making suitable directories in the Magento root folder. Navigate to the root folder and create the following suitable directories <root_magento>/app/design/frontend/<vendor_name>/<Theme_name>. Here, in place of <vendor_name> add your custom vendor name and in place of <Theme_name> add your own theme name. After that create subdirectories as follows Magento_Theme/layout.xml, media/preview.svg, web/images, web/css/source/_theme.less, registration.php, and theme.xml. The _theme.less enables us to reuse components from the default _theme.less file from Magento blank theme. After you create your directories its structure should match as in the image shown below.
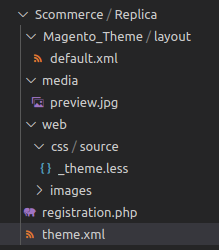
Theme Registration and Declaration
In order to declare and register your theme, you must add the following code as shown in the below steps.
Step 1:- Edit your registration.php file and add the code as follows.
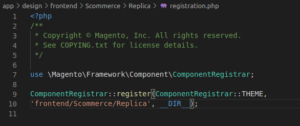
Here, replace the frontend/Scommerce/Replica with your own vendor name and theme name. This file will help your theme to register as a Magento entity so that you can apply this in the storefront.
Step 2:- Edit your theme.xml file and add the code as follows.
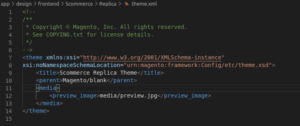
Replace the title of your theme. Parent represents the theme that we going to inherit or base our template on i.e blank Magento theme. Also, the preview image contains the preview of your theme. so replace the images with your own accordingly.
Changing Your Custom Theme Logo
Now, since our custom theme has been created let us start by doing basic edits such as logo and view these changes in our theme. To edit your logo you will have to add the following code in the layout.xml file in Magento_Theme folder.
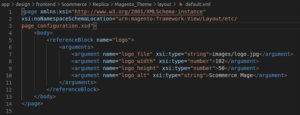
Here, you will have to replace the images/logo.jpg with your own logo name. Also, change the width and height as per your dimension requirements.
Applying Your Custom Theme
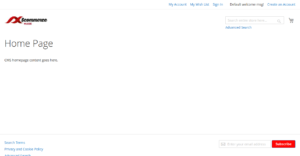
If you want you can add some custom styles in the _theme.less file to view these changes as we did here. Now, finally, you are ready to apply and view your theme in the storefront. Please login to your Magento 2 admin pane1 and navigate to contents>design>configuration. Here you should be able to see your theme in the list and apply it. After that admin panel will notify you to clear your cache from the cache management and voila! you are done. Your theme is now successfully applied to your storefront.
Setting and Customizing Admin Theme
We can also customize our own admin theme in a similar way adding registeration.php, theme.xml, and then changing the logo. First, you need to create a similar directory structure as to your custom theme. The structure should path should be app/design/adminhtml/<vendor>/<admin_theme_name>. Subsequently, registeration.php is almost the same except change the path to your admin theme.
ComponentRegistrar::register(ComponentRegistrar::THEME, 'adminhtml/<vendor>/<admin_theme_name>, __DIR__);
Whereas, in theme.xml change the title to your admin theme and provide a suitable path for your parent admin time. The necessary changes should look something like this:
<title>Admin_theme_title</title>
<parent><vendor>/<parent_admin_theme></parent>;
Furthermore, to change the logo of your new admin page simply add the exact code as the custom theme but it should be placed in the directory as follows <vendor> /admin_theme_name/Magento_Backend/ layout/admin_login.xml. You will have to change the path to your custom logo and its dimensions accordingly. Your logo should be placed in web/images directory.
Troubleshoot Display Errors
If for some reason you are still not able to see your theme in the storefront, then you can use the following commands to troubleshoot and fix your error. To apply these commands you must first cd or navigate into your <root_magento> directory.
- Clear your static files and view processed files with the following commands.
$ sudo rm -rf pub/static/*
$ sudo rm -rf var/view_preprocessed/
- You will have to use force static deploy command to deploy your static files in magento2.
$ Sudo PHP setup:static-content:deploy en_GB en_US -f
- Finally use the following commands to flush and clear your cache.
$ Sudo PHP bin/magento c:f
$ Sudo PHP bin/magento c:c
After using the commands above your custom theme should now be visible in the storefront. Know More


