Chances are, you already have an e-commerce website and want to transfer the existing products to your brand new Magento 2 storefront or need to move product data from a dropshipping platform – you’ve come to the right place. Perhaps, you want to transfer products and their prices to price comparison engines – you will also find out how to do that below. In the following article, we shed light on various nuances of Magento 2 product import and export.
This blog post peruses the Magento 2 import and export processes from the very beginning. It guides you through various prerequisites that you should know prior to importing to Magento 2, such as editing CSV files according to the native Magento 2 guidelines. After that, the article focuses on the default product import/export in Magento 2.

Firebear Studio, an Adobe Bronze Solution Partner, is willing to discuss your specific business case, providing a free quote and conducting business analysis to assist you in growing your e-commerce business. The time has come to request a free quote! Over 3000 merchants use the best Import & Integration solution, which we built and enhanced over the last ten years on top of the best Magento expertise and knowledge.
The detailed description of a CSV file structure that the system requires helps you master such nuances as tier price import and Magento 2 advanced pricing transfers.
Besides, you will find a detailed guide on importing configurable products and other product types to Magento 2.
After that, the article proceeds to another essential topic associated with data transfers to Magento 2. We describe how to import custom options to your e-commerce website and concentrate on updating product stock or other specific product attributes in Magento 2 with the help of import tools.
Although transferring prospects between your e-commerce website and external systems is a topic of another guide, we briefly touch upon it here. There is nothing complicated in it unless your business requires customizations. However, you can easily attain the features absent in the default import and export tools with the Improved Import & Export for Magento 2. Particular attention is given to it as well.
Magento 2 Sample Import Files GitHub
Magento 2 Google Sheet Master Import Table
Table of contents
The Magento 2 platform offers an improved import/export system out of the box. Thus, with Magento 2, you get such vital features as product custom options and images from remote URLs without any need to install third-party extensions.
Magento 2 Features listed below became a part of the platform. As for the 1.X, they are not available until you install additional modules. So, the new version of the platform provides the ability to import or export:
- Product custom options
- Product images from remote URL
- Extended configurable products
- Tier and group prices
- Related products, upsell and cross-sell products
What you should know prior to importing to Magento 2
The default Magento 2 import works with CSV file types. When exporting entities such as products or customers from Magento 2 you will be getting CSV files.
The Magento 2 support particular format of CSV files. The best way to learn the supported format is to export products or customers. To do this navigate to your store administrator panel and proceed to System > Export. The exported CSV files will have the following format:
| Character set | Unicode (UTF-8) |
| Field separator | Comma, Tab |
| Text delimiter | ” |
How to edit CSV files
Now that you have a CSV file what is the easiest way to edit it in case you need to apply changes? Having worked with import and export procedures for a long time we can recommend using Google Sheets. Why you might ask. Here is a list of advantages:
- Google Sheets are free and you only need a Google account to access it.
- Uploading a CSV file to Google Sheets doesn’t break the CSV file fomatting.
- When you have edited a file in Google Sheets you can download it without any changes to the separator and delimiter values.
- The file is ready for import right after it has been downloaded.
Why not use Microsoft Excel or Open Office? Such software tend to break CSV file formatting and automatically change separators and delimiters. If you are an average user you will have hard times editing these settings. Stick to Google Sheets, it is fast and easy.
How to Export Products in Magento 2
1. First of all, you should go to “System -> Export”

2. Then, it is necessary to select “Products” on the “Entity” dropdown.

3. Now, you can set up filters as well as exclude unnecessary.
4. Click “Continue”
5. Get your formatted csv files with Magento 2 products.
How to Import Products to Magento 2
- Сheck this complete CSV sample with all fields optimized for importing products into Magento 2: Magento 2 csv sample data. The file includes all products from Magento 2 official sample data.
- To download images for the CSV, follow this link: sample data.zip. Keep in mind that it should be unzipped, and images should be uploaded to your Magento 2 root folder /pub/media/import.
- Additionally, you can find the official Magento 2 CSV sample in a dropdown related to import. Go to “System -> Import”.
A general product import workflow in Magento 2 consists of the following steps:
1. In Magento 2 admin, go to “System -> Import.”

2. Select “Products” from “Entity Type”

3. Select an import behavior option: Add/Update, Replace, or Delete.

4. Select your CSV file. Use the “Select File to Import” option and then click “Check Data” – if data is correct, start importing products to Magento 2!
The CSV File Structure
Let’s have a look at CSV file structure for Magento 2 product import. Below, you can find a detailed description of its columns.
- sku – a unique product identifier used as a key product attribute in the Magento 2 core. It is required for all products and should be unique for each of them. sku can include both digits and letters without spaces separated with underscores (_) and dashes (-).
- store_view_code – an associated store view code. The column can be empty if an associated store / website have a single sub item.
- attribute_set_code – a product attribute set code. Create and configure an attribute set before importing products into Magento 2. It should look exactly the same as an attribute set name including capital letters (e.g. “Default”, “Man shoes” etc.)
- update_attribute_set – defines if the product set should be updated for the product during the import.
- product_type – the type of an imported product. Use only lowercase letters (small, configurable etc.)
- categories – product categories in Magento 2 differs from ones utilized in Magento 1, where comma separated category ids are used. In Magento 2, full names of assigned categories, including full path, are required. Besides, assigned categories should be separated by |. For instance, “Default Category/Gear|Default Category/Gear/Bags” means that product should be assigned to both Gear and Bags categories. The latest one is a subcategory of Gear.
- product_websites – an associated product website code. Use lowercase letters only (e.g. “base”).
- name – a product name.
- description – a product description.
- short_description – a short description of a product. Both, description and short description, could include valid HTML tags.
- weight – a weight of a product. Requires using the following format 1.00000.
- product_online – enables or disables products. Use 1 or 0 respectively.
- tax_class_name – a product tax class. Allows using capital later and spaces, like in Magento 2 backend (e.g. “Taxable Goods”).
- visibility – a visibility of a product (e.g. “Catalog, Search”, “Not Visible Individually” etc.).
- price – a price of a product (e.g. 34.000).
- special_price – a special price of a product (e.g. 34.000).
- special_price_from_date – time when Magento starts using a special price instead of a default one (e.g. ‘2015-09-01 15:26:29’).
- special_price_to_date – time when MAgento stops using a special price (e.g. ‘2015-09-01 15:26:29’).
- url_key – an URL key of product. In case of an empty field, a value is generated automatically based on a product name.
- meta_title – a meta title of a product.
- meta_keywords – product meta keywords
- meta_description – a product meta description
- base_image – the main product’s image and its path. Should be uploaded to /pub/media/import. The path of /sample_data/m/b/mb01-blue-0.jpg has the following structure: /pub/media/import/sample_data/m/b/mb01-blue-0.jpg. In addition, you can use a direct URL of an image, such as http://site.com/images/some_image.jpg.
- base_image_label – a label of a base product image.
- small_image – a name and a path related to a small product image. Should be also uploaded to /pub/media/import. The path of /sample_data/m/b/mb01-blue-0.jpg has the following structure: /pub/media/import/sample_data/m/b/mb01-blue-0.jpg. In addition, you can use a direct URL of an image, such as http://site.com/images/some_image.jpg.
- small_image_label – a label of a small product image.
- thumbnail_image – a name and a path related to a thumbnail product image. Should be uploaded to /pub/media/import as well. The path of /sample_data/m/b/mb01-blue-0.jpg has the following structure: /pub/media/import/sample_data/m/b/mb01-blue-0.jpg. In addition, you can use a direct URL of an image, such as http://site.com/images/some_image.jpg.
- thumbnail_image_label – a product thumbnail label
- created_at – time when a product was created. Use the following format: yyyy-mm-dd hh-mm-ss (e.g. 2015-09-01 22:26:27). If the field is empty, date and time of data base record are used.
- updated_at – time when a product was updated in. Use the following format: yyyy-mm-dd hh-mm-ss (e.g. 2015-09-01 22:26:27). If the field is empty, date and time of data base record are used.
- new_from_date – sets a product as “new” from the specified date. Use the following format: yyyy-mm-dd hh-mm-ss (e.g. 2015-09-01 22:26:27).
- new_to_date – stops displaying a product as “new” from the specified date. Use the following format: yyyy-mm-dd hh-mm-ss (e.g. 2015-09-01 22:26:27).
- display_product_options_in – it is a new feature introduced in Magento 2 which specifies a place on a product page where a block with options should be displayed (e.g. “Block after Info Column”).
- map_price – a minimum price of a product.
- msrp_price – a product’s MSRP price.
- map_enabled – use it to enable / disable a product’s minimum price.
- gift_message_available – shows that a gift message is available and will be displayed for a particular product.
- custom_design – a custom design of a product page.
- custom_design_from – a starting date for a custom design of a product page.
- custom_design_to – an end date for a custom design of a product page.
- custom_layout_update – a custom XML layout for a product page
- page_layout – a product page layout (e.g. 1 Column). If empty the field is empty, a default product layout is used.
- product_options_container – a product options container.
- msrp_display_actual_price_type – a type of a product’s MSRP price.
- country_of_manufacture – a country of origin.
- additional_attributes – import of product custom options and data related to a simple product associated to a configurable product. A sample value for a simple product associated to configurable product: “color=Red,has_options=0,required_options=0,size_pants=32” (Color attribute is “Red,” simple product has options in Magento 2: has_options = 0 – no required options, size pants attribute value is 32). A sample value for a configurable product in Magento 2 – “has_options=1,required_options=1” (Product has required options, simple product SKU is associated in the _associated_sku column ).
- qty – a quantity of a particular product in stock.
- out_of_stock_qty – an out of stock quantity of a particular product.
- use_config_min_qty – use minimum quantity value from config.
- is_qty_decimal – set 1 if a quantity can be decimal.
- allow_backorders – set 1 if backorders are enabled.
- use_config_backorders – use a default system value for back-order options (enable / disable).
- min_cart_qty – a minimum required quantity of a product in shopping cart.
- use_config_min_sale_qty – use a default config value for determining a minimum quantity of a sale product.
- max_cart_qty – a maximum quantity of a product in a shopping cart.
- use_config_max_sale_qty – use a default config value to determine a maximum quantity of a product in a shopping cart.
- is_in_stock – 1 – a product is in stock, 0 – a product is out of stock.
- notify_on_stock_below – set a minimum product quantity to start a notification about a low stock level.
- use_config_notify_stock_qty – use a default system value for a product’s low stock notification.
- manage_stock – to control a stock quantity of a product set 1. By setting 0 you allow Magento 2 to consider a product has an unlimited stock level.
- use_config_manage_stock – use a default system configuration value for stock management.
- use_config_qty_increments – use a product quantity increment from current store configuration. Set 1 to enable; set 0 to disable.
- qty_increments – a product quantity increment.
- use_config_enable_qty_inc – use a default store configuration value to enable a product quantity increment.
- enable_qty_increments – set 1 or 0 to enable or disable product quantity increment.
- is_decimal_divided – set 1 if a product quantity increment can be decimal.
- website_id – an associated product website ID
- related_skus – related products SKUs separated with commas (e.g. 24-WG085_Group,24-WG086,24-WG083-blue,24-UG01)
- crosssell_skus – cross-sale product SKUs separated with commas (e.g. 24-WG085_Group,24-WG086,24-WG083-blue,24-UG01)
- upsell_skus – upsallers product SKUs separated with comma (e.g. 24-WG085_Group,24-WG086,24-WG083-blue,24-UG01)
- additional_images – additional product images (product media gallery) separated with commas. Images should be uploaded to /pub/media/import. The path of /sample_data/m/b/mb01-blue-0.jpg has the following structure: /pub/media/import/sample_data/m/b/mb01-blue-0.jpg. In addition, you can use a direct URL of an image, such as http://site.com/images/some_image.jpg.
- additional_image_labels – Сomma separated labels for additional product images from the previous column.
- _associated_sku – an associated simple product SKU for a configurable product (several values should be separated with commas).
- _associated_default_qty – a default quantity for associated products
- _associated_position – associated products position, based on the _associated_sku column
How to Import Tier Prices to Magento 2
If you need to import tier prices to Magento 2, go to System -> Import -> Import Settings -> Advanced Pricing. Here, you should select “Advanced Pricing” from a dropdown list. Next, select “Add/Update” in “Import behaviour”.
As for a CSV file, you should remove ALL Groups Column, if there is such.
You CSV should have a similar structure:
|
sku |
tier_price_website |
tier_price_customer_group |
tier_price_qty |
tier_price |
|
1001-102 |
All Websites [USD] |
ALL GROUPS |
1 |
10 |
|
1001-102 |
All Websites [USD] |
ALL GROUPS |
3 |
9 |
|
1001-102 |
All Websites [USD] |
ALL GROUPS |
6 |
8 |
We have also composed a dedicated guide on importing tier prices to Magento 2. Should you experience any issues feel free to read it here:
How to import Magento 2 Advanced Pricing
Now, you should easily import Magento 2 tier prices to your website. This procedure allows to save hours of time necessary for manual configuration in the backend. Alternatively, you can export a CSV, edit the file, and reimport it back. This also helps to save time necessary for applying changes to tier prices.
How to import products with the MSI warehouse reference into Magento 2
With the 3.5.2 release of Improved Import & Export you can now import products and assign them to multiple warehouses if you are using Magento 2 MSI extension.
Improved Import & Export for Magento 2 allows you to specify:
- To which warehouse the product is assigned to
- Quantity of the product at a particular warehouse
- If the product can be purchased from the specific warehouse
To import products to Magento 2 with the warehouse reference you need to add three custom attributes to your product import file:
| Attribute name | Reference | Values | Value examples |
| msi_{warehouse_name} | Allows you to assign an imported product to a particular warehouse.
{warehouse_name} should be replaced by the name of the warehouse you want to assign the product. |
Possible attribute values are:
1 – product is assigned to warehouse 0 – product is not assigned to warehouse |
1 |
| msi_{warehouse_name}_qty | Allows you to specify a product quantity available at the particular warehouse.
{warehouse_name} should be replaced by the name of the warehouse you want to assign the product. |
Only numeral values are allowed | 123 |
| msi_{warehouse_name}_status | Allows you to specify if the product can be purchased from the specified warehouse.
{warehouse_name} should be replaced by the name of the warehouse you want to assign the product. |
Possible attribute values are:
1 – product can be purchased from the warehouse 0 – product cannot be purchased from the warehouse |
1 |
You can use multiple msi_{warehouse_name}, msi_{warehouse_name}_qty, msi_{warehouse_name}_status attributes to assign the product to multiple warehouses.
You can use a sample Master Table to see how these attributes can be used during the product import.
How to Import Configurable Products to Magento 2
Unfortunately, Magento 2 configurable products import is quite a complicated procedure. You can easily improve it with the help of third-party extensions, but below we describe how to achieve the goal with the native functionality of Magento 2. The procedure is divided into several steps, so let’s start with prerequisites.
- Go to Stores -> Attributes -> Products. Here, you should create and define product attributes.
- Next, it is necessary to create attribute sets for product attributes you want to import. Perhaps, these sets already exist, but you should check them under Stores -> Attributes -> Attribute Set in any case. If sets are not available, create them.
- And don’t forget to set up categories properly. It means that categories you are going to import configurable products to should be created before import. You can manage them under Products -> Categories.
- And may be the most important and unobvious thing: neither simple, nor configurable products should exist in your Magento 2 catalog before import. These are mandatory rules, and we can’t find a way around (until you start using third-party modules).
Now, let’s tell a few words about CSV file requirements. It is not a secret that Magento 2 import/export is based on CSV files, but if the requirements are not satisfied, you will never perform Magento 2 configurable products import. Therefore, be less dismissive to the following requirements.
- Use comma as the field and multiple value separator. This parameter can be changed during the import, but it often leads to failures, so we recommend to cope with this requirement.
- In a CSV file, list simple products before the configurable product. Otherwise, you will never import your the desired items to your website.
- Pay closer attention to the “attribute_set_code” field. It is very important for the whole procedure, because of vital data. The field should match the Attribute Set that contains the attributes for each product. Also, to update the attribute set of the product you need to include additional column into the imported file ‘update_attribute_set’ with the value ‘1’.
- Another important field is “configurable_variations”. Here, a pipe separated set of sku/option combinations for each simple should be created. Also note that it should be populated for the configurable product only.
- The last requirement is true to the “configurable_variation_labels” field – it should be populated only for the configurable product. And don’t forget that it’s role is to correlate the Attribute code to the Label Name.
- And in the “additional_attributes” field, list options for each simple product. Separate multiple attributes with comma.
Now, we’d like to draw you attention to the example of a CSV file. For instance, we’d like to import a shirt that comes in three colors: black, white, and red. Thus, the Product Attribute “color” defines these three colors and exists in the “Default” Attribute Set. As a result, you should import 4 products: 3 simple products – black shirt, white shirt, and red shirt, and the configurable one – shirt. As for key fields of a CSV file, they are:
- additional_attributes: for the Black shirt: color=Black; for the White shirt: color=White; and for the Red shirt: color=Red;
- configurable_variations: For the configurable shirt product: “sku=shirt-black,color=Black|sku=shirt-white,color=White|sku=shirt-red,color=Red”;
- configurable_variation_labels: for the configurable shirt product – color=Color.
|
sku |
store_view_code |
attribute_set_code |
product_type |
categories |
product_websites |
name |
description |
short_description |
weight |
product_online |
|
shirt-white |
Default |
simple |
Default |
Category/Gear/Bags |
base |
T-Shirt |
0 |
White |
||
|
shirt-black |
Default |
simple |
Default |
Category/Gear/Bags |
base |
T-Shirt |
0 |
Black |
||
|
shirt-red |
Default |
simple |
Default |
Category/Gear/Bags |
base |
T-Shirt |
0 |
Red |
||
|
shirt |
Default |
configurable |
Default |
Category/Gear/Bags |
base |
T-Shirt |
1 |
We also have a dedicated guide on importing Magento 2 configurable products here:
The Complete Guide to Magento 2 Configurable Products, and how to import them
As you can see, Magento 2 configurable product import is extremely complicated. The procedure has lots of requirements, but you can easily improve it with the help of reliable Magento 2 import/export extensions.
How to Import Custom Options to Magento 2
As a Magento administrator, you can configure Magento 2 custom options manually, but there is one serious problem: the process is time-consuming. Therefore, it is a good idea to apply custom options in bulk. It means that you should run Magento 2 custom options import.
The default Magento 2 import tool allows to upload custom options together with products, so you should assign all customizable fields to one product and nest them in one file column in the following format:
|
option name=NAME, type=OPTION TYPE (file, date, image), required=VALUE (1 or 0), price=VALUE, price_type=TYPE (fixed or percent), sku=CUSTOM OPTION SKU |
-
For Select Type
|
option name=NAME, option type=TYPE (dropdown, radio button, checkbox, multiple select), required=VALUE (1 or 0), price=VALUE, price_type=TYPE (fixed or percent), sku=CUSTOM OPTION SKU, option_title=CUSTOM OPTION TITLE |
Where:
- Magento 2 custom option name – specify custom option name as it should display for customers at the frontend (for example Print, Color, Shipped Till)
- Type – input type for custom option to be created (dropdown, image, date, multiple select, text field, etc)
- Required – mark this field as required using 1 value and respectively put 0 if customer is not obliged to adjust this option before adding product to cart
- Price – if the customization, represented by Magento 2 custom option, should draw additional cost specify its value
- Price_type – decide on price type, to be exact how custom option price will be calculated – by percentage from simple product price or as fixed value
- SKU – provide unique identifier for each custom option
- Option_title – if you import custom option of select type, you are supposed to configure its value
You must admin that it is not the easiest procedure, but, as you might have already guessed, you daily import routine can be simplified with a Magento 2 import extension.
How to Import / Update Product Stock or Other Specific Product Attributes in Magento 2
To import product stock data in Magento 2, you only need a CSV file with three columns: sku, product_type, and qty. The “qty” column represents the full stock value, so you can’t increase/decrease the stock value by importing a CSV file manually. You can only specify the new amount. Let’s look at the example:
|
sku |
qty |
product_type |
|
667 |
100 |
simple |
A CSV file with such parameters will apply a quantity of 100 items to the product with SKU 667. Beside, it will set “Stock Availability” to “In Stock” if previously the qty parameter was 0 and “Stock Availability” was “Out of Stock”.
The “Product type” (product_type) column is required by Magento 2 and should contain a product type in lowercase – simple, configurable, downloadable, etc.
Qty column can be replaced by any product attribute code and this attribute will be updated!
How to import / export customers to Magento 2
Magento 2 allows importing and exporting Customers Main File and Customers Addresses. And with Magento Commerce/Cloud (former Magento 2 Enterprise) you can also import/export customer finance, containing reward points and store credit updates.
Customers Main File contains all the personal information of the customer like: name, date of birth, name prefix and suffix.
Customers Addresses contains all information about shipping and billing details of customers like: address, VAT, postcode.
Customers Finance contains information on customers’ reward point and credit balance and allows updating these values.
Magento 2 customers export
To export customers data navigate to System > Export. At the export screen select either Customers Main File or Customers Addresses, tick out attributes you won’t need and apply filters.

Once you are done with filters and excluding attributes scroll down and click ‘Continue’ button. The customer list will be exported and you will be prompted to save the CSV table.
Magento 2 customer attributes and file composition
The CSV file with the customer data will have different sets of attributes depending on the entity you are importing:
- Customers Main file;
- Customer Addresses;
- Customers and Addresses.
Customers Main file
| Attribute name | Reference | Values | Value example |
| Email of the customer | Make sure to properly paste the email address with the domain | john.doe@test.com | |
| _website | Associate to Website. Defines to which website the customer belongs | To find the value for the column navigate to Stores > All Stores > Click the required Website in Website column and find its Code | base |
| _store | The Store View customer belongs to | To find the value for the column navigate to Stores > All Stores > Click the required Store in Stores column and find its Code | default |
| confirmation | Confirmed email. Defines whether customer has confirm their email address associated with their account | 1 – the email address has been confirmed0 – customer needs to confirm the email address | 1 |
| created_at | Account Created. Defines the date and time the account has been created | The data format is:yyyy/mm/dd hh:mm:ss
The time format uses 24 hour clock |
2018-01-16 9:48:37 |
| created_in | Account Created in. Defines the Website the account has been created in | You need to specify the name of the store view. You can find it at Stores > All Stores > Click the required store view in Store View column and find its Name | Default Store View |
| disable_auto_group_change | Disable Automatic Group Change Based on VAT ID | 1 – the automatic group change disabled0 – the automatic group change enabled | 0 |
| dob | Date of Birth of the customer | The date should be in the following format yyyy-mm-dd | 1973-12-15 |
| failures_num | The numbers of incorrect login attempts. Works with Maximum Login Failures to Lockout Account setting | Any numeral value | 0 |
| first_failure | First Failure Date. The date of the first failed login attempt | The date should be in the following format yyyy-mm-dd hh:mm:ss | 2018-03-30 8:33:01 |
| firstname | First Name of the customer | Any characters allowed | John |
| gender | Gender of the customer | MaleFemale
leave blank if not specified |
Male |
| group_id | If of the Customer Group the customer belongs to | ID of the Customer Group can be found under Customers > Customer Groups. In ID column | 2 |
| lastname | Last Name of the customer | Any characters allowed | Doe |
| lock_expires | Defines the date when the account lock expires. | The date should be in the following format yyyy-mm-dd hh:mm:ss | 2018-03-30 8:33:01 |
| middlename | Middle Name/Initial of the customer | Any character value allowed | D |
| password_hash | Hash value of the customer account password | Proper hash value | testhashvalue123 |
| prefix | Name Prefix of the customer | Any character value | Mr. |
| rp_token | Reset password token of the customer account | Proper token value | testtoken123 |
| rp_token_created_at | The date the password had been reset | The date should be in the following format yyyy-mm-dd hh:mm:ss | 2018-01-16 9:48:37 |
| store_id | ID of the store the customer belongs to | Numeric store ID | 1 |
| suffix | Name Suffix of the customer | Any character value | Jr. |
| taxvat | Tax/VAT Number of the customer | Proper VAT value | EU555555555 |
| updated_at | Date when the customer’s account was last updated | The date should be in the following format yyyy-mm-dd hh:mm:ss | 2018-02-21 13:01:41 |
| website_id | ID of the website the customer belongs to | Numeric website ID | 1 |
| password | If you want to change the password to the customer’s account this is the column you type it in. | Any values supported by password field | testpassword123 |
Customers and addresses
| Attribute name | Reference | Values | Value example |
| Email of the customer | Make sure to properly paste the email address with the domain | john.doe@test.com | |
| _website | Associate to Website. Defines to which website the customer belongs | To find the value for the column navigate to Stores > All Stores > Click the required Website in Website column and find its Code | base |
| _store | The Store View customer belongs to | To find the value for the column navigate to Stores > All Stores > Click the required Store in Stores column and find its Code | default |
| confirmation | Confirmed email. Defines whether customer has confirm their email address associated with their account | 1 – the email address has been confirmed0 – customer needs to confirm the email address | 1 |
| created_at | Account Created. Defines the date and time the account has been created | The data format is:yyyy/mm/dd hh:mm:ss
The time format uses 24 hour clock |
2018-01-16 9:48:37 |
| created_in | Account Created in. Defines the Website the account has been created in | You need to specify the name of the store view. You can find it at Stores > All Stores > Click the required store view in Store View column and find its Name | Default Store View |
| disable_auto_group_change | Disable Automatic Group Change Based on VAT ID | 1 – the automatic group change disabled0 – the automatic group change enabled | 0 |
| dob | Date of Birth of the customer | The date should be in the following format yyyy-mm-dd | 1973-12-15 |
| firstname | First Name of the customer | Any characters allowed | John |
| gender | Gender of the customer | MaleFemale
leave blank if not specified |
Male |
| group_id | If of the Customer Group the customer belongs to | ID of the Customer Group can be found under Customers > Customer Groups. In ID column | 2 |
| lastname | Last Name of the customer | Any characters allowed | Doe |
| middlename | Middle Name/Initial of the customer | Any character value allowed | D |
| password_hash | Hash value of the customer account password | Proper hash value | testhashvalue123 |
| prefix | Name Prefix of the customer | Any character value | Mr. |
| rp_token | Reset password token of the customer account | Proper token value | testtoken123 |
| rp_token_created_at | The date the password had been reset | The date should be in the following format yyyy-mm-dd hh:mm:ss | 2018-01-16 9:48:37 |
| store_id | ID of the store the customer belongs to | Numeric store ID | 1 |
| suffix | Name Suffix of the customer | Any character value | Jr. |
| taxvat | Tax/VAT Number of the customer | Proper VAT value | EU555555555 |
| website_id | ID of the website the customer belongs to | Numeric website ID | 1 |
| password | If you want to change the password to the customer’s account this is the column you type it in | Any values supported by password field | testpassword123 |
| _address_city | City of the customer | Can be any character value | Potsdam |
| _address_company | Company of the customer | Can be any value | FireBear Studio |
| _address_country_id | ID the customer country | For full list of country IDs refer to the Country and State Codes sheet of this table | DE |
| _address_fax | Fax of the customer | Can be any numeral value | 5555555555 |
| _address_firstname | Customer’s first name for the address | Can be any character value | John |
| _address_lastname | Customer’s last name for the address | Can be any character value | Doe |
| _address_middlename | Customer’s middle name for the address | Can be any character value | D |
| _address_postcode | Postcode of the customer | Can be any numeral value | 12345 |
| _address_prefix | Customer’s name prefix for address | Can be any character value | Mr. |
| _address_region | Region of the country of the customer | Refer to the Country and State Codes sheet of this table for proper region name or state code. Both can be entered in this field | BRG |
| _address_street | Name of the street of the customer | Can be any character or numeric value | 83 |
| _address_suffix | Customer’s name suffix for address | Can be any character value | Jr. |
| _address_telephone | Customer’s telephone number | Can be any numeral value | 5555555555 |
| _address_vat_id | Customer’s VAT for the address | Can be any proper VAT value | EU555555555 |
| _address_default_billing_ | Defines if the imported address of customer is default for Billing | 1 – the address is default0 – the address is not default | 1 |
| _address_default_shipping_ | Defines if the imported address of customer is default for Shipping | 1 – the address is default0 – the address is not default | 1 |
Customer addresses
| Attribute name | Reference | Values | Value example |
| _website | Defines to which website the customer belongs | To find the value for the column navigate to Stores > All Stores > Click the required Website in Website column and find its Code | base |
| _email | Email of the customer | Make sure to properly paste the email address with the domain | john.doe@test.com |
| _entity_id | Email of the customer | Make sure to properly paste the email address with the domain | 1 |
| city | City of the customer | Can be any character value | Calder |
| country_id | Company of the customer. | Can be any value | FireBear Studio |
| company | ID the customer country | For full list of country IDs refer to the Country and State Codes sheet | DE |
| fax | Fax of the customer | Can be any numeral value | 5555555555 |
| firstname | Customer’s first name | Can be any character value | John |
| lastname | Customer’s last name | Can be any character value | Doe |
| middlename | Customer’s middle name | Can be any character value | D |
| postcode | Postcode of the customer | Can be any numeral value | 12345 |
| prefix | Customer’s name prefix | Can be any character value | Mr. |
| region | Region of the country of the customer | Refer to the Country and State Codes sheet for proper region name or state code. Both can be entered in this field | BRG |
| region_id | Region ID of the country of the customer | Refer to the Country and State Codes sheet for proper region ID | 83 |
| street | Name of the street of the customer | Can be any character or numeric value | Test 23 |
| suffix | Customer’s name suffix | Can be any character value | Jr. |
| telephone | Customer’s telephone number | Can be any numeral value | 5555555555 |
| vat_id | Customer’s VAT | Can be any proper VAT value | EU555555555 |
| vat_is_valid | VAT number validity | 1 – the VAT number is valid0 – the VAT number is not valid | 0 |
| vat_request_date | VAT number validation request date | The data format is:yyyy/mm/dd | 2018-02-21 |
| vat_request_id | VAT number validation request ID | Proper validation request ID | 20 |
| vat_request_success | VAT number validation request success | 1 – success0 – failure | 1 |
| _address_default_billing_ | Defines if the imported address of customer is default for Billing | 1 – the address is default0 – the address is not default | 1 |
| _address_default_shipping_ | Defines if the imported address of customer is default for Shipping | 1 – the address is default0 – the address is not default | 1 |
Magento 2 customers import
Native Magento 2 customer import process allows importing customers and addresses in the same file.
You can download sample import files from the FireBear Studio github
To import customer data navigate to System > Import. Here you will be suggested to select the import entity and decide on the import behavior. The process is similar to the product import, so should you already be familiar with it.

Once you are done adjusting the import process behavior click ‘Check Data’ button in the upper right corner of the screen. You should get a message similar to this one.

If everything is correct and the import table doesn’t require any adjustments click ‘Import’ button to proceed. The import process will end in an import success message.
If you require a complete guide to importing and exporting customers to Magento 2 you may want to read through the dedicated blog post we have published here:
How To Import Customers & Customer Addresses To Magento 2
Improved Import / Export for Magento 2
If you want to improve the existing Magento 2 import / export functionality, pay attention to our Improved Import / Export extension, which provides the ability to import your csv files with products data and product images to Magento 2 from a Google Sheet, remote FTP/SFTP server, Dropbox or a direct URL of a source CSV and other files as well as offers a dedicated categories, order and attribute import from CSV, XML, XLS/XLSX, ODS, Json files on the fly import of product attribute values, cron jobs import, and more!

The module allows importing a file with product data and images in a hassle free manner, since the process can be very precise due to mapping presets. The following GIF illustrates how the feature is implemented:
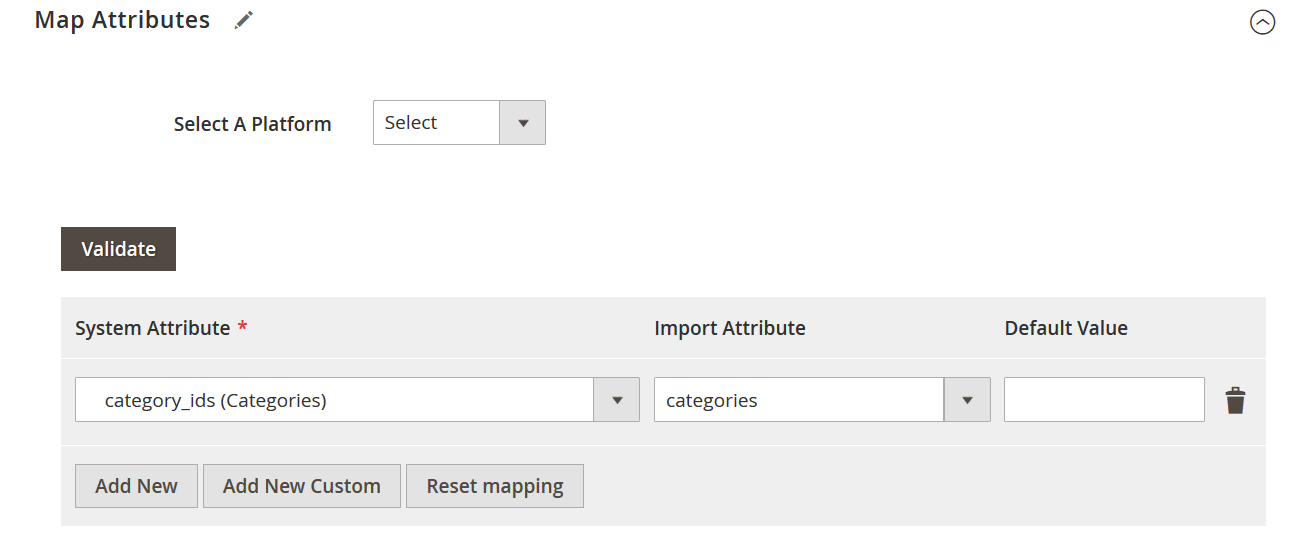
The mapping section looks like this:

As for other features, they are:
- Import via Google Sheet, FTP/SFTP, Dropbox, or direct URL (for both product data and images);
- Support of XML, CSV, XLS/XLSX, ODS, Json and other Magento 2 import formats;
- Magento 2 import XSLT transformation templates available for different file formats allowing you to import any table formats;
- Price adjustments for imported products – you can increase or decrease prices of the imported products by percent or flat value;
- Import: Orders, CMS pages, categories, cart price rules;
- Import Magento 2 EAV and custom attributes, create attributes sets on the fly and assign attribute groups;
- Use REST and SOAP APIs to connect with external management software like CRM and ERP systems;
- Import of tier prices along with products;
- Dedicated simple categories import via CSV and other file types;
- Flexible Import mapping;
- New product attributes and attribute values on the fly;
- Advanced cron job import scheduler for products, categories, customers, stocks, and attributes;
- Configurable and downloadable products are fully supported;
- Magento 2 event system for the export jobs: on order placed or saved and product in catalog save.
[embedded content]
Lots of new features will be available soon. Note that all the updates will be provided for free after their release if you purchase the extension now. For further information, follow these links:
Download / Buy Firebear Improved Import / Export Magento 2 Extension
Improved Import Magento 2 Extension Manual
More new features are described here:
Improved Import / Export changelog
More useful tips:
Magento 2 Product Import & Export FAQ
Below, you will find a summary of frequently asked questions about Magento 2 import and export. We’ve divided questions and answers into two sections related to import and export processes correspondingly.
Import
How to import products in Magento 2?
Well, the entire article described this procedure. You can use either the default Magento 2 instruments or rely on third-party extensions. Prepare your import file according to the requirements of your import tool and start the transfer. Depending on the complexity of your import and business requirements, the default Magento 2 instruments may not satisfy your requirements. Therefore, you need to use additional solutions, such as Improved Import & Export. Contact our specialists to get a consultancy regarding your export needs and the tools that can satisfy them.
How to import products in Magento from CSV?
Basically, it is the only way to import products to Magento 2 – via a CSV file. However, you should edit it following the standards described in this article. However, the Improved Import & Export extension provides the ability to import a provided file applying changes to it right within the extension. You don’t need to open your CSV file in an editor. Besides, the module lets you transfer products in files of other formats.
How to do a bulk import of comparable products from Magento 2?
By default, Magento 2 doesn’t let you either import or export comparable products. Therefore, you need a third-party solution to do that. Contact our specialists to discuss how to apply Improved Import & Export to achieve your goal.
How to import multiple product photos in CSV to Magento 2
You cannot import images in a CSV file directly, but you can use it to inform Magento about the place where product photos are situated. To download images for the CSV, follow this link: sample data.zip. Keep in mind that it should be unzipped, and images should be uploaded to your Magento 2 root folder /pub/media/import.
How can I import products from hollister.com to the Magento website?
You need to export products from an external platform, edit the output, save it as a CSV file, and then provide to Magento 2 manually via the default import instruments. However, it is possible to simplify this process with Improved Import & Export. We slightly describe this process below.
How to auto import products from Aliexpress and Amazon into my Magento store?
By default, you cannot import products from external platforms to Magento 2 automatically. While magento 2 lets you leverage cron jobs to automate data transfers, you still have to edit external files to make them suitable for Magento 2. Therefore, you can auto-import products from Aliexpress and Amazon into your e-commerce website using Improved Import & Export. The extension lets you create a mapping scheme once and apply it to further data transfers.
Magento 2 lets you import and export related products, upsell and cross-sell products with the help of the following attributes:
- related_skus – related products SKUs separated with commas (e.g. 24-WG085_Group,24-WG086,24-WG083-blue,24-UG01)
- crosssell_skus – cross-sale product SKUs separated with commas (e.g. 24-WG085_Group,24-WG086,24-WG083-blue,24-UG01)
- upsell_skus – upsellers product SKUs separated with comma (e.g. 24-WG085_Group,24-WG086,24-WG083-blue,24-UG01
How to update existing products on import?
You need to choose the corresponding import behavior in Magento 2 import settings: Add/Update.
How to import product Magento IDs?
How to import products with images to Magento?
By default, you can download images via a CSV file. Follow this link to see how to configure your CSV file for that: sample data.zip. Keep in mind that it should be unzipped, and images should be uploaded to your Magento 2 root folder /pub/media/import.
How to import configurable products in Magento?
The Magento 2 configurable products import is quite a complicated procedure. We describe how to achieve the goal with the native functionality of Magento 2 here: Magento 2 Configurable Product Import.
How to import products from Magento 1 to Magento 2?
The system lets you import products from Magento 1 to Magento 2 via a CSV file and the default import process. You export data from Magento 1, edit it following the Magento 2 requirements, and import the file into your new website. That’s it. Also, it is possible to automate this process with the Improved Import & Export Magento 2 extension. Contact our specialists for further information.
Export
How to export products from Magento 2?
You can use the default export tool to transfer products from Magento 2. Choose Products as your export entity and specify CSV as your export file format. That’s it!
How to export specific products from Magento 2?
You need to leverage the Entity Attributes table to export specific products from Magento 2. Enter the required value in the Filter column, such as a specific SKU. Alternatively, you can leverage the system of filters available in Improved Import & Export.
How to export product categories in Magento 2?
How to export Magento product IDs?
There is no option to export product entity_id from Magento 2 by default. You need to leverage a third-party solution or retrieve all products via API.
How to export product images in Magento 2?
Magento lets you export image names with their directory location but no physical image transfers take place. With the Improved Import & Export Magento 2 extension, you can export both source files and product images to the same server, remote FTP/SFTP server, or Dropbox. Furthermore, Magento 2 product image processing settings and configuration are at your service. You can crop and scale, adjust size and file name, convert to different formats, etc.
How to export Magento 2 product data and upload it to a new website?
The default Magento 2 tools are enough to create an export file with product data. Also, you need to leverage the tools available on your new website to import products. Depending on your new platform, these instruments may vary a lot. Also, it is possible to leverage the API functionality of our Improved Import & Export extension to connect the two websites directly.
How to export configurable products in Magento 2?
You can dramatically simplify the default configurable product import with the help of the Improved Import & Export extension. Contact our specialists for further information.
How to solve the Magento product export timeout issue?
Firstly, you need to check whether the max_execution_time parameter in .htaccess is not too short. If it doesn’t help, connect your server provider. Also, you may use the Improved Import & Export extension to avoid this issue.
Final Words
As you can see, Magento 2 provides much better import/export capabilities than 1.x but it can still be improved with the help of third-party modules. And the Magento ecosystem offers tons of reliable solutions, so you are free to choose one that suits your particular ecommerce needs.
Services Offered
As for the services offered with the FireBear Studio extensions you can always count on the following:
- Free installation of the extension
- Assistance with setting up and configuring the extension;
- Assistance with Google Sheet and XML file setup for Improved Import and Export extension;
- Assistance with complex import procedures, and mapping of the import tables;
- Free consultations on any FireBear extensions and extension workflow;
- Composing XSLT transformation templates for your file types.
Vote for the upcoming features
You can vote for the features coming in the next Improved Import and Export extension releases. Simply follow the link to the extension roadmap and upvote the features of interest.
Vote for upcoming Magento 2 improved import features
Firebear Studio would be glad to discuss your project, offer a free quote, and run a business analysis for your specific business case. With over ten years of Magento experience, we’ve become an Adobe Bronze Solution Partner. Request a free quote right now! We have over 3000 merchants worldwide who trust us because we have been providing the premier Import & Integration solution for over a decade.

Related posts